- How to Fix Folder Keeps Reverting to Read Only on Windows 10
- What causes the folder to revert to read-only on Windows 10?
- Solution 1: Disabling Controlled Access
- Solution 2: Login as an Administrator
- Solution 3: Changing the Attribute of the Folder
- Solution 4: Changing Permissions of the Drive
- Solution 5: Disabling your Third-party antivirus
- Why did my C: drive become read only after the Windows 10, version 1709?
- Replies (5)
- 5 Methods: Solve USB Drive Read Only Issue Easily in Windows 10, 8, 7
- “My USB stick is read only!”
- 5 Methods to fix USB drive read only issue in Windows PC
- в–Њ Method 1. Check write protection tab
- в–Њ Method 2. Clear read-only attribute on USB drive via Diskpart
- в–Њ Method 3. Remove write protection in Registry Editor
- в–Њ Method 4. Run CHKDSK command to fix disk errors
- в–Њ Method 5. Fix USB drive read only by reformatting it
- The bottom line
How to Fix Folder Keeps Reverting to Read Only on Windows 10
If your folder keeps reverting to read-only it could be due to a recent Windows 10 upgrade. Many users have reported that when upgraded their system to Windows 10, they encountered this error. Read-only is a file/folder attribute which lets only a specific group of users read or edit the files or folder. This can get really infuriating, however, the fix is quite simple and easy but may differ depending on the scenario that caused it.
Generally, when you encounter such an issue, you can easily overcome it by unchecking the read-only attribute box found in the properties of the file/folder. However, this case is not that simple. You won’t be able to change the read-only attribute of the file/folder which gets annoying. Nevertheless, this article will teach you how to access your files/folders again — just follow through the instructions.
What causes the folder to revert to read-only on Windows 10?
This might be happening to you due to various reasons, nonetheless, the most generic ones are —
- Windows upgrade. If you’ve recently upgraded your system to Windows 10, this might be occurring due to that as your account permissions may have been altered.
- Account permissions. Sometimes, the error could be simply because of your account permissions which is the most common cause without you realizing it.
The possible and effective solutions for this problem are: –
Solution 1: Disabling Controlled Access
Before we try other technical solutions, we will first try to disable the Controlled Folder Access in your settings. This is a hotfix and you may proceed with other solutions if this doesn’t work for you.
- Press and hold the “Windows Key + I” button to launch Windows Settings.
- Once the Settings are opened, navigate to Update & Security and then click on Windows Security.
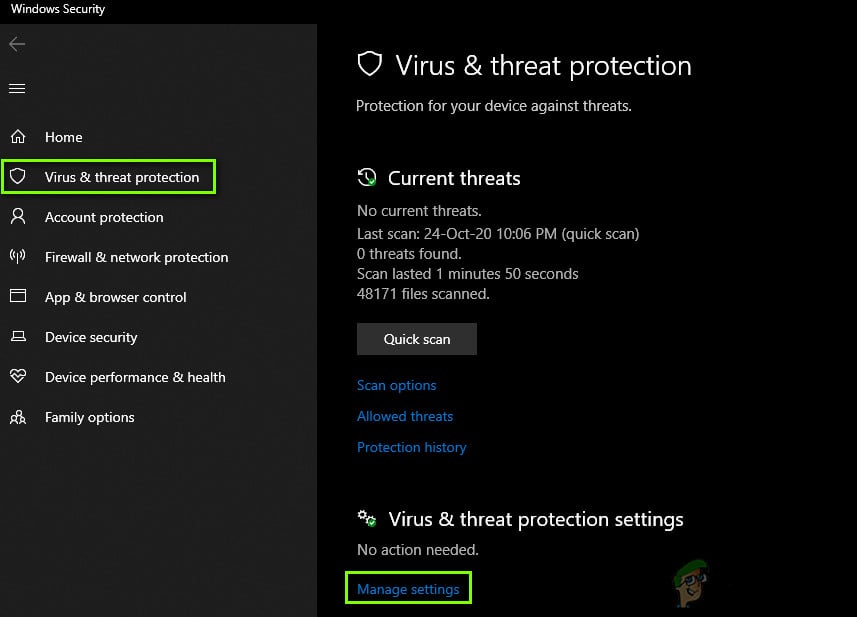
- Now, under the Virus & threat protection settings, click on Manage settings.
 Virus & threat protection settings
 - Under Controlled folder access, select Manage Controlled folder access and switch the access to Off. Manage Controlled folder access to Off
- Restart your computer completely and then check if the issue is resolved.
 Virus & threat protection settings
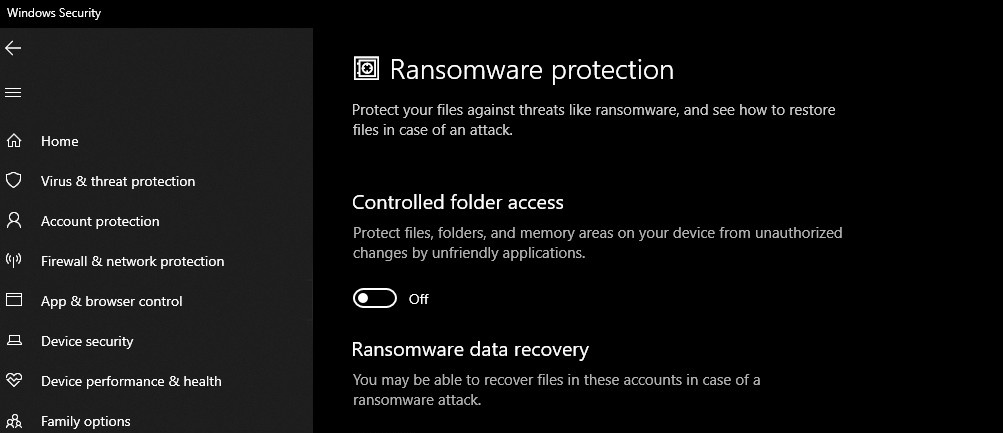 Manage Controlled folder access to Off
Solution 2: Login as an Administrator
To start off with the common mistake, if you have created multiple accounts on your system, make sure you are signed in as an administrator while accessing the file. The reason you are not able to read or edit the file/folder could be that the file/folder was created using an administrator account and you are trying to access it using a guest account or any other. Hence, before you move into the solutions mentioned below, make sure you are using the administrative account.
Solution 3: Changing the Attribute of the Folder
If you are logged in as an administrator and still unable to access the files, then in such a case, you’ll have to change the attribute of the file using the command prompt. To do this, follow the given instructions:
- Press Winkey + X and select Command Prompt (Admin) from the list.
- In order to remove the read-only attribute and set a new attribute, use the following command: Enter the command to remove Read-only Attribute
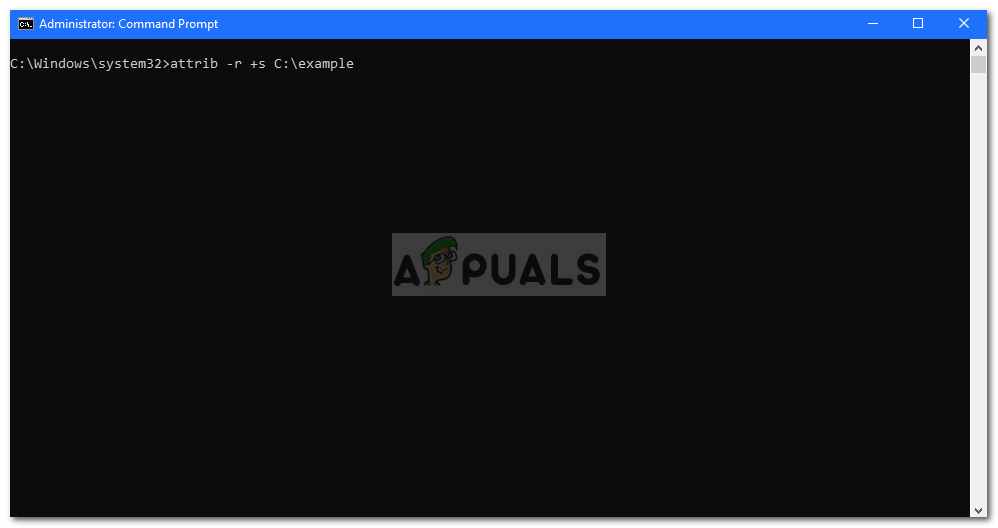 Enter the command to remove Read-only Attribute
- The above command will remove the read-only attribute of the file and change it to a system attribute. However, some files/folders do not operate properly in the system attribute so use the following command if you want to remove the system attribute:
Solution 4: Changing Permissions of the Drive
If you are facing this issue after upgrading your system to Windows 10, then changing the permissions of the drive could fix your problem. There have been several reports according to which the issue has been solved via this method. Here’s how to do it:
- Right-click on the drive where your files/folders are located.
- Select Properties.
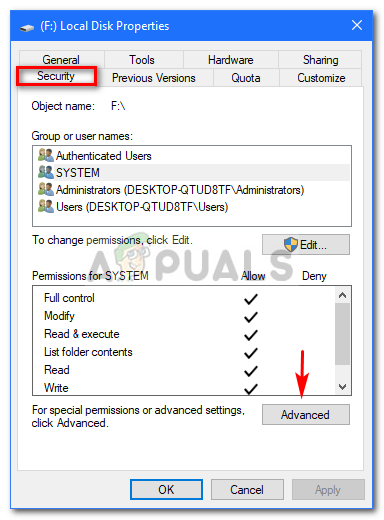
- Navigate to the Security tab. Local Disk Properties (Security)
- Click Advanced and then select Change permissions. Select change permissions
- Highlight your user and then click Edit. Highlight your user and click Edit
- Select This folder, subfolders and files from the drop-down list.
- Check the Full Control box under Basic Permissions. Check the Full Control Box
- Click OK.
 Local Disk Properties (Security)
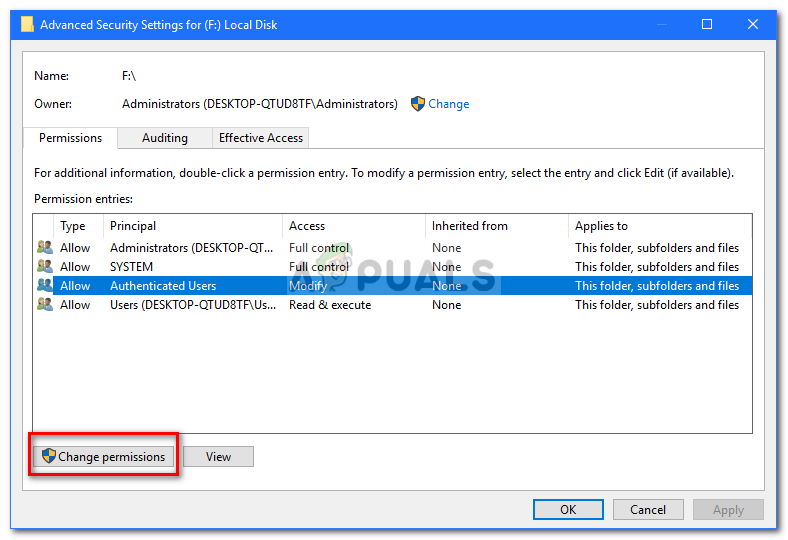 Select change permissions
 Highlight your user and click Edit
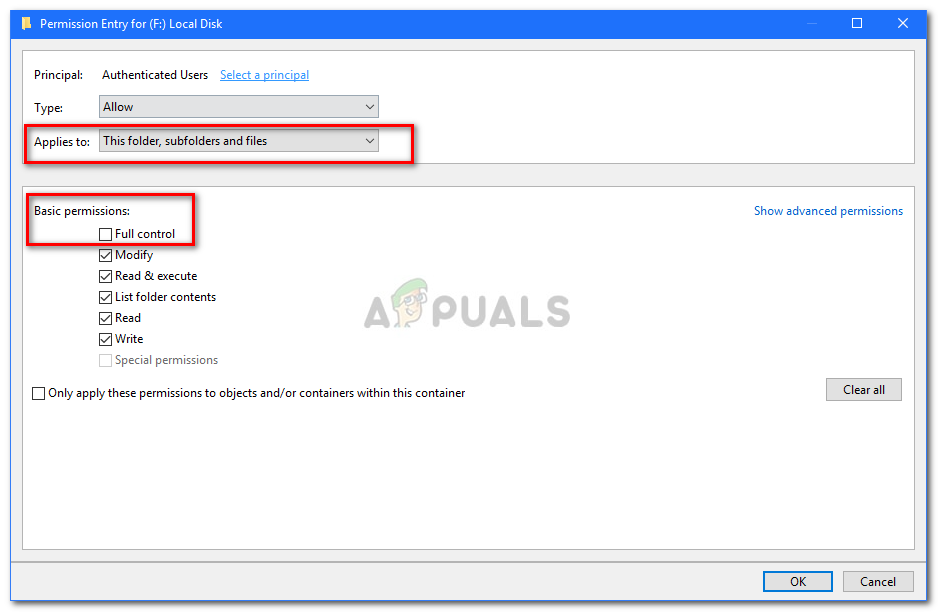 Check the Full Control Box
If you have more than one account on the system, then you’ll have to enable inheritance first. Here’s how to do it:
- Go to your System drive (where your Windows is installed).
- Go to the Users folder.
- Right-click on your username and click Properties.
- In the Security tab, click Advanced.
- Hit Enable Inheritance. Highlight your user and click Enable Inheritance
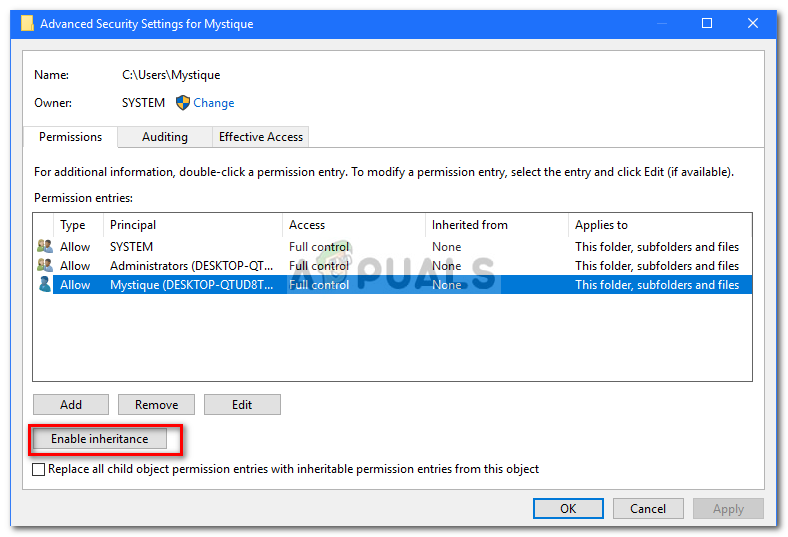 Highlight your user and click Enable Inheritance
Solution 5: Disabling your Third-party antivirus
If the error persists whenever your system restarts, it could be due to your third-party antivirus software. Your antivirus might be detecting the files as a threat and consequently, stopping you from accessing them. In such a case, you’ll have to disable your antivirus software, change the attributes of the files/folders as mentioned above and restart your system to see if the files/folders still revert to read-only. If they don’t, this means your antivirus is causing the issue and you should probably uninstall it.
Why did my C: drive become read only after the Windows 10, version 1709?
Replies (5)
Sumit
Volunteer Moderator- Microsoft Community
Mark the reply as helpful or answered to help others if your query is resolved
1 person found this reply helpful
Was this reply helpful?
Sorry this didn’t help.
Great! Thanks for your feedback.
How satisfied are you with this reply?
Thanks for your feedback, it helps us improve the site.
How satisfied are you with this reply?
Thanks for your feedback.
1 person found this reply helpful
Was this reply helpful?
Sorry this didn’t help.
Great! Thanks for your feedback.
How satisfied are you with this reply?
Thanks for your feedback, it helps us improve the site.
How satisfied are you with this reply?
Thanks for your feedback.
Sumit
Volunteer Moderator- Microsoft Community
Mark the reply as helpful or answered to help others if your query is resolved
3 people found this reply helpful
Was this reply helpful?
Sorry this didn’t help.
Great! Thanks for your feedback.
How satisfied are you with this reply?
Thanks for your feedback, it helps us improve the site.
How satisfied are you with this reply?
Thanks for your feedback.
Right-click on your C Drive, and choose Properties.
Go to Security tab.
Click Advanced, then Change Permissions.
Highlight the user, and click Edit.
Choose This folder, subfolders and files under Applies to:.
Choose Full Control under Basic Permissions.
Hit OK.
If there are other users on the computer, follow the steps below:
Go to C Drive.
Right-click your user name in Users folder, then click Properties.
Go to Security tab.
Click Advanced, then click Continue.
Click Enable Inheritance.
16 people found this reply helpful
Was this reply helpful?
Sorry this didn’t help.
Great! Thanks for your feedback.
How satisfied are you with this reply?
Thanks for your feedback, it helps us improve the site.
How satisfied are you with this reply?
Thanks for your feedback.
Exactly. Here is what the users can do on Program Files folder on C:/
https://i.imgur.com/fHdmbg6.png\
Notice the Users can only read and execute, not write.
This actually has a reason-The folders are write protected to prevent misuse(Example, you accidentally delete some folder from there and as a reason the PC screws up at next boot)
While this is technically valid reasoning, this is also the kind of silliness that Apple pulls with their products so that your own computer feels like something you’re borrowing rather than own yourself. I’m an adult — and a software developer at that — and I know how to manage my system, I don’t need hand-holding that only prevents me from working the way I would like. Or from viewing my computer’s file layout in a way that makes sense rather than a way that seems more like a Unix structure.
(Found this post while trying to figure out why all of a sudden I can’t install anything anywhere on my C drive except my own user directory. Sure, I love going 38 directory deep when I have to find stuff, that’s efficient!)
40 people found this reply helpful
Was this reply helpful?
Sorry this didn’t help.
Great! Thanks for your feedback.
How satisfied are you with this reply?
Thanks for your feedback, it helps us improve the site.
5 Methods: Solve USB Drive Read Only Issue Easily in Windows 10, 8, 7
Here, you will learn how to tackle with USB drive read only problem in Windows 10, 8, 7. There are 5 different methods you can try.

By Emily  / Last Updated March 26, 2021
“My USB stick is read only!”
“My USB Flash Drive (32gb Corsaire Voyager) is suddenly read-only, and I’m not sure why. There is no «read-only» switch on the drive. All data is still there. But I cannot write anything to it anymore. It wasn’t this way yesterday. What could cause the USB drive read only, and how can I get it back to read/write mode like it ought to be? Thanks!”
5 Methods to fix USB drive read only issue in Windows PC
Typically, when your USB drive is stuck read-only error, also called write-protected, you will be unable to make any modification on the USB drive, which could protect your data from being changed by someone else. But what if you want to make some changes? You can try the following methods to fix USB drive read only issue in Windows 10/8/7.
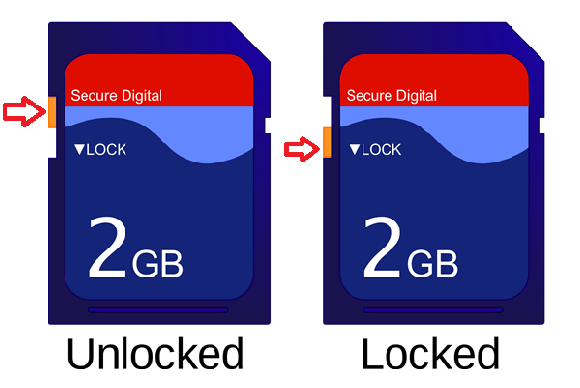
в–Њ Method 1. Check write protection tab
In some cases, USB drive comes with a physical write-protection switch on the side or bottom. This switch is used to keep the contents on your drive safe from malware or modification by others. If your USB has this switch, move it to the «unlock» position, which will turn off the USB drive’s write protection and enable you to store files and data on the USB drive again.
в–Њ Method 2. Clear read-only attribute on USB drive via Diskpart
If your USB drives do not have a lock switch, you can use Diskpart to clear its read only attribute in the following steps.
Step 1. Press “Win+R” button and type in “cmd”, press Enter. And in the cmd window, type “diskpart” and press Enter.
Step 2. Input “list disk” and press Enter: to get a list of all disks on your Windows computer.
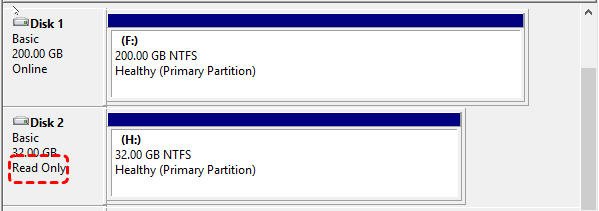
Step 3. Input “select disk #” and press Enter: “#” is your USB drive number. Here we select disk 2.
Step 4. Input “attributes disk clear readonly” and press Enter: to remove the write protection on the USB drive.
![]()
Note: if you want to make USB drive read-only, you can type “attributes disk set readonly” instead.
в–Њ Method 3. Remove write protection in Registry Editor
Apart from clearing read only attribute in Diskpart, you can edit the Registry key to disable the write protection.
Step 1. Press “Win+R” button to open “Run” dialogue and type “regedit”.
Step 2. Go to the following path:
“Computer\HKEY_LOCAL_MACHINE\SYSTEM\CurrentControlSet\Control\StorageDevicePolicies”
Step 3. Double click the “WriteProtect” and change the value from 1 to 0.
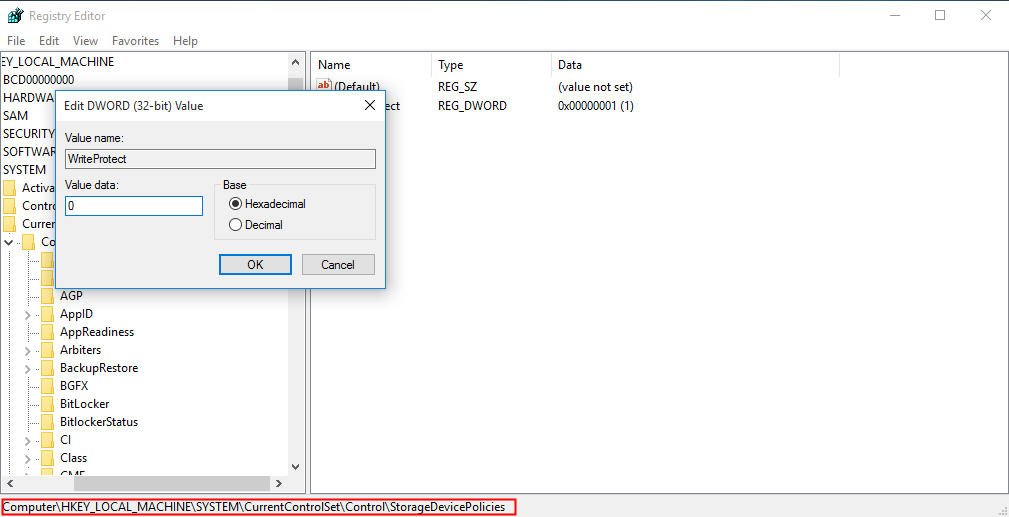
Step 4. Close Regedit and restart your computer. Connect your USB drive again and you should find it is no longer read only.
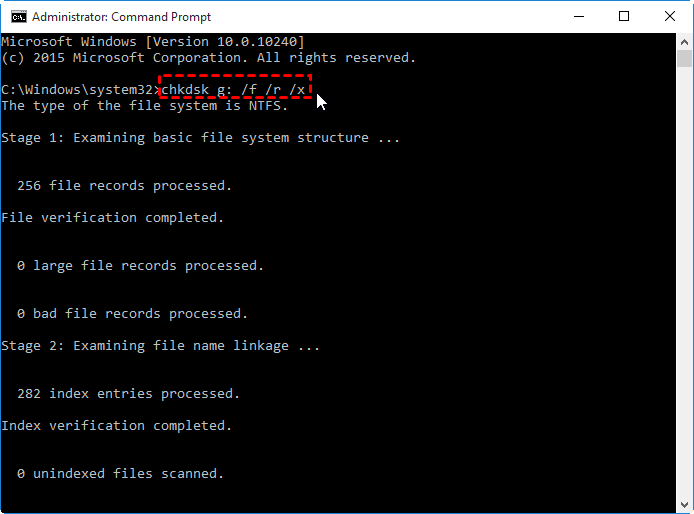
в–Њ Method 4. Run CHKDSK command to fix disk errors
If your USB becomes read only mode because of disk errors, you can make use of CHKDSK.exe tool to check and fix found errors on the USB drive.
Step 1. Press “Win+R” to open run dialogue, type “cmd” in the search box and press “Enter”, right click the Command Prompt icon and select “Run as administrator”.
Step 2. In the pop-out command prompt window, type “chkdsk g: /f /r / x” to both check and fix errors if found.
в–Њ Method 5. Fix USB drive read only by reformatting it
If the given fixes above do not fix USB read only in Windows 10/8/7, you might consider whether it is the corrupted file system that causes the issue, if that’s the case, you can reformat it completely to make it back into read/write mode.
Here we would like to recommend a free disk formatting utility-AOMEI Partition Assistant Standard. With it, you can reformat the read-only USB drive to NTFS, FAT32, exFAT, or Ext2/3/4 in Windows 10/8/7/XP/Vista free. Moreover, it provides you with effective ways to format as well as repair RAW USB drives.
Warning: Formatting disk will delete all data on it, so back up important files on the read-only disk before proceeding.
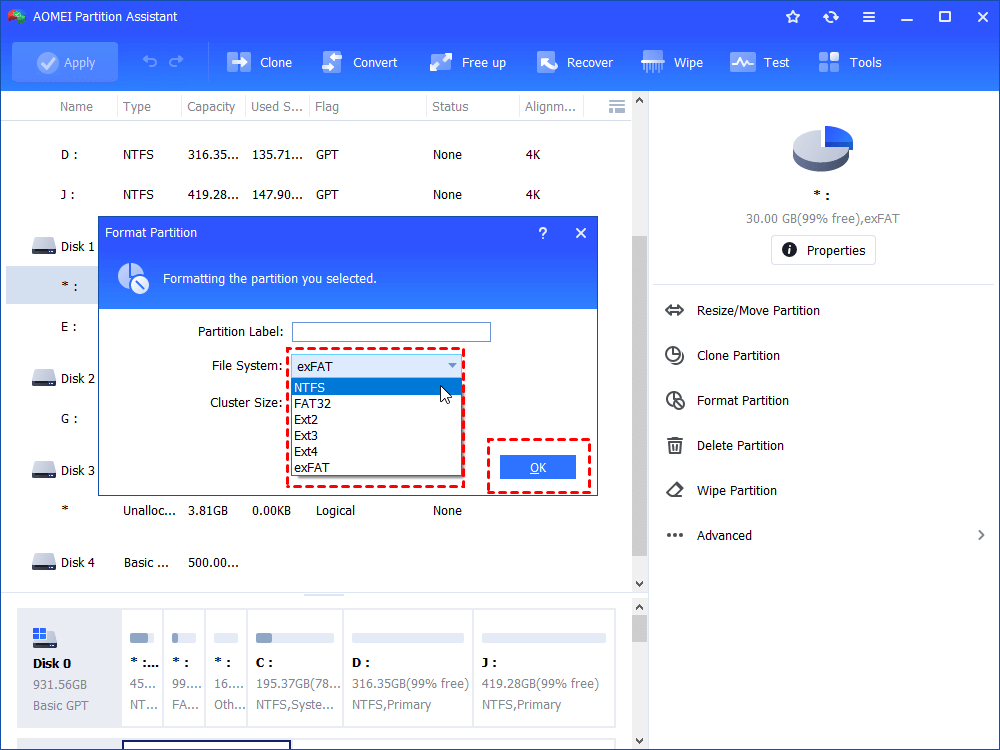
Step 1. Download the freeware. Install and double click to open it. In the main interface of AOMEI Partition Assistant, right-click the USB drive and choose “Format Partition”.
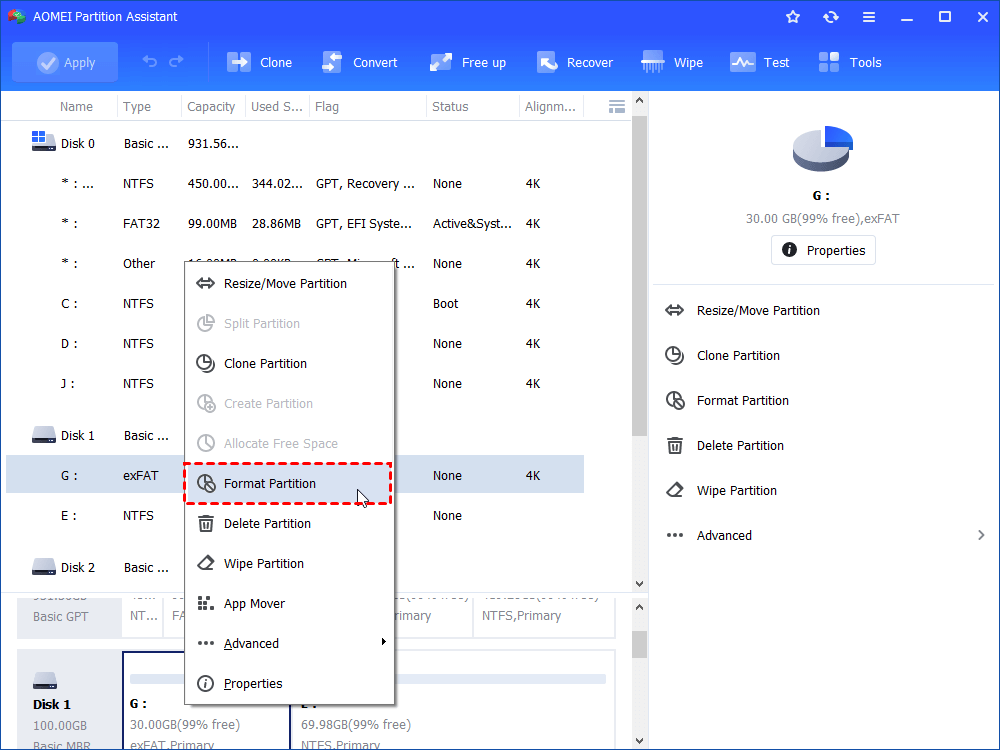
Step 2. Choose a compatible file system from the given options, here we choose NTFS and click “OK” to continue.
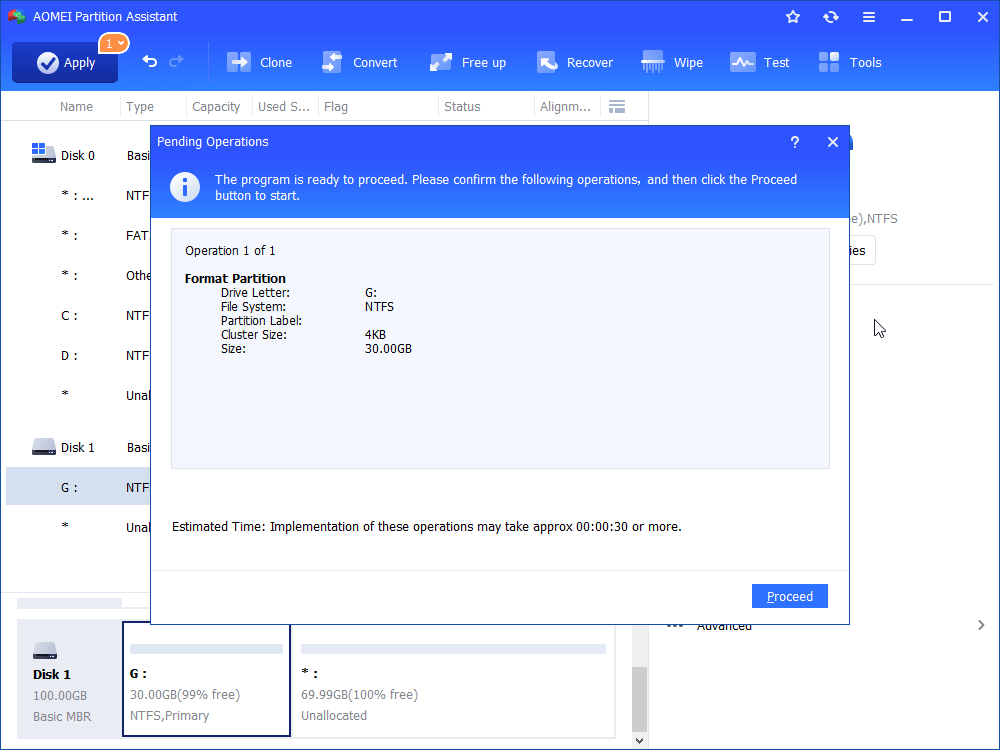
Step 3. Hit on “Apply” and then “Proceed” to commit the pending operation.
The bottom line
Here, 5 different methods are introduced to help you solve “USB drive read only” issue in Windows 10/8/7. I sincerely hope you can get it fixed. Worth to mention that AOMEI Partition Assistant can help you deal with many disk partition issues such as USB showing 0 byte, hard drive only showing half capacity, SSD reporting wrong size, etc.
If you upgrade it to Professional edition, you can enjoy more amazing functions including recovering lost partitions, converting dynamic disk to basic without data loss, convert boot disk between MBR and GPT without deleting partitions and so on. If you want to enjoy such amazing functions on Windows Server 2019, 2016, 2012, 2008 or 2003, please try AOMEI Partition Assistant Server.


