- Steps to Remove Read Only Attribute via Command Line in Windows 10, 8, 7
- How do I remove read only attribute?
- Steps to remove read only attribute via Command Line
- Other methods to clear read-only attribute in Windows 10/8/7
- Method 1. Edit the registry key
- Method 2. Remove read only attribute by reformatting
- Method 3. Check disk error on the read-only disk
- Summary
- Fix Folder keeps reverting to Read Only for good
- How can I remove Read only from a folder in Windows 10?
- Solution 1 – Change permissions
- Solution 2 – Change the attributes
- Can’t remove read-only from folders
- Replies (7)
Steps to Remove Read Only Attribute via Command Line in Windows 10, 8, 7
In this post, you can learn how to remove read only attribute via Command Line to make your disk writable again. Besides. another three methods are also shared to clear read only attribute.

By Emily  / Last Updated April 14, 2021
How do I remove read only attribute?
“Hi, guys, my Seagate external hard drive is stuck in read only mode, I cannot make any changes to data stored in it, so I need to remove read-only attributes from this disk on Windows 7 using command line. Could you please provide an example on this?»
Steps to remove read only attribute via Command Line
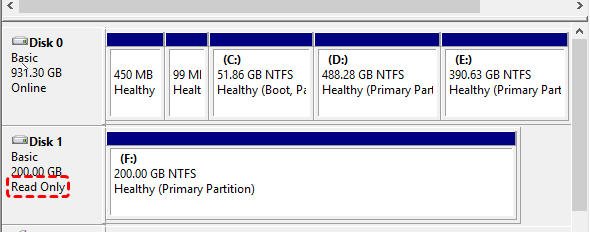
When a hard drive is set in read only mode, you will only be able to read data saved in that drive, but cannot add new data and modify the current data. To some degree, this write protection attribute can protect your data from being changed by others. But what if you want to make some changes? Then it is necessary to clear the read only attributes from the target disk. To finish it via Command Line (Diskpart service), follow the below instruction.
1. Click “Start” button and type “cmd” in the “Search” box, press “Enter”. Right-click the Command Prompt icon and select “Run as administrator”. Then type “diskpart” in the pop-out window and press “Enter” to launch Diskpart.exe utility.
2. Type “list disk” and press “Enter”: to get detailed information about every disk on your Windows computer.
3. Type “select disk” and press “Enter”. Here we select disk 1.
4. Type “attributes disk clear readonly” and press “Enter”: to remove the write protection on the selected disk.
![]()
Other methods to clear read-only attribute in Windows 10/8/7
The above steps only work when your disk is set into read only with the command (attributes disk set readonly). If your disk is write-protected for other reasons like wrong registry key, corrupted file system, disk errors, you can try the following methods to remove write protection attribute from disks.
Method 1. Edit the registry key
1. Press “Win+R” button at the same time to open “Run” dialogue and type “regedit” and hit on “Enter”.
2. In the Registry Editor window, navigate to the following path:
“Computer\HKEY_LOCAL_MACHINE\SYSTEM\CurrentControlSet\Control\StorageDevicePolicies”
3. Double click the “WriteProtect” or right click on it, select “Modify” and change the value from 1 to 0.
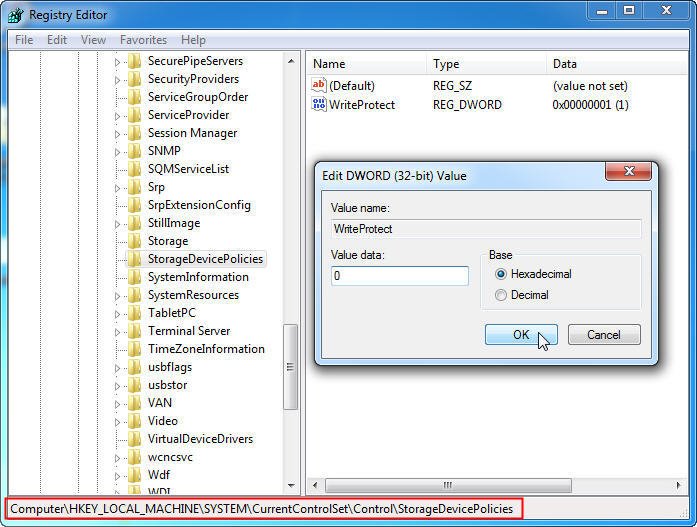
4. Close Regedit and restart your computer. Connect your hard drive again and the read only attribute has been removed already.
Pay attention to: If there is no “StorageDevicePolicies” under the «Control» folder, you can create a rule manually.
1. Right click “Control” folder and select “New” > “Key”. Name it with “StorageDevicePolices” without quotation marks.
2. Then right click on the white space at the right-hand pane and choose “New” ->“DWORD (32-bit) value”. Name it with “WriteProtect”without quotation marks and open it to set the Value data to 0.
Method 2. Remove read only attribute by reformatting
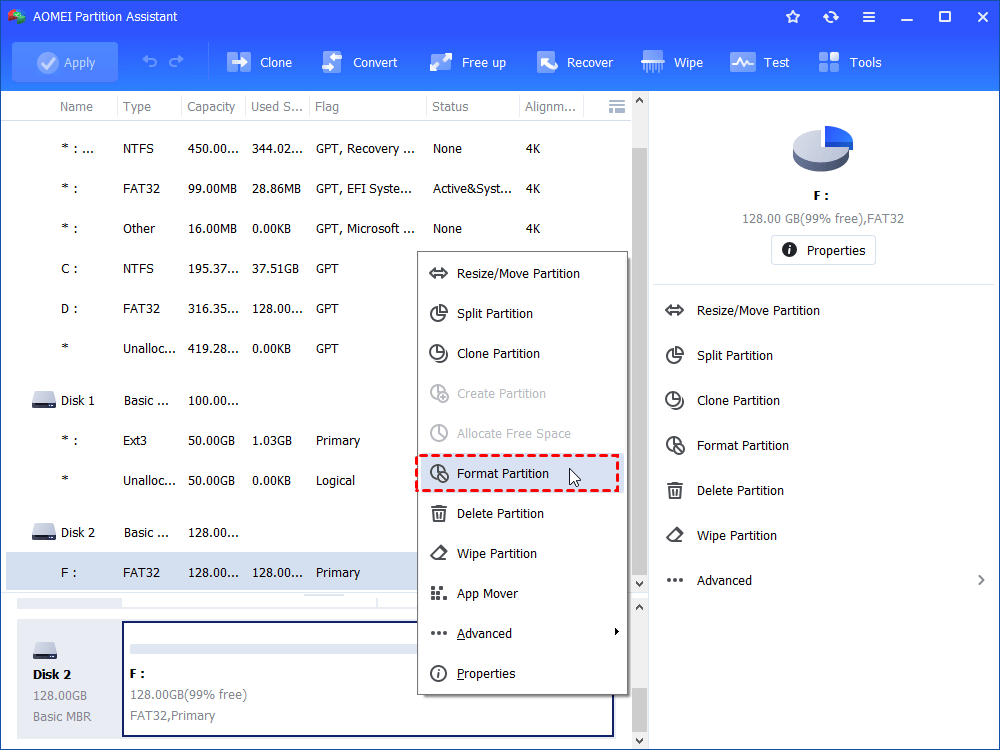
If your disk becomes read-only due to the corrupted file system, you can reformat the disk to make it writable again. But when you try to format it in Disk Management, you will find the Format option is grey out, in File Explorer, you will receive an error message saying The disk is write protected. Then you can use the free partition manager: AOMEI Partition Assistant Standard. This freeware allows you to format read-only disk with ease in Windows 10/8/7. Moreover, you can also use it to format RAW drive.
Warning: formatting will lead to data loss, so you can back up important data on the read-only hard drive in advance.
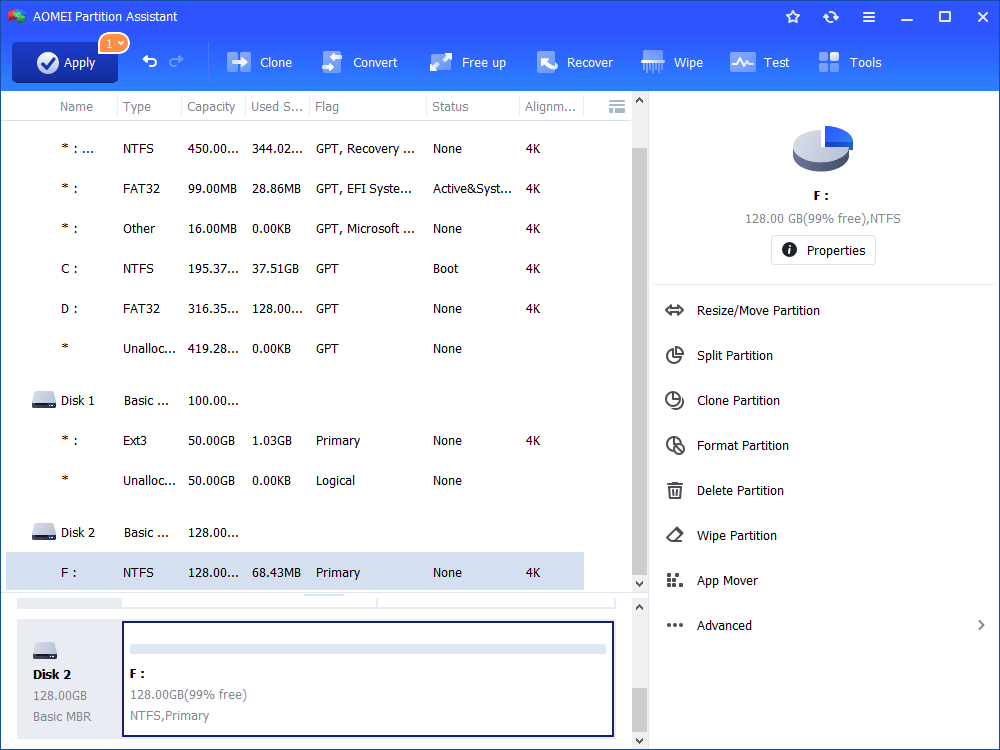
1. Install and launch AOMEI Partition Assistant Standard. Right-click the drive with read-only attribute and select “Format Partition”.
2. Select a desirable file system from the given list, then click “OK” to continue.
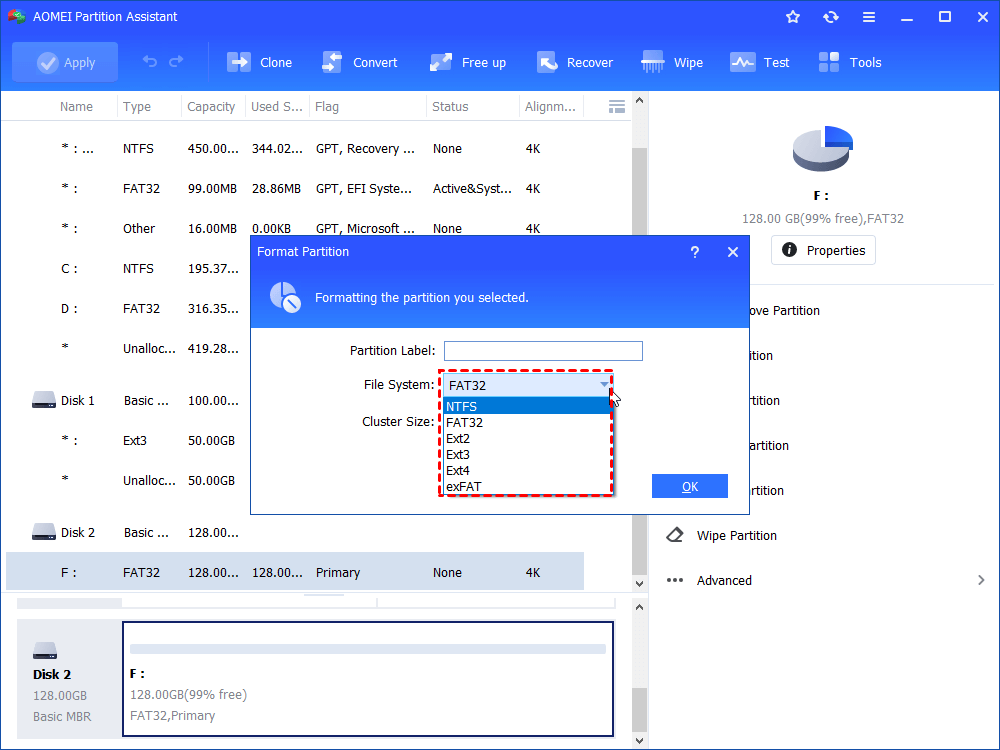
3. In the main interface, click “Apply” and then “Proceed” to execute the formatting operation.
Method 3. Check disk error on the read-only disk
If it is the disk error (bad sector) that causes the read-only issue, you cannot remove read only attribute using Command Line. Instead, you can use AOMEI Partition Assistant Standard to check and fix possible errors on the hard drive.
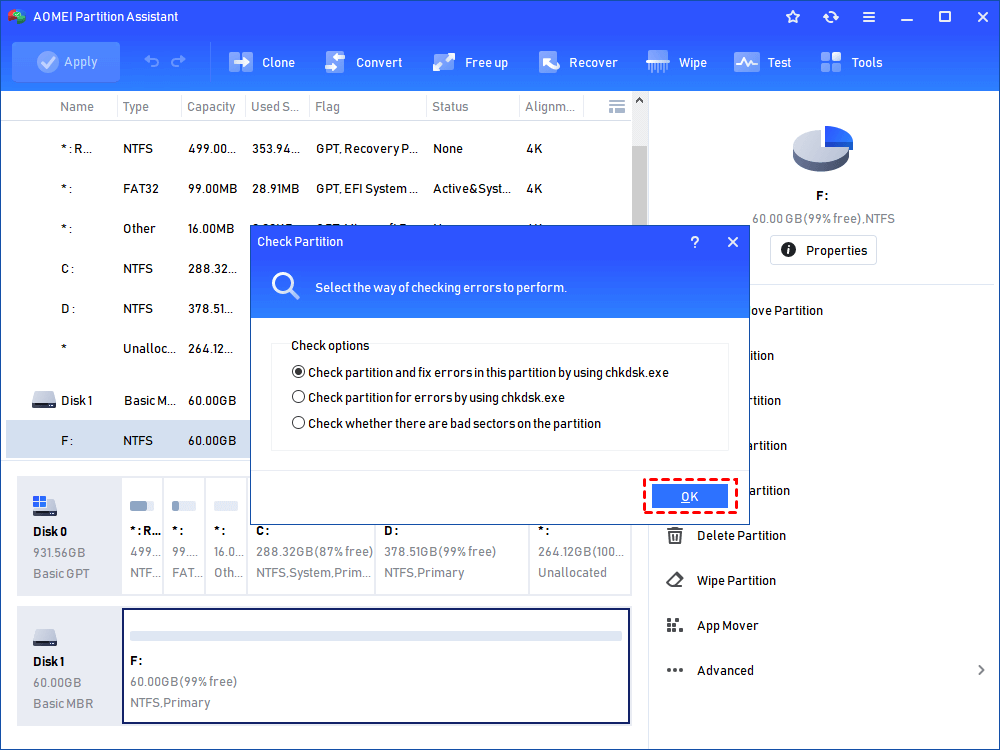
1. Run AOMEI Partition Assistant Standard. Right-click the read-only drive and choose «Advanced» > «Check Partition».

2. Choose the first method to check and fix found error and click «OK».
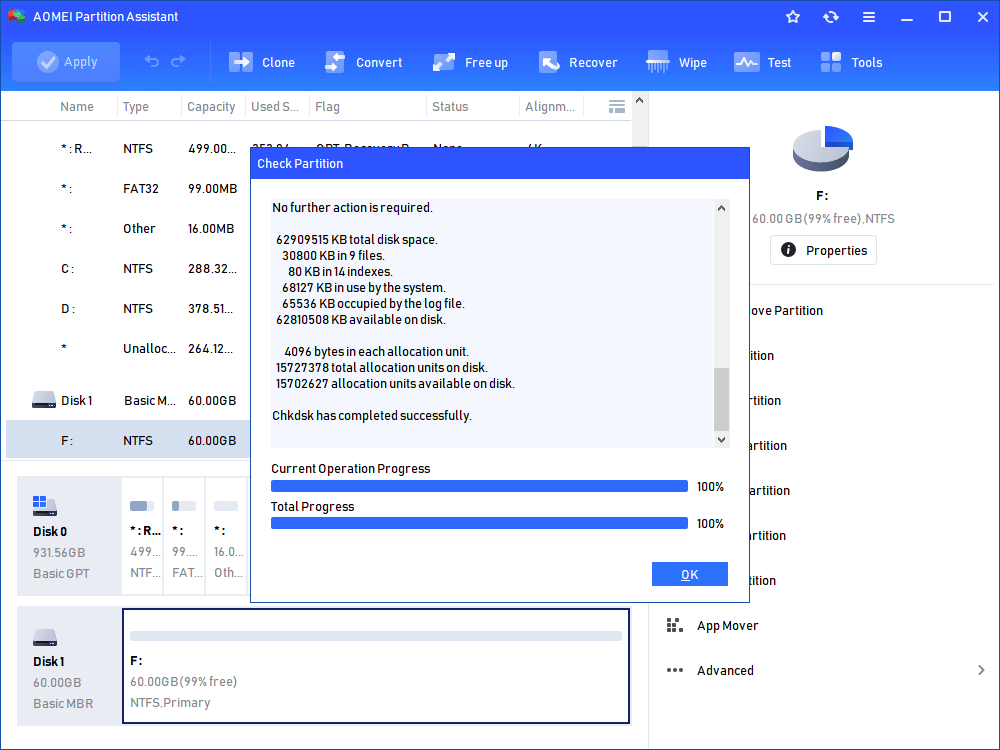
3. Then wait for the process to be completed.
Summary
After you remove read-only attribute via Command Line or other recommended methods above, you will be able to add/copy new data to it and delete or modify data on it. The AOMEI Partition Assistant Standard is a versatile partition freeware. Apart from the above functions, it is also able to clone hard drive, clone partition, convert data disk to MBR or GPT without deleting partitions.
В If you upgrade to Professional edition, you can enjoy more amazing functions such as migrating OS to SSD, converting disk to MBR or GPT without deleting partitions, splitting partition, allocating free space from one partition to another and recovering lost partitions.
Fix Folder keeps reverting to Read Only for good

- A folder is reverting back to the Read-Only status. This problem most often occurred after installing Windows 10 updates, and in some cases, because of account permissions.
- The simplest solution is to change the permissions. Most of the time, some changes in permissions can make a folder read-only.
- If File Explorer is giving you a hard time, you can go to our Fix File Explorer errors hub for answers.
- We wrote thousands of articles about Windows 10, so if you encounter any problems, you will find a solution in our Complete guides on troubleshooting Windows 10 hub.

- Download Restoro PC Repair Tool that comes with Patented Technologies (patent available here).
- Click Start Scan to find Windows issues that could be causing PC problems.
- Click Repair All to fix issues affecting your computer’s security and performance
- Restoro has been downloaded by 0 readers this month.
File and folder attributes are kept by Windows in the file system.
They are stored in the respective location with the file and folder name, extension, date and time stamp, and any other information available.
If you right-click on any given time on a folder and go to its proprieties, you’ll see a Read-Only check-mark.
It seems like many users reported that after they clear the check-mark, the folder is reverting back to the Read-Only status.
This problem most often occurred after installing Windows 10 updates, and in some cases, because of account permissions.
Nevertheless, an issue like this is very annoying and has to be dealt with.
What can I do if a folder reverts to Read-only in Windows 10? The simplest solution is to change the permissions.
Most of the time, some changes in permissions can make a folder read-only. Additionally, you can log in as an administrator or change the attribute of the folders.
For more info on how to do that, check the steps below.
How can I remove Read only from a folder in Windows 10?
If on your Windows 10 PC are more than one accounts, make sure that you’re trying to access the file or the folder from the Administrator account.
Because the folder was created by the admin account and you are trying to access it from a guest one, you won’t be able to make any changes to it.
So first, connect to your computer using the Administrator account.
Solution 1 – Change permissions
A lot of users have reported this problem. Because the majority of them confirmed that they solved it by changing the permissions, we suggest that you try this first.
If you are the only user on the Windows 10 PC, do the following to change the permissions:
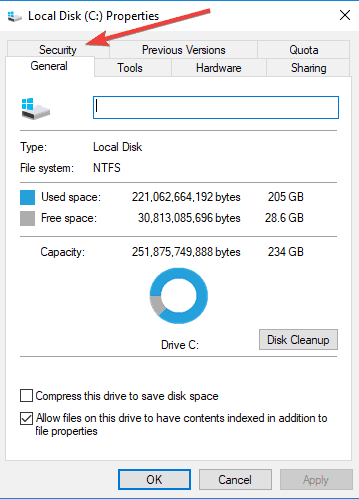
- Find your C Drive, right-click it and then choose Properties.
- A new window will appear. Click on Security tab.

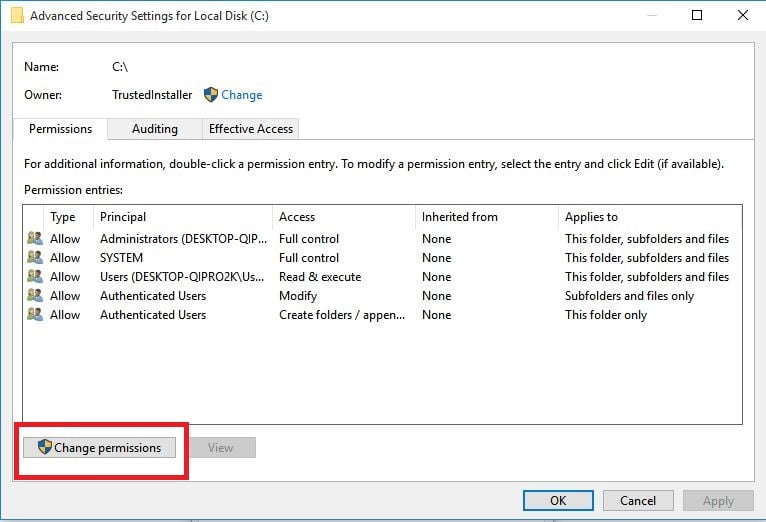
- In the bottom right, click Advanced. Then click on Change permissions.
- Choose the user that’s of interest to you and then click Edit.
- Under Applies to: drop-menu, choose This folder, subfolders and files.
- Under Basic permissions check Full control and click OK.
If there are more than one users on that computer, then follow these steps:
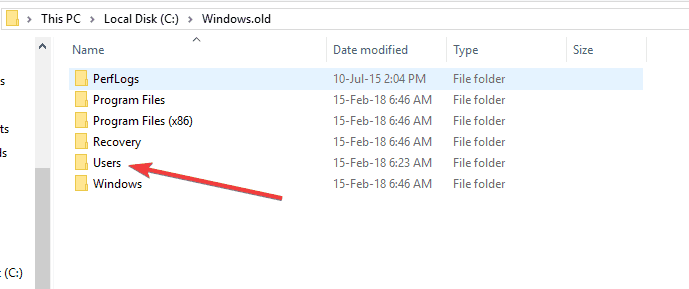
- Find your C Drive and double-click on it.
- You will see a Users folder. Double-click on it.
- Now you should see your users folder. Right-click it and choose Proprieties.
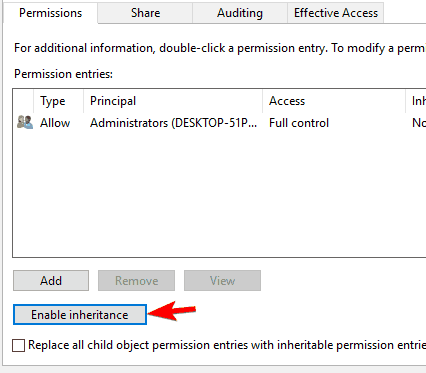
- Go to the Security tab, and in the bottom-right click Advanced.
- In the new window, in the bottom-left should see an Enable inheritance button. Click it.

After changing the permissions, the issue should be gone. If your still having problems, then go to the next solution.
Solution 2 – Change the attributes
If a certain folder has the Read-only attribute, then a program can’t save files or make changes to it. To change the Read-only attribute to System by using the Attrib command in cmd, follow the steps:
- In the Windows search box type cmd. Right-click the result and choose Run as administrator.
- To remove the Read-only attribute and to set the System attribute, type in the following command attrib -r +s drive:

.
Keep in mind that removing the Read-only or the System attribute of a folder can cause some customization loss, but it’s not particularly important unless you have something specific in mind.
We hope that these solutions worked for you, as many other Windows 10 users confirmed them.
Don’t forget to leave any other questions you may have in the comments section below, and we’ll be sure to take a look.
Can’t remove read-only from folders
How to remove read-only from folders. All searched helps don’t work.
Replies (7)
What error messages are you receiving?
Don’t be thinking the black square in the ReadOnly checkbox is a status indicator.
Was this reply helpful?
Sorry this didn’t help.
Great! Thanks for your feedback.
How satisfied are you with this reply?
Thanks for your feedback, it helps us improve the site.
How satisfied are you with this reply?
Thanks for your feedback.
If you are referring to this Attribute setting then it is not a Read only marker and does not affect the folder.
Can you tell us more about your problem.
Was this reply helpful?
Sorry this didn’t help.
Great! Thanks for your feedback.
How satisfied are you with this reply?
Thanks for your feedback, it helps us improve the site.
How satisfied are you with this reply?
Thanks for your feedback.
I’ve tried changing attribute from read only to non read only by unclicking that box on whole drive, on a;; documents, on selected folders, on individual files and none cause the locations to be anything but continued read only.
2 people found this reply helpful
Was this reply helpful?
Sorry this didn’t help.
Great! Thanks for your feedback.
How satisfied are you with this reply?
Thanks for your feedback, it helps us improve the site.
How satisfied are you with this reply?
Thanks for your feedback.
Hi and thanks for reaching out. My name is William. I’m a Windows technical expert. I’ll be happy to help you out today.
This is a common area of misconception. The important thing to note is that the read-only attribute applies only to files, not folders. As such, the box can have one of two states applied to it, either checked or unchecked. Applying either and clicking OK will apply the respective attribute.
What you are seeing by default when you view the folder properties, is the box being «filled-in». This middle or «limbo» state is indicating that you can apply/remove (check/uncheck) the read-only attribute to apply them to the files in this folder. When you subsequently open the folder properties again, the box state is filled-in again, or reset.
Was this reply helpful?
Sorry this didn’t help.
Great! Thanks for your feedback.
How satisfied are you with this reply?
Thanks for your feedback, it helps us improve the site.


