- Как записать звук на компьютере (с микрофона или тот, что слышен в колонках)
- Как и чем записать звук
- Сначала проверьте работоспособность микрофона
- Встроенное приложение в Windows: звукозапись (или запись голоса)
- Audio Master (Аудио Мастер)
- Audacity
- How To Record PC Screen with Audio Audio Sound Recording (Computer Sound, Microphone)
- Audio Sound Recording in Windows Vista, 7, 8 and 10
- 1. How to record «computer sound» in Windows Vista/7/8/10
- 2. How to record «your voice» in Windows Vista/7/8/10
- 3. How to record «computer sound» and «your voice» at the same time in Windows Vista/7/8/10
- Audio Sound Recording in Windows XP
- 1. How to record «computer sound» in Windows XP (Stereo Mix)
- 2. How to record «your voice» in Windows XP
- 3. How to record «computer sound» and «your voice» at the same time in Windows XP
- How To Record Your Computer Screen And Audio
- The Easy Solution: Use ScreenRec To Record Screen Audio And Video
- Step 1: Download and Install Screenrec For Windows
- Step 2: Configure audio recording settings
- Step 3: Record your screen video
- Step 4: Share your recorded videos instantly
- Step 5: Manage the screen recordings in the gallery and user panel
- User-friendliness
- Two Alternative Ways To Capture Your Screen With Audio
- Option 1: ShareX – open source screen recorder that gets the job done
- Step 1: Download and Install ShareX
- Step 2: Start the app
- Step 3: Record your computer audio and microphone
- Step 4: Select video capture area
- Step 5: Share your screen captures
- Step 6: Manage your screen captures
- Option 2: Microsoft Expression Encoder 4 – For advanced users
- User-friendliness
- Step 1: Download and Install Microsoft Expression Encoder 4
- Step 2: Start the app
- Step 3: Configure the audio recording settings
- Step 4: Create a screen capture with audio
- Step 5: Encode the video
- Step 6: Share your screen recording
- Conclusion
Как записать звук на компьютере (с микрофона или тот, что слышен в колонках)
 Всем доброго времени!
Иногда возникает, казалось бы, достаточно простая задача: записать звук, который слышно из наушников/колонок (или тот, который вы сами просто наговорите в микрофон).
Ну, например, услышали вы какую-то интересную онлайн-передачу, вам нужно записать аудио-урок для подчиненных или говорите с дальними родственниками и хотите поделиться записью с близкими. Но по закону подлости, с самыми простыми задачами, вроде этой, можно просидеть не один час, пока добьешься оптимального качества .
Собственно, в этой статье хочу показать пару примеров, как и чем можно записать звук на ПК. Думаю, заметка может быть весьма полезной для всех начинающих аудио-редакторов.
Если вы хотите записывать телефонные разговоры, то рекомендую ознакомиться с этой заметкой

Как и чем записать звук
Сначала проверьте работоспособность микрофона
Если вы собираетесь вести запись с микрофона — проверьте в первую очередь его работоспособность. Для этого нажмите сочетание Win+R, и в окне «Выполнить» используйте команду mmsys.cpl (см. пример ниже).
Что делать, если значок звука пропал (его нет в трее рядом с часами).
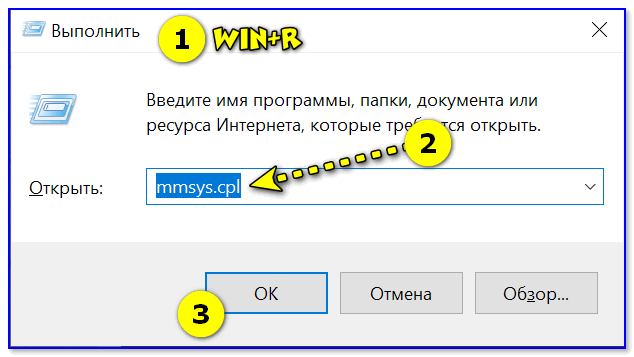
Win+R — mmsys.cpl — настройки звука
Далее откройте вкладку «Запись» и укажите рабочий микрофон.
Важно! Если у вас в этой вкладке несколько устройств, то при неправильно выбранном микрофоне — вы не сможете сделать звукозапись (вас просто не будет слышно).
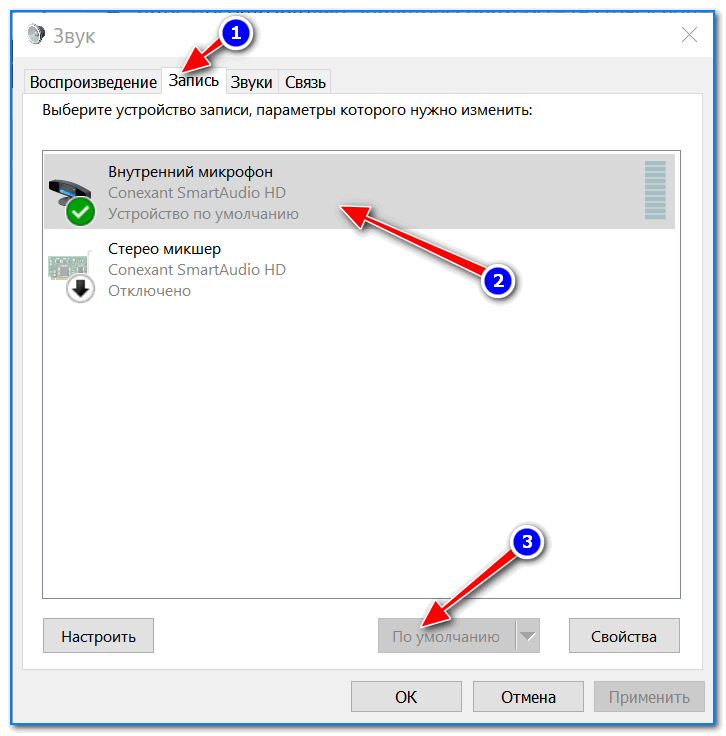
Выбираем устройство по умолчанию
Для правильного выбора — обратите внимание на ползунки справа (напротив каждого устройства). Если вы скажете что-нибудь в микрофон — вы увидите, как они позеленеют (в зависимости от громкости). См. пример ниже.

Кстати, обратите также внимание на то, что у современных ноутбуков есть встроенный микрофон: обычно расположен рядом с веб камерой, над экраном. См. пример на фото ниже.
Просто многие пользователи подключают к ноутбуку внешний микрофон, а выбирают в качестве используемого по умолчанию встроенный микрофон.
В результате их очень плохо слышно, т.к. говорят они не в тот микрофон (сумбурно объяснил, но думаю суть понятна. ).
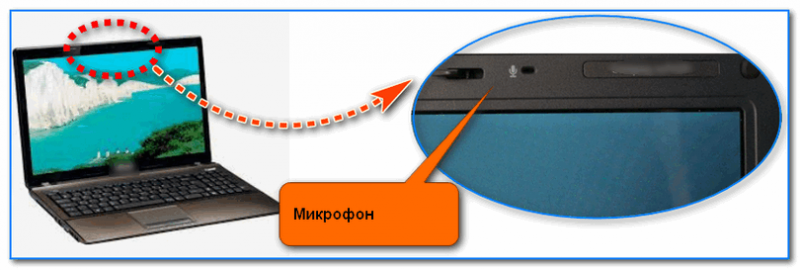
Где обычно располагается микрофон на ноутбуке
Подключение и настройка внешнего микрофона в Windows — см. инструкцию для начинающих
Встроенное приложение в Windows: звукозапись (или запись голоса)
В ОС Windows уже встроено очень простое приложение для записи звука с микрофона. В Windows 7 оно называется «Звукозапись» (см. скрин ниже), в Windows 10 — «Запись голоса» (его проще запустить через поиск, см. пример ниже).
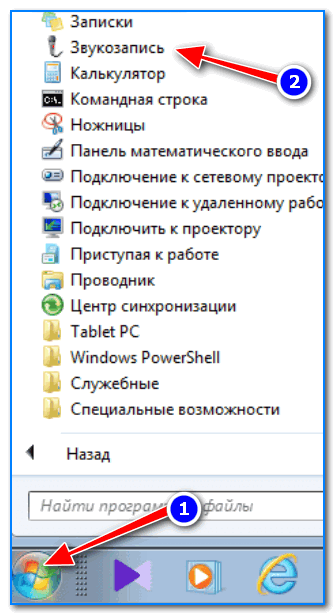
Звукозапись в Windows 7
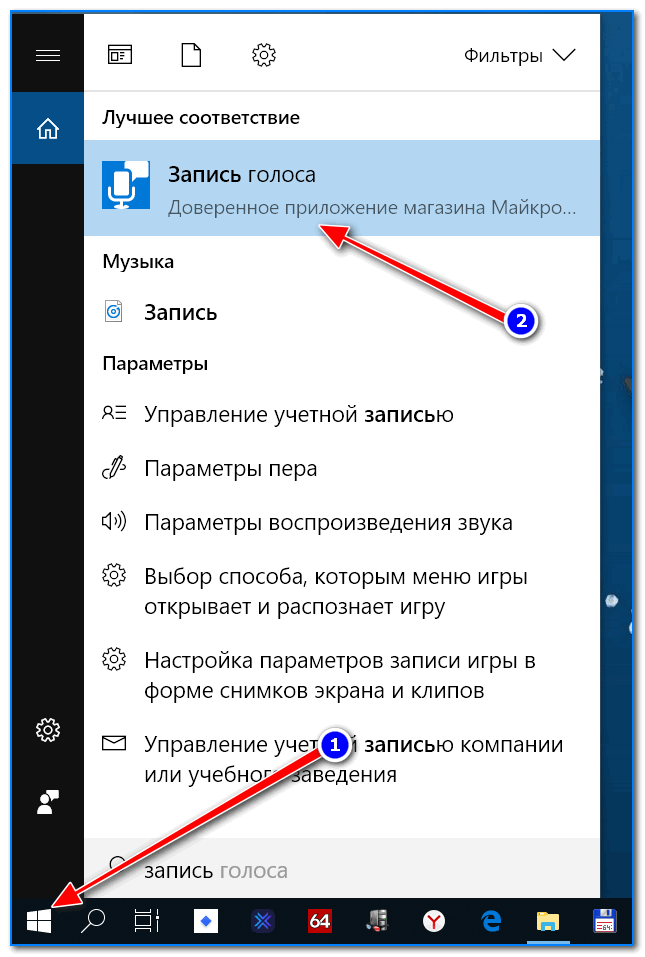
Запись голоса (Windows 10)
В своем примере ниже покажу программу «Запись голоса» . После запуска программы — вам достаточно нажать только одну кнопку «Запись» (либо сочетание кнопок Ctrl+R).

Главное окно (запись голоса)
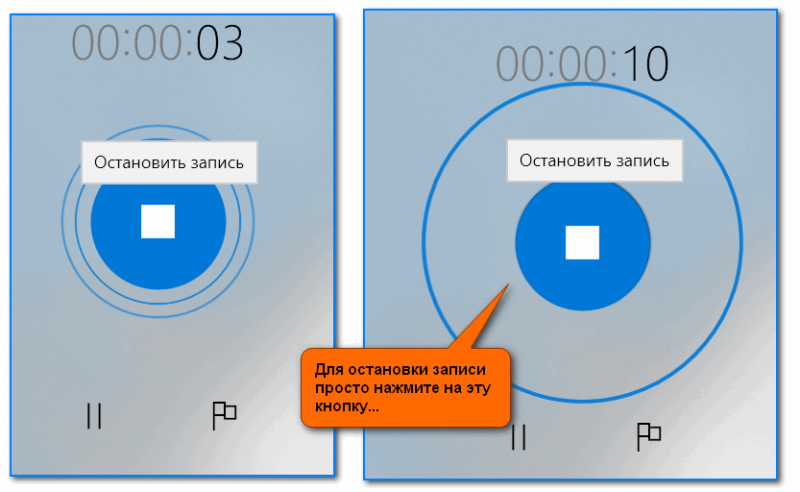
Далее вы сможете наблюдать за процессом записи: обратите внимание, что круг возле кнопки «Остановить запись» будет показывать активность микрофона (чем громче звук — тем больше в диаметре круг, см. скрин ниже).
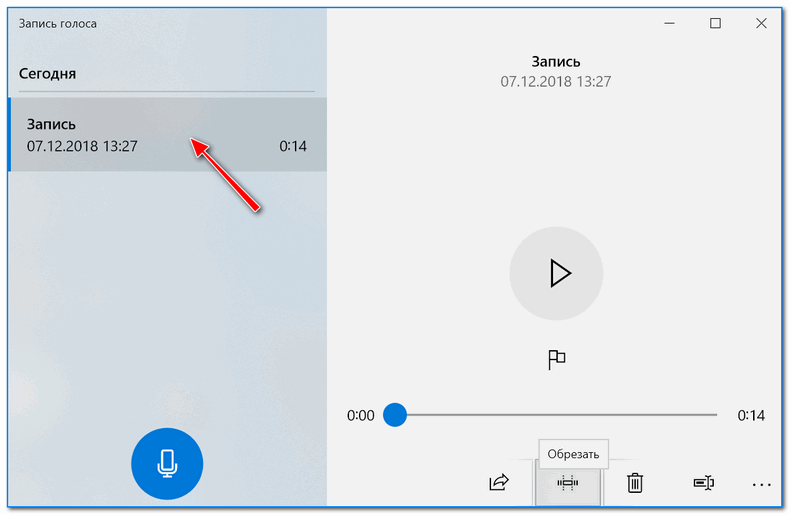
После остановки записи, она отобразиться в меню слева. Ее можно прослушать, отрезать от нее ненужные фрагменты, переименовать, поделиться с кем-нибудь и пр. В общем-то, все самое необходимое для неискушенного пользователя.
Если возможностей стандартной программы в Windows вам недостаточно, рекомендую обратить внимание на специализированные программы (о паре из них расскажу ниже).
Audio Master (Аудио Мастер)
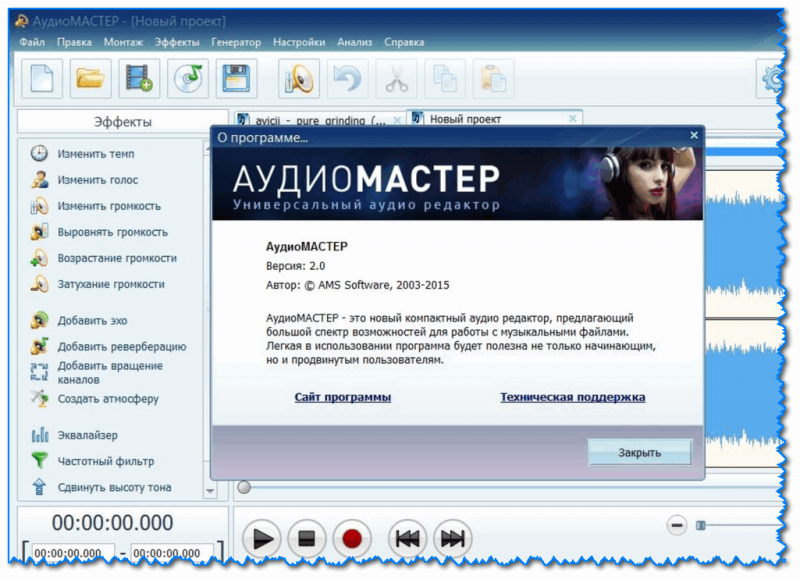
Аудио Мастер — главное окно программы / Кликабельно
Многофункциональная программа для работы с аудио. Позволяет не только полноценно редактировать аудио файлы, но и записывать речь с микрофона (или любой звук с колонок/наушников, например), извлекать музыку с аудио-CD дисков, создавать рингтоны для смартфонов, различные эффекты и пр.
- программа позволяет захватывать звук с различных аудио-устройств: микрофона, звуковой карты, ТВ-тюнера и пр. (причем, захваченные части можно в последствии объединить). Аудио дорожку можно будет сохранить в форматы OGG, MP3, или WAV;
- можно конвертировать музыку с аудио дисков (также в форматы OGG, MP3, или WAV). Причем, в процессе захвата можно отредактировать любой из треков: например, отрезать от него лишнюю часть;
- возможность извлечь звук из видеофайла (например, многие «достают» свои любимые песни, мелодии и фразы и ставят их к себе на телефон);
- программа позволяет работать со всеми популярными аудио-форматами: MP3, WAV, WMA, OGG, FLAC, M4R и др.;
- возможность обрезать файлы и соединять несколько аудио-дрожек в одну;
- есть возможность накладывать десятки различных эффектов (например, можно добавить эхо, попытаться изменить свой голос и пр.);
- интуитивно просто интерфейс: для выполнения нужной задачи, достаточно выбрать ее из левого меню (см. скрин выше);
- поддержка русского языка, и популярных ОС Windows 7, 8 ,10 (32/64 bits).
Что касается процесса начала записи — то сразу после установки и запуска приложения, просто выберите в окне вариант «Записать звук с микрофона» .
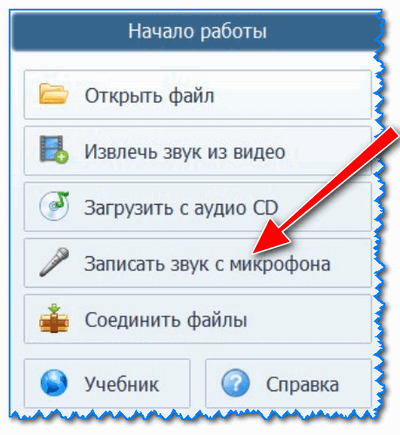
Запись звука с микрофона
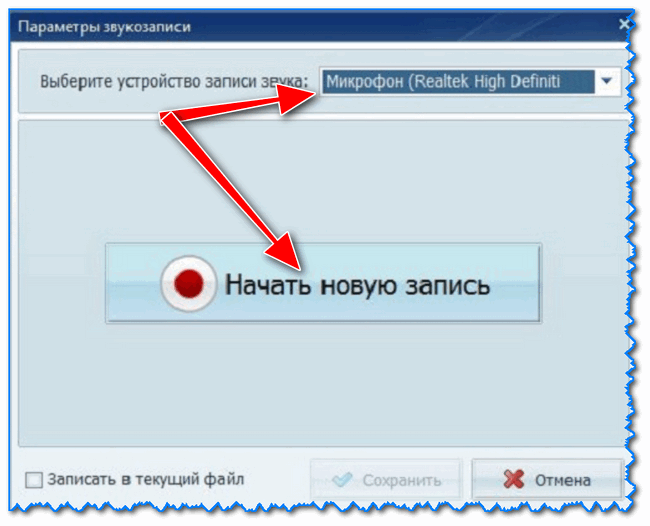
После укажите устройство записи (Микрофон, см. скрин ниже), и начните запись. В общем-то, достаточно просто!
Audacity
Сайт разработчика: https://www.audacityteam.org/
Загрузить можно с Source Forge
Audacity — главное окно программы / Кликабельно
Бесплатная программа с открытым исходным кодом, позволяющая редактировать аудио-файлы. Также с ее помощью можно записать звук как с микрофона, так и с любого другого источника звука. Работает в ОС Windows, Mac OS X, GNU/Linux и др.
Отмечу, что по сравнению с предыдущим ПО, это несколько сложнее в освоении, т.к. здесь гораздо больше функций.
- Audacity может записать живой звук с микрофона или аудио-карты компьютера (можно сделать это параллельно);
- возможность обрезки, склеивания, копирования и удаления аудио-треков, добавленных в окно программы;
- возможность добавить на редактировку в программу любые ваши прошлые записи, музыкальные треки и пр.;
- поддерживает звук разной битности: 16-bit, 24-bit и 32-bit;
- программа поддерживает плагины (причем, эффекты, которые они создают, могут быть изменены вами с помощью редактирования обычного текстового файла!);
- любые ваши действия в программе могут быть отменены (причем, вы можете откатиться на любое количество шагов назад);
- большинство действий по редактированию трека могут осуществляться с помощью клавиатуры (а значит, со временем, привыкнув, вы сможете очень быстро редактировать файлы);
- режим просмотра спектрограммы частот (для визуального и простого восприятия).
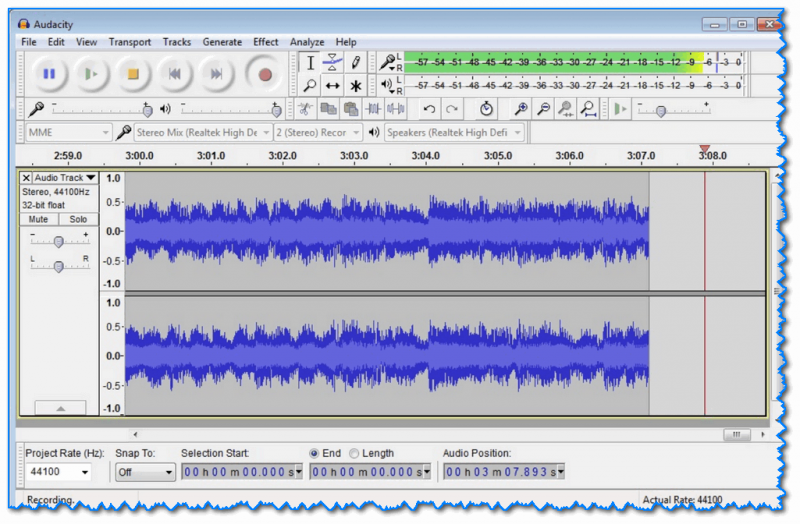
Для справки : для записи звука, необходимо сначала установить уровень входного сигнала (см. скрин ниже, №1), затем выбрать устройство «Микрофон» (2), нажать кнопку записи (3).
Обратите внимание, как у вас начнет «играть» звуковая дорожка, в зависимости от громкости поступающего звука (4). Для остановки записи — нажмите кнопку «Стоп» (5).

Инструкция по записи звука в Audacity

Для тех, кто хочет записывать не только звук, но и видео с экрана — рекомендую вот эту заметку
How To Record PC Screen with Audio
Audio Sound Recording (Computer Sound, Microphone)
Bandicam is a great capture program as it will allow you to easily record the computer screen, computer sound and microphone all together. If you want to record the system audio and/or your voice, please see the tutorials below:
Audio Sound Recording in Windows Vista, 7, 8 and 10
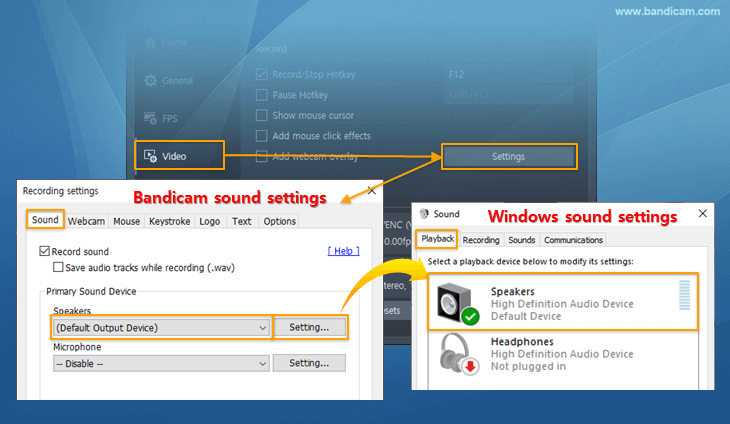
To record computer sound and your voice at the same time in Windows Vista, 7, 8 and 10, start Bandicam -> Video -> Settings -> and choose «(Default Sound Device)» and «Microphone» at the Recording settings, and then check the «Two Sound Mixing» option.
1. How to record «computer sound» in Windows Vista/7/8/10
To record «computer sound», choose «(Default Sound Device)» as the Primary Sound Device. » See more
* Tip) If you can’t see «(Default Sound Device)«, Properties > Compatibility > and then—> uncheck the Run this program in compatibility mode for: option.
2. How to record «your voice» in Windows Vista/7/8/10
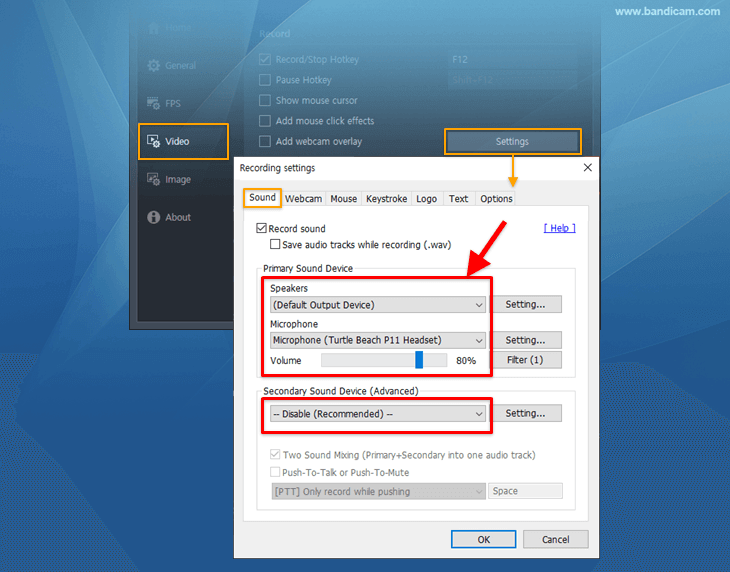
To record your voice, you have to choose the «Microphone» device in the Sound settings window. » See more
3. How to record «computer sound» and «your voice» at the same time in Windows Vista/7/8/10
To record «computer sound» and «your voice» at the same time, choose «(Default Sound Device)» and «Microphone«, and then check the «Two Sound Mixing» option. » See more
Audio Sound Recording in Windows XP
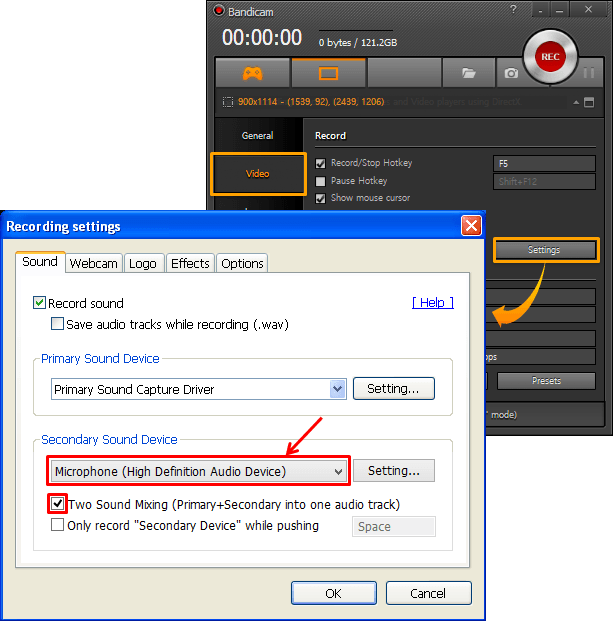
To record computer sound and your voice at the same time in Windows XP, start Bandicam -> Video -> Settings -> and choose «Primary Sound Capture Driver» and «Microphone» at the Recording settings, and then check the «Two Sound Mixing» option.
1. How to record «computer sound» in Windows XP (Stereo Mix)
If there is no sound for the captured video in Windows XP, you have to enable «Stereo Mix» in Volume Control and change the sound device in the Recording settings of Bandicam. » See more
2. How to record «your voice» in Windows XP
To record your voice in Windows XP, you have to enable «Microphone» in Volume Control and select «your microphone». » See more
3. How to record «computer sound» and «your voice» at the same time in Windows XP
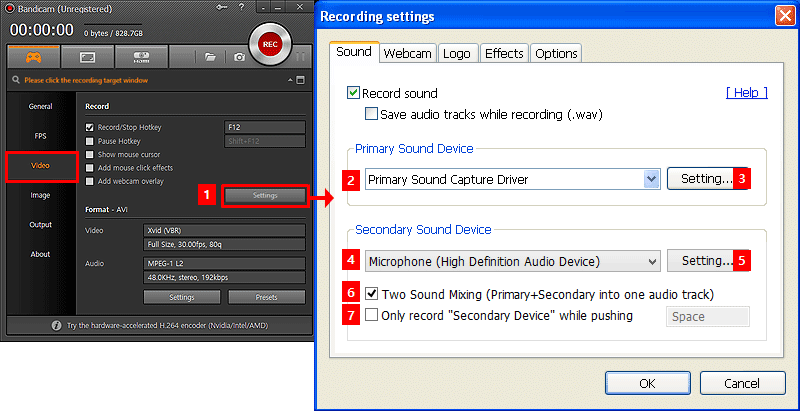
To record «computer sound» and «your voice» at the same time in Windows XP, choose «Primary Sound Capture Driver» as the primary sound device, select «your microphone» as the secondary sound device and then check the «Two Sound Mixing» option. » See more
How To Record Your Computer Screen And Audio
Whether it’s to record a live stream or create a video training for work, you often need to record computer screen and audio together.
That should be easy, right?
Yeah… Not really.
When you want a screen recorder with sound that can truly deliver amazing features for free, well, let’s just say your options are limited. No worries, however. I’m going to break down the best FREE screen recorders on the market today. The criteria are based on screen capture abilities, audio recording capabilities, sharing options, and user-friendliness.
The Easy Solution: Use ScreenRec To Record Screen Audio And Video
Hiding in the mess of the internet is ScreenRec and it may be the best screen and sound recorder for Windows you’ve used thus far. It’s easy to use, free and lightning fast and works on Windows 7, Windows 8 and Windows 10. I know this might be saying a lot, so let me show you. Here’s how to record your screen with audio on Windows. Watch this video:
Or see the text-based guide below.
Step 1: Download and Install Screenrec For Windows
Screenrec will launch automatically after it is installed.

Step 2: Configure audio recording settings
Screenrec can record your computer screen WITH sound coming from both your microphone and/or your computer audio. Believe it or not, this is a big deal as many other screen recording tools make it look impossible.
The microphone is selected by default to allow you to add audio narration. To record system (desktop) audio, go to Settings and slide the system audio toggle to “On”.
Step 3: Record your screen video
Press Alt-S or click the camera icon and then use your mouse to select a capture region. For a full-screen capture, click and drag the mouse over the entire screen.
Once you select a capture region, the screen recording (screencast) will start automatically. You will see a big orange countdown, starting from 3.
Step 4: Share your recorded videos instantly
When you finish your screen and audio recording, a unique sharing link is automatically created. If this is the first time you are using Screenrec, you will be asked to create a free account. You can paste your unique sharing link in an email, a messaging app, directly on social media, you name it. Pretty cool, huh?
Screenrec is actually the only free screen recording tool on the market that gives you a sharing link instantly. It is possible because Screenrec uploads your screen recording in the background (while you’re recording). So, if you ever forget to save locally or somehow accidentally delete your video, it’s already online!
Step 5: Manage the screen recordings in the gallery and user panel
Not only is a sharable link automatically created, but your video screen capture is uploaded directly to the cloud in high quality. Click the gallery icon to view your existing recordings. Hover on a recording to preview it, get a sharing link or delete it.
User-friendliness
As far as user-friendliness, Screenrec is so simple, it’s insane. There are no complicated buttons or settings. You don’t have to think about encoding or uploading your video. It’s all done for you. With just a few clicks and within a few minutes, you can record your screen audio and video and share it.
Two Alternative Ways To Capture Your Screen With Audio
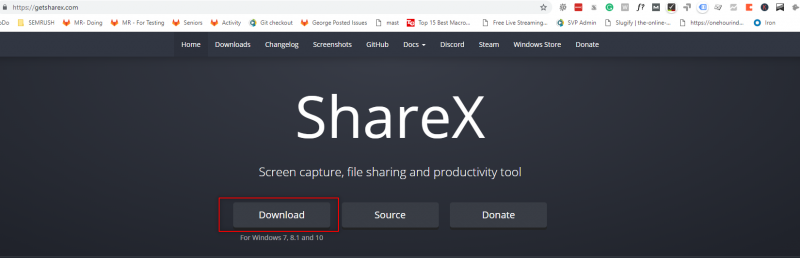
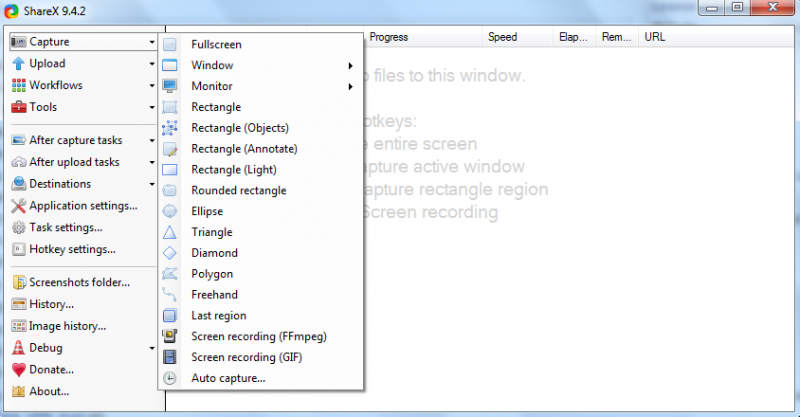
Option 1: ShareX – open source screen recorder that gets the job done
If you’re looking for a basic screen recorder, then ShareX is a good choice. It’s simple, easy to use and gets the job done. Think of it as the flip phone of screen recorders. Durable, reliable, and even with the advancement of today’s technology, somehow not yet obsolete.
User-friendliness
Sharex is definitely user-friendly simply because it has very basic functions. Reminding you of a Windows menu, the interface is minimal. This could be a good thing for those who don’t care for bells and whistles. But a little color wouldn’t hurt. Let’s just say it’s not very pretty.
Here’s how to record your computer screen and audio with ShareX.
Step 1: Download and Install ShareX
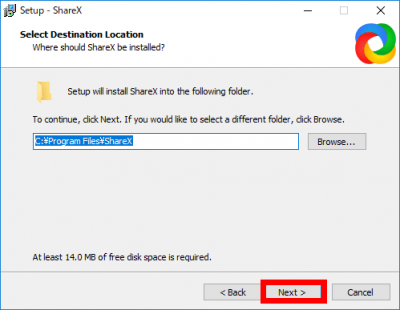
Step 2: Start the app
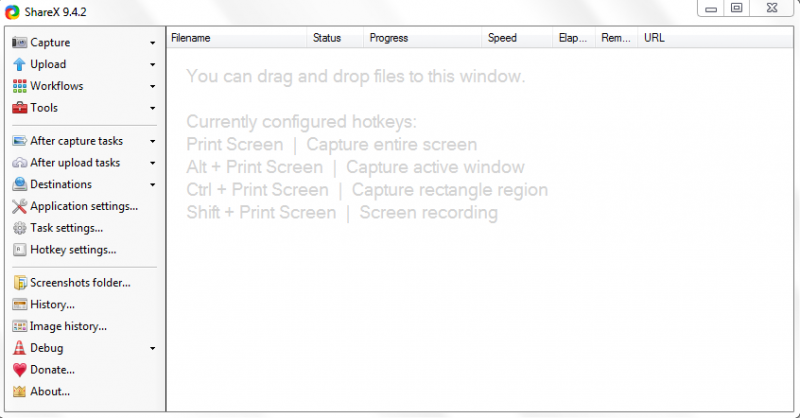
Step 3: Record your computer audio and microphone
Technically with ShareX, you can record your voice and/or your computer audio. Don’t get too happy, though. In order to create a screen video and audio capture, you have to download additional software, install it and make changes within the editing menu.
You can, however, narrate with your microphone as you record your screen. If that’s what you need to do, I guess you’re in luck.
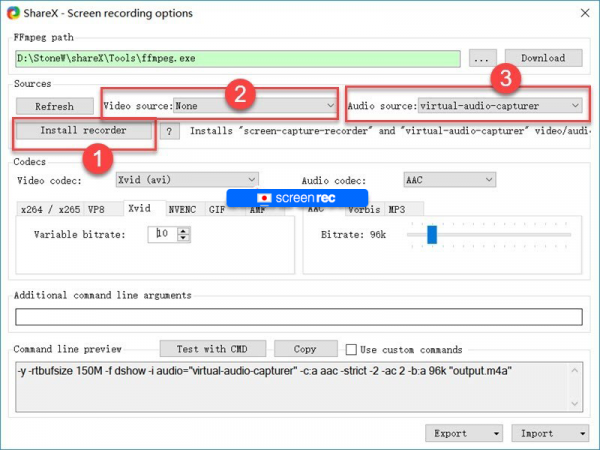
To record your microphone, go to Task settings > Capture > Screen recorder > Screen recording options > Audio source. Select “Microphone” as a new audio source.
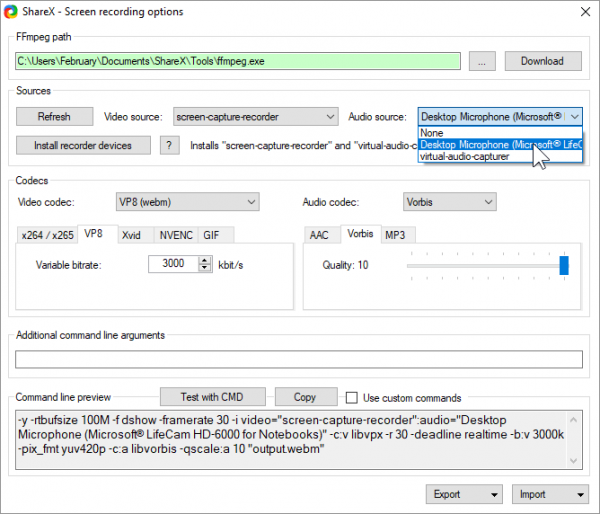
For screen capture with audio, click the “Install recorder” box on the left side of the screen. You will be prompted to download and install additional software. Follow the instructions. Once complete, choose “Virtual audio capturer” in the audio source drop-down menu.
Step 4: Select video capture area
Click “Capture” found on the left side of the screen. Select the desired recording region and click “Screen recording” from the drop-down menu to capture video.
Step 5: Share your screen captures
There are dozens of sharing destinations that you can choose from and upload directly to, right from the ShareX menu. The only downside is that you have to wait for your recording to be uploaded.
Click “After upload tasks” found on the left side of the screen. Select desired options to shorten, copy, or share URL. Choose “Destinations” to upload directly to a social media platform or website.

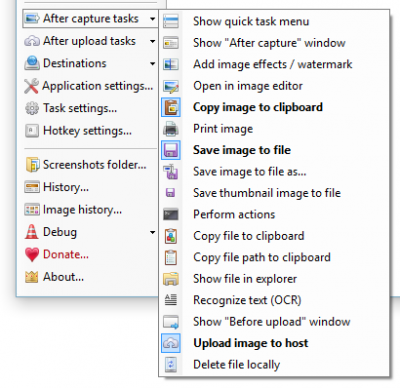
Step 6: Manage your screen captures
Once the screen has been captured, there are multiple task options in “After capture tasks”. Unfortunately, the best options apply only to screenshots and not video (ie; image effects, image editor, watermark creator, etc).
The only thing you can do with a recorded video is to share it. Oh, and delete it, I guess. So… two things!
Option 2: Microsoft Expression Encoder 4 – For advanced users
Microsoft’s Expression Encoder is a popular recording solution that gives you more properties that you might have missed with ShareX. However, these extra options seem to come at the cost of clutter. There is so much to look at, so much to decipher, that, if you’re not a genuine techie, you might as well look for a tutorial on YouTube now.
User-friendliness
I don’t mind a bit of sophistication with my apps, but there is a fine line between sophisticated and complex. A line that Microsoft certainly crossed.
The problem with Expression Encoder 4 is that it is clunky. The interface is much like a space shuttle control center—heavy with toggles, switches, and functions that you have to remember. One of the things you have to DIY is to actually encode your video. Once you’ve finished recording, you have to manually select “Encode” to receive your final video. It is not automatic.
I’m sure with time, you will get the hang of it, but, if you want something simple and easy to understand, this is definitely NOT it.
Here’s how to record your computer screen and audio with Microsoft Expression Encoder 4.
Step 1: Download and Install Microsoft Expression Encoder 4
Step 2: Start the app
Make sure to start Microsoft Expression Encoder 4 Screen Capture (not the other program). You will see the recording toolbar.

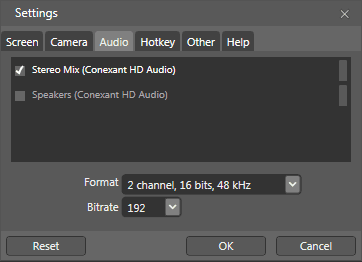
Step 3: Configure the audio recording settings
Recording audio is far simpler than it is with ShareX. When taking a screen capture, audio can be recorded from either the system speakers or a microphone without requiring any additional installations.
All you have to do is choose the proper audio option in the settings tab and voilà! System sounds recorded.
To record the Mic audio, click the settings icon within the user panel and check “Microphone”.
To record the system audio, follow the same procedure but check “Speakers”.
If you are using an older system, say Windows XP or Windows 7, you can forget about recording the computer audio. If there are any discrepancies between the systems audio output and the options within the encoder, you will receive an error message. In other words… your screen recording will have no sound.
I also tried recording my screen on Windows 10. I was successful with the microphone but, sometimes, ShareX simply refused to capture the system audio for no apparent reason. So, if you happen to have issues, don’t free. It’s not you, it’s the software.
Step 4: Create a screen capture with audio
In all fairness, even though it might take you a while to funnel through the abundance of information, once you start recording, it is quite simple. The play/pause/stop functions are easily accessible. You could either use your mouse to highlight a recording area or choose specific menus or regions from the drop-down menu within the panel.
To start the video recording, view the screen options by clicking the sun icon. Be sure everything is configured the way you like. Choose your desired capture region by using the crop tool or choosing a window from the drop-down menu. When you select capture area, click the record icon to begin.

Step 5: Encode the video
Yes, there is an extra step here and it’s not the most fun thing to do. When you stop recording, you have to actually click “Send to encoder” which will open the other Microsoft Expression Encoder program. You can edit the recording and adjust the encoding settings. If
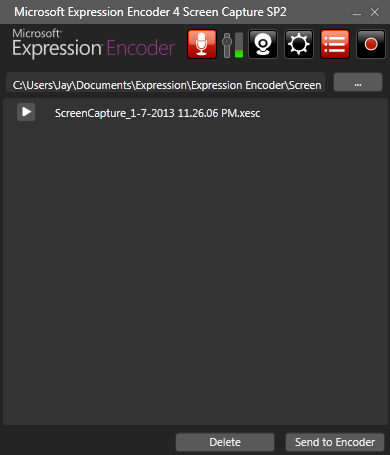
If this makes you want to scream in horror and run, rest easy. You can simply click the Encode button at the bottom left of your screen and be done with it.

Step 6: Share your screen recording
Sharing your videos can be a bit tedious. Instead of having direct sharing capabilities like ShareX, you have to manually upload the video to YouTube after saving it locally.
There is no simple “Share on Facebook” buttons or “Tweet This!” option. It’s 2021. We’ve all been spoiled and expect to share our creations in an instant.
Come on, Microsoft! Get with the program! (No pun intended)
Conclusion
So, this is it! You now know three ways to record computer screen and audio. But how can you choose the right tool for the job?
Well, if you are looking for a free and easy screen recorder with sound, then go with Screenrec (but be careful not to get addicted to the instant sharing option). If you’re familiar with ShareX and you don’t care about instant sharing, then that may be a viable option. Finally, if you want lots of advanced features and you’re comfortable with encoding and uploading your screen captures manually, then the MS Expression Encoder might be what you’re looking for.
How To Record Computer Screen Video And Audio
Step 1: Download and Install Screenrec For Windows;
Step 2: Press Alt + S to select screen capture area and click the audio toggle to enable system sound recording;
Step 3: Click the video camera to start recording
What is the best way to record your screen with desktop audio?
You need a screen recording tool that can record system audio. Not all screen capture programs offer this functionality, so make sure that it is available.


