- Создание USB-накопителя восстановления
- Создание USB-накопителя восстановления
- Create a recovery drive
- How to Recover Files from USB Flash Drive with or Without Software
- How to Recover Files from USB — Page Content
- How to Recover Files from USB Using Data Recovery Software
- Effective Data Recovery Software
- How to Recover Deleted Files from USB Flash Drive Without Software
- Recover Files from USB Using CMD (Only Recover Hidden Files)
- Restore Deleted Files from USB from Previous Versions
- Restore Deleted Files from USB withВ Windows Backups
- Conclusion В
- How toВ Avoid USB Flash Drive/Pen Drive Data Loss
- Regularly Back Up Files
- Plug and UnplugВ the USB Flash DriveВ Correctly
- Scan and Remove Virus on USBВ
Создание USB-накопителя восстановления
USB-накопитель восстановления поможет выявить и устранить проблемы с компьютером под управлением Windows даже в случае, когда компьютер не запускается.
Возможно, ваш компьютер поставлялся с образом восстановления, который используется для обновления или сброса компьютера. Образ для восстановления хранится на диске компьютера в специальном разделе восстановления и обычно занимает 3–6 ГБ. Чтобы сэкономить место на диске, можно удалить с компьютера образ для восстановления и использовать вместо него диск восстановления. Windows 8.1 включает встроенные средства для создания диска для восстановления USB. Windows поможет вам узнать, насколько сильно разделом восстановления, и вам понадобится USB флэш-накопитель по крайней мере.
Предупреждение: При создании накопителя восстановления будут стерты все данные, имеющиеся на USB-устройстве флэш-памяти. Перед созданием USB-накопителя восстановления скопируйте с него все важные данные на другое запоминающее устройство либо используйте пустое USB-устройство флэш-памяти.
Создание USB-накопителя восстановления
Выполните прокрутку от правого края экрана и нажмите кнопку Поиск. (Если вы используете мышь, переместите указатель в правый нижний угол экрана, потом вверх, а затем щелкните Поиск.)
Введите в поле поиска диск восстановления, а затем выберите пункт Создание диска восстановления.
После того как откроется средство создания диска восстановления, установите флажок Выполнить резервное копирование системных файлов на диск восстановления и нажмите кнопку Далее.
Примечание: Если на компьютере нет раздела восстановления, то этот значок будет недоступен. На диске восстановления будут только средства восстановления и загрузочный образ, но не будет образа для восстановления компьютера или возврата его в исходное состояние.
Вставьте USB-устройство флэш-памяти в компьютер. Необходимо, чтобы оно имело не меньший размер, чем указанный на экране.
Выберите USB-накопитель, который вы хотите использовать в качестве накопителя восстановления, а затем нажмите кнопку Далее.
Нажмите Создать. Изображение для восстановления и необходимые средства восстановления будут скопированы на USB-устройство, что займет некоторое время, в зависимости от вашего компьютера и размера образа восстановления.
По завершении процесса выполните следующее:
Если вы хотите сохранить раздел восстановления на компьютере, нажмите кнопку Готово.
Если вы хотите удалить раздел восстановления с компьютера и освободить место на диске, выберите пункт Удаление раздела восстановления. Затем нажмите кнопку Удалить. В результате на диске освободится место, которое занимал образ для восстановления. По окончании удаления нажмите кнопку Готово.
Примечание: Некоторые компьютеры не предлагают удалить раздел восстановления. Это значит, что на компьютере нет раздела восстановления, на хранение которого уходит часть места на диске.
Извлеките USB-устройство флэш-памяти. Это диск восстановления Windows 8.1, и вам понадобится его, если вам потребуется обновить или сбросить компьютер. Храните накопитель в безопасном месте и не используйте его для хранения других файлов и данных.
Примечание: Если ваш компьютер поставлялся с Windows 8 и вы обновили его на Windows 8.1, диск восстановления будет включать Windows 8, и вам потребуется выполнить обновление до Windows 8.1 после обновления или сброса компьютера.
Create a recovery drive
It’s a good idea to create a recovery drive. That way, if your PC ever experiences a major issue such as hardware failure, you’ll be able to use the recovery drive to reinstall Windows 10. Windows updates to improve security and PC performance periodically so it is recommended to recreate the recovery drive annually. Personal files and any applications that did not come with your PC will not be backed up. You’ll need a USB drive that’s at least 16 gigabytes.
Warning: Use an empty USB drive because this process will erase any data that’s already stored on the drive.
To create a recovery drive in Windows 10:
In the search box next to the Start button, search for Create a recovery drive and then select it. You might be asked to enter an admin password or confirm your choice.
When the tool opens, make sure Back up system files to the recovery drive is selected and then select Next.
Connect a USB drive to your PC, select it, and then select Next.
Select Create. Many files need to be copied to the recovery drive, so this might take a while.
If you ever need to use the recovery drive to reinstall Windows 10 on your PC, see Recovery options in Windows 10 for further instructions. It’s a good idea to back up your files frequently because the recovery drive isn’t a system image. It doesn’t contain your personal files, settings, or programs.
Need more options for creating a recovery drive?
To download Windows 10 installation media, see Recovery options in Windows 10.
How to Recover Files from USB Flash Drive with or Without Software
When you delete files from USB, you have 4 ways to recover files from USB or pen drive. You can recover deleted files from USB with EaseUS data recovery software in simple clicks. Or you can also recover files from USB without software by using CMD or files backup.
Table of Contents
About the Author
Reviews and Awards
How to Recover Files from USB — Page Content
- 1. Recover deleted files from USB Using EaseUS data recovery software(Recommended)
- 2. Recover files from USB flash drive using CMD (Only recover hidden files)
- 3. Retrieve files from USB from previous versions (File backups required)
- 4. Restore USB files from Windows Backups (File backups required)
Several reasons can cause file loss on a USB flash drive or a pen drive, such as unintentional file deletion, hard drive formatting, storage device failure, and virus attack. Among them, accidental deletion is the most likely reason for data loss from USB.В
Where do deleted files from USB go?
Since the USB flash drive or pen drive is an external device, files deleted on the USB flash drive are deleted permanently instead of going to the recycle bin, so you cannot perform recycle bin recovery to recover files from USB. But you still have a chance to recover deleted files from USB by using the 4 ways in this tutorial.В
Note: When you realize that you have deleted files on USB by mistake, stop using your USB flash drive immediately to avoid data overwriting.В
How to Recover Files from USB Using Data Recovery Software
The most effective and possible way to recover deleted files from USB is to use professional data recovery software. EaseUS Data Recovery Wizard, a top-rank data recovery tool, can completely recover deleted files from UBS flash drive, pen drive, SD card, HDD, SSD, camcorder, digital camera, and so on.
Effective Data Recovery Software
- Perform a deleted and formatted USB data recovery from different data loss situations.
- Recover all types of lost files: photos, documents, videos, audio, emails, compressed files, etc.
- Boot with a downloadable WinPE when your system fails to start or crashes.
Follow the steps below to recover deleted files from the pen drive/USB drive with a few clicks.В
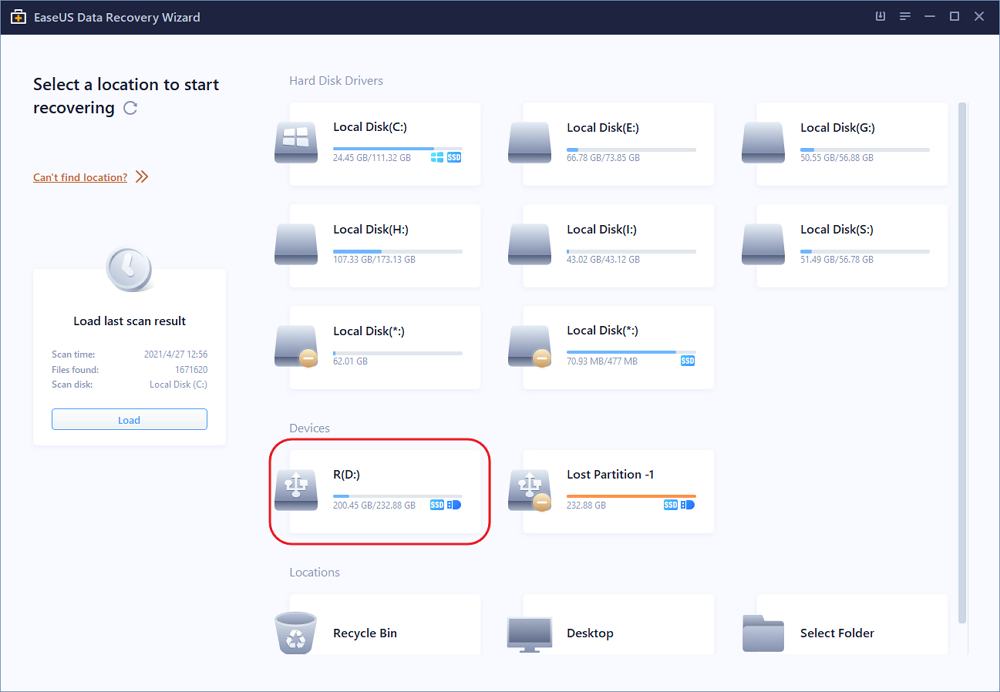
Step 1.В Run USB data recovery software.
Connect the USB flash drive to your computer and launchВ EaseUS USB data recovery software on your PC. Select your USB drive which marks as a removable disk, and click «Scan» to start finding your lost files.
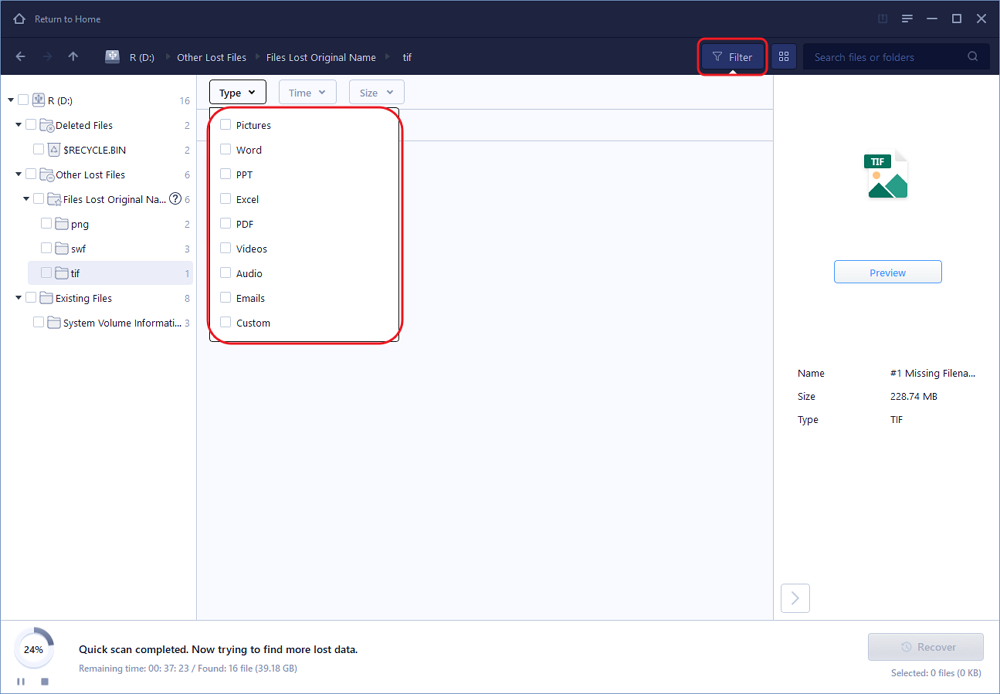
Step 2.В Scan all lost files from USB.
EaseUS Data Recovery Wizard will thoroughly scan your USB flash drive and find all your lost data on it. After the scanning process,В use the Filter feature to filter a specific file type. You can check and preview found USB files in this program.
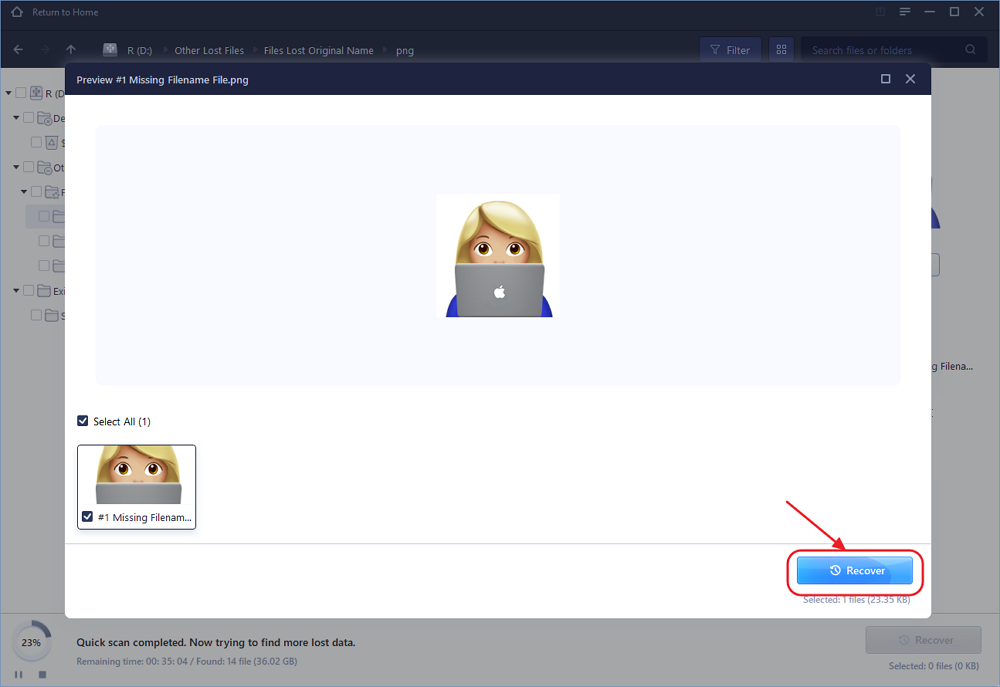
Step 3.В Restore all lost files from USB.
A double-click will allow you to preview the file results. Choose the target files and click «Recover» to save them to aВ secure location on your PC or other external storage devices.
How to Recover Deleted Files from USB Flash Drive Without Software
For some users who don’t like to recover USB files with third-party software, you can try the three methods in this part to retrieve files from USB with CMD, Windows Backup, and previous versions.
However, these solutions have limitations and requirements. If you haven’t backed up your USB in advance, you can only use data recovery software to retrieve USB files.В
Recover Files from USB Using CMD (Only Recover Hidden Files)
Command Prompt is a Windows application available in all Windows Operating Systems. If your files are not deleted but missing from your USB flash drive or a pen drive, then you can follow this method to recover hidden files on USB with CMD.В
Steps recover deleted files from a USB flash drive using CMD:
Step 1. Connect the USB flash drive to your computer.
Step 2.В Click the Search button, type cmd.В Right-click Command Prompt and choose Run as administrator.В
Step 3. Run the following command lines in order.В
Type chkdsk X: /f in the Command Prompt window and hit Enter. Just make sure to replace «X» with the letter assigned to your USB flash drive.
Type attrib -h -r -s /s /d e:*.*В and hit Enter.В (e is the USB drive letter. You should replace g depending on your own USB drive letter shown on the computer)

Then, wait for the process to complete and close the window. Then you can check if your files are back.
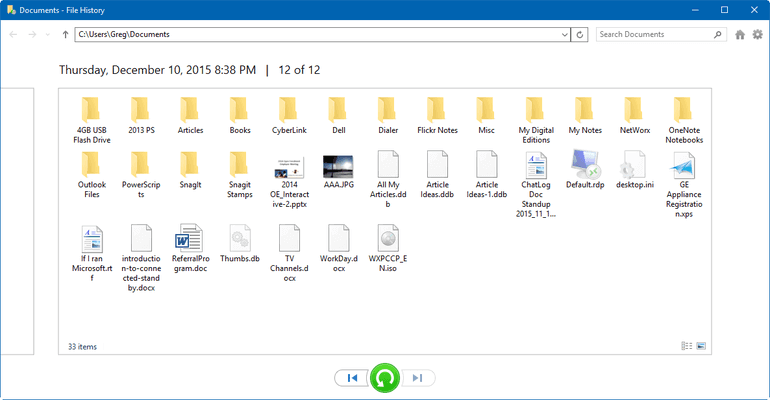
Restore Deleted Files from USB from Previous Versions
In addition to recovering permanently deleted files from USB using software or CMD, you can try another option to restore an older version of files in Windows 10/8.1/8/7. Before you try this method, make sure that you have set up File History to automatically back up files. If you haven’t turned on this feature, give up this method, and use USB drive recovery software to make it.В
Step 1. Right-click on the folder that contains your deleted files on USB and select «Properties».
Step 2. Click on the tab «Previous Versions». You’ll be told there that previous versions come from File History or from restore points.
Step 3. A list of older versions of the file will be displayed. Choose the file edition you’re looking for, and click the «Restore» button to retrieve USB files.
Restore Deleted Files from USB withВ Windows Backups
If you have backed up data before, you can check the backups. Also, check the online or cloud storage service you use. It is possible you’ve synced your files to a cloud storage service such as Microsoft OneDrive, Dropbox, or Google Drive.В If you have turned on the Windows backup, you can retrieve USB data with it:
Step 1. Open «Control Panel», go to «System and Maintenance», select «Backup and Restore (Windows 7)».В
Step 2. Click «Restore my files».
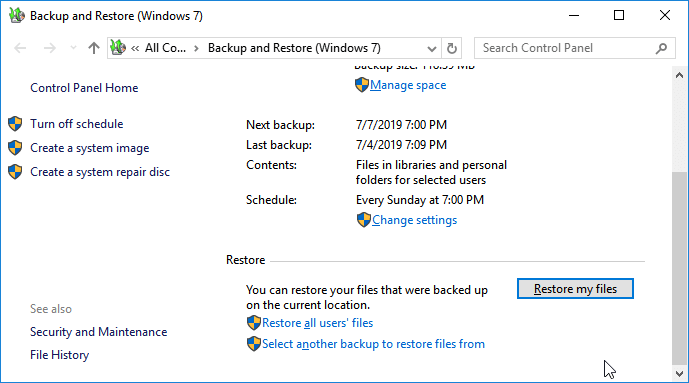
Step 3. Click «Browse for files» or «Browse for folders» to select the previously created backup.
Step 4. Choose a location to save the backup — «In the original location» or «In the following location». If there’s a conflict, choose «Copy and Replace», «Don’t copy» or «Copy, but keep both files» according to your needs.

Step 5. Wait for the restoring process to complete. Then all of your files or folder that were permanently removed will show up on your PC at the original or the new location.В
Conclusion В
Deleting files on USB doesn’t mean permanent data loss. In this article, we’ve explained four methods to recover deleted files on pen drive with or without software. В EaseUS data recovery software offers the greatest chance to recover files from USB. It supports deleted file recovery, formatted recovery, raw drive recovery, and more data recovery features.В
How toВ Avoid USB Flash Drive/Pen Drive Data Loss
It is also of vital importance to protect your USB data in effective ways. If you don’t want to suffer from USB data loss, you can follow these tips to help:
Regularly Back Up Files
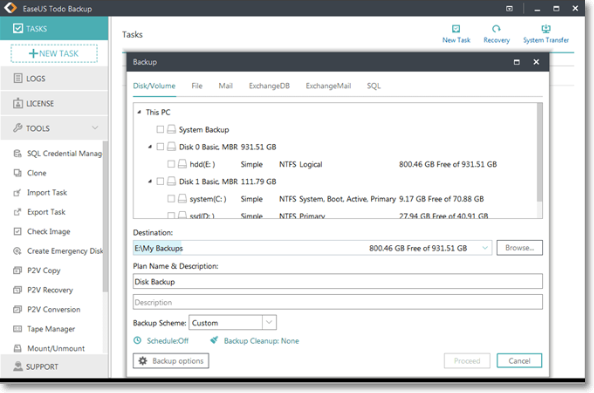
It’s a nice choice to back up files automatically with the help of file backup software. Here my suggestion is using EaseUS Todo Backup. With this software, even you don’t have the technical knowledge; you can still create an image. Follow the details below to back up data with the help of EaseUS backup and recovery software.
Step 1. Launch EaseUS Todo Backup software and then choose «File Backup», «Disk/partition Backup» or «System Backup» for different backup purpose.
Step 2. Choose the system, disk partition, files or apps that you want to back up. Then select a destination where you want to store the backup file.
Step 3. Click «Proceed» to start the data backup process.
Plug and UnplugВ the USB Flash DriveВ Correctly
When you plugin or disconnect a USB to your computer or laptop, use it properly. When you disconnect it, use the «eject USB» option by right-clicking it.
Scan and Remove Virus on USBВ
Use anti-virus software to protect your computer against malicious computer viruses, trojan, and other malicious-ware. Be sure to update your Anti-virus software with the latest patch and signature files for maximum security.


