- How the Regional and Language Options settings in Windows Server 2003 are applied
- Introduction
- Regional options settings
- Language settings
- Advanced settings
- Configure Regional and Language Options during Windows Setup
- Considerations for Windows Server 2003 Terminal Server
- Existing user profiles
- Change the Windows regional settings to modify the appearance of some data types
- Change the regional settings
- Change your personal language and region settings
- To change your personal language and region settings
- How to change Language, Time, Region, Locale settings in Windows 10
- Change Language, Time, Region in Windows 10
- Time and Language Settings in Windows 10
- 1. Date and Time
- 2. Region
- 3. Language
- 4. Speech
How the Regional and Language Options settings in Windows Server 2003 are applied
This article describes the user-specific and computer-wide settings in Regional and Language Options in Control Panel, the implications of configuring Regional and Language Options during Windows Setup, and the effects on Window Server 2003 Terminal Server.
Original product version: В Windows Server 2003
Original KB number: В 924852
Introduction
This article describes how the Regional and Language Options settings in Windows Server 2003 are applied. Some of the settings vary from user profile to user profile. Other settings are computer wide. This article also discusses the effects of configuring the Regional and Language Options settings during Windows Setup.
Regional options settings
The Regional and Language Options settings are located in Control Panel on a Windows Server 2003-based computer.
The Regional Options tab contains the following settings:
- Standards and formats
These are user-specific settings and are stored as part of the user profile. - Location
This is a user-specific setting and is stored as part of the user profile.
Language settings
The Languages tab contains the following settings:
Default input language
This is a user-specific setting and is stored as part of the user profile.
Installed services
This is a computer-wide setting.
To access these language settings, click Details in Text services and input languages.
Advanced settings
The Advanced tab contains the following settings:
- Language for non-Unicode programs
This is a computer-wide setting. - Default user account settings
Click to select the Apply all settings to the current user account and to the default user profile check box to apply changes to the default user profile.
Configure Regional and Language Options during Windows Setup
You’re prompted to configure Regional and Language Options during Windows Setup. Computer-wide settings affect all users who log on to the system. User-specific settings affect only the default user profile. New user profiles inherit the user-specific settings that you specified during Setup.
You can change the user-specific settings for the default user profile by selecting the Apply all settings to the current user account and to the default user profile check box on the Advanced tab.
Considerations for Windows Server 2003 Terminal Server
This section, method, or task contains steps that tell you how to modify the registry. However, serious problems might occur if you modify the registry incorrectly. Therefore, make sure that you follow these steps carefully. For added protection, back up the registry before you modify it. Then, you can restore the registry if a problem occurs. For more information about how to back up and restore the registry, click the following article number to view the article in the Microsoft Knowledge Base:
322756 How to back up and restore the registry in Windows
The first time that a user uses a Remote Desktop Connection to log on to a server that has Terminal Server enabled, a new profile is created. The new profile inherits the Regional and Language Options settings from the default user profile. The profile may be local to the terminal server or may reside on a network share. However, the Default input language setting is obtained from the client computer that initiated the Remote Desktop Connection.
To change the default behavior to obtain the Default input language setting from the default user profile, you must set a registry entry value on the terminal server. To do this, follow these steps:
On the terminal server, click Start > Run, type regedit, and then click OK.
Locate and then click the following registry subkey:
On the Edit menu, click Add Value, and then add the following registry information:
Value name: IgnoreRemoteKeyboardLayout
Data type: REG_DWORD
Value data: 1
When the IgnoreRemoteKeyboardLayout entry is set to 1, new user profiles inherit the Default input language setting from the default user profile that the user account uses.
This registry entry may not work if you’re not running Windows Server 2003 Service Pack 1.
Existing user profiles
If a user profile already exists, the Regional and Language Options settings in the existing user profile are applied to new users.
Change the Windows regional settings to modify the appearance of some data types
Your Microsoft Windows regional settings will influence how your date/time, numeric, and currency data types appear when you apply formatting options. Windows supports a variety of languages, plus currency and date/time formats for the countries/regions that use those languages.
For example, you might use forward slashes to enter a date value for a Date/Time field (for example, 8/29/2019), but when you apply the General Date display format, it may or may not display the forward slashes, depending on the regional settings for Windows.
This principle also applies to numeric and financial data. You can enter currency amounts that use the English pound symbol (£), but Access may display those values in euros, because that is the currency symbol selected for Windows.
The following procedure shows you how to change the Windows regional settings for your computer.
Change the regional settings
To change regional settings, follow the steps described for your computer’s operating system.
Click the Start button, and then click Control Panel.
Click Change date, time, or number formats.
The Region dialog box appears.
On the Formats tab, select the format you want to change from the drop-down list. Now click the Additional Settings button.
The Customize Format dialog box appears.
Click the tab that contains the settings that you want to modify, and make your changes. For example, to change part or all of a number format, click the Numbers tab and change the setting that you want.
Click the Start button, and then click Control Panel.
Click Clock, Language, and Region, and then click Regional and Language Options.
The Regional and Language Options dialog box appears.
On the Formats tab, under Current format, click Customize this format.
The Customize Regional Options dialog box appears.
Click the tab that contains the settings that you want to modify, and make your changes. For example, to change part or all of a number format, click the Numbers tab and change the setting that you want.
Change your personal language and region settings
You can view your Microsoft SharePoint display language, time zone, country/region, and related settings at any time from your personal profile page, accessible from your desktop or mobile devices. If your organization policies allow it, you can also change your language and region settings. Your settings apply only to your view of your organization’s SharePoint sites and do not affect how other people view these sites.
If you’re a SharePoint admin, see Change regional settings for a site to change regional settings on a site collection.
If you’re working in an environment of local SharePoint sites that your organization manages—and not an Microsoft 365 environment, your site collection admin must make the language available for you to use before you can use the language-dependent guidance in this article.
If you set your language in SharePoint and then change it in Microsoft 365, the Microsoft 365 setting will override the SharePoint setting. See Change your display language in Microsoft 365 for more information.
The features described in this article depend on whether your organization has set up or customized personal sites and user profiles. For more information, see your SharePoint admin.
To change your personal language and region settings
Select your name or picture at the top of any SharePoint or Microsoft 365 site in your organization.
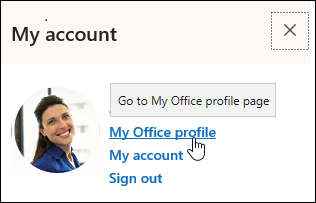
Select My Office profile and then Update profile.
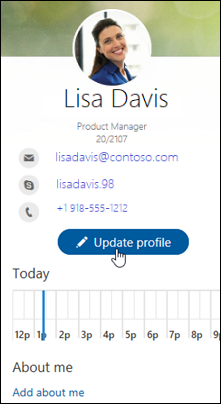
Select How can I change language and regional settings? and then select the here link.
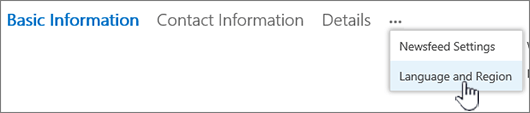
In the In the Edit Details screen, select the ellipsis (…) and then Language and Region.

Update your settings. You can use the table below for guidance.
Select Save all and close.
Click your name or picture at the top of any SharePoint or Microsoft 365 site in your organization.
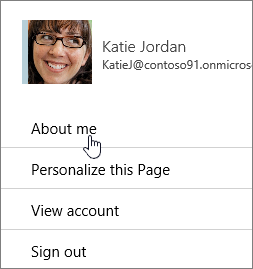
Click About me and then Update profile.
Click the link under How can I change language and regional settings?
On the Edit Details page, click the ellipsis (…), and then click Language and Region.
Update your settings. You can use the table that follows this procedure for guidance.
Click Save all and close.
The following settings can be set to apply to Everyone, or Only You. If they can’t be changed, your administrator may have restricted the settings.
To edit these language and region settings:
Change your preferences as follows:
To change your display language in a SharePoint environment, select the Pick a new language down arrow, select a language, and then Add. If you add multiple languages, you can re-order the languages or delete a language as described next for the Advanced Language settings.
To select a language for your content and searches, select Show Advanced Language Settings, select the Pick a new language down arrow, click a language, and then Add.
If you work in a Microsoft 365 site, you cannot change the display language, and this setting does not apply. Select Edit to continue updating settings on other profile pages, or proceed to other options on this page.
If you add multiple languages, you can use the up and down arrows  in My Content and Search box to indicate the order in which these languages should be used. For example, if you want French to be the primary language and English to be used only if French is not available, select the arrows to make sure French has top priority.
To delete a language, select the X option next to the language.
Note: For a consistent viewing experience, select corresponding settings for your language and region options. This way you can avoid conditions where you’re viewing English in an Arabic calendar, for example.
Select the Time Zone box, and choose your current time zone from the list. If you cannot edit this setting, try selecting Always use regional settings defined by your administrator, in the next line under Choose your settings. Doing so should make the Time Zone box available, unless your administrator has customized settings to block editing.
Choose your settings
Select Always use regional settings defined by your administrator to use the language and region settings defined by your site administrator.
Select Always use my personal settings to use your personal settings.
Note: This option must be selected in order to edit region and time settings.
Click the Locale box, and then select a language.
Set Your Calendar
Select a calendar type from the drop-down list. Select Show week numbers in the Date Navigator if you want these numbers to appear.
Enable An Alternate Calendar
Select an alternate calendar type if you wish.
Define Your Work Week
Select the days of the week that define your work week. For example, if you work Tuesday through Saturday, check those boxes.
Select the Time Format box, and select 12 hour or 24 hour.
How to change Language, Time, Region, Locale settings in Windows 10
Time and Language Settings in Windows 10 consist of all the settings that allow you to set your date and time, time zone, country or region, preferred languages, and speech-language settings. You will also find other such Related settings to time and language such as speech privacy settings, additional date, time and regional settings, etc.
We have already taken a look at the Windows 10 Personalization Settings, Privacy Settings Network and Internet and the Update and Security settings. In this post, we will show you how to set or change the date and time, language and speech, Locale settings, manually on your Windows 10 PC.
Change Language, Time, Region in Windows 10
In this post, we will cover all these above-mentioned settings that are related to time and language. You can also change data formats and add additional clocks for different time zones in this section of the Windows 10 Settings.
Time and Language Settings in Windows 10
To open the Time and Language Settings on your Windows 10 PC, click on the Start menu > Windows Settings > Time & Language. The Time and Language Settings window will open and you will see four main categories –
- Date and Time,
- Region,
- Language, and
- Speech.
Let us now learn more about these settings.
1. Date and Time
In this section, you will find the option to synchronize the clock and set the time zone. If you wish to show additional clocks in the Taskbar, you select Simplified Chinese (Lunar) or Traditional Chinese (Lunar); or you can choose to not show any additional calendars on the Taskbar. Under Related Settings, you will find the settings to date, time and regional formatting and to add clocks for different time zones.
You can turn on Adjust for Daylight Saving Time automatically. In most of Europe, local time is moved forward by 1 hour in Spring and moved backward by 1 hour in Autumn. This happens around March or April and ends in October or November. This practice is called Daylight Saving Time.
Turn off Set Time Automatically and you will be able to change the time and date manually, via the following setting box which opens, as soon as you set it to ‘Off’. However, setting it to set time automatically is always recommended.
Windows 10 lets you change the Date and Time Formats too. Scroll down and click on ‘Change Date and Time Formats’ and this is where you can select, which day your week will start, whether it will be Sunday, Monday or any other day in the week. It also lets you select the long or short date and time format.
2. Region
The Region tab lets you choose the country or region your currently live in. This helps the Windows and apps to give you all the local content. Next is to choose the Regional Format. Click on Change data formats to make changes to calendar, first day of week, short date, long date, short time, and long time supported by the region. Under Related settings, you will find the link to the Additional date, time, and regional settings.
3. Language
Choose the Windows display language in which you want the Windows features to appear. You can also add a preferred language by clicking on the option and installing the language you prefer. Click on choose an input method to always use as a default to access the advanced keyboard settings. Under Related settings, you will find the Date, time, and regional formatting, Administrative language settings, and Spelling, typing, and keyboard settings.
4. Speech
You can adjust the Speech settings of your PC. Choose the language your PC speaks, select the tempo (speed) of the speech and also select the default voice for your PC. Windows 10 offers Microsoft Mark Mobile (a male voice) and Microsoft Zira Mobile (a female voice).
In the Speech section, you can choose the language you speak with your device. You can click on the check box if you wish to recognize the non-native accents for the selected speech language. Next is to click on Get started in order to set up your microphone for speech recognition.
The Microphone tab lets you check the Mic for speech recognition.
Just click on Get Started and follow the instructions to set up your Microphone.
You can choose voice between Microsoft Ravi and Microsoft Heera in English (India) and set the voice speed as well. You can also add a voice package where you can install voices in the different selected languages. Under Related settings, you will find the link to the Speech privacy settings.
This covers all the Time and Language Settings in Windows 10.


