- Редактирование реестра Windows офлайн
- Offline NT Password and Registry Editor — сброс пароля Windows
- How to Open Registry Editor
- Detailed instructions on opening Registry Editor in Windows
- How to Open Registry Editor
- More Help With Registry Editor
- How to edit & modify the Windows Registry OFFLINE
- How to modify Windows Registry OFFLINE
- Method 1: Modify Registry OFFLINE using Windows Installation DVD.
- Method 2: Modify Registry OFFLINE using Hiren’s BOOTCD.
- Step 1. Download Hiren’s BootCD
- Step 2: Burn Hirens BootCD into an optical disk.
- Note: If you don’t have a CD/DVD drive on your computer (e.g. if you own a netbook) then follow this guide: How to put Hirens BootCD into a USB stick.
- Step 3: Boot with Hirens.BootCD.
- Step 4. Modify Remote Registry.
Редактирование реестра Windows офлайн
Представьте ситуацию, когда возникли проблемы с загрузкой Windows (например, вирусная или троянская атака, ошибка в автоматически запускающийся службах или программах) и для нормальной загрузки системы необходимо осуществить редактирование некого параметра реестра Windows. Положение может усугубить тот факт, что в безопасном режиме исправить проблему также не удается. В такой ситуации нам могут помочь специальные средства загрузки и редактирование параметров Windows, такие как загрузочные диски BartPE, ERD Commander и т.д. А что же делать, если под рукой нет такого универсального загрузчика, а имеется лишь установочный диск с Windows или диск для восстановления пароля со средой WinPE? К счастью, даже эти средства при правильном использовании позволяют отредактировать реестр системы, находящейся в оффлайн состоянии.
Поясним, каким образом можно изменить некий параметр в той или иной ветке реестра. Все кусты реестра в Windows существуют в виде отдельных файлов и их можно открыть и править обычным редактором реестра regedit, запущенным с работающей машины. Для этого нужно понимать в каком файле храниться та или иная ветка реестра:
| Ветка реестра | Файл, в котором храниться параметры данной ветки реестра |
| HKEY_LOCAL_MACHINE\SAM | windows\system32\config\sam |
| HKEY_LOCAL_MACHINE\Security | windows\system32\config\security |
| HKEY_LOCAL_MACHINE\Software | windows\system32\config\software |
| HKEY_LOCAL_MACHINE\System | windows\system32\config\system |
| HKEY_CURRENT_CONFIG | windows\system32\config\system |
| HKEY_CURRENT_USER | \ntuser.dat |
| HKEY_USERS\.DEFAULT | windows\system32\config\default |
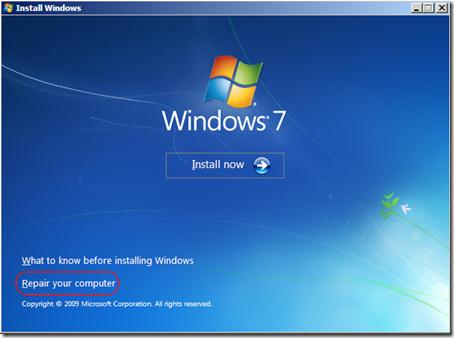
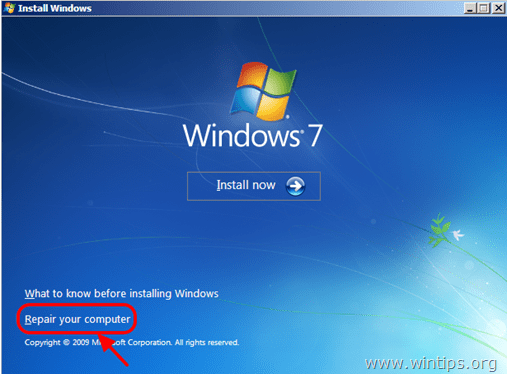
Далее рассмотрим offline редактирование реестра на примере Windows 7. Итак, нам нужен установочный диск с Windows 7 или загрузочный диск Windows PE (Windows Preinstallation Environment) / Windows RE (Windows Recovery Environment).
- Загружаемся с этого диска и в окне выбираем “Repair your computer” (Восстановить компьютер).

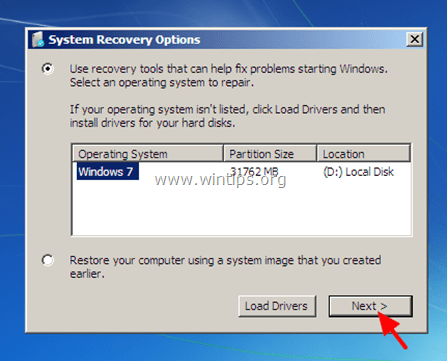
- В следующем окне нажимаем Next
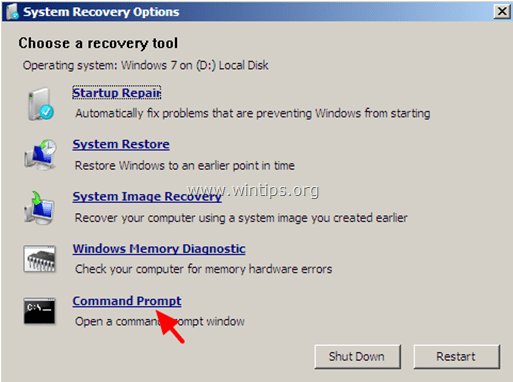
- И затем запускаем командную строку: “Command Prompt ”
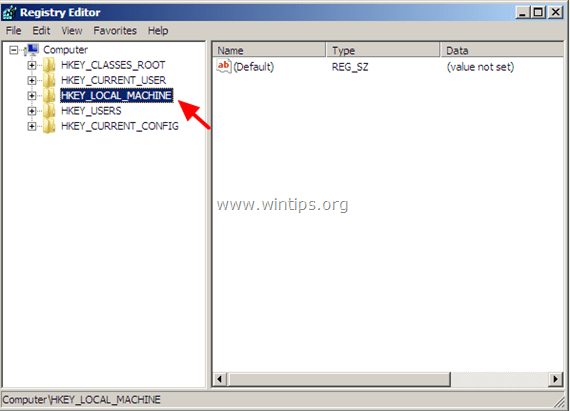
- В командной строке набираем regedit, в результате чего откроется редактор реестра. На данный момент он отображает состояние реестра загрузочной среды (той самой урезанной версии Windows под названием WinPE).
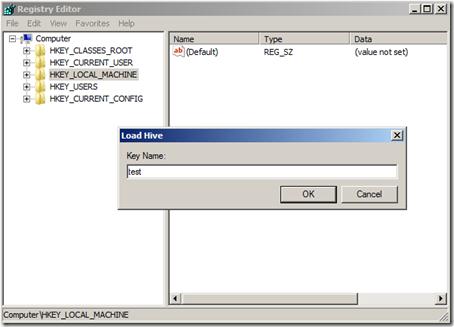
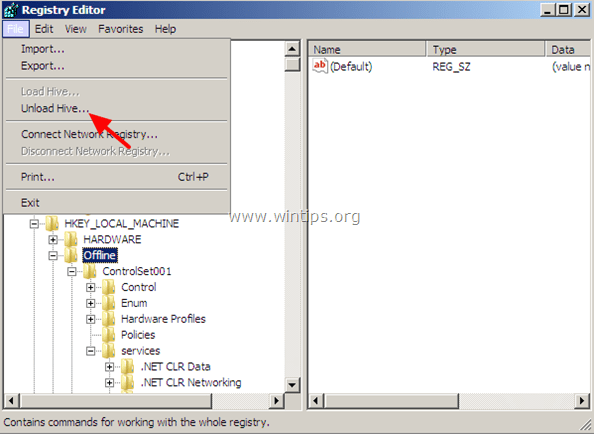
- Встаем на ветку реестра HKEY_LOCAL_MACHINE и выбираем “Load Hive” (загрузить куст).
- Находим диск на котором располагается система (в моем случае это оказался диск D:\) и по приведенной выше таблице выбираем ветку реестра, которую мы хотим подгрузить.
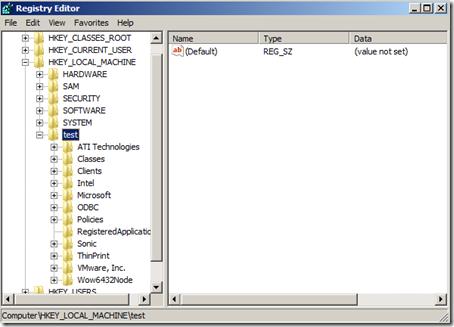
- Указываем имя, под которым загружаемая ветка реестра будет смонтирована в разделе HKEY_LOCAL_MACHINE, например test
- Затем нужно найти и отредактировать параметр, который не дает Windows загрузиться или исправить другую проблему
- По окончании офлайн работы с веткой реестра, необходимо в меню выбрать File->Unload hive, и результаты редактирования сохранятся в реестре выключенного ПК.
Offline NT Password and Registry Editor — сброс пароля Windows
Для сброса пароля учетной записи пользователя в операционной системе Windows можно воспользоваться утилитой Offline NT Password and Registry Editor .
На данный момент программа протестирована на следующих версиях:
NT 3.51, NT 4, Windows 2000, Windows XP, Windows 2003 Server, Vista, Windows 7 и Server 2008 .
Она должна работать со всеми пакетами обновлений (SP) и выпусками (Server, Professional, Home), а так же с 64-битными версиями.
Для того чтобы создать загрузочную USB-flash необходимо:
1. Распаковать файлы из архива на флэшку
— файлы на флэшке должны лежать в корне, а не в каталоге
— для установки нет необходимости форматировать носитель или удалять файлы
2. Установить загрузчик (необходимы права администратора)
— запустить с командной строки файл «syslinyx.exe», например:
J: \ syslinux.exe -ма J:
J — это буква, присвоенная вашему съемному носителю (замените ее на вашу)
параметр -ma можно убрать, если установщик выдает ошибку
Обратите внимание на то, что вам придется поменять настройки BIOS для загрузи с usb.
Официальная страница разработчика http://pogostick.net/
Архив утилиты Offline NT Password and Registry Editor http://pogostick.net/
Процесс сброса пароля происходит следующим образом.
После загрузки вы должны увидеть это:
Здесь достаточно просто нажать клавишу «Enter».
Затем будет показано сообщение об установленном на вашем компьютере оборудовании.
Далее происходит загрузка драйверов дисков.
Эти сообщения драйверов о марке, модели и размерах найденных дисков.
Все драйвера загружены.
Начинается процесс поиска учетных записей и сброса пароля. Здесь нет ничего страшного и обычно достаточно соглашаться с предложенными программой вариантами.
Шаг 1: Выбор диска, на котором установлена Windows
Здесь найден один диск с одним разделом
На выбран устройстве смонтирована файловая система NTFS.
Шаг 2: Указываем директорию реестра
Показана директория по умолчанию и здесь достаточно просто согласиться и получаем список интересующих файлов.
Выбираем 1 для сброса пароля.
Шаг 3: Внесение изменений в учетные записи
Происходит копирование параметров SAM (диспетчер учетных записей безопасности) во временную папку.
Выбираем интересующий нас пункт под цифрой 1 и получаем список всех локальных учетных записей, зарегистрированных в нашем Windows.
В крайней правой колонке Lock?отображается статус пароля. Отсутствует / заблокирован (dis/lock) или пустой (*BLANK*). Колонка Admin? показывает нам принадлежит ли учетная запись к группе администраторов. Мы выбираем учетную запись admin, что позволит нам завладеть учетной записью администратора компьютера. Для этого нам необходимо ввести RID или имя учетной записи.
Пользователь состоит в группе 220 — группа администраторов.
Показана информация о статусе учетной записи.
Если бы учетная запись была заблокирована, то для разблокирования нужно выбрать 4. Но так как с пользователем все в порядке, то мы выбираем 1 и просто удаляем пароль.
Затем возвращаемся в главное меню при помощи выбора символа «!»
Выбираем «q» для выхода.
Шаг 4. Записываем изменения. Отвечаем «y» для записи внесенных изменений
Выбираем «n» и завершаем работу с программой.
How to Open Registry Editor
Detailed instructions on opening Registry Editor in Windows
:max_bytes(150000):strip_icc()/tim-fisher-5820c8345f9b581c0b5a63cf.jpg)
:max_bytes(150000):strip_icc()/ryanperiansquare-de5f69cde760457facb17deac949263e-180a645bf10845498a859fbbcda36d46.jpg)
All manual changes to the Windows Registry occur in Registry Editor, a tool included in all versions of Windows.
Registry Editor lets you view, create, and modify the registry keys and registry values that make up the entire Windows Registry.
There’s not an obvious shortcut for the tool in most versions of Windows, so the best way to open it is by executing it from a command line.
Open Registry Editor this way in any version of Windows that uses the registry, including Windows 10, Windows 8, Windows 7, Windows Vista, and Windows XP.
How to Open Registry Editor
Access Registry Editor by following this procedure:
In Windows 10 or Windows 8.1, right-click or tap-and-hold the Start button and then choose Run. Prior to Windows 8.1, the Run dialog box is most easily available from the Apps screen.
:max_bytes(150000):strip_icc()/001_2625150-5ba5886c4cedfd0025fa8c62.jpg)
In Windows 7 or Windows Vista, select Start.
In Windows XP, select Start and then Run.
One quick way you can open the Run dialog box in any of these Windows versions is to use the keyboard shortcut Win+R.
In the search box or Run window, type the following, followed by Enter:
:max_bytes(150000):strip_icc()/002_2625150-5ba588af4cedfd0050f42aa2.jpg)
Depending on your version of Windows, and how it’s configured, you may see a User Account Control dialog box where you’ll need to confirm that you want to open Registry Editor.
Registry Editor will open.
:max_bytes(150000):strip_icc()/003_2625150-5ba588d146e0fb00251add3a.jpg)
If you’ve used Registry Editor before, it’ll open up to the same location you were working in last time. If that happens, and you don’t want to work with the keys or values at that location, just continue to minimize the registry keys until you’ve reached the top level, listing the various registry hives.
You can minimize or expand registry keys by selecting the small > icon next to the key. In Windows XP, the + icon is used instead.
You can now make whatever changes you need to make to the registry, which probably shouldn’t be done unless you’re versed in how to safely add, change, or delete registry keys and values. Make sure, whatever you do, that you only affect the narrow registry areas that you intend to.
Considering the significance of the registry on your Windows-based computer, we strongly recommend that you back up the registry, either the whole thing or even just the areas you’re working in, before you do anything.
More Help With Registry Editor
It’s important to know how to restore the Window’s Registry before using Registry Editor. This lets you add a REG file backup into the registry should something go wrong during editing.
Even though Registry Editor is open and ready to be used, it’s not always wise to make changes yourself, manually, especially if a program or automated service can do it for you. For example, if you’re using Registry Editor to clear up residual or junk registry entries, you shouldn’t do it yourself unless you’re very sure that you know what you’re doing. Instead, use a free registry cleaner if you want to clear out common registry junk automatically.
The same regedit command can be executed from Command Prompt. After opening Command Prompt, just type out the command and press Enter.
Although the circumstance would have to be rare, yet another way to launch this tool is from Task Manager. To do that, open Task Manager though Ctrl+Shift+Esc, go to File > Run new task, and type regedit, followed by OK.
:max_bytes(150000):strip_icc()/regedit-task-manager-e00fe15fdee54cbd8cae87f27cc857e6.png)
You might open it that way if you can’t access the standard Run dialog box as described in Step 1 above, or if Explorer or Command Prompt won’t open for some reason.
If you find yourself opening this tool often, you can make a Registry Editor shortcut on your desktop. Right-click the desktop, go to New > Shortcut, type regedit, and press Next and then Finish. In some versions of Windows, you can drag the shortcut onto your taskbar for even quicker access.
Opening a remote Windows Registry is a bit different of a process than the one described above for a local registry. After opening a regular Registry Editor window, there’s an additional step to find the remote registry.
How to edit & modify the Windows Registry OFFLINE
Last updated on March 11th, 2015
If your system is no longer bootable due to a virus attack or for some other reason (e.g. after you change SATA controller mode in BIOS or Motherboard) then you have to use an offline registry editor to make the appropriate modifications in Windows registry in order to boot Windows normally. This article contains detailed instructions on how to load and edit Windows registry without booting to Windows (Unbootable Windows system).
How to modify Windows Registry OFFLINE
To modify Registry offline you need an OFFLINE registry Editor. For this task, I prefer to use two offline registry editors. One of them can be found in the Windows Recovery Environment on any Windows 7 or Windows Vista installation DVD and the other can be found on the Hiren’s boot CD. So let’s start.
Method 1: Modify Registry OFFLINE using Windows Installation DVD.
1. Place the Windows Installation DVD on your CD/DVD drive and boot your computer from the Windows installation DVD.
Notice: In order to boot from the DVD, you must set the CD/DVD device as the first boot device in BIOS settings. To do that:
- Power On your computer and press «DEL» or «F1» or «F2» or «F10» to enter BIOS (CMOS) setup utility.
(The way to enter into BIOS Settings depends on the computer manufacturer). - Inside BIOS menu, find the «Boot Order» setting.
(This setting is commonly found inside «Advanced BIOS Features» menu). - At “Boot Order” setting, set the CD/DVDRW device as the first boot device.
- Save and exit from BIOS settings.
2. At the first screen press Next.
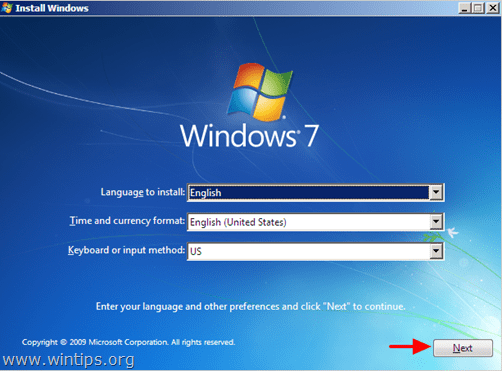
3. At the next screen, select «Repair your computer«.
4. At System Recovery Options (1st screen) click Next.
5. At Choose a recovery tool screen, choose Command Prompt.
6. At command window, type «regedit» (without quotes) & press Enter.

In Registry Editor:
7. Highlight the HKEY_LOCAL_MACHINE key.
8. From File menu, select Load Hive to load the offline registry file you need.
HKEY_LOCAL_MACHINE \SAM > %windir%\system32\config\SAM
HKEY_LOCAL_MACHINE \SYSTEM > %windir%/system32/config/system
[HKEY_LOCAL_MACHINE \SOFTWARE > %windir%/system32/config/software
HKEY_USERS \.Default] > %windir%/system32/config/default
HKEY_CURRENT_USER > %userprofile%/ntuser.dat
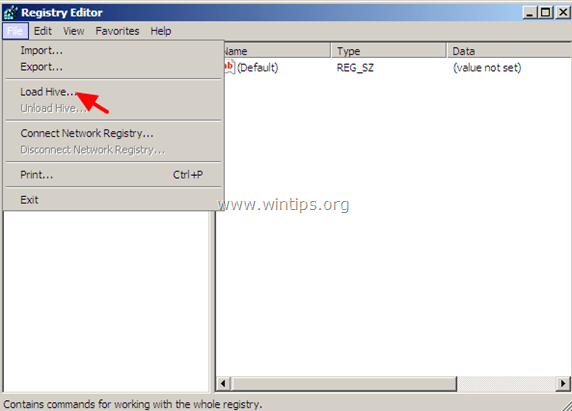
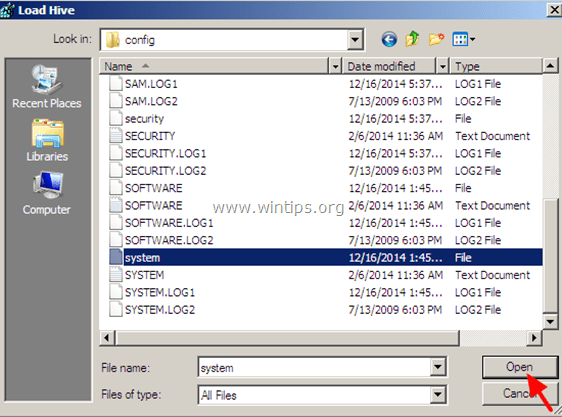
e.g. If you want to modify the SYSTEM registry database then navigate to the disk where Windows installed on (commonly on disk «C:») and open the system file found in «%Windir%\system32\config» directory. (e.g. «C:Windows\system32\config\system»)
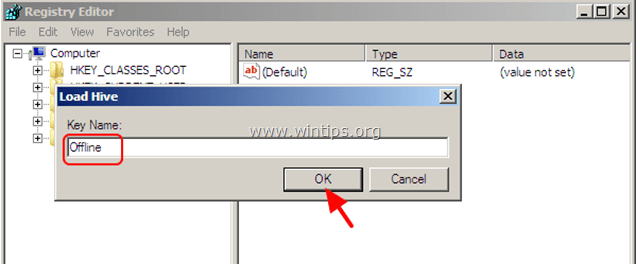
9. Then type a Key Name for the offline registry database (e.g. «Offline«) and press OK.
10. Now under the HKEY_LOCAL_MACHINE key, you should have a new key, named after the name you typed previously (e.g. ‘Offline» in this example).
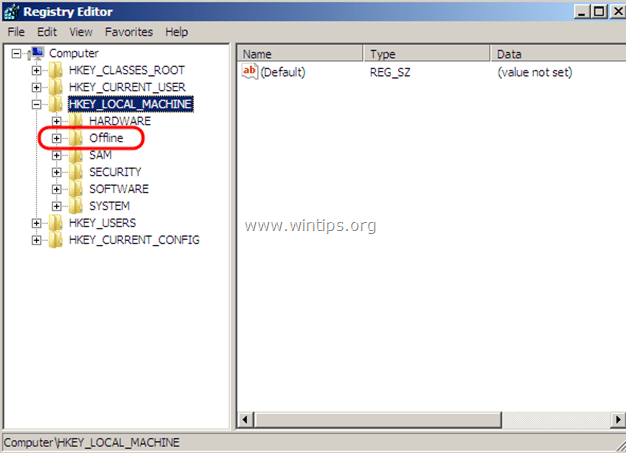
11. Now perform all the modifications you want under this key. When you finish with the modifications, highlight the key you created previously (e.g. the «Offline«key ) and from the File menu, choose Unload Hive to write back the changes you made to the offline Registry.
12. Close the Registry editor, the Command prompt window and Restart the computer.
13. Remove the Windows Installation DVD from the CD/DVD drive and let Windows start normally.
Method 2: Modify Registry OFFLINE using Hiren’s BOOTCD.
Step 1. Download Hiren’s BootCD
1. Download Hiren’s BootCD to your computer.*
Scroll the page down and click on “Hirens.BootCD.15.2.zip” )

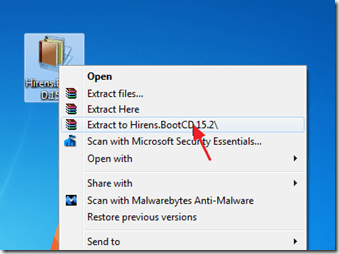
2. When the Download is complete, right-click on “Hirens.BootCD.15.2.zip” file to extract it.
Step 2: Burn Hirens BootCD into an optical disk.
Note: If you don’t have a CD/DVD drive on your computer (e.g. if you own a netbook) then follow this guide: How to put Hirens BootCD into a USB stick.
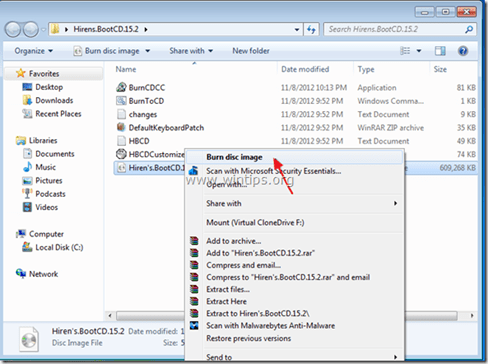
1. In “Hirens.BootCD.15.2” folder, find the “Hiren’s.BootCD.15.2.ISO” disc Image file and burn it to a CD.
Step 3: Boot with Hirens.BootCD.
1. First, make sure that your DVD/CDROM Drive is selected as first boot device in BIOS (CMOS) Setup. To do that:
- Power On your computer and press «DEL» or «F1» or «F2» or «F10» to enter BIOS (CMOS) setup utility.
(The way to enter into BIOS Settings depends on the computer manufacturer). - Inside BIOS menu, find the «Boot Order» setting.
(This setting is commonly found inside «Advanced BIOS Features» menu). - At “Boot Order” setting, set the CD-ROM drive as first boot device.
- Save and exit from BIOS settings.
2. Put the Hirens Boot CD on the infected computer’s CD/DVD drive in order to boot from it.
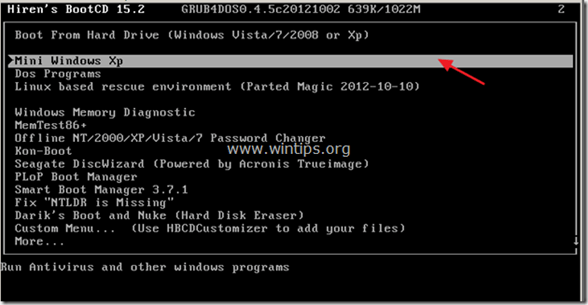
3. When the «Hiren’s BootCD” menu appears on your screen, use your keyboard arrows keys to highlight the “Mini Windows Xp” option and then press «ENTER«
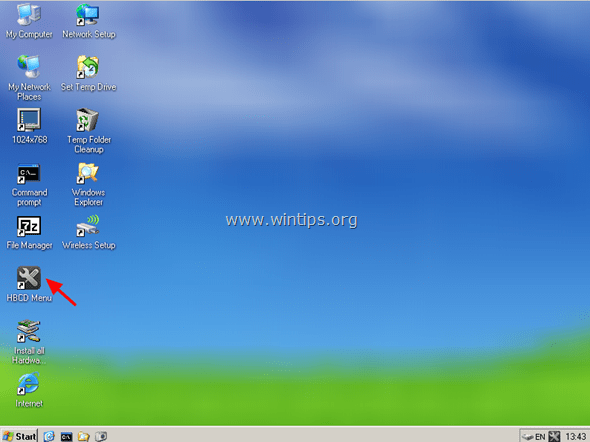
Step 4. Modify Remote Registry.
1. From “Mini Windows XP” desktop, double-click at HBCD menu icon.
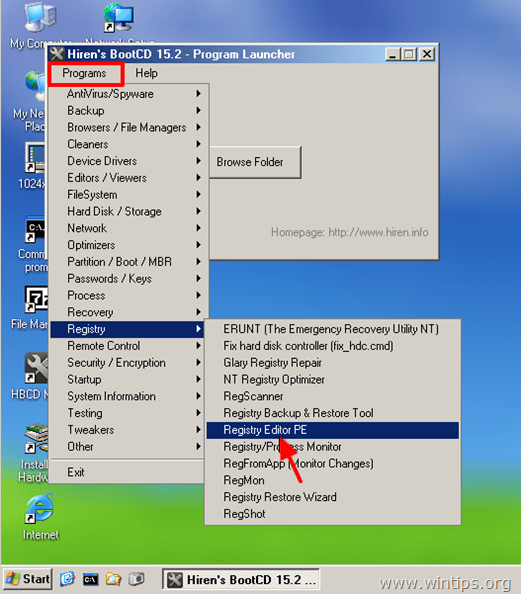
2. From Programs menu, select Registry > Registry Editor PE.
3. At Browse for folder screen, select the Windows directory where Windows are installed in (usually «C:\Windows») and choose OK.

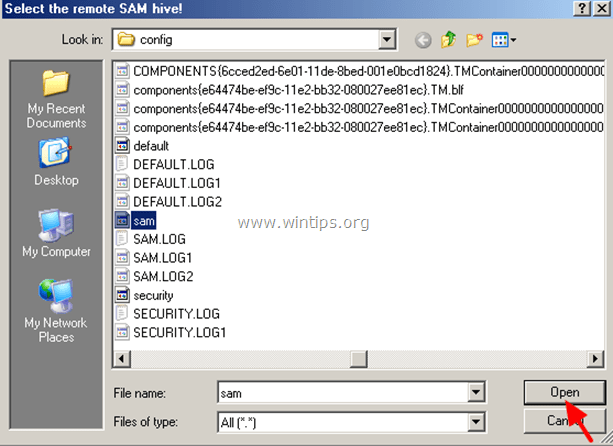
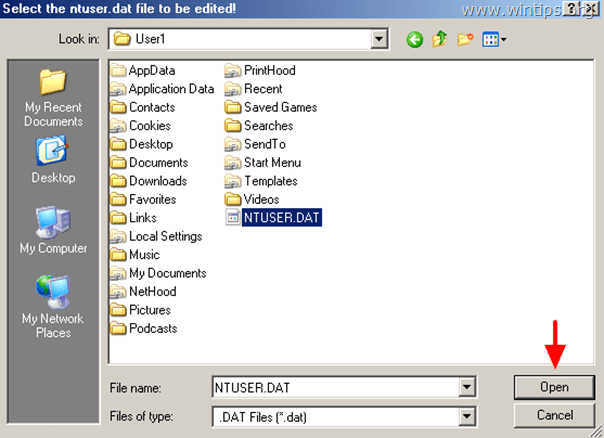
4. Select the related registry hive in each window appears on the screen and then press Open. (You have to do that for all registry hives: SAM, SYSTEM, SOFTWARE & SECURITY).
e.g. to select the SAM hive select the «sam» file under «%windir%\system32\config\»directory and press Open. (e.g. C:\Windows\System32\config\sam)
5. If you want to edit a remote user profile (HKEY_CURRENT_USER) then you have to choose Yes at the following screen (otherwise select No).
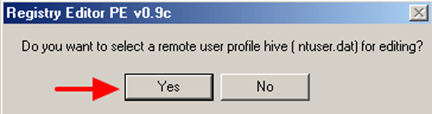
6. Then select the NTUSER.DAT file found under the user profile directory (%userprofile%/ntuser.dat ) of the user that you want to edit. (Usually the full path is: C:\Users\%Username%\ntuser.dat in Windows 7 or C:\Documents and Settings\Username\ntuser.dat in Windows XP.)
7. If you want to select another remote profile to edit press Yes otherwise press No to continue.
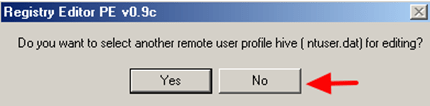
8. At the Registry Editor PE’s information window, press OK.
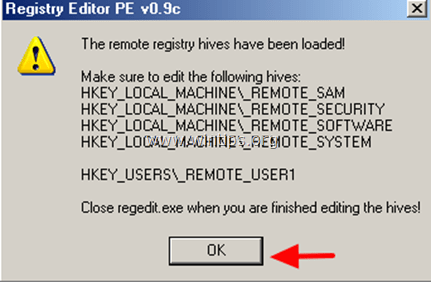
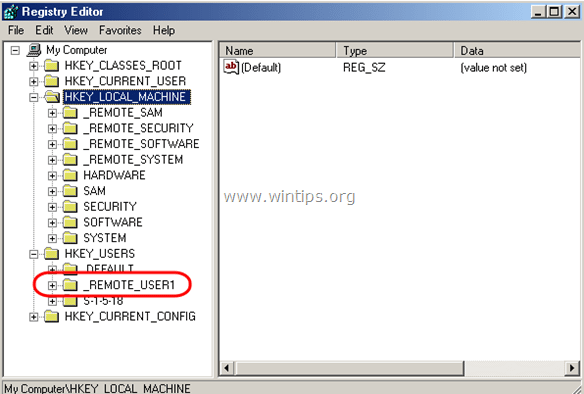
9. Double click to expand the HKEY_LOCAL_MACHINE key and you should see four (4) folders marked with the _REMOTE_ prefix on their name. These _REMOTE_ keys contains the remote registry settings so expand them and make all the modifications you want.

10. In the same way you can edit the remote user profile settings, found under HKEY_USERS key, with the prefix _REMOTE_.
11. Finally when you finish with the modifications, close the registry editor and the modifications will be uploaded automatically to the remote registry.


