- Изменение параметров cистемного реестра Windows
- Содержание статьи:
- Определение и запуск системного реестра Windows
- Запуск редактора реестра при помощи команды Выполнить
- Запуск редактора реестра из проводника
- Структура реестра Windows
- Разделы реестра
- Типы данных реестра
- Резервное копирование реестра
- Создание бэкапа реестра
- Восстановление реестра из бэкапа
- Удаление записей из системного реестра Windows
- Добавление и изменение параметров ключей в реестре Windows
- How to Open Registry Editor
- Detailed instructions on opening Registry Editor in Windows
- How to Open Registry Editor
- More Help With Registry Editor
- Windows registry information for advanced users
- Description of the registry
- Back up the registry
- Edit the registry
- Use the Windows user interface
- Use Registry Editor
- Use Group Policy
- Use a Registration Entries (.reg) file
- Use Windows Script Host
- Use Windows Management Instrumentation
- Use Console Registry Tool for Windows
- Restore the registry
- Method 1: Restore the registry keys
- Method 2: Restore the whole registry
- References
Изменение параметров cистемного реестра Windows
При настройке системы Windows могут возникать такие ситуации, когда тот или иной параметр невозможно изменить через пользовательский интерфейс. 
Зачастую, выход кроется в редактировании системного реестра Windows , с помощью которого можно воздействовать на огромное количество настроек операционной системы.
Ниже мы рассмотрим, что такое реестр и как вносить в него изменения. Для удобства разобьём статью на небольшие разделы
Содержание статьи:
Определение и запуск системного реестра Windows
Определений термина реестр Windows можно дать множество, приведём относительно простое и доступное для понимания:
То есть, огромное количество пользовательских и системных настроек ОС отражаются в этой виртуальной среде.
Рассмотрим два основных способа запуска стандартной утилиты редактора реестра:
Запуск редактора реестра при помощи команды Выполнить
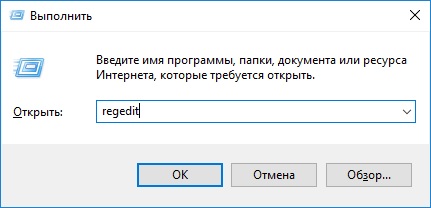
- Запускаем утилиту Выполнить, перейдя в Пуск — Все программы — Стандартные (в Windows 10 утилита Выполнить находится в каталоге Служебные), либо зажав на клавиатуре клавиши Пуск (на некоторых клавиатурах она отмечается как Win) и R
- В открывшемся окне вбиваем команду
и жмём на клавишу Enter
Запуск редактора реестра из проводника
- Переходим в каталог C:\Windows
- Запускаем исполнительный файл regedit.exe
Перед нами откроется окно редактора реестра.
Структура реестра Windows
Отображение информации в реестре имеет определённую структуру.
В правой части окна мы видим разделы и ветки реестра , каждая из которых ещё называется куст реестра , в левой же расположены ключи реестра и их параметры .
Разделы реестра

В каждом разделе реестра отображается заданная ему информация. В современных версиях ОС от компании Microsoft заложены пять разделов:
- HKEY_CLASSES_ROOT (HKCR) — содержит параметры определения типов файлов и объектов
- HKEY_CURRENT_USER (HKCU) — настройки текущего пользователя (учётной записи)
- HKEY_LOCAL_MACHINE (HKLM) — общие настройки компьютера, относящиеся ко всем пользователям
- HKEY_USERS (HKU) — отображает информацию о пользователях
- HKEY_CURRENT_CONFIG (HKCC) — отображает параметры оборудования и подключенных устройств компьютера
В ранних версиях ОС Windows присутствовал ещё один раздел:
-
- HKEY_DYN_DATA (HKDD) — содержащий динамически изменяемые данные о загрузке процессора, использовании оперативной памяти и прочих текущих параметрах
Типы данных реестра
Ключи реестра в Windows могут быть различных типов, не станем углубляться в особенности каждого из них, рядовому пользователю это знать не обязательно, просто приведём их ниже:
— Строковый параметр
— Двоичный параметр
— Параметр DWORD (32 бита)
— Параметр QWORD (64 бита)
— Мультистроковый параметр
— Расширяемый строковый параметр
Изменить тип данных созданного ключа стандартными средствами нельзя, если ошиблись при создании, надо удалить некорректную запись и внести новый ключ.
Резервное копирование реестра
! Перед редактированием реестра всегда желательно создавать резервную копию изменяемой ветки или раздела
Создание бэкапа реестра

Для создания бэкапа раздела реестра мы воспользуемся функцией экспорта в стандартной утилите regedit.
- Запускаем редактор реестра командой regedit из окна Выполнить или запуском одноимённого исполнительного файла из проводника (способы описаны выше)
- Правой кнопкой мыши жмём на нужный раздел и выбираем пункт Экспортировать
- В появившемся окне выбираем каталог для сохранения файла бэкапа, вносим имя файла и нажимаем кнопку Сохранить .
Восстановление реестра из бэкапа
Если по каким-то причинам возникнет необходимость восстановления данных реестра из резервной копии, то нам нужно будет только запустить файл бэкапа с расширением *.reg и согласиться на внесение изменений в реестр .
Удаление записей из системного реестра Windows
В первую очередь отметим, что некоторые ключи имеют дефолтные значения . Это значит, что даже если конкретный ключ отсутствует в своей ветке, система будет вести себя, будто ему присвоен параметр по умолчанию.
Отсюда можно сделать вывод, что процесс редактирования реестра делится на несколько типов:
- изменение параметров существующих ключей;
- добавление ключей в реестр с присвоением им нужного значения;
- удаление из реестра лишних ключей или даже кустов.
Сразу пройдёмся по последнему пункту, касаемо удаления записей из реестра.
Чаще всего это бывает нужно после удаления софта для чистки хвостов. Дело в том, что некоторые программы, работающие в Windows среде, при установке и в процессе работы активно взаимодействуют с реестром системы, добавляя туда записи с технической информацией. Но при деинсталляции затираются в реестре далеко не все строки. Частично эту проблему решают программы uninstaller-ы от сторонних разработчиков, но встречаются и случаи, требующие ручного вмешательства.
 После всего вышесказанного у кого-то может возникнуть резонный вопрос: зачем вообще чистить реестр от ненужных записей?
Ответ прост: во-первых, иногда оставшиеся записи в реестре после удаления программы мешают повторной установке того же софта; во-вторых, записи реестра хранятся в файлах большого объёма, увеличение которого негативно сказывается на фрагментации жесткого диска и отзывчивости системы.
Ещё одной причиной для чистки реестра может послужить обнаружение в нём записей о вредоносных программах. Такими зловредами могут быть и баннерные вирусы, и трояны, и рекламные ссылки, терроризирующие пользователя постоянным запуском заданных web-страниц в браузере. О способах избавления от последних, кстати говоря, мы писали в соответствующей статье: Стартовая страница браузера. Решение проблем
Добавление и изменение параметров ключей в реестре Windows
Мы уже рассматривали пример настроек параметров Windows через добавление записей реестра в статьях Открытие проводника Windows 10 на закладке Этот компьютер и Автозагрузка. Добавление приложений в автозагрузку Windows.
Давайте посмотрим, каким образом можно изменить параметр существующего ключа. Для примера произведём отключение контроля UAC через реестр ( User Account Control — контроль учётных записей).

Запускаем редактор реестра Windows.
Далее, в левой части окна переходим к ветке
Теперь в правой части окна находим ключ EnableLUA и кликаем по нему двойным щелчком мышки.
В поле Значение меня 1 на 0 и нажимаем кнопку OK

Теперь при запуске программ, требующих дополнительные разрешения, окно контроля учётных записей UAC появляться не будет.
На этом закончим знакомство с системным реестром Windows.
В статье Создание reg-файлов. Синтаксис записей реестра мы подробнее рассмотрим тему о том, как создавать reg-файлы для автоматизации работы с реестром, чтобы не править нужные параметры вручную. О том же, как работать с реестром из командной строки, мы поговорим в рамках отдельной публикации Редактирование реестра Windows из командной строки, bat-файлы
How to Open Registry Editor
Detailed instructions on opening Registry Editor in Windows
:max_bytes(150000):strip_icc()/tim-fisher-5820c8345f9b581c0b5a63cf.jpg)
:max_bytes(150000):strip_icc()/ryanperiansquare-de5f69cde760457facb17deac949263e-180a645bf10845498a859fbbcda36d46.jpg)
All manual changes to the Windows Registry occur in Registry Editor, a tool included in all versions of Windows.
Registry Editor lets you view, create, and modify the registry keys and registry values that make up the entire Windows Registry.
There’s not an obvious shortcut for the tool in most versions of Windows, so the best way to open it is by executing it from a command line.
Open Registry Editor this way in any version of Windows that uses the registry, including Windows 10, Windows 8, Windows 7, Windows Vista, and Windows XP.
How to Open Registry Editor
Access Registry Editor by following this procedure:
In Windows 10 or Windows 8.1, right-click or tap-and-hold the Start button and then choose Run. Prior to Windows 8.1, the Run dialog box is most easily available from the Apps screen.
:max_bytes(150000):strip_icc()/001_2625150-5ba5886c4cedfd0025fa8c62.jpg)
In Windows 7 or Windows Vista, select Start.
In Windows XP, select Start and then Run.
One quick way you can open the Run dialog box in any of these Windows versions is to use the keyboard shortcut Win+R.
In the search box or Run window, type the following, followed by Enter:
:max_bytes(150000):strip_icc()/002_2625150-5ba588af4cedfd0050f42aa2.jpg)
Depending on your version of Windows, and how it’s configured, you may see a User Account Control dialog box where you’ll need to confirm that you want to open Registry Editor.
Registry Editor will open.
:max_bytes(150000):strip_icc()/003_2625150-5ba588d146e0fb00251add3a.jpg)
If you’ve used Registry Editor before, it’ll open up to the same location you were working in last time. If that happens, and you don’t want to work with the keys or values at that location, just continue to minimize the registry keys until you’ve reached the top level, listing the various registry hives.
You can minimize or expand registry keys by selecting the small > icon next to the key. In Windows XP, the + icon is used instead.
You can now make whatever changes you need to make to the registry, which probably shouldn’t be done unless you’re versed in how to safely add, change, or delete registry keys and values. Make sure, whatever you do, that you only affect the narrow registry areas that you intend to.
Considering the significance of the registry on your Windows-based computer, we strongly recommend that you back up the registry, either the whole thing or even just the areas you’re working in, before you do anything.
More Help With Registry Editor
It’s important to know how to restore the Window’s Registry before using Registry Editor. This lets you add a REG file backup into the registry should something go wrong during editing.
Even though Registry Editor is open and ready to be used, it’s not always wise to make changes yourself, manually, especially if a program or automated service can do it for you. For example, if you’re using Registry Editor to clear up residual or junk registry entries, you shouldn’t do it yourself unless you’re very sure that you know what you’re doing. Instead, use a free registry cleaner if you want to clear out common registry junk automatically.
The same regedit command can be executed from Command Prompt. After opening Command Prompt, just type out the command and press Enter.
Although the circumstance would have to be rare, yet another way to launch this tool is from Task Manager. To do that, open Task Manager though Ctrl+Shift+Esc, go to File > Run new task, and type regedit, followed by OK.
:max_bytes(150000):strip_icc()/regedit-task-manager-e00fe15fdee54cbd8cae87f27cc857e6.png)
You might open it that way if you can’t access the standard Run dialog box as described in Step 1 above, or if Explorer or Command Prompt won’t open for some reason.
If you find yourself opening this tool often, you can make a Registry Editor shortcut on your desktop. Right-click the desktop, go to New > Shortcut, type regedit, and press Next and then Finish. In some versions of Windows, you can drag the shortcut onto your taskbar for even quicker access.
Opening a remote Windows Registry is a bit different of a process than the one described above for a local registry. After opening a regular Registry Editor window, there’s an additional step to find the remote registry.
Windows registry information for advanced users
This article describes the Windows registry and provides information about how to edit and back up it.
Original product version: В Windows 10 — all editions, Windows Server 2012 R2
Original KB number: В 256986
Description of the registry
The Microsoft Computer Dictionary, Fifth Edition, defines the registry as:
A central hierarchical database used in Windows 98, Windows CE, Windows NT, and Windows 2000 used to store information that is necessary to configure the system for one or more users, applications, and hardware devices.
The Registry contains information that Windows continually references during operation, such as profiles for each user, the applications installed on the computer and the types of documents that each can create, property sheet settings for folders and application icons, what hardware exists on the system, and the ports that are being used.
The Registry replaces most of the text-based .ini files that are used in Windows 3.x and MS-DOS configuration files, such as the Autoexec.bat and Config.sys. Although the Registry is common to several Windows operating systems, there are some differences among them. A registry hive is a group of keys, subkeys, and values in the registry that has a set of supporting files that contain backups of its data. The supporting files for all hives except HKEY_CURRENT_USER are in the % SystemRoot%\System32\Config folder on Windows NT 4.0, Windows 2000, Windows XP, Windows Server 2003, and Windows Vista. The supporting files for HKEY_CURRENT_USER are in the %SystemRoot%\Profiles\Username folder. The file name extensions of the files in these folders indicate the type of data that they contain. Also, the lack of an extension may sometimes indicate the type of data that they contain.
| Registry hive | Supporting files |
|---|---|
| HKEY_LOCAL_MACHINE\SAM | Sam, Sam.log, Sam.sav |
| HKEY_LOCAL_MACHINE\Security | Security, Security.log, Security.sav |
| HKEY_LOCAL_MACHINE\Software | Software, Software.log, Software.sav |
| HKEY_LOCAL_MACHINE\System | System, System.alt, System.log, System.sav |
| HKEY_CURRENT_CONFIG | System, System.alt, System.log, System.sav, Ntuser.dat, Ntuser.dat.log |
| HKEY_USERS\DEFAULT | Default, Default.log, Default.sav |
In Windows 98, the registry files are named User.dat and System.dat. In Windows Millennium Edition, the registry files are named Classes.dat, User.dat, and System.dat.
Security features in Windows let an administrator control access to registry keys.
The following table lists the predefined keys that are used by the system. The maximum size of a key name is 255 characters.
| Folder/predefined key | Description |
|---|---|
| HKEY_CURRENT_USER | Contains the root of the configuration information for the user who is currently logged on. The user’s folders, screen colors, and Control Panel settings are stored here. This information is associated with the user’s profile. This key is sometimes abbreviated as HKCU. |
| HKEY_USERS | Contains all the actively loaded user profiles on the computer. HKEY_CURRENT_USER is a subkey of HKEY_USERS. HKEY_USERS is sometimes abbreviated as HKU. |
| HKEY_LOCAL_MACHINE | Contains configuration information particular to the computer (for any user). This key is sometimes abbreviated as HKLM. |
| HKEY_CLASSES_ROOT | Is a subkey of HKEY_LOCAL_MACHINE\Software . The information that is stored here makes sure that the correct program opens when you open a file by using Windows Explorer. This key is sometimes abbreviated as HKCR. Starting with Windows 2000, this information is stored under both the HKEY_LOCAL_MACHINE and HKEY_CURRENT_USER keys. The HKEY_LOCAL_MACHINE\Software\Classes key contains default settings that can apply to all users on the local computer. The HKEY_CURRENT_USER\Software\Classes key contains settings that override the default settings and apply only to the interactive user. The HKEY_CLASSES_ROOT key provides a view of the registry that merges the information from these two sources. HKEY_CLASSES_ROOT also provides this merged view for programs that are designed for earlier versions of Windows. To change the settings for the interactive user, changes must be made under HKEY_CURRENT_USER\Software\Classes instead of under HKEY_CLASSES_ROOT. To change the default settings, changes must be made under HKEY_LOCAL_MACHINE\Software\Classes . If you write keys to a key under HKEY_CLASSES_ROOT, the system stores the information under HKEY_LOCAL_MACHINE\Software\Classes . If you write values to a key under HKEY_CLASSES_ROOT, and the key already exists under HKEY_CURRENT_USER\Software\Classes , the system will store the information there instead of under HKEY_LOCAL_MACHINE\Software\Classes . |
| HKEY_CURRENT_CONFIG | Contains information about the hardware profile that is used by the local computer at system startup. |
The registry in 64-bit versions of Windows XP, Windows Server 2003, and Windows Vista is divided into 32-bit and 64-bit keys. Many of the 32-bit keys have the same names as their 64-bit counterparts, and vice versa. The default 64-bit version of Registry Editor that is included with 64-bit versions of Windows XP, Windows Server 2003, and Windows Vista displays the 32-bit keys under the node HKEY_LOCAL_MACHINE\Software\WOW6432Node . For more information about how to view the registry on 64-Bit versions of Windows, see How to view the system registry by using 64-bit versions of Windows.
The following table lists the data types that are currently defined and that are used by Windows. The maximum size of a value name is as follows:
- Windows Server 2003, Windows XP, and Windows Vista: 16,383 characters
- Windows 2000: 260 ANSI characters or 16,383 Unicode characters
- Windows Millennium Edition/Windows 98/Windows 95: 255 characters
Long values (more than 2,048 bytes) must be stored as files with the file names stored in the registry. This helps the registry perform efficiently. The maximum size of a value is as follows:
- Windows NT 4.0/Windows 2000/Windows XP/Windows Server 2003/Windows Vista: Available memory
- Windows Millennium Edition/Windows 98/Windows 95: 16,300 bytes
There is a 64K limit for the total size of all values of a key.
| Name | Data type | Description |
|---|---|---|
| Binary Value | REG_BINARY | Raw binary data. Most hardware component information is stored as binary data and is displayed in Registry Editor in hexadecimal format. |
| DWORD Value | REG_DWORD | Data represented by a number that is 4 bytes long (a 32-bit integer). Many parameters for device drivers and services are this type and are displayed in Registry Editor in binary, hexadecimal, or decimal format. Related values are DWORD_LITTLE_ENDIAN (least significant byte is at the lowest address) and REG_DWORD_BIG_ENDIAN (least significant byte is at the highest address). |
| Expandable String Value | REG_EXPAND_SZ | A variable-length data string. This data type includes variables that are resolved when a program or service uses the data. |
| Multi-String Value | REG_MULTI_SZ | A multiple string. Values that contain lists or multiple values in a form that people can read are generally this type. Entries are separated by spaces, commas, or other marks. |
| String Value | REG_SZ | A fixed-length text string. |
| Binary Value | REG_RESOURCE_LIST | A series of nested arrays that is designed to store a resource list that is used by a hardware device driver or one of the physical devices it controls. This data is detected and written in the \ResourceMap tree by the system and is displayed in Registry Editor in hexadecimal format as a Binary Value. |
| Binary Value | REG_RESOURCE_REQUIREMENTS_LIST | A series of nested arrays that is designed to store a device driver’s list of possible hardware resources the driver or one of the physical devices it controls can use. The system writes a subset of this list in the \ResourceMap tree. This data is detected by the system and is displayed in Registry Editor in hexadecimal format as a Binary Value. |
| Binary Value | REG_FULL_RESOURCE_DESCRIPTOR | A series of nested arrays that is designed to store a resource list that is used by a physical hardware device. This data is detected and written in the \HardwareDescription tree by the system and is displayed in Registry Editor in hexadecimal format as a Binary Value. |
| None | REG_NONE | Data without any particular type. This data is written to the registry by the system or applications and is displayed in Registry Editor in hexadecimal format as a Binary Value |
| Link | REG_LINK | A Unicode string naming a symbolic link. |
| QWORD Value | REG_QWORD | Data represented by a number that is a 64-bit integer. This data is displayed in Registry Editor as a Binary Value and was introduced in Windows 2000. |
Back up the registry
Before you edit the registry, export the keys in the registry that you plan to edit, or back up the whole registry. If a problem occurs, you can then follow the steps in the Restore the registry section to restore the registry to its previous state. To back up the whole registry, use the Backup utility to back up the system state. The system state includes the registry, the COM+ Class Registration Database, and your boot files. For more information about how to use the Backup utility to back up the system state, see the following articles:
Edit the registry
To modify registry data, a program must use the registry functions that are defined in Registry Functions.
Administrators can modify the registry by using Registry Editor (Regedit.exe or Regedt32.exe), Group Policy, System Policy, Registry (.reg) files, or by running scripts such as VisualBasic script files.
Use the Windows user interface
We recommend that you use the Windows user interface to change your system settings instead of manually editing the registry. However, editing the registry may sometimes be the best method to resolve a product issue. If the issue is documented in the Microsoft Knowledge Base, an article with step-by-step instructions to edit the registry for that issue will be available. We recommend that you follow those instructions exactly.
Use Registry Editor
Serious problems might occur if you modify the registry incorrectly by using Registry Editor or by using another method. These problems might require that you reinstall the operating system. Microsoft cannot guarantee that these problems can be solved. Modify the registry at your own risk.
You can use Registry Editor to do the following actions:
- Locate a subtree, key, subkey, or value
- Add a subkey or a value
- Change a value
- Delete a subkey or a value
- Rename a subkey or a value
The navigation area of Registry Editor displays folders. Each folder represents a predefined key on the local computer. When you access the registry of a remote computer, only two predefined keys appear: HKEY_USERS and HKEY_LOCAL_MACHINE.
Use Group Policy
Microsoft Management Console (MMC) hosts administrative tools that you can use to administer networks, computers, services, and other system components. The Group Policy MMC snap-in lets administrators define policy settings that are applied to computers or users. You can implement Group Policy on local computers by using the local Group Policy MMC snap-in, Gpedit.msc. You can implement Group Policy in Active Directory by using the Active Directory Users and Computers MMC snap-in. For more information about how to use Group Policy, see the Help topics in the appropriate Group Policy MMC snap-in.
Use a Registration Entries (.reg) file
Create a Registration Entries (.reg) file that contains the registry changes, and then run the .reg file on the computer where you want to make the changes. You can run the .reg file manually or by using a logon script. For more information, see How to add, modify, or delete registry subkeys and values by using a Registration Entries (.reg) file.
Use Windows Script Host
The Windows Script Host lets you run VBScript and JScript scripts directly in the operating system. You can create VBScript and JScript files that use Windows Script Host methods to delete, to read, and to write registry keys and values. For more information about these methods, visit the following Microsoft Web sites:
Use Windows Management Instrumentation
Windows Management Instrumentation (WMI) is a component of the Microsoft Windows operating system and is the Microsoft implementation of Web-Based Enterprise Management (WBEM). WBEM is an industry initiative to develop a standard technology for accessing management information in an enterprise environment. You can use WMI to automate administrative tasks (such as editing the registry) in an enterprise environment. You can use WMI in scripting languages that have an engine on Windows and that handle Microsoft ActiveX objects. You can also use the WMI Command-Line utility (Wmic.exe) to modify the Windows registry.
Use Console Registry Tool for Windows
You can use the Console Registry Tool for Windows (Reg.exe) to edit the registry. For help with the Reg.exe tool, type reg /? at the Command Prompt, and then click OK.
Restore the registry
To restore the registry, use the appropriate method.
Method 1: Restore the registry keys
To restore registry subkeys that you exported, double-click the Registration Entries (.reg) file that you saved in the Export registry subkeys section. Or, you can restore the whole registry from a backup. For more information about how to restore the whole registry, see the Method 2: Restore the whole registry section later in this article.
Method 2: Restore the whole registry
To restore the whole registry, restore the system state from a backup. For more information about how to restore the system state from a backup, see How to use Backup to protect data and restore files and folders on your computer in Windows XP and Windows Vista.
Backing up the system state also creates updated copies of the registry files in the %SystemRoot%\Repair folder.
References
For more information, visit the following Web sites:
The Windows Server Catalog of Tested Products is a reference for products that have been tested for Windows Server compatibility.
Data Protection Manager (DPM) is a key member of the Microsoft System Center family of management products and is designed to help IT professionals manage their Windows environment. DPM is the new standard for Windows backup and recovery and delivers continuous data protection for Microsoft application and file servers that use seamlessly integrated disk and tape media. For more information about how to back up and restore the registry, see How to back up and restore the registry in Windows XP and Windows Vista.


