- How to back up and restore the registry in Windows
- Windows 10, 8.1, or 8
- Windows Registry Recovery 3.1.0
- Use Windows Recovery Environment (WinRE) to troubleshoot common startup issues
- Summary
- Start WinRE from Windows installation media
- How to enter recovery mode in Windows 10
- How do I boot into recovery mode on Windows 10?
- 1. Press F11 during the system startup
- 2. Enter Recover Mode with the Start Menu’s Restart option
- 3. Enter Recovery Mode with a bootable USB drive
- 4. Select the Restart now option
- 5. Enter Recovery Mode using Command Prompt
- Windows Registry Recovery: «One of the files containing the system’s registry data had to be recovered by one of a log or alternate copy. The recovery was successful»
- Replies (3)
How to back up and restore the registry in Windows
Windows 10, 8.1, or 8
Back up the registry manually, or create a system restore point.
From the Start menu, type regedit.exe in the search box, and then press Enter. If you are prompted for an administrator password or for confirmation, type the password or provide confirmation.
In Registry Editor, locate and click the registry key or subkey that you want to back up.
Click File > Export.
In the Export Registry File dialog box, select the location to which you want to save the backup copy, and then type a name for the backup file in the File name field.
From the Start menu, type create a restore point.
Select Create a restore point from the search results.
Choose Create, and then follow the steps to create a restore point.
After you’ve backed up the information, restore it based on the method you used.
From the Start menu, type regedit.exe, and then press Enter. If you are prompted for an administrator password or for confirmation, type the password or provide confirmation.
In Registry Editor, click File > Import.
In the Import Registry File dialog box, select the location to which you saved the backup copy, select the backup file, and then click Open.
From Start, type create a restore point.
Select Create a restore point from the search results.
Choose System Restore.
Back up the registry manually, or create a restore point.
Click Start, type regedit.exe in the search box, and then press Enter. If you’re prompted for an administrator password or for confirmation, type the password or provide confirmation.
In Registry Editor, locate and click the registry key or subkey that you want to back up.
Click File > Export.
In the Export Registry File dialog box, select the location to which you want to save the backup copy, and then type a name for the backup file in the File name field.
Right-click the Start button, then select Control Panel > System and Maintenance > System.
In the left pane, select System protection.
Select the System Protection tab, and then select Create.
In the System Protection dialog box, type a description, and then select Create.
Restore the information based on which backup method you used.
Right-click the Start button, then select Control Panel > System and Maintenance > Backup and Restore.
Select either Restore my files or Restore all users’ files.
In the Import Registry File box, select the location in which you saved the backup copy, select the backup file, and then click Open.
Windows Registry Recovery 3.1.0
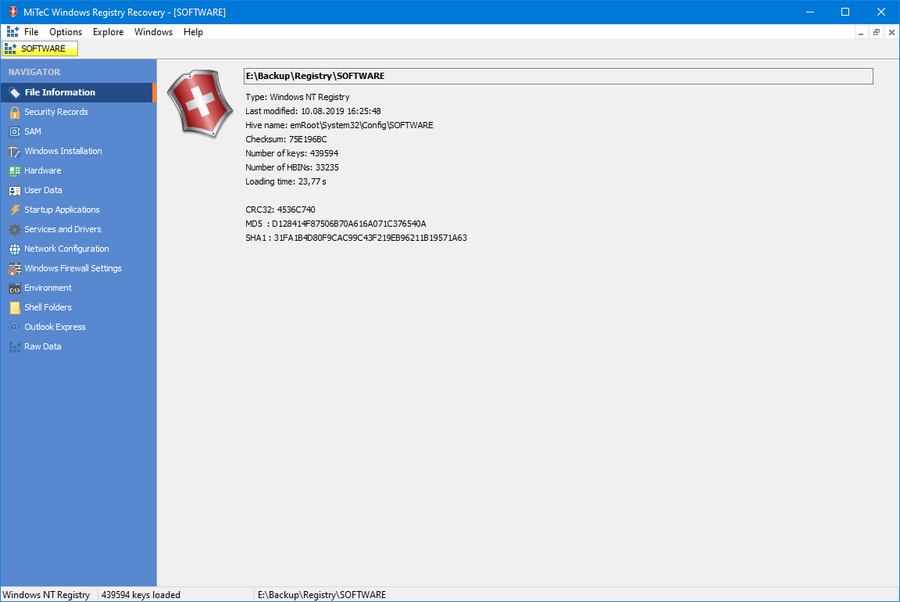
Windows Registry Recovery — простая в обращении программа не требующая установки для восстановления данных конфигурации реестра, это нужно обычно после того как случился сбой компьютера, плюс вы получите поддержку экспорта данных.
По сути, перед вами маленькое и портативное приложение, распаковываем архив, запускаем, далее оно дает пользователь возможность читать файлы, которые включают данные реестра Windows, а также важные данные о конфигурации и настройках Windows. Я писал выше, что софт портативен, а значит удалить его можно будет в будущем, просто удалив исполняемый файл, по сути он один, больше файлов за собой не тащит. Также возможно записать его на USB-накопитель, чтобы запустить на любом компьютере без усилий и проблем, подключили носитель, запустили, работает.
Кто хочет скачать Windows Registry Recovery последней версии, ссылка в полной новости, распространяется программа бесплатно, не требуется патч, ключ, кряк и прочие средства, распаковали архив, запустили и сразу можно приступать к работе.
Если рассматривать интерфейс, то сделан он из обычного окна с простым шаблоном, в нем вы можете открывать файлы, используя только файловый браузер, поддержка поддержка перетаскивания не реализована. Софт содержит информацию о типе файла, дате последнего изменения, имени главного раздела реестра, контрольной сумме, количестве ключей, времени загрузки, а также сигнатурах CRC32, MD5 и SHA1.
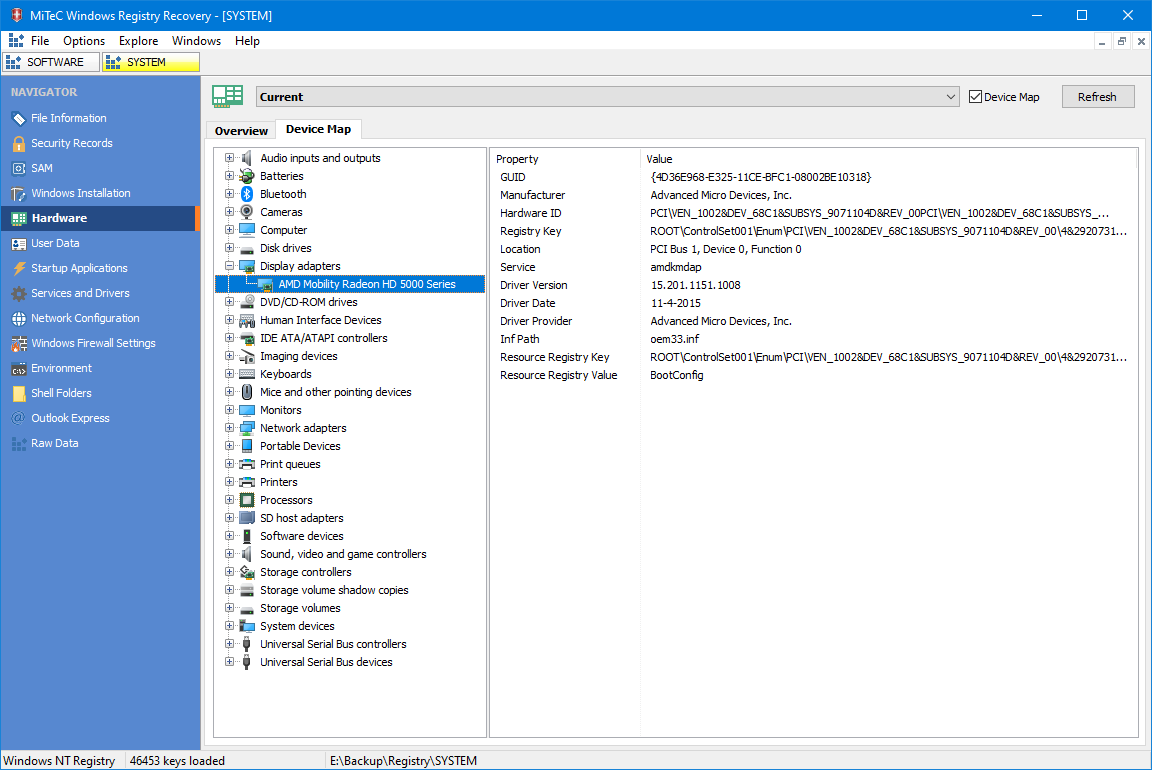
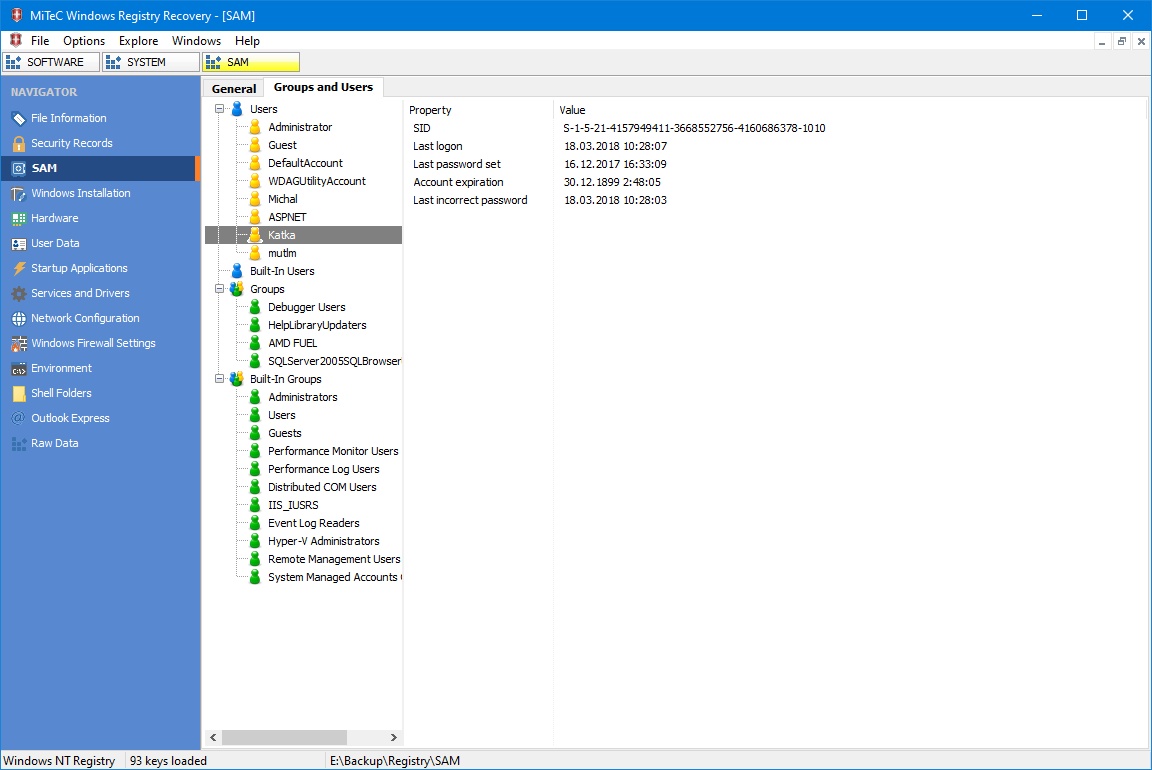
Кроме того, вы можете ввести префикс ключа или корневой ключ для экспорта данных, изучить записи отвечающие за безопасность и узнать различные детали (например счетчик использования, размер записи, идентификатор владельца и группы), получить сведения об установке Windows (например, установленное программное обеспечение, обновления) , просматривать информацию об оборудовании и многое другое. Сама по себе программа Windows Registry Recovery потребляет минимальное количество ресурсов системы, оперативная память и процессор вообще не нагружаются. Работает приложение шустро, не вызывая зависания операционной системы, при тесте в минут пять проблем не найдено. Благодаря интуитивно понятной структуре и общей простоте, программа способна неплохо справится с поставленной перед ней задачей.

Разработчик: Mitec
Лицензия: FreeWare — даром
Язык: English — Русская версия и Русификатор отсутствуют
Размер: 4 MB
ОС: Windows XP+
Версия: 3.1.0
Скачать программу Windows Registry Recovery последняя версия бесплатно


 [/not-group]
 —>
—> 
Use Windows Recovery Environment (WinRE) to troubleshoot common startup issues
This article describes how to start WinRE from Windows installation media to troubleshoot common startup issues.
Original product version: В Windows 10 — all editions, Windows Server 2019, Windows Server 2016, Windows Server 2012 R2
Original KB number: В 4026030
Summary
When a Windows operating system fails to start or restarts unexpectedly, the Windows Recovery Environment (WinRE) can be used to run commands that may resolve the issues. The system may be unable to start because of disk corruption, corrupted or missing system files, or pending actions from the installation of an update.
Start WinRE from Windows installation media
For additional methods to start WinRE, see Entry points into WinRE.
Start the system to the installation media for the installed version of Windows. For more information, see Create installation media for Windows.
On the Install Windows screen, select Next > Repair your computer.
On the System Recovery Options screen, select Next > Command Prompt.
At the command prompt, run the following command by using BCDEdit command-line options to identify the drive letter of the system volume:
In the Windows Boot Loader section, the drive letter of the system volume is displayed next to osdevice . (For example, D:)
At the command prompt, run the following command to complete a check disk for the system volume that’s identified in step 4:
If any failures or unrepairable issues are listed in the results, you may have to investigate these further.
At the command prompt, run the following command to complete a System File Check (SFC) for the system volume that’s identified in step 4:
If any failures or unrepairable issues are listed in the results, you may have to investigate these further.
At the command prompt, run the following command to complete an image cleanup and health restoration by using the DISM tool:
- If any issue is found and fixed, repeat step 6.
- The DISM command only applies to Windows Server 2012 and later versions.
At the command prompt, run the following command to revert any pending actions by using the DISM tool.
If the pending actions can’t be reverted, you may have to investigate these further.
Close the Command Prompt window, and then select Reboot.
How to enter recovery mode in Windows 10

- It’s not hard to learn how to enter recovery mode in Windows 10 and there are a few ways to do it.
- The Windows 10 recovery mode can be reached by pressing an F key during the system startup.
- Another simple solution is to use the Start Menu’s Restart option.
- You can even use a line-command tool to enter recovery mode.

- Download Restoro PC Repair Tool that comes with Patented Technologies (patent available here).
- Click Start Scan to find Windows issues that could be causing PC problems.
- Click Repair All to fix issues affecting your computer’s security and performance
- Restoro has been downloaded by 0 readers this month.
Windows 10 includes a recovery mode that enables users to access a range of diagnostic and repair utilities outside the OS. That recovery mode is more widely known as the Advanced Startup Options menu.
The Advanced Startup Options menu is there to assist users troubleshoot Windows when the platform doesn’t start up as users expect. Thus, it appears automatically after startup errors. Users can also manually enter recovery mode.
How do I boot into recovery mode on Windows 10?
1. Press F11 during the system startup

This is among the more straightforward methods for entering recovery mode. Users can press the F11 key shortly after turning their PCs on to enter recovery mode.
Note, however, that this method might not work on all PCs. Some may use the F9 or F12 keys so check that detail with the PC manufacturer.
2. Enter Recover Mode with the Start Menu’s Restart option
- The Start menu’s Restart option provides one of the most reliable methods for entering recovery mode. Click the Start button in Windows 10.
- Then click the Power button.
- Press and hold the Shift key.
- Then click Restart while holding the Shift key.
- After that, select Troubleshoot and Advanced options on the blue menu.
3. Enter Recovery Mode with a bootable USB drive
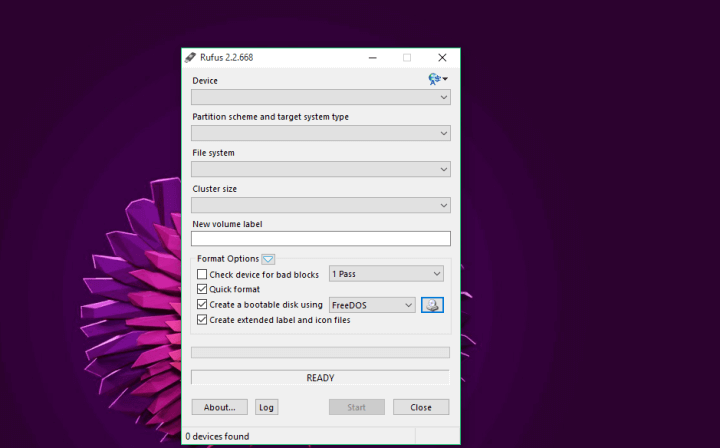
- Users can enter recovery mode with a bootable USB drive that they can install (or reinstall) Windows 10 with.
- First, users will need to set up the bootable USB drive with the Rufus software and a Windows 10 image file.

- Users will also need to configure their PCs to boot from USB drives first by adjusting the BIOS or UEFI settings.
- Thereafter, insert a bootable USB drive into a PC’s USB slot.
- Turn the laptop or desktop on. Then a Windows Setup window will appear if the PC is configured to boot from USB drives.
- Click Next on the Windows setup window.
- Select the Repair your computer option.
- Then select Troubleshoot and click on Advanced Options to enter the Advanced Startup Options menu.

4. Select the Restart now option
- Users can also get to Advanced Startup Options by clicking the Restart now option in Settings.
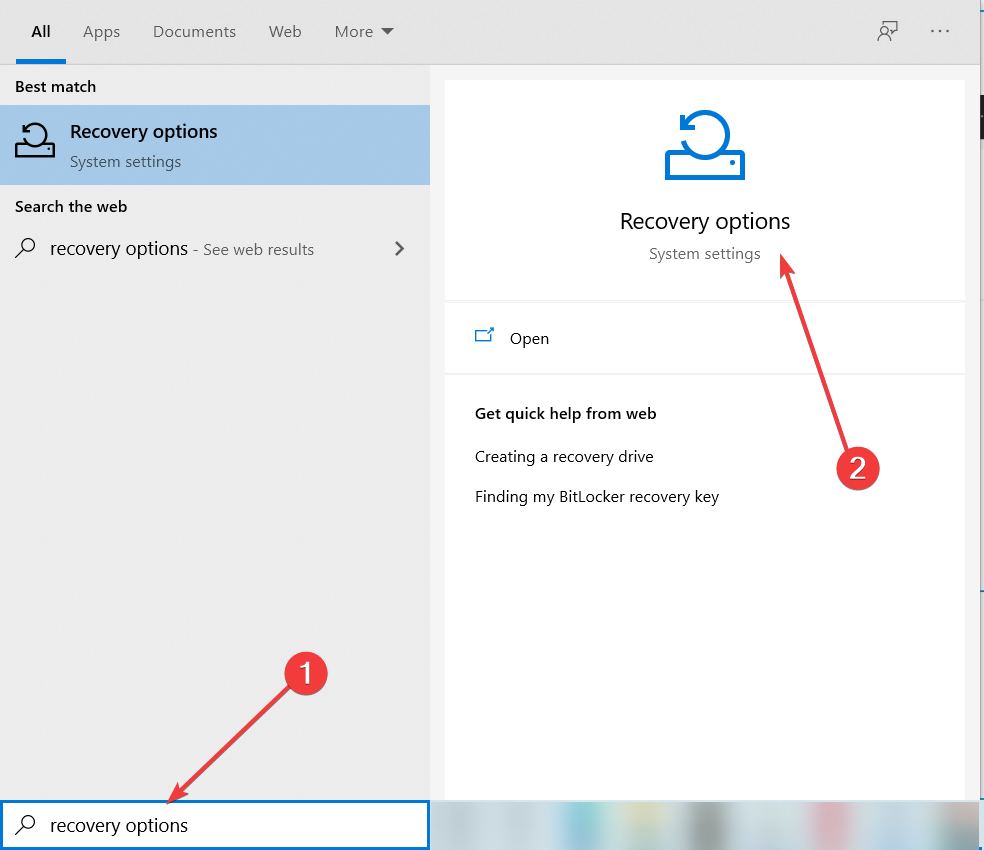
- Click the Type here to search button on Windows 10’s taskbar.
- Enter the keyword recover in the search box to find the Recovery option.
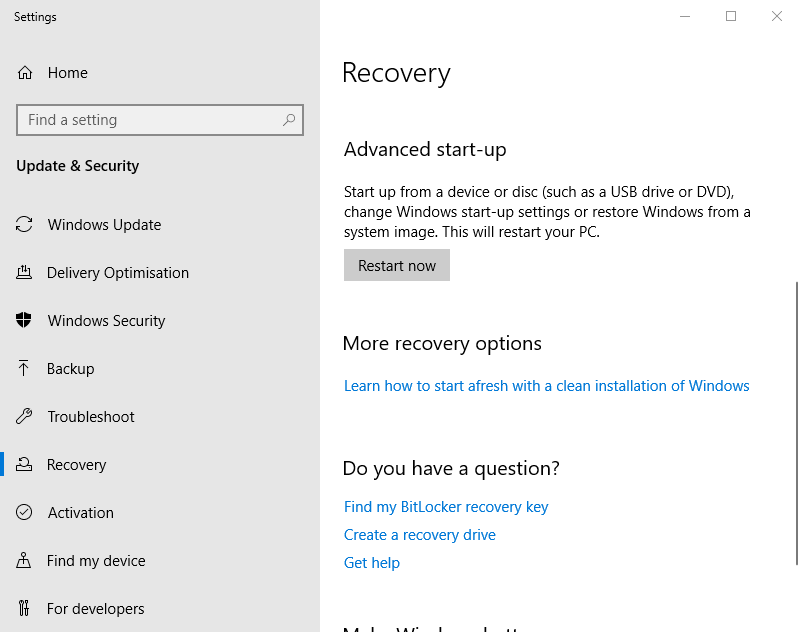
- Click Recovery to open the window shown directly below.
- Click the Restart now button under Advanced start-up.
- The PC will restart to the Choose an option menu from which users can select Troubleshoot and then Advanced options.
5. Enter Recovery Mode using Command Prompt
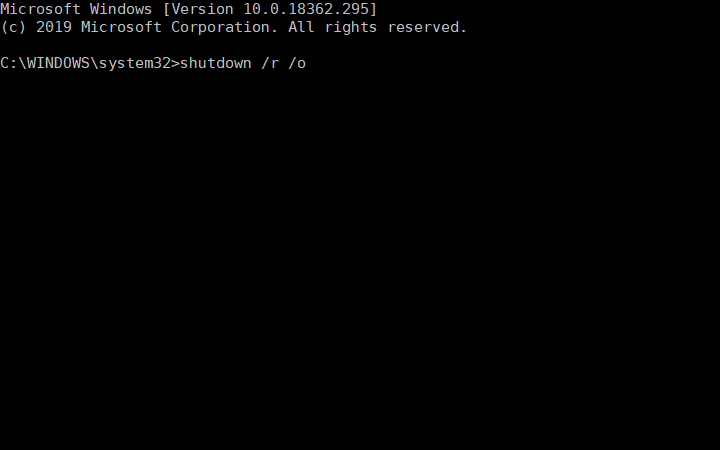
- The Command Prompt provides another way to access recovery mode. Type cmd in Windows Search and click on Run as administrator to start Command Prompt.
- Input the following command and press Enter: shutdown /r /o
- Click Close on the You’re about to be signed out prompt that appears.
- Thereafter, select Troubleshoot and Advanced options after the restart.
So, there are few ways users can enter Windows 10’s recovery mode. When users enter the recovery mode, they can then utilize the System Restore, Command Prompt, System Image Recovery, and Startup Repair utilities from there.
Windows Registry Recovery: «One of the files containing the system’s registry data had to be recovered by one of a log or alternate copy. The recovery was successful»
Original title: Windows Registry Recovery
Running Windows XP SP3.
When starting Windows XP, I have the message: «One of the files containing the system’s registry data had to be recovered by one of a log or alternate copy. The recovery was successful»
After that, everything seems to be OK.
I test the harddrive with chkdsk and it is OK
I test the memory with memtest and it is OK
I have used many tools to check the registry and it seems to be OK. No errors were reported by these tools.
I have used also spybot and spyware doctor to clean the PC.
I also used the windows update to have the system up to date.
Everything seems to be OK but every time I started windows I have this message.
Replies (3)
![]()
If the system used to work properly, what do you think might have changed on the system since the last time it did work properly?
What is your system make and model?
Do you now or have you ever had an HP printer installed and if so, tell us about it.
Was this reply helpful?
Sorry this didn’t help.
Great! Thanks for your feedback.
How satisfied are you with this reply?
Thanks for your feedback, it helps us improve the site.
How satisfied are you with this reply?
Thanks for your feedback.
No HW changes since last time the system was working without the error. Only one new SW program installed XDMB, but I have already uninstalled it.
Intel i3 @ 3,07 GHz. Memory: 4 GB
Yes I have an HP printer. I experience some problems in the past with the printer SW (also reported in other microsoft forums). But now the printer is working fine.
Was this reply helpful?
Sorry this didn’t help.
Great! Thanks for your feedback.
How satisfied are you with this reply?
Thanks for your feedback, it helps us improve the site.
How satisfied are you with this reply?
Thanks for your feedback.
![]()
What kind of HP Printer do you have?
Describe your current antivirus and anti malware situation: McAfee, Symantec, Norton, Spybot, AVG, Avira!, MSE, Panda, Trend Micro, CA, Defender, ZoneAlarm, PC Tools, Comodo, etc.
I have never personally seen or fixed this one, but have read about it and it is in my notes for some reason. (hence my asking about this HP printer).
My interpretation is that some HP Printers have a HP Cue Device Discovery Service (my HP printer setup does not) that could be malfunctioning at startup.
In spite of the error, the printer seems to work just fine and since you have had some printer problems in the past (which I cannot find here) maybe there is still some problem there.
If you look in the Event Viewer System log at the time of the failure, you might find a recent event with clues along those lines and it may be accompanied by another event from the IPSec Service.
Disabling one or both of Services doesn’t seem to help, but uninstalling all of the HP printer software, rebooting (do you still have the issue after uninstalling the HP software and rebooting) and then reinstalling the HP software from scratch seems to have worked for some folks in the same boat.
If you do see the HP Cue Device Discovery errors in the Event Viewer System log, I would like to see them and here is how to post those individual events back here:
Look in the Event Viewer for clues around the time of the incident
Here is a method to post the specific information about individual events.
To see the Event Viewer logs, click Start, Settings, Control Panel, Administrative Tools, Event Viewer.
A shortcut to Event Viewer is to click Start, Run and in the box enter:
Click OK to launch the Event Viewer.
The most interesting logs are usually the Application and System logs.
Some logs such as Security and Internet Explorer may be completely empty or have only a few items. The default
settings for XP is not to log all that activity unless you need to troubleshoot some issue in those areas. If you enable the logging for them the logs fill up quickly and could negatively effect your system performance with all the extra (usually unnecessary) activity.
If you have Microsoft Office installed, it has its own logs and they may be empty or occasional boring activity or very little activity if there is no problem with your Office applications. This is normal.
Not every event is a problem, some are informational messages that things are working okay and some are warnings.
However, no event should defy reasonable explanation.
Each event is sorted by Date and Time. Errors will have red Xs, Warnings will have yellow !s. Information messages have white is. Not every Error or Warning event means there is a serious issue. Some are excusable at startup time when Windows is booting. Try to find just the events at the date
and time around your problem.
If you double click an event, it will open a Properties window with more information. On the right are black up and down arrow buttons to scroll through the open events. The third button that looks like two pages on top of each other is used to copy the event details to your Windows clipboard.
When you find an interesting event that occurred around the time of your issue, click the third button under the up and down arrows to copy the details and then you can paste the details (right click, Paste or CTRL-V) the detail text back here for analysis. Remove any personal information from your information after pasting if you are compelled to do so.
If you paste an Event, it will look something like this boring system startup event:
Event Type: Information
Event Source: Service Control Manager
Event Category: None
Event ID: 7035
Date: 7/14/2010
Time: 5:54:18 PM
User: Jose
Computer: Computer
Description:
The Remote Access Connection Manager service was successfully sent a start control.


