- How to Uninstall Drivers in Windows
- Roll Back to a Previous Driver
- Uninstall a Driver
- Reinstall Graphics Driver on Windows 10, 7 & 8
- Step 1: Uninstall the graphics driver
- Step 2: Install a new graphics driver
- Option 2: Reinstall the graphics driver with Driver Easy
- remove and reinstall *all* drivers
- 3 Answers 3
- Download and install drivers in Windows 8.1
- To check that automatic updating is on
- To manually install a driver
- Windows can’t verify the publisher of this driver software
- This driver hasn’t been signed
- Windows requires a digitally signed driver
How to Uninstall Drivers in Windows


By Michael King
Today’s Best Tech Deals
Picked by PCWorld’s Editors
Top Deals On Great Products
Picked by Techconnect’s Editors
Installing drivers can be a hair-raising adventure, even on today’s modern operating systems. These finicky pieces of code act as the middleman between your PC’s hardware and its operating system. Although they install with ease just like any other software, they integrate deeply into the OS, sinking their teeth into areas most other software doesn’t go near. Most of the time the driver installation process is simple, seamless, and transparent to you, as it should be.
On those occasions when things go wrong, however, they can go really wrong, and even crash your entire computer. For example, when Microsoft’s Windows Vista came out in 2007, critics lambasted it for being slow and prone to crashing; Microsoft investigated the causes and found that a majority of crashes were due to driver issues.
Thankfully, when you prepare yourself for battle with a problematic driver, you have a couple of tricks that can help. Microsoft has introduced an easy way to roll back to a previous (and, you hope, more stable) version of the driver, or remove it from the system altogether, giving you a clean slate to try again or install a different version.
Roll Back to a Previous Driver
- Click Start, type Device Manager, and press Enter.
- Find and double-click the category of device causing the issue (for instance, the graphics card would be listed under Display Adapters).
- Double-click the problematic device to bring up the Properties window.
- Click the Driver tab.
- Click the Roll Back Driver button.
- A dialog box will ask you to confirm your decision to roll back to a previous driver. Click Yes to begin the roll-back process. Use the Properties menu to uninstall your driver software or roll back to a previous version.
At this point Windows will automatically remove the current driver for the device and reinstall the previous driver. You may then receive a notification that the system settings have changed, and Windows will ask you to reboot. If you see that message, you should reboot your computer as soon as possible.
Uninstall a Driver
When you need to uninstall a driver completely, the best and safest method is to use the device’s uninstaller program (if it has one). If you added the device to your system through an installer (as is the case with most graphics card and sound card drivers, for instance), you can uninstall it just as you would any other program.
- Click Start, type Uninstall Program, and press Enter.
- In the Uninstall window that appears, go through the list and find your device or drivers. Double-click the entry to begin the uninstallation process.
Sometimes devices won’t have an uninstaller, or the uninstaller will not appear in the list. In those instances, you can use the Device Manager to remove the driver completely.
- Click Start, type Device Manager, and press Enter.
- Find and double-click the category of device whose driver you wish to uninstall (for example, the graphics card would be listed under Display Adapters).
- Right-click the device, and click Uninstall.
- Windows will prompt you to confirm the device’s removal. Click OK to remove the driver.
- After the uninstallation is complete, reboot your computer as soon as possible. In a pinch you can use the Windows Device Manager to uninstall troublesome driver software.
After you roll back or uninstall a problematic driver, you can try downloading and installing the latest version from the manufacturer’s website, or try a specific version that previously worked to get your computer back on its feet.
Reinstall Graphics Driver on Windows 10, 7 & 8
Last Updated: 6 months ago
When your PC runs slowly, reinstalling graphics drivers could be your first option to fix the problem. Below, I’ll show you how to reinstall the graphic driver on Windows 10, 7 & 8 step by step. The steps are easy to follow. You can reinstall the driver easily even if you don’t have much computer skills.
Two steps you need to reinstall the graphics driver:
Step 1: Uninstall the graphics driver
To reinstall the driver, you need to uninstall the driver first. You can uninstall the graphics driver via Device Manager. Device Manager is a Control Panel application that allows you to manage devices and drivers in your system. You can uninstall, update or roll back drivers through Device Manager. I’ll lead you through how to uninstall the graphics driver via Device Manager below:
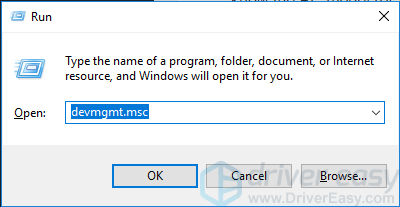
1) On your keyboard, press Win+R (the Windows logo key and R key) at the same time to invoke the Run box.
2) Type devmgmt.msc and press Enter to open the Device Manager window.
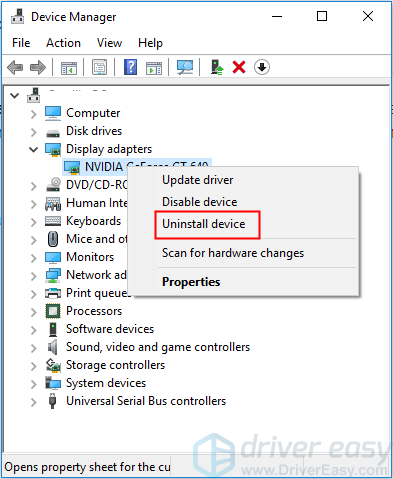
3) Double-click Display adapters to view the devices in the category. Then right click the graphics card name (for example, NVIDIA GeForce GT 640), and select Uninstall device (in some cases, this could be just Uninstall).
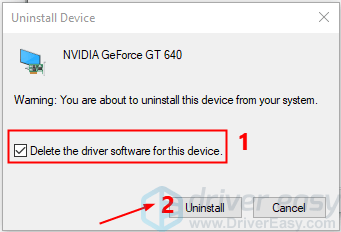
4) On the Uninstall confirm dialog box, click the Delete the driver software for this device option, then click Uninstall.
After uninstalling the driver, move on to Step 2 to install the graphics driver again.
Step 2: Install a new graphics driver
There are three methods for you to reinstall the driver. One method is to download and install a new driver from the PC manufacturer or the graphics card manufacturer.
To download the correct driver from the manufacturers, you need to know the PC model (or the graphics card model), and the operating system version. I don’t recommend using this method unless you know what you’re doing when searching for the right driver. In this post, I’d like to introduce two simple methods to reinstall the graphics driver:
Option 1: Allow Windows to install the graphics driver automatically
This method is very simple. After uninstalling the driver, you just need to reboot your computer. Then Windows will install the driver automatically from Windows Update.
This method may not provide the latest driver for you. If you still have slow PC performance after having the graphics driver reinstalled, you can try the next method.
Option 2: Reinstall the graphics driver with Driver Easy
If you don’t have the time, patience or computer skills to reinstall the driver manually, or if Windows doesn’t provide the latest driver, you can do it automatically with Driver Easy.
Driver Easy will automatically recognize your system and find the correct drivers for it. You don’t need to know exactly what system your computer is running, you don’t need to risk downloading and installing the wrong driver, and you don’t need to worry about making a mistake when installing.
You can update your drivers automatically with either the FREE or the Pro version of Driver Easy. But with the Pro version it takes just 2 clicks (and you get full support and a 30-day money back guarantee):
1) Download and install Driver Easy.
2) Run Driver Easy and click Scan Now. Driver Easy will then scan your computer and detect any problem drivers.

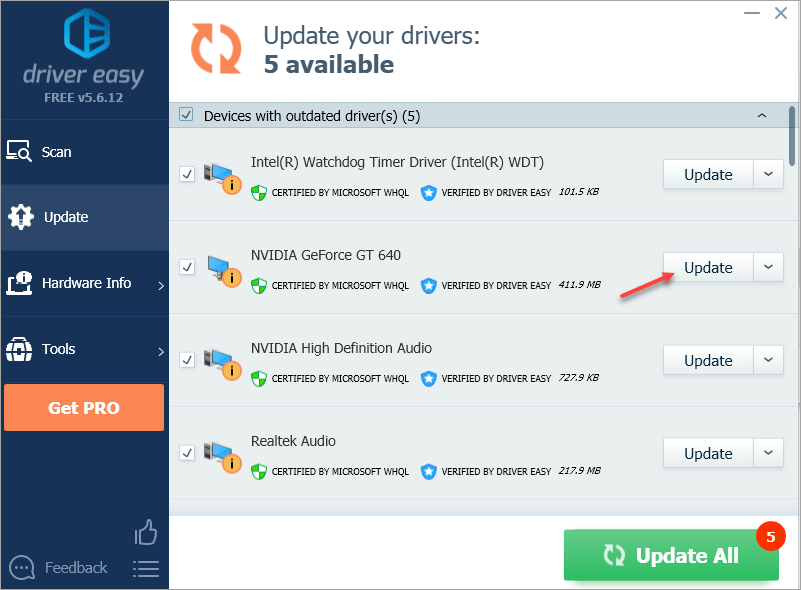
3) Click the Update button next to a flagged graphics driver to automatically download the correct version of this driver, then you can manually install it (you can do this with the FREE version).
Or click Update All to automatically download and install the correct version of all the drivers that are missing or out of date on your system (this requires the Pro version – you’ll be prompted to upgrade when you click Update All).
In the screenshot shown below, take NVIDIA GeForce GT 640 for example. If you’re using Intel graphics driver, or AMD graphics driver, you’ll see the specific Intel or AMD graphics card model in the list.
Hopefully you have reinstalled the graphics driver successfully. If you have any questions, please feel free to leave your comments. I’d love to hear of any ideas or suggestions.
remove and reinstall *all* drivers
I have been struggling getting some 3G USB modems and some other hardware to work and in the process I have managed to get a lot of unnecessary and just plain wrong drivers installed. This is causing my system and other hardware to work incorrectly. I would like to remove all the drivers on this system and have windows reinstall all the default drivers.
Can I do this with a Windows 7 repair install or how else can I get rid off all the current drivers.

3 Answers 3
I would recommend that you do a clean reinstall of Windows 7, that way you can wipe all of the old drivers, and Windows 7 will automatically reinstall the default drivers needed (for the most part).
Obviously, it is not possible to remove all of the drivers in an operating system, because it will break the OS permanently, thus a clean reinstall is pretty much the only way to go.
You can use sysprep tool for that. Just run it from c:\windows\system32\sysprep\sysprep.exe , check Generalize and hit OK
Removing ALL drivers will damage windows and make your life horrible! Your are better off selectively removing the drivers.
Boot from Windows 7 DVD Select Repair and command prompt
If instead of a wim file your working with an offline copy of windows substitute the path that has the windows folder on it for c:\test\offline. When in the command prompt mode from the windows 7 DVD your drive letter may not be the same. Also with an offline copy of windows dism /Mount-Image maybe skipped.
This is all that is require on a offline version of windows.
Lists all drivers
feed the list one at a time into the remove command below. It is only necessary to mount once, not once per driver.
You create an empty folder called test and within that another empty folder called offline. The wim file will be mounted to that folder.
Remove a specific driver from the image. Multiple drivers can be removed on one command line. For example, type:
Removing a boot-critical driver package can make the offline Windows image unbootable
Download and install drivers in Windows 8.1
Windows comes with drivers for many devices, such as printers, displays, keyboards, and TVs. A driver is software that a device uses to work with your PC. Every device needs a driver to work with your PC. So, in many cases, you can plug in a device, and it’ll work automatically.
Windows can also download device software and info. This might include an app that the device manufacturer created to go with your device or info like the product name, manufacturer, and model number, to help you distinguish between similar devices.
Drivers are updated occasionally. Windows can update them automatically, or you can install the updated drivers yourself. It’s important for you to have confidence in the updated drivers you install. Windows notifies you if it detects a suspicious or unsafe driver you shouldn’t install.
Windows Update checks for updated drivers and software for your devices and install them automatically. Keeping Windows Update on is a good way to make sure your devices continues to work properly and you get the best experience with them.
Note: PCs running Windows RT 8.1 always automatically download and install drivers, apps, and info for your devices.
To check that automatic updating is on
Swipe in from the right edge of the screen, tap Settings, and then tap Change PC settings. (If you’re using a mouse, point to the lower-right corner of the screen, move the mouse pointer up, click Settings, and then click Change PC settings.)
Tap or click Update and recovery, and then tap or click Windows Update.
Tap or click Choose how updates get installed.
Under Important updates, choose Install updates automatically (recommended).
If your device came with a disc, it might contain software that installs a driver. Before you install a driver from a disc, check the info that comes with it to be sure it supports your current version of Windows.
You can also search for new drivers on the manufacturer’s website. Driver updates are often available in the support section of their website. Download the latest driver for your device, and follow the installation instructions on the website. You can usually double-tap or double-click the downloaded file to install the driver on your PC.
If the driver you got from a disc or downloaded from a website doesn’t install itself, you might need to install manually.
To manually install a driver
You must be signed in as an administrator to follow these steps.
Swipe in from the right edge of the screen, and then tap Search. (If you’re using a mouse, point to the lower-right corner of the screen, move the mouse pointer up, and then click Search.)
Enter Device Manager in the search box, and tap or click Device Manager.
In the list of hardware categories, double-tap or double-click the category your device is in and then double-tap or double-click the device you want. For example, to see your video card, tap or click Display adapters, and then double-tap or double-click the video card name.
Tap or click the Driver tab, tap or click Update Driver, and then follow the instructions.  You might be asked for an admin password or to confirm your choice.
Occasionally, you might see a notification that a driver is unsigned, has been changed since it was signed, or can’t be installed by Windows. We recommend that you don’t install unsigned or changed drivers.
A digitally signed driver includes a digital signature, which is an electronic security mark that indicates the publisher of software and whether someone has tampered with it since it was signed. If a driver has been signed by a publisher that has verified its identity with a certification authority, you can be confident that the driver comes from that publisher and hasn’t been changed.
If you see any of the following notifications when you’re installing a driver, you should stop the installation and go to your device manufacturer’s website to get a digitally signed driver for your device.
Windows can’t verify the publisher of this driver software
The driver doesn’t have a digital signature or has been signed with a digital signature that wasn’t verified by a certification authority. You should only install this driver if you got it from the manufacturer’s disc or from your system administrator.
This driver hasn’t been signed
The driver hasn’t been digitally signed by a verified publisher. The driver might have been changed to include malware that could harm your PC or steal info. In rare cases, legitimate publishers do change drivers after they’ve been digitally signed, but you should only install an unsigned driver if you got it from a device manufacturer’s disc.
Unfortunately, there’s no trustworthy source of info that indicates who has published an unsigned driver. Anyone can change the contents of an unsigned driver, and there’s no way to know why it was changed. Most manufacturers now digitally sign the drivers they create before releasing them to the public.
Windows requires a digitally signed driver
A driver that lacks a valid digital signature, or has a signature that was changed after it was signed, can’t be installed on 64-bit versions of Windows. You’ll only see this notification if you have a 64-bit version of Windows and try to install such a driver on it.


