- Windows Machine File Copy task
- YAML snippet
- Arguments
- Open source
- I get a system error 53 when using this task. Why?
- Do I need an agent?
- I’m having problems. How can I troubleshoot them?
- I can’t select a default agent pool and I can’t queue my build or release. How do I fix this?
- My NuGet push task is failing with the following error: «Error: unable to get local issuer certificate». How can I fix this?
- I use TFS on-premises and I don’t see some of these features. Why not?
- Access Linux filesystems in Windows and WSL 2
- Getting started
- Accessing these files with File Explorer
- Limitations
- Give us your feedback!
- Using the Windows Headers
- Visual C++ and the Windows Header Files
- Macros for Conditional Declarations
- Setting WINVER or _WIN32_WINNT
- Controlling Structure Packing
- Faster Builds with Smaller Header Files
Windows Machine File Copy task
Azure Pipelines | Azure DevOps Server 2020 | Azure DevOps Server 2019 | TFS 2018 — TFS 2015
Use this task to copy application files and other artifacts such as PowerShell scripts and PowerShell-DSC modules that are required to install the application on Windows Machines. It uses RoboCopy, the command-line utility built for fast copying of data.
In Microsoft Team Foundation Server (TFS) 2018 and previous versions, build and release pipelines are called definitions, runs are called builds, service connections are called service endpoints, stages are called environments, and jobs are called phases.
YAML snippet
Arguments
| Argument | Description |
|---|---|
| Source | The path to the files to copy. Can be a local physical path such as c:\files or a UNC path such as \\myserver\fileshare\files . You can use pre-defined system variables such as $(Build.Repository.LocalPath) (the working folder on the agent computer), which makes it easy to specify the location of the build artifacts on the computer that hosts the automation agent. |
| Machines | A comma-separated list of machine FQDNs or IP addresses, optionally including the port number. Can be: — The name of an Azure Resource Group. — A comma-delimited list of machine names. Example: dbserver.fabrikam.com, dbserver_int.fabrikam.com:5986,192.168.34:5986 — An output variable from a previous task. |
| Admin Login | The username of either a domain or a local administrative account on the target host(s). — Formats such as domain\username, username, and machine-name\username are supported. — UPN formats such as username@domain.com and built-in system accounts such as NT Authority\System are not supported. |
| Password | The password for the administrative account specified above. Consider using a secret variable global to the build or release pipeline to hide the password. Example: $(passwordVariable) |
| Destination Folder | The folder on the Windows machine(s) to which the files will be copied. Example: C:\FabrikamFibre\Web |
| Advanced — Clean Target | Set this option to delete all the files in the destination folder before copying the new files to it. |
| Advanced — Copy Files in Parallel | Set this option to copy files to all the target machines in parallel, which can speed up the copying process. |
| Advanced — Additional Arguments | Arguments to pass to the RoboCopy process. Example: /min:33553332 /l |
| Select Machines By | Depending on how you want to specify the machines in the group when using the Filter Criteria parameter, choose Machine Names or Tags. |
| Filter Criteria | Optional. A list of machine names or tag names that identifies the machines that the task will target. The filter criteria can be: — The name of an Azure Resource Group. — An output variable from a previous task. — A comma-delimited list of tag names or machine names. Format when using machine names is a comma-separated list of the machine FQDNs or IP addresses. Specify tag names for a filter as |
| Control options | See Control options |
Open source
This task is open source on GitHub. Feedback and contributions are welcome.
I get a system error 53 when using this task. Why?
Typically this occurs when the specified path cannot be located. This may be due to a firewall blocking the necessary ports for file and printer sharing, or an invalid path specification. For more details, see Error 53 on TechNet.
Do I need an agent?
You need at least one agent to run your build or release.
I’m having problems. How can I troubleshoot them?
I can’t select a default agent pool and I can’t queue my build or release. How do I fix this?
My NuGet push task is failing with the following error: «Error: unable to get local issuer certificate». How can I fix this?
This can be fixed by adding a trusted root certificate. You can either add the NODE_EXTRA_CA_CERTS=file environment variable to your build agent, or you can add the NODE.EXTRA.CA.CERTS=file task variable in your pipeline. See Environment variables for more details.
I use TFS on-premises and I don’t see some of these features. Why not?
Some of these features are available only on Azure Pipelines and not yet available on-premises. Some features are available on-premises if you have upgraded to the latest version of TFS.
Access Linux filesystems in Windows and WSL 2
September 10th, 2020
Starting with Windows Insiders preview build 20211, WSL 2 will be offering a new feature: wsl —mount . This new parameter allows a physical disk to be attached and mounted inside WSL 2, which enables you to access filesystems that aren’t natively supported by Windows (such as ext4).
So, if you’re dual booting with Windows & Linux using different disks, you can now access your Linux files from Windows!
Getting started
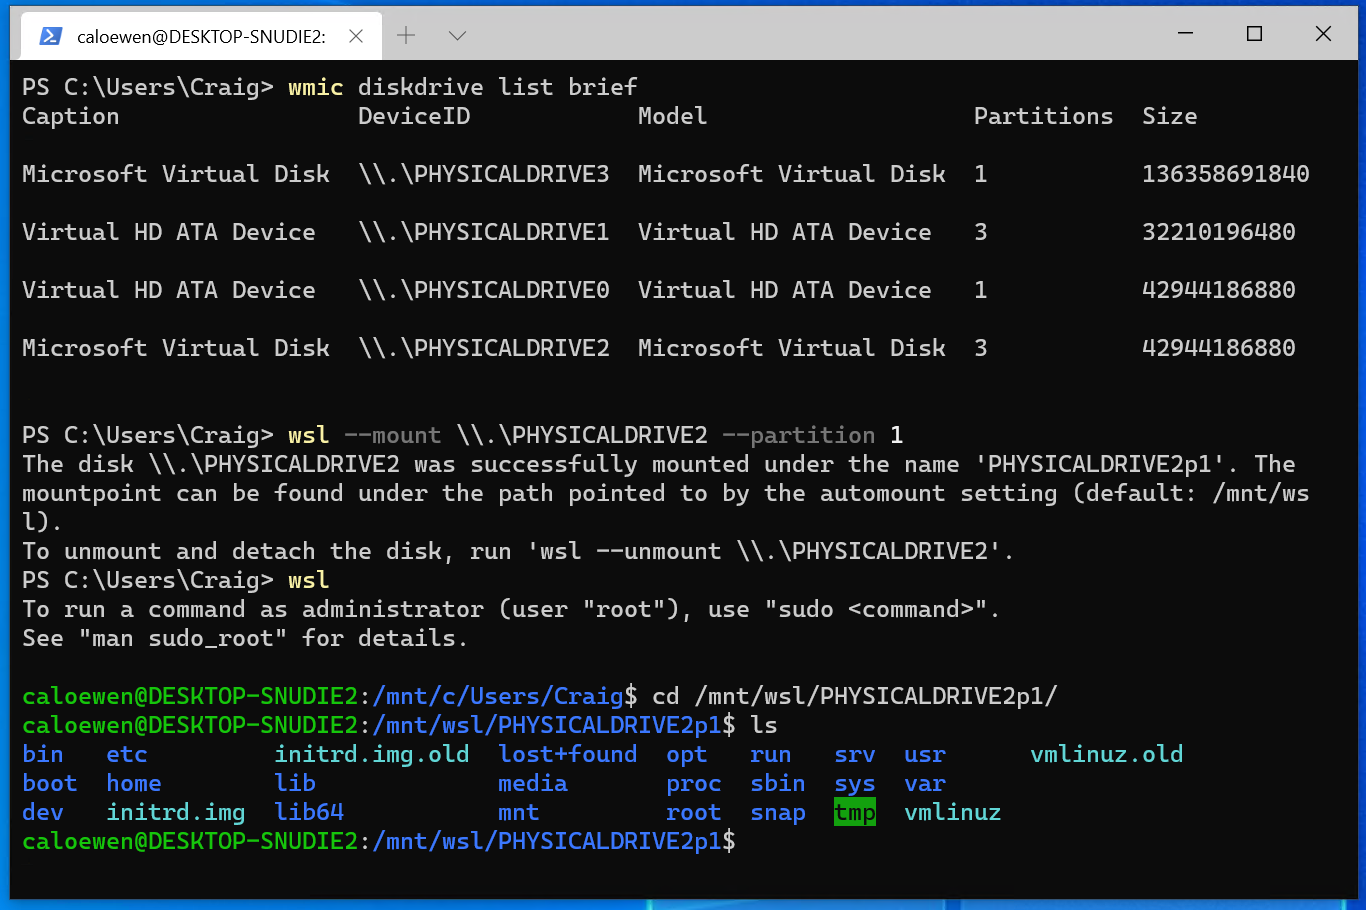
To mount a disk, open a PowerShell window with administrator privileges and run:
To list the available disks in Windows, run:
To unmount and detach the disk from WSL 2, run
The disks paths are available under the ‘DeviceID’ columns. Usually under the \\.\\\.\PHYSICALDRIVE* format. Below is an example of mounting a specific partition of a given hard disk into WSL and browsing its files.
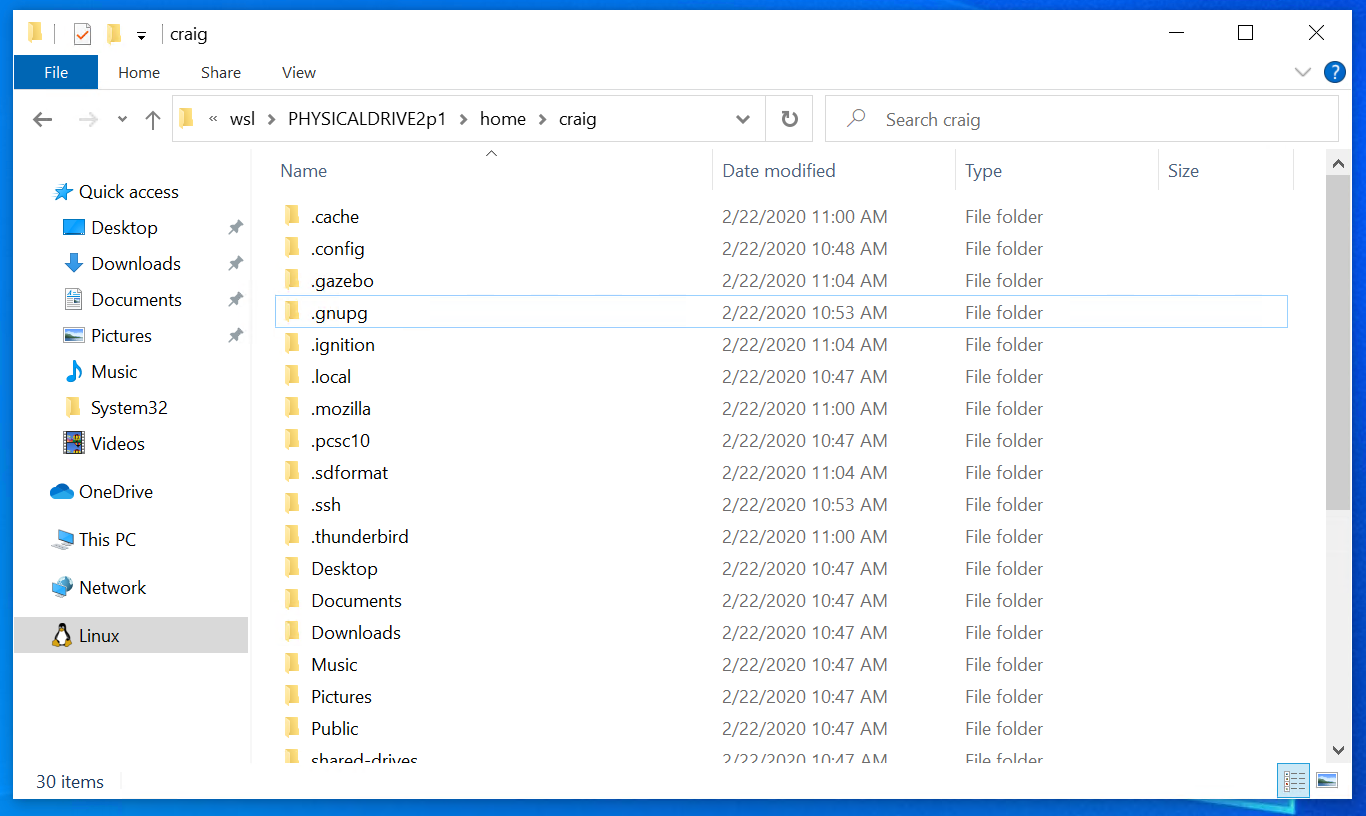
Accessing these files with File Explorer
Once mounted, it’s also possible to access these disks through the Windows explorer by navigating to \wsl$ and then to the mount folder.
Limitations
By default, wsl —mount attempts to mount the disk as ext4. To specify a filesystem, or for more advanced scenarios, check out Mount a disk in WSL 2.
Also please note that this feature comes with the limitation that only physical disks can be attached to WSL 2. At this time, it’s not possible to attach a single partition. More details on the limitations here.
Give us your feedback!
If you run into any issues, or have feedback for our team please file an issue on our Github , and if you have general questions about WSL you can find all of our team members that are on Twitter on this twitter list.
Using the Windows Headers
The header files for the Windows API enable you to create 32- and 64-bit applications. They include declarations for both Unicode and ANSI versions of the API. For more information, see Unicode in the Windows API. They use data types that enable you to build both 32- and 64-bit versions of your application from a single source code base. For more information, see Getting Ready for 64-bit Windows. Additional features include Header Annotations and STRICT Type Checking.
Visual C++ and the Windows Header Files
Microsoft Visual C++ includes copies of the Windows header files that were current at the time Visual C++ was released. Therefore, if you install updated header files from an SDK, you may end up with multiple versions of the Windows header files on your computer. If you do not ensure that you are using the latest version of the SDK header files, you will receive the following error code when compiling code that uses features that were introduced after Visual C++ was released: error C2065: undeclared identifier.
Macros for Conditional Declarations
Certain functions that depend on a particular version of Windows are declared using conditional code. This enables you to use the compiler to detect whether your application uses functions that are not supported on its target version(s) of Windows. To compile an application that uses these functions, you must define the appropriate macros. Otherwise, you will receive the C2065 error message.
The Windows header files use macros to indicate which versions of Windows support many programming elements. Therefore, you must define these macros to use new functionality introduced in each major operating system release. (Individual header files may use different macros; therefore, if compilation problems occur, check the header file that contains the definition for conditional definitions.) For more information, see SdkDdkVer.h.
The following table describes the preferred macros used in the Windows header files. If you define NTDDI_VERSION, you must also define _WIN32_WINNT.
| Minimum system required | Value for NTDDI_VERSION |
|---|---|
| Windows 10 1903 «19H1» | NTDDI_WIN10_19H1 (0x0A000007) |
| Windows 10 1809 «Redstone 5» | NTDDI_WIN10_RS5 (0x0A000006) |
| Windows 10 1803 «Redstone 4» | NTDDI_WIN10_RS4 (0x0A000005) |
| Windows 10 1709 «Redstone 3» | NTDDI_WIN10_RS3 (0x0A000004) |
| Windows 10 1703 «Redstone 2» | NTDDI_WIN10_RS2 (0x0A000003) |
| Windows 10 1607 «Redstone 1» | NTDDI_WIN10_RS1 (0x0A000002) |
| Windows 10 1511 «Threshold 2» | NTDDI_WIN10_TH2 (0x0A000001) |
| Windows 10 1507 «Threshold» | NTDDI_WIN10 (0x0A000000) |
| WindowsВ 8.1 | NTDDI_WINBLUE (0x06030000) |
| WindowsВ 8 | NTDDI_WIN8 (0x06020000) |
| WindowsВ 7 | NTDDI_WIN7 (0x06010000) |
| Windows ServerВ 2008 | NTDDI_WS08 (0x06000100) |
| WindowsВ Vista with Service PackВ 1 (SP1) | NTDDI_VISTASP1 (0x06000100) |
| WindowsВ Vista | NTDDI_VISTA (0x06000000) |
| Windows ServerВ 2003 with Service PackВ 2 (SP2) | NTDDI_WS03SP2 (0x05020200) |
| Windows ServerВ 2003 with Service PackВ 1 (SP1) | NTDDI_WS03SP1 (0x05020100) |
| Windows ServerВ 2003 | NTDDI_WS03 (0x05020000) |
| WindowsВ XP with Service PackВ 3 (SP3) | NTDDI_WINXPSP3 (0x05010300) |
| WindowsВ XP with Service PackВ 2 (SP2) | NTDDI_WINXPSP2 (0x05010200) |
| WindowsВ XP with Service PackВ 1 (SP1) | NTDDI_WINXPSP1 (0x05010100) |
| WindowsВ XP | NTDDI_WINXP (0x05010000) |
The following tables describe other macros used in the Windows header files.
| Minimum system required | Minimum value for _WIN32_WINNT and WINVER |
|---|---|
| WindowsВ 10 | _WIN32_WINNT_WIN10 (0x0A00) |
| WindowsВ 8.1 | _WIN32_WINNT_WINBLUE (0x0603) |
| WindowsВ 8 | _WIN32_WINNT_WIN8 (0x0602) |
| WindowsВ 7 | _WIN32_WINNT_WIN7 (0x0601) |
| Windows ServerВ 2008 | _WIN32_WINNT_WS08 (0x0600) |
| WindowsВ Vista | _WIN32_WINNT_VISTA (0x0600) |
| Windows ServerВ 2003 with SP1, WindowsВ XP with SP2 | _WIN32_WINNT_WS03 (0x0502) |
| Windows ServerВ 2003, WindowsВ XP | _WIN32_WINNT_WINXP (0x0501) |
| Minimum version required | Minimum value of _WIN32_IE |
|---|---|
| Internet Explorer 11.0 | _WIN32_IE_IE110 (0x0A00) |
| Internet Explorer 10.0 | _WIN32_IE_IE100 (0x0A00) |
| Internet Explorer 9.0 | _WIN32_IE_IE90 (0x0900) |
| Internet Explorer 8.0 | _WIN32_IE_IE80 (0x0800) |
| Internet Explorer 7.0 | _WIN32_IE_IE70 (0x0700) |
| Internet Explorer 6.0 SP2 | _WIN32_IE_IE60SP2 (0x0603) |
| Internet Explorer 6.0 SP1 | _WIN32_IE_IE60SP1 (0x0601) |
| Internet Explorer 6.0 | _WIN32_IE_IE60 (0x0600) |
| Internet Explorer 5.5 | _WIN32_IE_IE55 (0x0550) |
| Internet Explorer 5.01 | _WIN32_IE_IE501 (0x0501) |
| Internet Explorer 5.0, 5.0a, 5.0b | _WIN32_IE_IE50 (0x0500) |
Setting WINVER or _WIN32_WINNT
You can define these symbols by using the #define statement in each source file, or by specifying the /D compiler option supported by Visual C++.
For example, to set WINVER in your source file, use the following statement:
#define WINVER 0x0502
To set _WIN32_WINNT in your source file, use the following statement:
#define _WIN32_WINNT 0x0502
To set _WIN32_WINNT using the /D compiler option, use the following command:
cl -c /D_WIN32_WINNT=0x0502 source.cpp
For information on using the /D compiler option, see /D (preprocessor definitions).
Note that some features introduced in the latest version of Windows may be added to a service pack for a previous version of Windows. Therefore, to target a service pack, you may need to define _WIN32_WINNT with the value for the next major operating system release. For example, the GetDllDirectory function was introduced in Windows ServerВ 2003 and is conditionally defined if _WIN32_WINNT is 0x0502 or greater. This function was also added to WindowsВ XP with SP1. Therefore, if you were to define _WIN32_WINNT as 0x0501 to target WindowsВ XP, you would miss features that are defined in WindowsВ XP with SP1.
Controlling Structure Packing
Projects should be compiled to use the default structure packing, which is currently 8 bytes because the largest integral type is 8 bytes. Doing so ensures that all structure types within the header files are compiled into the application with the same alignment the Windows API expects. It also ensures that structures with 8-byte values are properly aligned and will not cause alignment faults on processors that enforce data alignment.
Faster Builds with Smaller Header Files
You can reduce the size of the Windows header files by excluding some of the less common API declarations as follows:
Define WIN32_LEAN_AND_MEAN to exclude APIs such as Cryptography, DDE, RPC, Shell, and Windows Sockets.


