- How to Fix Windows not Remembering Window Positions and Sizes?
- What Causes Window Size And Positioning Issue?
- How Size And Position Changes Are Remembered In Windows 7 And 10?
- Method 1: Cascading
- Method 2: Booting Windows In Safe Mode And Reproducing The Issue
- Method 3: Using Third-Party Solutions
- Installation:
- Usage:
- Remember window positions
- WindowManager: remember window sizes and positions in Windows
- WindowManager
- Closing Words
How to Fix Windows not Remembering Window Positions and Sizes?
Microsoft’s Windows operating system is known for its unusual bugs and errors. However, the problem of it not remembering window positions and sizes appears to be more of a user experience issue (in most cases) rather than it being a definite bug. People who use Windows very often when working, generally open and close multiple windows (or tabs) at one time. They want Windows to remember the dimensions and position they chose for a distinct window so that they don’t have to do it all over again when they reopen the window. However, when they reopen (or open a new) window, it doesn’t appear how they want it to be.
What Causes Window Size And Positioning Issue?
We will now briefly list some of the causes of this issue:
- PC Reboot – Rebooting the computer makes you start all over. So you lose your previously saved size and position of the window.
- Updating Windows – Similarly, updating Windows means you have to restart your computer. It will also cause the issue.
- Interfering Software – There might be an installed software or virus interfering with your Windows settings which can cause this issue to happen.
- Lack of Understanding – Sometimes, users are not aware of how Windows manages the size and position settings of windows. Windows manages these settings uniquely for Windows XP and below, and differently for Windows 7 and afterward.
How Size And Position Changes Are Remembered In Windows 7 And 10?
Firstly, rather than thinking of it as an issue, if a user is aware of how Windows remembers its size and position settings, he/she will be in a better position to use it to his/her benefit. So let’s look into how Windows manages this. This is the rule:
“Windows 7 and 10 will remember the last window closed (of a single program) as a global position.”
Let’s simplify what that means. It basically means whatever window you last closed, the size and position you had chosen for it, will be used for the next window you open. Let’s take an example. For instance, you opened a folder named ‘Old Window’ and positioned it to the right side like this:
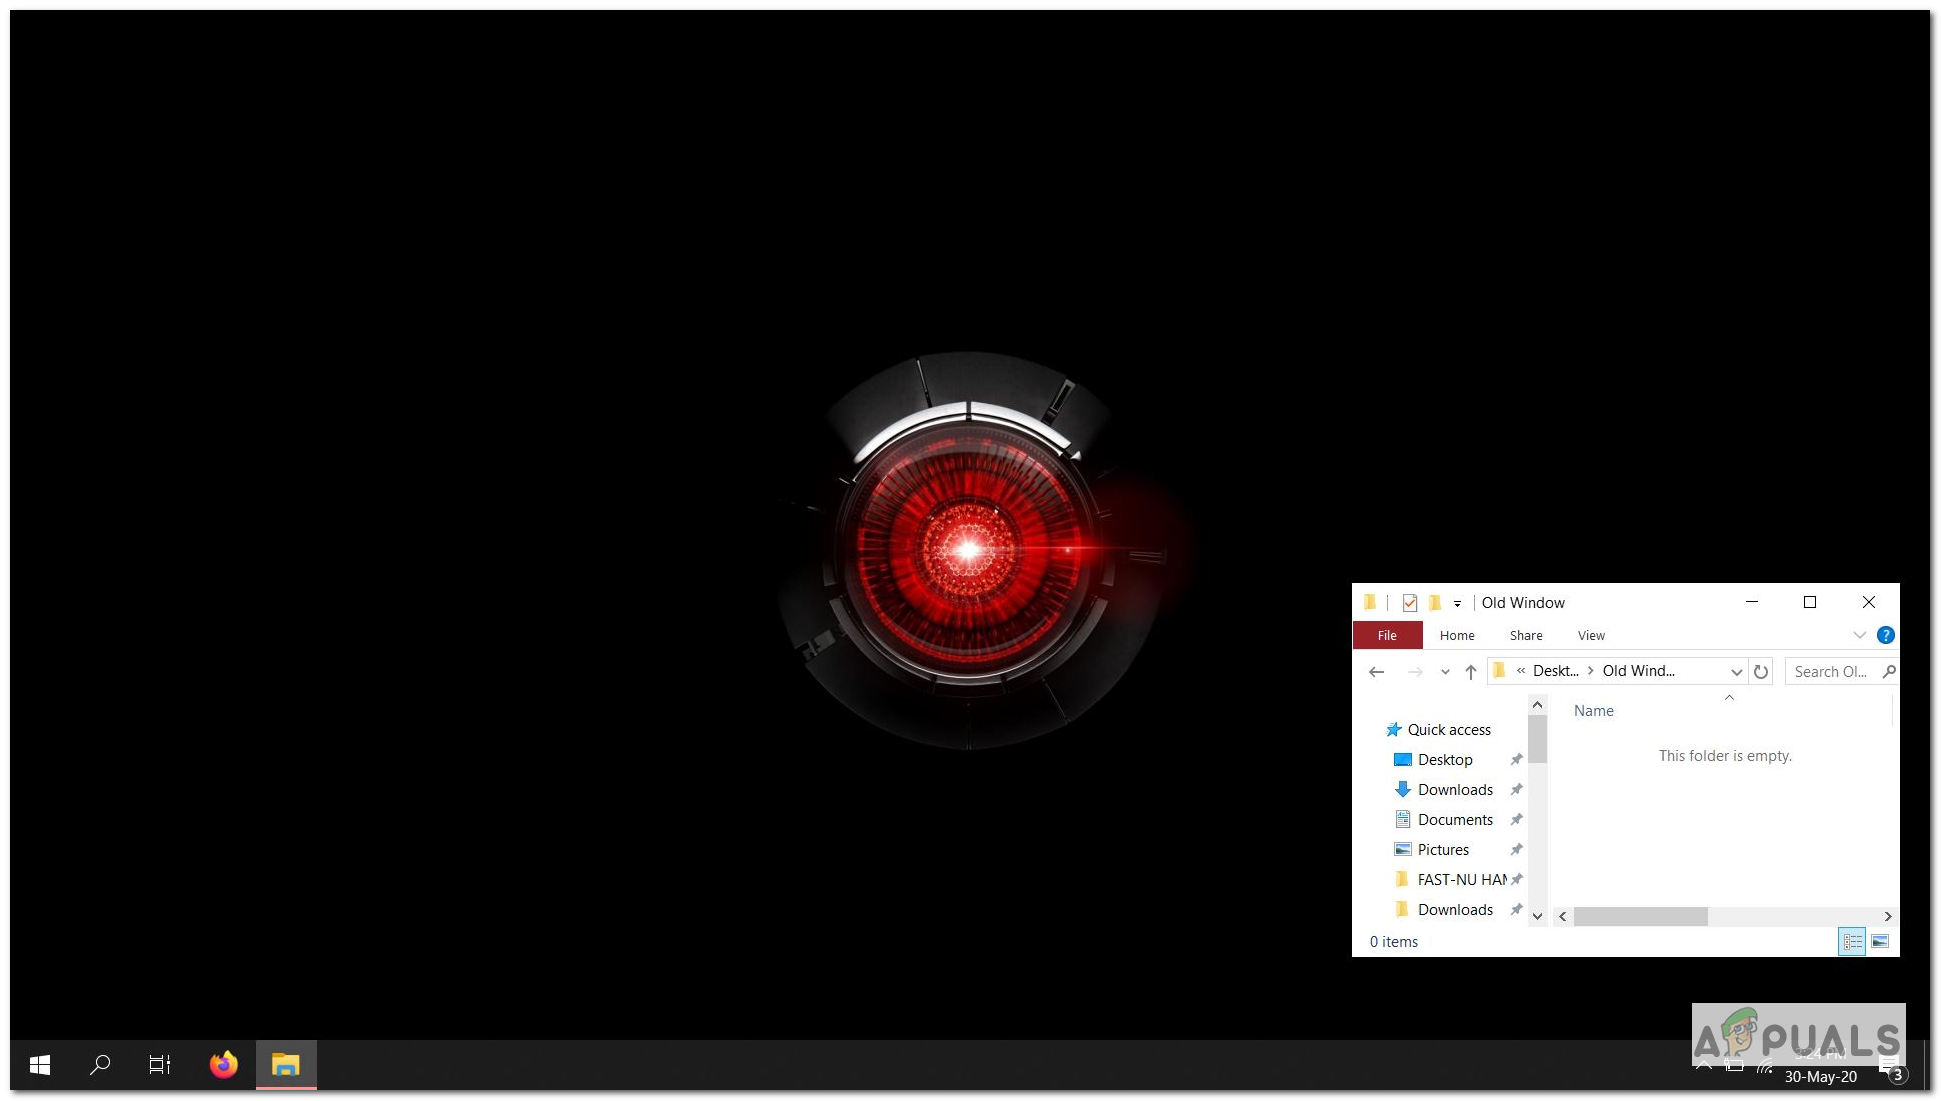 Resizing and Re-Positioning a Window
Now if you close it (or not), and open a new folder named ‘New Window’ here, It will automatically position and resize itself as the ‘Old Window’:
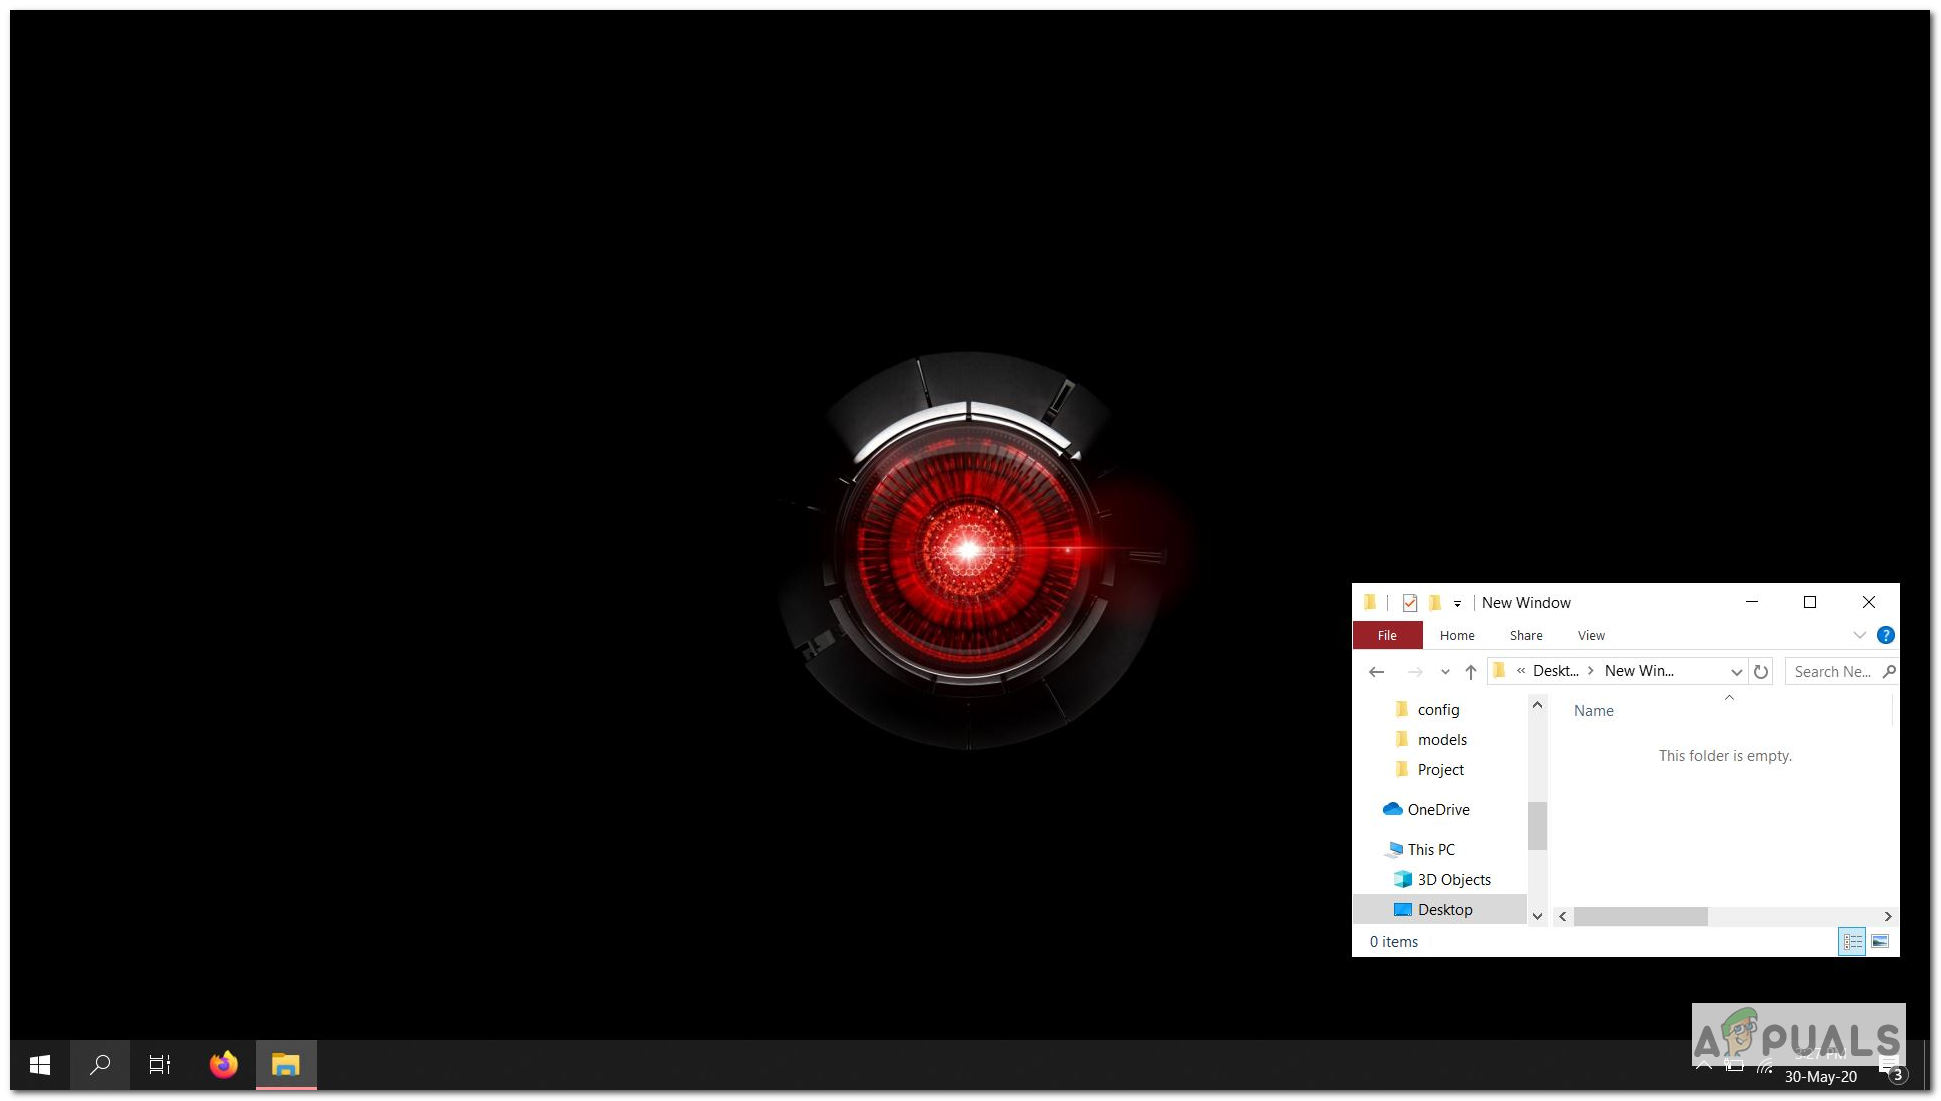 New Window positioned like Latter Window
If you keep this in mind, you will exactly know when Windows does the resizing/repositioning and when it doesn’t.
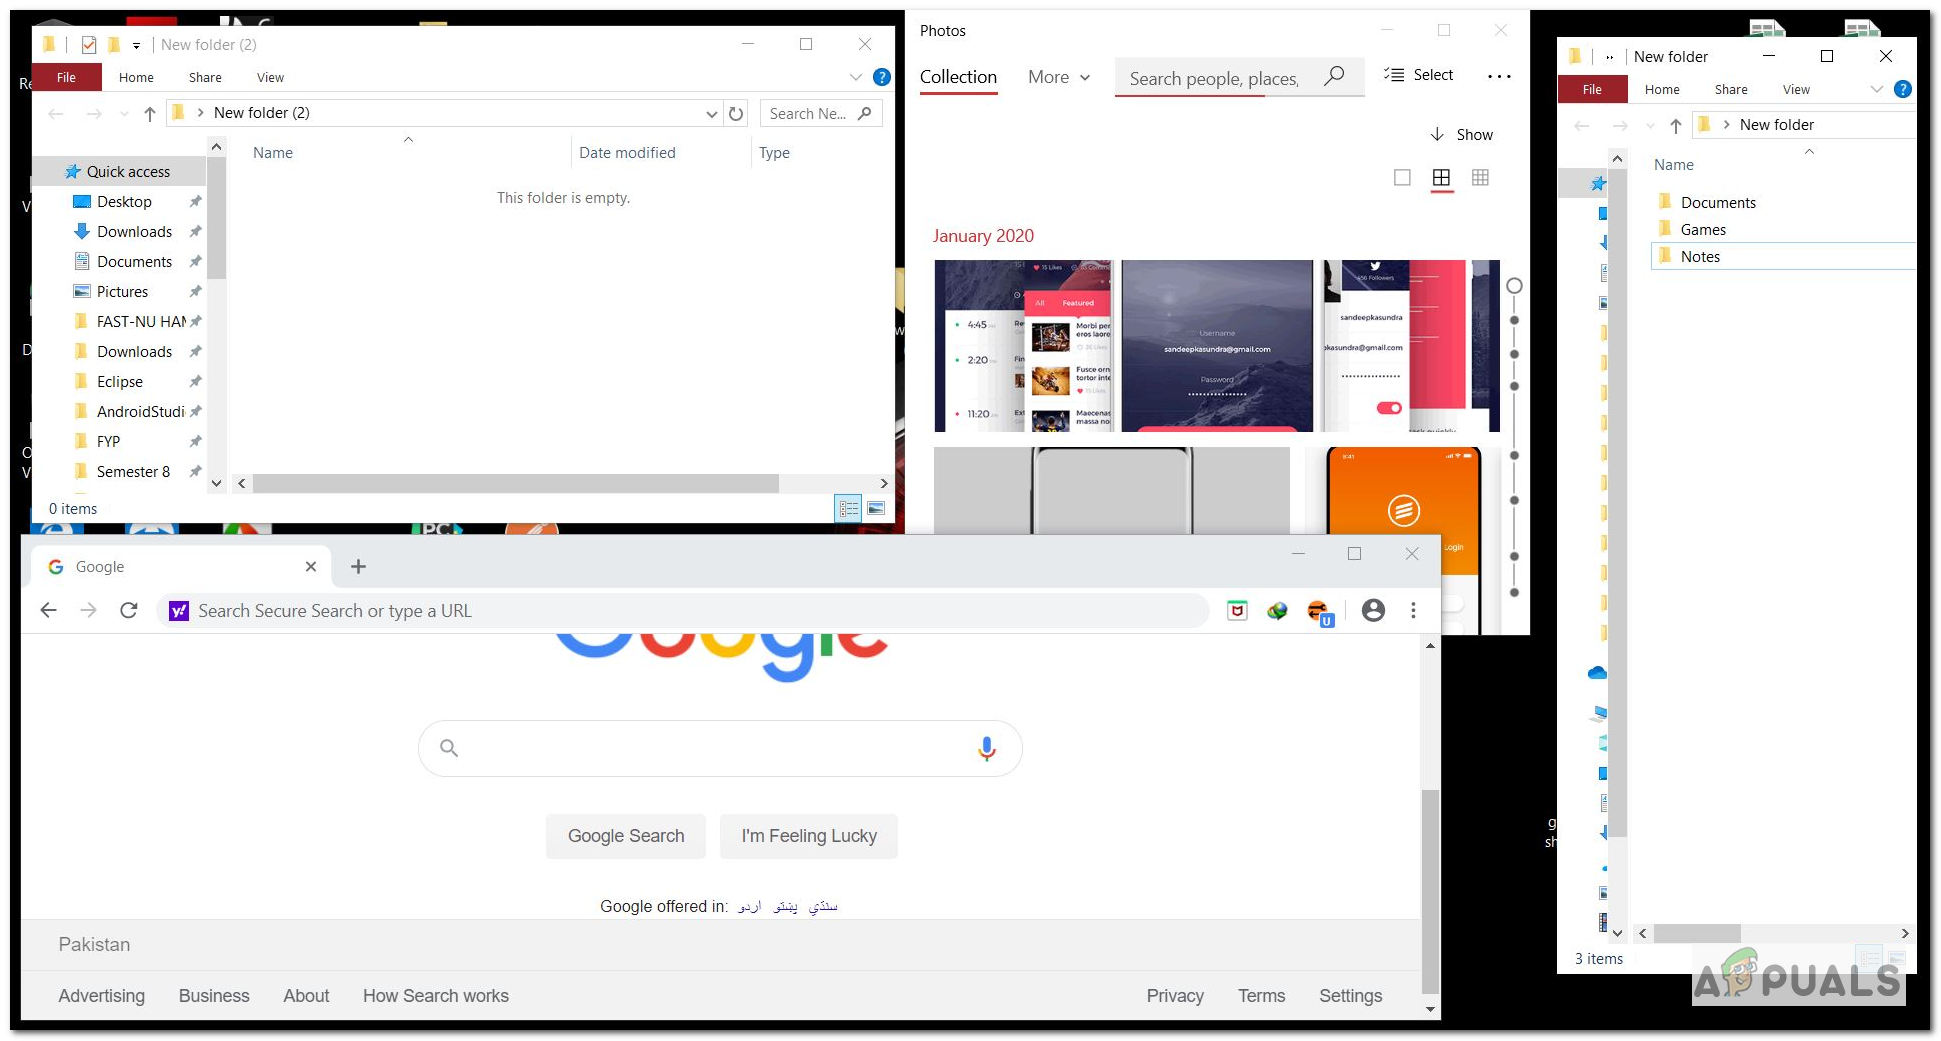
There is an important point to note. The remembrance part only works for a particular program type. For instance, if you close a window of File Explorer and open a new window of Photos, the auto-positioning and resizing won’t be the same for both Photos window and File Explorer window because both windows are of different programs.
So that’s how sizing and positioning work for windows. Now, if your Windows is not even remembering the last closed window size, then it means there is some issue that needs to be resolved. Lets, look at some of the possible solutions you can try.
Method 1: Cascading
Cascading is one possible fix to the issue. Follow the given steps below:
- Firstly, Restart your computer. This is an optional step but it might help in some cases.
- Now open any window(like File Explorer), of which size and position you want to remember.
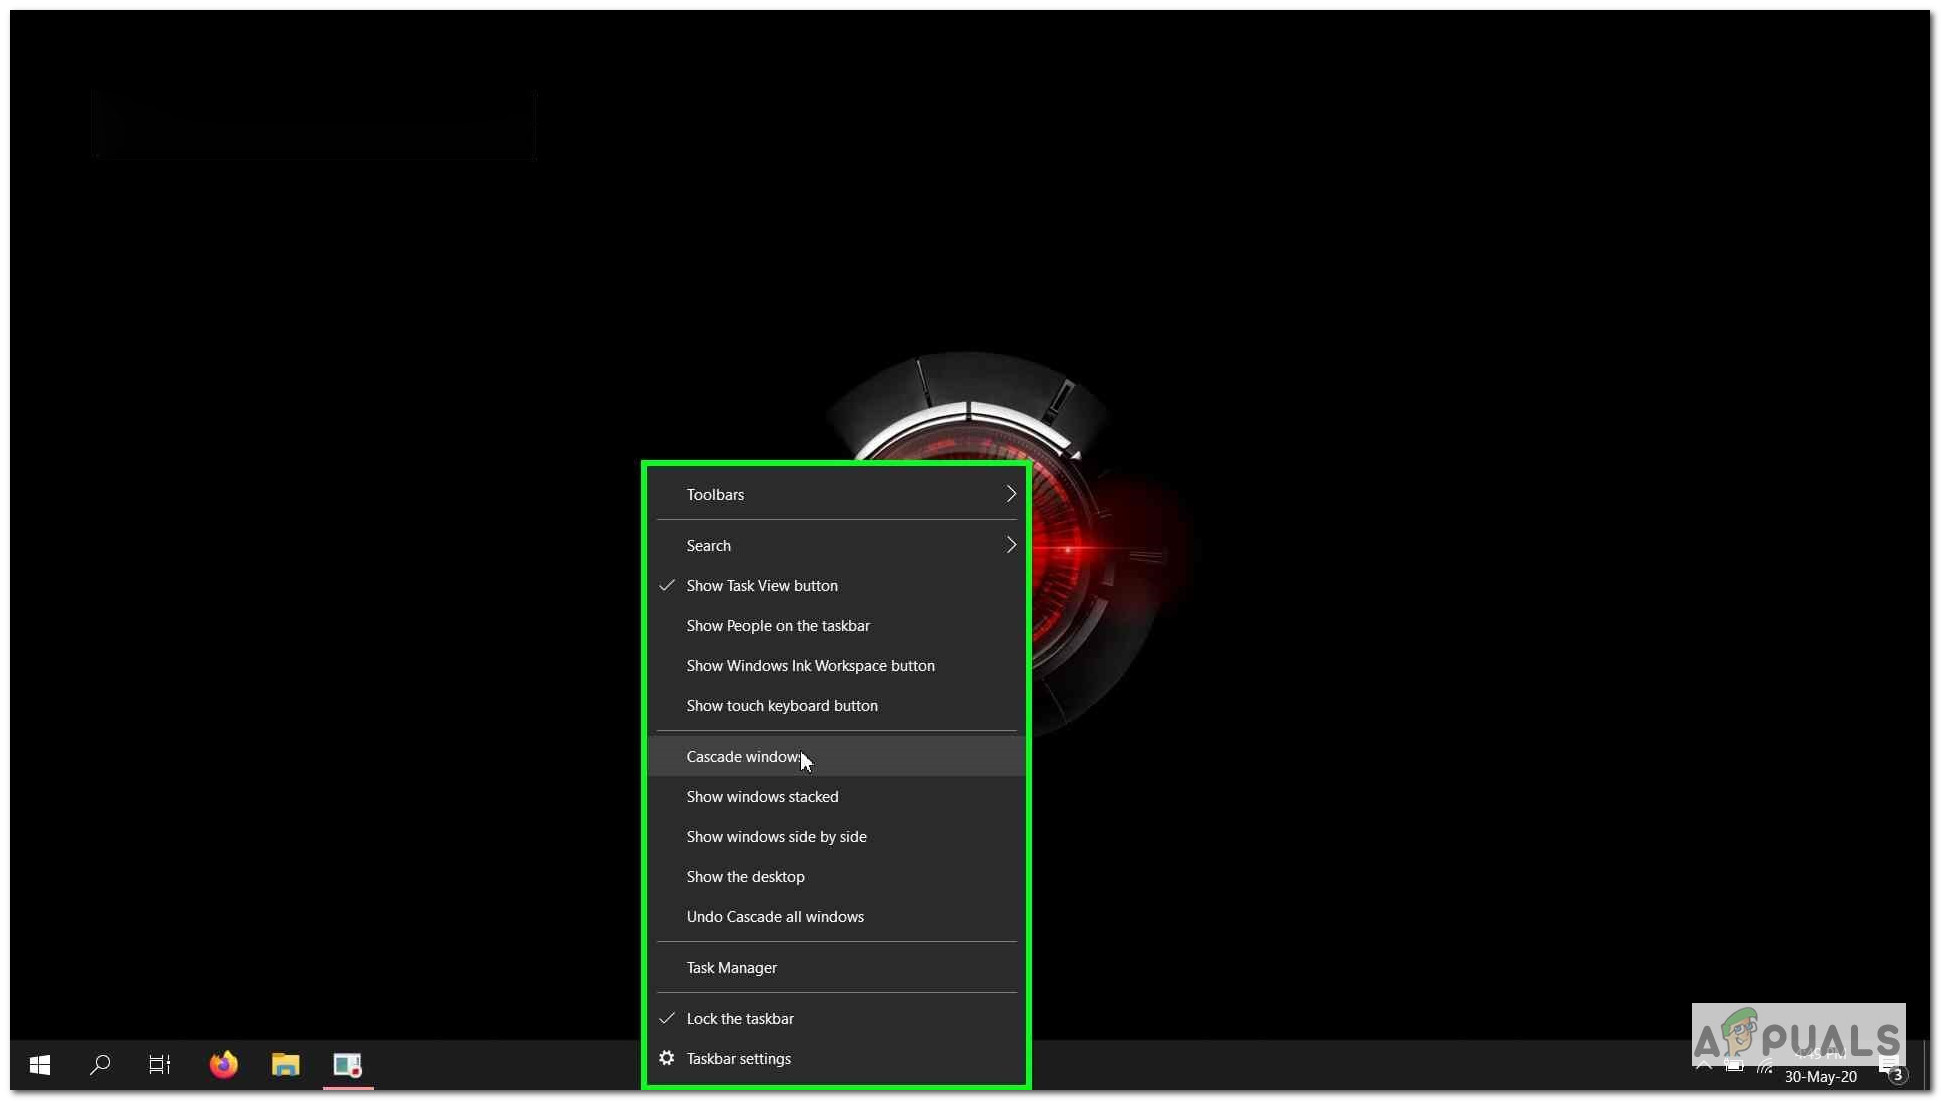
- Right-click on the Taskbar (the bar at the bottom of the screen).
- Choose the Cascade windows option (in case of Windows 10).
 Cascade Windows Option
 - This will resize the window to a pre-defined size. After that, you can expand the window to your desired size and position. Then close it. It should open to that size and position next time you open it.
 Cascade Windows Option
Method 2: Booting Windows In Safe Mode And Reproducing The Issue
If you are still encountering the issue of Windows not remembering window sizes and positions (even for the last closed window), then you could try booting your Windows in Safe mode:
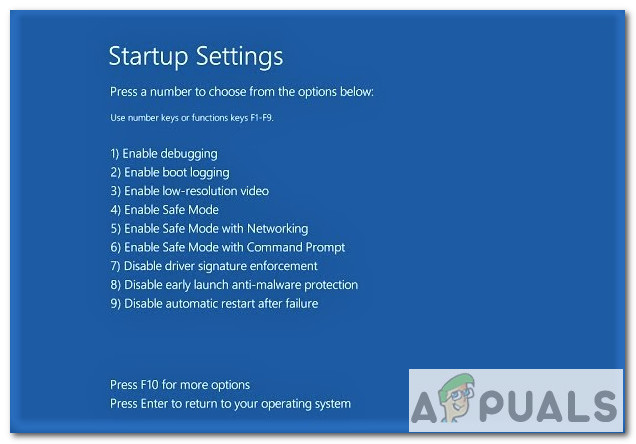 Safe Mode Option
Steps to boot Windows 10 in safe mode are mentioned below:
-
- Click the Windows button in the bottom left corner.
- Now, click the Power Button.
- Hold down the Shift key and click Restart.
- Now, choose the Troubleshoot option and afterward, Advancedoptions.
- Now in advanced options, choose Start-up settings and then click the Restart button.
- Various options will be displayed on restart. Press F4 to boot Windows in safe mode.
Once booting your Windows in safe mode. Check if the issue persists.
-
- That is open a File Explorer window.
- Reposition it to the right side and maybe resize it.
- Close the window.
- Reopen it.
- If the window does not appear on the right with changed size. Then the issue still exists.
If booting fixed the problem, then it’s highly likely that some installed software is interfering with your Windows settings. You could also try doing a virus scan to help identify the issue.
Method 3: Using Third-Party Solutions
If no above solution works. Then you could always use third-party solutions such as WinSize2 that can help you with resizing and moving windows for multiple windows at once. WinSize2 is a free solution available for all Windows versions (as stated on their website). WinSize2 can help you remember window size and position changes for each window you open regardless of its type and opening sequence. How does it do that?
WinSize2 identifies a particular window position and its size by remembering its title. Each time when a user opens a window, WinSize2 matches the title with the internal record of titles stored within the software.
Installation:
- To get started, download WinSize2 here.
 WinSize2 Download
- After downloading, unzip the file named “WinSize2_2.38.04.zip” which is likely placed in your downloads folder.
- The next step would be to run “WinSize2_Update.exe” and follow the instructions to install the software. The program runs on the background when installed.
Usage:
A special hotkey Ctrl+Alt+Z manages all activities of WinSize2. Pressing the hotkey 1, 2 or 3 times calls these functions mentioned below:
- One time, you can store the position and size of any window or overwrite it.
- Two times, you can delete the list entry for a window which you saved to be remembered.
- Three times, you can change the Special Parameters, to set options for any title in the list of WinSize2.
You can find more details about WinSize2 here. There is also a guidebook available once you download the software.
Another well-recognized program you can use is WindowManager by DeskSoft. It’s not free but you can use it for a 30-day free trial.
Remember window positions
Okay so I’m really going back in time, I seem to remember on window 3. something that you could tell it to remember a window position so it opened in the same place each time.
I use a widescreen monitor and have several apps open at the same time.
Is it possible to «tell» an app to open at a certain position on screen. i.e I like my calculator to be bottom right corner, but it always opens up top left.
Thank you for visiting the Microsoft Answers Community.
Does this happen with all of your applications, or just calculator?
Windows stores the location where you close your application and opens it the next time in that location. However, there could be third party software that may be interfering with this process.
Try performing a clean boot:
Step 1: Perform a clean boot
Note If the computer is connected to a network, network policy settings may prevent you from following these steps. We strongly recommend that you do not use the System Configuration utility to modify the advanced boot options on the computer unless a Microsoft support engineer directs you to do this. Doing this may make the computer unusable.
· Log on to the computer by using an account that has administrator rights.
· Click Start, type msconfig.exe in the Start Search box, and then press ENTER to start the System Configuration Utility. If you are prompted for an administrator password or for confirmation, type your password, or click Continue.
· On the General tab, click Selective Startup, and then click to clear the Load startup items check box. (The Use Original Boot.ini check box is unavailable.)
· On the Services tab, click to select the Hide all Microsoft services check box, and then click Disable all.
Note Following this step lets Microsoft services continue to run. These services include Networking, Plug and Play, Event Logging, Error Reporting, and other services. If you disable these services, you may permanently delete all restore points. Do not do this if you want to use the System Restore utility together with existing restore points.
· Click OK, and then click Restart.
Step 2: Enable half of the services
· Follow steps 1a and 1b to start the System Configuration utility.
· Click the Services tab, and then click to select the Hide all Microsoft services check box.
· Click to select half of the check boxes in the Service list.
· Click OK, and then click Restart.
Step 3: Determine whether the problem returns
If the problem still occurs, repeat step 1 and step 2. In step 2, click to clear half of the check boxes that you originally selected in the Service list.
If the problem does not occur, repeat step 1 and step 2. In step 2, select only half of the remaining check boxes that are cleared in the Service list. Repeat these steps until you have selected all the check boxes.
If only one service is selected in the Service list, and you still experience the problem, the selected service causes the problem. Go to step 6. If no service causes this problem, go to step 4.
Step 4: Enable half of the Startup items
Perform a clean boot by repeating step 1.
Click the Startup tab, and then click to select half of the check boxes in the Startup Item list.
Click OK, and then click Restart.
Step 5: Determine whether the problem returns
If the problem still occurs, repeat step 1 and step 4. In step 4, click to clear half of the check boxes that you originally selected in the Startup Item list.
If the problem does not occur, repeat step 1 and step 4. In step 4, select only half of the remaining check boxes that are cleared in the Startup Item list. Repeat these steps until you have selected all the check boxes.
If only one startup item is selected in the Startup Item list, and you still experience the problem, the startup item that is selected in the list is the service that is causing the problem. Go to step 6.
If no startup item causes this problem, a Microsoft service most likely causes the problem. To determine which Microsoft service may be causing the problem, repeat step 1 and step 2 without selecting the Hide all Microsoft services check box in either step.
Step 6: Resolve the problem
After you determine the startup item or the service that causes the problem, contact the program manufacturer to determine whether the problem can be resolved. Or, run the System Configuration Utility, and then click to clear the check box for the problem item.
Step 7: Reset the computer to start as usual
After you have finished troubleshooting, follow these steps to reset the reset the computer to start as usual:
· Click Start, type msconfig.exe in the Start Search box, and then press ENTER. If you are prompted for an administrator password or for confirmation, type your password, or click Continue.
· On the General tab, click the Normal Startup option, and then click OK.
· When you are prompted to restart the computer, click Restart. Collapse this imageExpand this image
Hope this helps
Chris.H
Microsoft Answers Support Engineer
Visit our Microsoft Answers Feedback Forum and let us know what you think.
WindowManager: remember window sizes and positions in Windows
WindowManager is a long-standing shareware program for the Windows operating system that remembers window sizes and positions so that they are launched using the same screen position and dimensions each time.
The program supports a variety of other features, from configuring custom dimensions and size to lots of triggers, hotkeys, and more.
Programs that don’t remember window size and position on the screen on exit or don’t load them properly on next start are frustrating. I ran into an issue with Firefox Nightly recently. I run the browser on half the screen on a 1920×1080 monitor but Firefox would also load with some space between the browser interface and the taskbar, and I could not figure out why this was happening.
WindowManager

WindowManager supports all 32-bit and 64-bit versions of Windows starting with Windows XP (including server versions).
The program is shareware but you can download a 30-day free trial from the developer website. A free alternative is listed below if you are interested in that.
The Windows software can remember the size and position of programs running on Windows so that program windows open always in the exact location on the screen.
It is not a run-and-forget type of program though. The main interface displays the available rules on start. You can select «all windows» there to add all running program windows to the rules section to get started.

A click on edit after selecting one of the programs opens the rules editor. You define matching rules — the program matches based on window title, program file name, and window class — the actions and advanced options.
Actions define window position, size, state, and other related variables. Use the get, set and pick options, or enter values manually to get started. Get pulls the current position, state, and size and enters the values automatically. Set enforces the rules so that you can verify them.
WindowManager may lock size, position and state of any window, enforce that the window is always visible on the screen (and not moved outside of it). Other options include setting the window to be always on top or at the bottom.
Advanced options let you set commands that you want execute on window open and close. The commands include clicking, moving, or typing text into the window when it opens or closes.
Once you have configured rules you can save them to the profile. The rules are enforced automatically when WindowManager runs and matching program windows get opened or closed on the system.
WindowManager supports a sophisticated triggering system to enforce rules automatically or manually. Set a hotkey for all windows of a profile or the active one to quickly enforce rules to display it in a certain position and with a certain size and state on the screen.
The program supports screen triggers to apply rules when the screen resolution changes, session triggers which activate during logon, logoff, or connect operations, power and time triggers.
The screen trigger could prove useful to users who use multiple monitors on their device or connect their computer to different monitors regularly.
Closing Words
WindowManager worked with any program window I set custom rules for. It resolved the issue with Firefox on my system but worked with Windows Explorer, Thunderbird, and any other program window that I tried it with as well. It even worked with dialog windows.
The program supports profiles that you can switch between and other nice to have features such as silent deployment options, or multi-monitor support.
The asking price of $10 is reasonable considering that the license does not expire. You may buy the «lifetime free upgrades» to include all future upgrades; if you don’t, only minor version upgrades and one year of major version upgrades are included.
Alternatives?
You can check out WindowPadX which supports moving and resizing windows among many other things. If it is just the window state you are after, check out Auto Window Manager instead.


