- Remote Desktop — Allow access to your PC
- How to enable Remote Desktop
- Windows 10 Fall Creator Update (1709) or later
- Windows 7 and early version of Windows 10
- All versions of Windows (Legacy method)
- Should I enable Remote Desktop?
- Why allow connections only with Network Level Authentication?
- Run command for remote desktop (RDP client)
- Mstsc command
- Run command for opening remote desktop session in full screen mode
- Run command for specifying the remote computer name from the command itself
- Run command to specify remote desktop connection settings using a rdp file
- Run command for Remote desktop manager
- Relevant Posts:
- Приступая к работе с клиентом для Windows Desktop Get started with the Windows Desktop client
- Установка клиента Install the client
- Обновление клиента Update the client
- Рабочие области Workspaces
- Подписка на рабочую область Subscribe to a Workspace
- Подписка с учетной записью пользователя Subscribe with a user account
- Подписка по URL-адресу Subscribe with URL
- Сведения о рабочей области Workspace details
- Обновление рабочей области Refreshing a Workspace
- Отмена подписки на рабочую область Unsubscribe from a Workspace
- Управляемые рабочие столы Managed desktops
- Параметры рабочего стола Desktop settings
- Обратная связь Give us feedback
- Получение доступа к журналам клиента Access client logs
Remote Desktop — Allow access to your PC
Applies to: Windows 10, Windows 8.1, Windows Server 2019, Windows Server 2016, Windows Server 2012 R2
You can use Remote Desktop to connect to and control your PC from a remote device by using a Microsoft Remote Desktop client (available for Windows, iOS, macOS and Android). When you allow remote connections to your PC, you can use another device to connect to your PC and have access to all of your apps, files, and network resources as if you were sitting at your desk.
You can use Remote Desktop to connect to Windows 10 Pro and Enterprise, Windows 8.1 and 8 Enterprise and Pro, Windows 7 Professional, Enterprise, and Ultimate, and Windows Server versions newer than Windows Server 2008. You can’t connect to computers running a Home edition (like Windows 10 Home).
To connect to a remote PC, that computer must be turned on, it must have a network connection, Remote Desktop must be enabled, you must have network access to the remote computer (this could be through the Internet), and you must have permission to connect. For permission to connect, you must be on the list of users. Before you start a connection, it’s a good idea to look up the name of the computer you’re connecting to and to make sure Remote Desktop connections are allowed through its firewall.
How to enable Remote Desktop
The simplest way to allow access to your PC from a remote device is using the Remote Desktop options under Settings. Since this functionality was added in the Windows 10 Fall Creators update (1709), a separate downloadable app is also available that provides similar functionality for earlier versions of Windows. You can also use the legacy way of enabling Remote Desktop, however this method provides less functionality and validation.
Windows 10 Fall Creator Update (1709) or later
You can configure your PC for remote access with a few easy steps.
- On the device you want to connect to, select Start and then click the Settings icon on the left.
- Select the System group followed by the Remote Desktop item.
- Use the slider to enable Remote Desktop.
- It is also recommended to keep the PC awake and discoverable to facilitate connections. Click Show settings to enable.
- As needed, add users who can connect remotely by clicking Select users that can remotely access this PC.
- Members of the Administrators group automatically have access.
- Make note of the name of this PC under How to connect to this PC. You’ll need this to configure the clients.
Windows 7 and early version of Windows 10
To configure your PC for remote access, download and run the Microsoft Remote Desktop Assistant. This assistant updates your system settings to enable remote access, ensures your computer is awake for connections, and checks that your firewall allows Remote Desktop connections.
All versions of Windows (Legacy method)
To enable Remote Desktop using the legacy system properties, follow the instructions to Connect to another computer using Remote Desktop Connection.
Should I enable Remote Desktop?
If you only want to access your PC when you are physically using it, you don’t need to enable Remote Desktop. Enabling Remote Desktop opens a port on your PC that is visible to your local network. You should only enable Remote Desktop in trusted networks, such as your home. You also don’t want to enable Remote Desktop on any PC where access is tightly controlled.
Be aware that when you enable access to Remote Desktop, you are granting anyone in the Administrators group, as well as any additional users you select, the ability to remotely access their accounts on the computer.
You should ensure that every account that has access to your PC is configured with a strong password.
Why allow connections only with Network Level Authentication?
If you want to restrict who can access your PC, choose to allow access only with Network Level Authentication (NLA). When you enable this option, users have to authenticate themselves to the network before they can connect to your PC. Allowing connections only from computers running Remote Desktop with NLA is a more secure authentication method that can help protect your computer from malicious users and software. To learn more about NLA and Remote Desktop, check out Configure NLA for RDS Connections.
If you’re remotely connecting to a PC on your home network from outside of that network, don’t select this option.
Run command for remote desktop (RDP client)
The Run command for Windows Remote desktop application is Mstsc
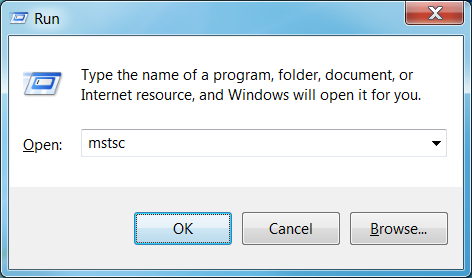
Just open Run from start menu and type mstsc in the text box next to open and press enter. 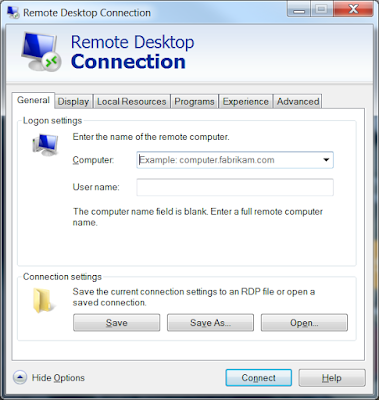
This command mstsc can be used from command line too.
A system running Windows 7/Windows 10 allows only one remote desktop connection at a time, means only one remote user can work on it any time. A computer running Windows server edition can support remote sessions for multiple users at the same time.
Mstsc command
Every time we connect to the server it opens a new user session. To avoid this we can open a connection to the console. This allows us to login back to the same user session if we already have one. To do this we need to add /console switch to the mstsc command.
This command can be run from command prompt or from Run window.
Run command for opening remote desktop session in full screen mode
Add /f switch to the command.
Run command for specifying the remote computer name from the command itself
Use /v switch in this case.
Run command to specify remote desktop connection settings using a rdp file
A RDP file can be created using the ‘Save As‘ button in the General tab in mstsc(Remote desktop connection client) window.
These commands work on XP, Vista, Windows 7 and Server 2003/2008 operating systems.
Run command for Remote desktop manager
There is no Run command for opening remote desktop connection manager directly. It is usually installed in the path C:\Program Files\Remote Desktop Connection Manager\RDCman.exe . By specifying this complete path we can launch connection manager.
Relevant Posts:
Good information on the command line switches available with the mstsc command. thank you.
i would like to write command script to check whether the servers could RDP or not.
we have around 30 servers hence cant run mstsc /v:servername for each. Hence just would like to write cmd script to check all the servers. Could you please help me ?
can you please assist me with the system to enable remote access desktop/working into the network user without being there physically,i have i.p address and computer name of the workstation and we are all in one network.
Possibly you only have Windows Home Edition, which doesn’t support Remote Connections.
Remote Desktop Assistance is a feature of Windows Pro Editions.
can user able to see the desktop in mstsc command
It is not mstsc/console anymore. Now it is mstsc/admin. You can also add it to a desktop shortcut by changing the Target to %windir%\system32\mstsc.exe -admin
“admin” is different than “console” actually. Admin allows you to boot another user. My bad.
Hello..is there any option to trigger MSTC on windows boot up, preferably with pre-specified destination server and credentials?
Also, if the user logs out of the terminal server, he should get logged out of the local desktop as well.
I don’t want to give the user the option of a local desktop.
Приступая к работе с клиентом для Windows Desktop Get started with the Windows Desktop client
Применяется к: Windows 10, Windows 10 IoT Корпоративная и Windows 7 Applies to: Windows 10, Windows 10 IoT Enterprise, and Windows 7
Клиент удаленного рабочего стола для Windows Desktop можно использовать для удаленной работы с приложениями для Windows и рабочими столами Windows с другого устройства с Windows. You can use the Remote Desktop client for Windows Desktop to access Windows apps and desktops remotely from a different Windows device.
- Эта документация не относится к клиенту подключения к удаленному рабочему столу (MSTSC), входящему в состав Windows. This documentation is not for the Remote Desktop Connection (MSTSC) client that ships with Windows. Она относится к новому клиенту Удаленного рабочего стола (MSRDC). It’s for the new Remote Desktop (MSRDC) client.
- Сейчас этот клиент поддерживает только доступ к удаленным приложениям и рабочим столам с виртуального рабочего стола Windows. This client currently only supports accessing remote apps and desktops from Windows Virtual Desktop.
- Хотите узнать о новых выпусках для клиента Windows Desktop? Curious about the new releases for the Windows Desktop client? Ознакомьтесь с разделом Что нового в клиенте для Windows Desktop. Check out What’s new in the Windows Desktop client
Установка клиента Install the client
Выберите клиент, который соответствует версии Windows. Choose the client that matches the version of Windows. Новый клиент Удаленного рабочего стола (MSRDC) поддерживает клиентские устройства Windows 10, Windows 10 IoT Корпоративная и Windows 7. The new Remote Desktop client (MSRDC) supports Windows 10, Windows 10 IoT Enterprise, and Windows 7 client devices.
Можно установить клиент для текущего пользователя, что не требует прав администратора. Кроме того, администратор может установить и настроить клиент, чтобы все пользователи устройства могли получить к нему доступ. You can install the client for the current user, which doesn’t require admin rights, or your admin can install and configure the client so that all users on the device can access it.
После установки клиент можно будет запустить из меню «Пуск», выполнив поиск фразы Удаленный рабочий стол. Once you’ve installed the client, you can launch it from the Start menu by searching for Remote Desktop.
Обновление клиента Update the client
Вы будете получать уведомления каждый раз, когда будет доступна новая версия клиента, если администратор не отключил эти уведомления. You’ll be notified whenever a new version of the client is available as long as your admin hasn’t disabled notifications. Уведомление будет отображено в центре подключений или в центре уведомлений Windows. The notification will appear in either the Connection Center or the Windows Action Center. Чтобы обновить клиент, просто выберите уведомление. To update your client, just select the notification.
Можно также вручную выполнить поиск новых обновлений для клиента. You can also manually search for new updates for the client:
- В центре подключений коснитесь дополнительного меню ( … ) на панели команд в верхней части окна клиента. From the Connection Center, tap the overflow menu (. ) on the command bar at the top of the client.
- Из раскрывающегося списка выберите About (О программе). Select About from the drop-down menu.
- Клиент автоматически выполняет поиск обновлений. The client automatically searches for updates.
- Если доступно обновление, коснитесь Install update (Установить обновление), чтобы обновить клиент. If there’s an update available, tap Install update to update the client.
Рабочие области Workspaces
Получите список управляемых ресурсов, к которым можно получить доступ (например, приложений и рабочих столов), подписавшись на рабочую область, предоставленную администратором. Get the list of managed resources you can access, such as apps and desktops, by subscribing to the Workspace your admin provided you. После подписки эти ресурсы станут доступными на вашем локальном компьютере. When you subscribe, the resources become available on your local PC. Сейчас клиент Windows Desktop поддерживает ресурсы, опубликованные с виртуального рабочего стола Windows. The Windows Desktop client currently supports resources published from Windows Virtual Desktop.
Подписка на рабочую область Subscribe to a Workspace
Существует два способа оформить подписку на рабочее пространство. There are two ways you can subscribe to a Workspace. Клиент может искать ресурсы, доступные для вашей рабочей или учебной учетной записи, или вы можете напрямую предоставить URL-адрес, по которому доступны ресурсы, если клиент по какой-либо причине не может их найти. The client can try to discover the resources available to you from your work or school account or you can directly specify the URL where your resources are for cases where the client is unable to find them. Оформив подписку на рабочее пространство, вы можете запустить ресурсы одним из следующих способов. Once you’ve subscribed to a Workspace, you can launch resources with one of the following methods:
- Перейдите в центр подключений и дважды щелкните ресурс, чтобы запустить его. Go to the Connection Center and double-click a resource to launch it.
- Вы также можете перейти в меню «Пуск» и найти папку с именем соответствующей рабочей области или ввести имя ресурса в строке поиска. You can also go to the Start menu and look for a folder with the Workspace name or enter the resource name in the search bar.
Подписка с учетной записью пользователя Subscribe with a user account
- На главной странице клиента щелкните действие Subscribe (Подписаться). From the main page of the client, tap Subscribe.
- При появлении запроса войдите в систему со своей учетной записью. Sign in with your user account when prompted.
- В центре подключений будут отображены ресурсы, сгруппированные по рабочей области. The resources will appear in the Connection Center grouped by Workspace.
Подписка по URL-адресу Subscribe with URL
- На главной странице клиента щелкните действие Subscribe with URL (Подписаться по URL-адресу). From the main page of the client, tap Subscribe with URL.
- Введите URL-адрес рабочего пространства или адрес электронной почты. Enter the Workspace URL or your email address:
- Если вы используете URL-адрес рабочего пространства, введите предоставленный администратором адрес. If you use the Workspace URL, use the one your admin gave you. Если обращение к ресурсам выполняется из Виртуального рабочего стола Windows, можно использовать один из следующих URL-адресов. If accessing resources from Windows Virtual Desktop, you can use one of the following URLs:
- Виртуальный рабочий стол Windows (классическая модель): https://rdweb.wvd.microsoft.com/api/feeddiscovery/webfeeddiscovery.aspx . Windows Virtual Desktop (classic): https://rdweb.wvd.microsoft.com/api/feeddiscovery/webfeeddiscovery.aspx
- Виртуальный рабочий стол Windows: https://rdweb.wvd.microsoft.com/api/arm/feeddiscovery . Windows Virtual Desktop: https://rdweb.wvd.microsoft.com/api/arm/feeddiscovery
- Чтобы использовать адрес электронной почты, введите свой адрес электронной почты. To use email, enter your email address. В этом случае клиент будет искать URL-адрес, связанный с вашим адресом электронной почты, если администратор настроил обнаружение по адресу электронной почты. This tells the client to search for a URL associated with your email address if your admin has setup email discovery.
- Если вы используете URL-адрес рабочего пространства, введите предоставленный администратором адрес. If you use the Workspace URL, use the one your admin gave you. Если обращение к ресурсам выполняется из Виртуального рабочего стола Windows, можно использовать один из следующих URL-адресов. If accessing resources from Windows Virtual Desktop, you can use one of the following URLs:
- Коснитесь Next (Далее). Tap Next.
- При появлении запроса войдите в систему со своей учетной записью. Sign in with your user account when prompted.
- В центре подключений будут отображены ресурсы, сгруппированные по рабочей области. The resources will appear in the Connection Center grouped by Workspace.
Сведения о рабочей области Workspace details
После того, как вы подпишетесь, можно будет просматривать дополнительные сведения о рабочей области на панели «Details» (Сведения). After subscribing, you can view additional information about a Workspace on the Details panel:
- Имя рабочей области. The name of the Workspace
- URL-адрес и имя пользователя, используемые для подписки. The URL and username used to subscribe
- Число приложений и рабочих столов. The number of apps and desktops
- Дата и время последнего обновления. The date/time of the last refresh
- Состояние последнего обновления. The status of the last refresh
Вот как можно перейти к панели «Details» (Сведения). Accessing the Details panel:
- В центре подключений коснитесь дополнительного меню ( … ) рядом с рабочей областью. From the Connection Center, tap the overflow menu (. ) next to the Workspace.
- Из раскрывающегося списка выберите Details (Сведения). Select Details from the drop-down menu.
- Панель «Details» (Сведения) отобразится в правой части окна клиента. The Details panel appears on the right side of the client.
После того, как вы подпишетесь, рабочая область будет регулярно автоматически обновляться. After you’ve subscribed, the Workspace will refresh automatically on a regular basis. Ресурсы могут быть добавлены, изменены или удалены в соответствии с изменениями, внесенными администратором. Resources may be added, changed, or removed based on changes made by your admin.
При необходимости можно также вручную искать обновления для ресурсов, выбрав Обновить на панели сведений. You can also manually look for updates to the resources when needed by selecting Refresh from the Details panel.
Обновление рабочей области Refreshing a Workspace
Вы можете вручную обновить рабочую область, выбрав Обновить в меню переполнения ( . ) рядом с рабочей областью. You can manually refresh a Workspace by selecting Refresh from the overflow menu (. ) next to the Workspace.
Отмена подписки на рабочую область Unsubscribe from a Workspace
В этом разделе показано, как отменить подписку на рабочую область. This section will teach you how to unsubscribe from a Workspace. Вы можете отменить подписку, чтобы либо повторно подписаться на веб-канал с другой учетной записью, либо удалить ресурсы из системы. You can unsubscribe to either subscribe again with a different account or remove your resources from the system.
- В центре подключений коснитесь дополнительного меню ( … ) рядом с рабочей областью. From the Connection Center, tap the overflow menu (. ) next to the Workspace.
- Из раскрывающегося меню Unsubscribe (Отменить подписку). Select Unsubscribe from the drop-down menu.
- Просмотрите диалоговое окно и выберите Continue (Продолжить). Review the dialog box and select Continue.
Управляемые рабочие столы Managed desktops
Рабочие области могут содержать несколько управляемых ресурсов, включая рабочие столы. Workspaces can contain multiple managed resources, including desktops. При обращении к управляемому рабочему столу предоставляется доступ ко всем приложениям, установленным администратором. When accessing a managed desktop, you have access to all the apps installed by your admin.
Параметры рабочего стола Desktop settings
Вы можете настроить некоторые параметры ресурсов рабочего стола в соответствии со своими потребностями. You can configure some of the settings for desktop resources to ensure the experience meets your needs. Чтобы открыть список доступных параметров, щелкните правой кнопкой мыши ресурс рабочего стола и выберите Параметры. To access the list of available settings right-click on the desktop resource and select Settings.
Клиент будет использовать параметры, настроенные администратором, если только не отключить параметр Использовать параметры по умолчанию. The client will use the settings configured by your admin unless you turn off the Use default settings option. Это позволит настроить приведенные ниже параметры. Doing so allows you to configure the following options:
- Конфигурация дисплеев — выбор дисплеев, которые можно использовать для сеанса рабочего стола. Влияет на то, какие дополнительные параметры доступны. Display configuration selects which displays to use for the desktop session and impacts which additional settings are available.
- All displays (Все дисплеи) — сеанс всегда будет использовать все локальные дисплеи, даже если некоторые из них будут добавлены или удалены позже. All displays ensures the session always uses all your local displays even when some of them are added or removed later.
- Single display (Один дисплей) — сеанс всегда будет использовать один дисплей с возможностью настройки его свойств. Single display ensures the session always uses a single display and allows you to configure its properties.
- Select displays (Выбранные дисплеи) — позволяет выбрать, какие из дисплеев будут использоваться для сеанса, и включить динамическое изменение списка дисплеев во время сеанса. Select displays allows you to choose which displays to use for the session and provides an option to dynamically change the list of displays during the session.
- Select the displays to use for the session (Выберите экраны для этого сеанса) указывает, какие локальные экраны нужно использовать для сеанса. Select the displays to use for the session specifies which local displays to use for the session. Все выбранные экраны должны размещаться радом друг с другом. All selected displays must be adjacent to each other. Этот параметр доступен только в режиме Select displays (Выбранные дисплеи). This setting is only available in Select display mode.
- Maximize to current displays (Развернуть до текущих дисплеев) — определяет, какие дисплеи будут использовать сеансы при переходе в полноэкранный режим. Maximize to current displays determines which displays the sessions will use when going full screen. При включении этого параметра изображение сеанса переходит в полноэкранный режим на дисплеях, связанных с окном сеанса. When enabled, the session goes full screen on the displays touched by the session window. Это позволяет менять дисплеи во время сеанса. This allows you to change displays during the session. Если этот параметр отключен, изображение сеанса переходит в полноэкранный режим на том же дисплее, на котором он в последний раз был в полноэкранном режиме. When disabled, the session goes full screen on the same displays it was on the last time it was full screen. Этот параметр доступен только в режиме Select displays (Выбранные дисплеи) и отключен в других случаях. This setting is only available in Select display mode and is disabled otherwise.
- Single display when windowed (Один дисплей, если в оконном режиме) — определяет, какие дисплеи доступны в сеансе при выходе из полноэкранного режима. Single display when windowed determines which displays are available in the session when exiting full screen. Если этот параметр включен, сеанс переключается на один дисплей в оконном режиме. When enabled, the session switches to a single display in windowed mode. Если этот параметр отключен, в оконном режиме сеанс отображается на тех же дисплеях, что и в полноэкранном режиме. When disabled, the session retains the same displays in windowed mode as in full screen. Этот параметр доступен только в режимах All displays (Все дисплеи) и Select displays (Выбранные дисплеи) и отключен в других случаях. This setting is only available in All displays and Select display modes and is disabled otherwise.
- Параметр Start in full screen (Запуск в полноэкранном режиме) позволяет указать, будет ли сеанс запускаться в полноэкранном или оконном режиме. Start in full screen determines whether the session will launch in full-screen or windowed mode. Этот параметр доступен только в режиме Single display (Один дисплей) и включен в других случаях. This setting is only available in Single display mode and is enabled otherwise.
- Параметр Fit session to window (Сеанс по размеру окна) определяет способ отображения сеанса, когда разрешение удаленного рабочего стола отличается от размера локального окна. Fit session to window determines how the session is displayed when the resolution of the remote desktop differs from the size of the local window. Если этот параметр включен, то содержимое сеанса будет умещаться в окне, сохраняя пропорции окна сеанса. When enabled, the session content will be resized to fit inside the window while preserving the aspect ratio of the session. Если этот параметр отключен и разрешение и размер окна не совпадают, то будут отображены полосы прокрутки или черные области. When disabled, scrollbars or black areas will be shown when the resolution and window size don’t match. Этот параметр доступен во всех режимах. This setting is available in all modes.
- Update the resolution on resize (Обновление разрешения при изменении размера) автоматически изменяет разрешение удаленного рабочего стола при изменении размера окна сеанса. Update the resolution on resize makes the remote desktop resolution automatically update when you resize the session in windowed mode. Если этот параметр отключен, для сеанса всегда сохраняется то разрешение, которое задано в параметре Resolution. When disabled, the session always remains at whichever resolution you specify in Resolution. Этот параметр доступен только в режиме Single display (Один дисплей) и включен в других случаях. This setting is only available in Single display mode and is enabled otherwise.
- Параметр Resolution (Разрешение) позволяет указать разрешение удаленного рабочего стола. Resolution lets you specify the resolution of the remote desktop. Оно будет использоваться на всем протяжении сеанса. The session will retain this resolution for its entire duration. Этот параметр доступен только в режиме Single display (Один дисплей) и когда параметр Update the resolution on resize (Обновление разрешения при изменении размера) отключен. This setting is only available in Single display mode and when Update the resolution on resize is disabled.
- Параметр Change the size of the text and apps (Изменение размера текста и приложений) указывает размер содержимого сеанса. Change the size of the text and apps specifies the size of the content of the session. Этот параметр применяется только при подключении к Windows 8.1 и более поздних версий или Windows Server 2012 R2 и более поздних версий. This setting only applies when connecting to Windows 8.1 and later or Windows Server 2012 R2 and later. Этот параметр доступен только в режиме Single display (Один дисплей) и когда параметр Update the resolution on resize (Обновление разрешения при изменении размера) отключен. This setting is only available in Single display mode and when Update the resolution on resize is disabled.
Обратная связь Give us feedback
У вас есть предложение по компоненту или вы хотите сообщить о проблеме? Have a feature suggestion or want to report a problem? Сообщите нам об этом в Центре отзывов. Tell us with the Feedback Hub.
Вы также можете отправить нам отзыв, нажав в клиентском приложении кнопку, которая выглядит как смайлик с улыбающимся лицом, как показано на следующем рисунке: You can also give us feedback by selecting the button that looks like a smiley face emoticon in the client app, as shown in the following image:
Чтобы мы могли помочь вам, предоставьте нам как можно более подробную информацию о возникшей проблеме. To best help you, we need you to give us as detailed information about the issue as possible. Например, можно включить снимки экрана или запись действий, выполнение которых привело к возникновению проблемы. For example, you can include screenshots or a recording of the actions you took leading up to the issue. Дополнительные советы по предоставлению полезных отзывов см. в разделе Отзывы и предложения. For more tips about how to provide helpful feedback, see Feedback.
Получение доступа к журналам клиента Access client logs
При расследовании проблемы вам могут потребоваться журналы клиента. You might need the client logs when investigating a problem.
Чтобы получить эти журналы, сделайте следующее. To retrieve the client logs:
- Убедитесь в том, что нет активных сеансов и процесс клиента не выполняется в фоновом режиме, щелкнув правой кнопкой мыши значок Удаленный рабочий стол на панели задач и выбрав пункт Отключение от всех сеансов. Ensure no sessions are active and the client process isn’t running in the background by right-clicking on the Remote Desktop icon in the system tray and selecting Disconnect all sessions.
- Откройте проводник. Open File Explorer.
- Перейдите к папке %temp%\DiagOutputDir\RdClientAutoTrace. Navigate to the %temp%\DiagOutputDir\RdClientAutoTrace folder.
—>


