- Безопасная оболочка (SSH) Secure Shell (SSH)
- Использование клиента Windows 10 OpenSSH Using the Windows 10 OpenSSH client
- Использование выводимых Using PuTTY
- Скачивание SSH-клиента Download an SSH client
- Подключение к устройству Connect to your device
- Обновление пароля учетной записи Update account password
- Настройка устройства Windows IoT базовая Configure your Windows IoT Core device
- Часто используемые служебные программы Commonly used utilities
- Secure Shell (SSH)
- Using the Windows 10 OpenSSH client
- Using PuTTY
- Download an SSH client
- Connect to your device
- Update account password
- Configure your Windows IoT Core device
- Commonly used utilities
Безопасная оболочка (SSH) Secure Shell (SSH)
Secure Shell (SSH) позволяет удаленно администрировать и настраивать устройство Windows IoT базовая. Secure Shell (SSH) allows you to remotely administer and configure your Windows IoT Core device
Использование клиента Windows 10 OpenSSH Using the Windows 10 OpenSSH client
Клиент Windows OpenSSH требует, чтобы ОС узла SSH-клиента была Windows 10 версии 1803 (17134). The Windows OpenSSH client requires that your SSH client host OS is Windows 10 version 1803(17134). Кроме того, устройство Windows 10 IoT базовая должно работать под RS5 предварительной версии Windows Предварительная версия 17723 или более поздней. Also, the Windows 10 IoT Core device must be running RS5 Windows Insider Preview release 17723 or greater.
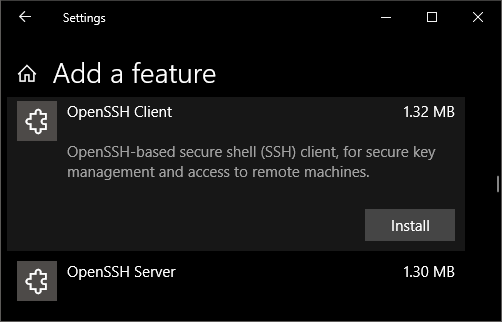
Клиент OpenSSH был добавлен в Windows 10 в 1803 (сборка 17134) как дополнительный компонент. The OpenSSH Client was added to Windows 10 in 1803 (build 17134) as an optional feature. Чтобы установить клиент, можно выполнить поиск по запросу Управление дополнительными компонентами в параметрах Windows 10. To install the client, you can search for Manage Optional Features in Windows 10 settings. Если клиент OpenSSH не указан в списке установленных компонентов, выберите Добавить компонент. If the OpenSSH Client is not listed in the list of installed features, then choose Add a feature.

Затем выберите в списке клиент OpenSSH и нажмите кнопку установить. Next select OpenSSH Client in the list and click Install.

Чтобы войти с помощью имени пользователя и пароля, используйте следующую команду: To login with a username and password use the following command:
Где Host — это IP-адрес устройства Windows IoT базовая или имя устройства. Where host is either the IP address of the Windows IoT Core device or the device name.
При первом подключении появится сообщение следующего вида: The first time you connect you see a message like the following:
Введите Да и нажмите клавишу Ввод. Type yes and press enter.
Если необходимо войти как Дефаултаккаунт, а не как администратор, потребуется создать ключ и использовать его для входа. If you need to login as DefaultAccount rather than as administrator, you will need to generate a key and use the key to login. На рабочем столе, с которого планируется подключиться к устройству IoT, откройте окно PowerShell и перейдите в папку личных данных (например, CD
). From the desktop that you intend to connect to your IoT Device from, open a PowerShell window and change to your personal data folder (e.g cd
Зарегистрируйте ключ с помощью ssh-агента (необязательно, для интерфейса единого входа). Register the key with ssh-agent (optional, for single sign-on experience). Обратите внимание, что SSH-Add необходимо выполнять из папки, которая является ACL, в качестве пользователя, выполнившего вход в систему (Builtin \ администраторы NT_AUTHORITY \system также ОК). Note that ssh-add must be performed from a folder that is ACL’d to you as the signed-in user (Builtin\Administrators and the NT_AUTHORITY\System user are also ok). По умолчанию компакт-диск
из PowerShell должен быть достаточно, как показано ниже. By default cd
from PowerShell should be sufficient as shown below.
Если вы получаете сообщение о том, что служба ssh-agent отключена, ее можно включить с помощью sc.exe config ssh-agent Start = Auto . If you receive a message that the ssh-agent service is disabled you can enable it with sc.exe config ssh-agent start=auto
Чтобы включить единый вход, добавьте открытый ключ в файл authorized_keys устройства Windows IOT базовая. To enable single sign, append the public key to the Windows IoT Core device authorized_keys file. Если у вас есть только один ключ, скопируйте файл открытого ключа в файл удаленного authorized_keys . Or if you only have one key you copy the public key file to the remote authorized_keys file.
Если ключ не зарегистрирован в ssh-agent, он должен быть указан в командной строке для входа: If the key is not registered with ssh-agent, it must be specified on the command line to login:
Если закрытый ключ зарегистрирован в ssh-agent, необходимо указать только DefaultAccount@host : If the private key is registered with ssh-agent, then you only need to specify DefaultAccount@host:
При первом подключении появится сообщение следующего вида: The first time you connect you see a message like the following:
Введите Да и нажмите клавишу Ввод. Type yes and press enter.
Теперь вы должны подключиться как дефаултаккаунт You should now be connected as DefaultAccount
Чтобы использовать единый вход с учетной записью администратора , добавьте открытый ключ в к:\дата\програмдата\сш\ administrators_authorized_keys на устройстве Windows IOT базовая. To use single sign-on with the administrator account, append your public key to c:\data\ProgramData\ssh\administrators_authorized_keys on the Windows IoT Core device.
Кроме того, необходимо задать список ACL для administrators_authorized_keys в соответствии с ACL ssh_host_dsa_key в том же каталоге. You will also need to set the ACL for administrators_authorized_keys to match the ACL of ssh_host_dsa_key in the same directory.
Настройка ACL с помощью PowerShell To set the ACL using PowerShell
Если вы видите сообщение об изменении идентификатора удаленного узла после внесения изменений в устройство Windows 10 IOT базовая, измените C:\Users . SSH \ known_hosts и удалите узел, который был изменен. If you see a REMOTE HOST IDENTIFICATION CHANGED message after making changes to the Windows 10 IoT Core device, then edit C:\Users .ssh\known_hosts and remove the host that has changed.
Использование выводимых Using PuTTY
Скачивание SSH-клиента Download an SSH client
Чтобы подключиться к устройству с помощью SSH, сначала необходимо скачать клиент SSH, например, выполнив. In order to connect to your device using SSH, you’ll first need to download an SSH client, such as PuTTY.
Подключение к устройству Connect to your device
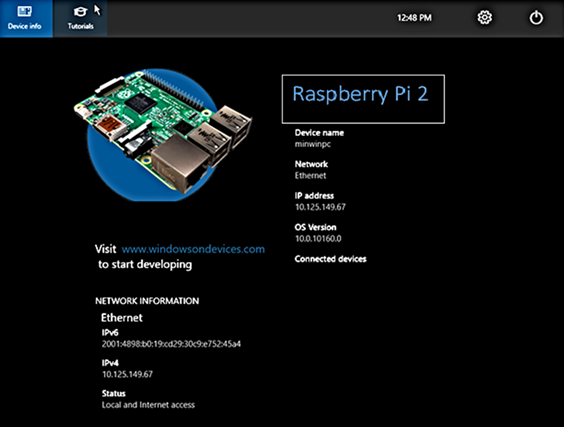
Чтобы подключиться к устройству, сначала необходимо получить IP-адрес устройства. In order to connect to your device, you need to first get the IP address of the device. После загрузки устройства Windows IoT базовая на экране, подключенном к устройству, будет отображаться IP-адрес: After booting your Windows IoT Core device, an IP address will be shown on the screen attached to the device:
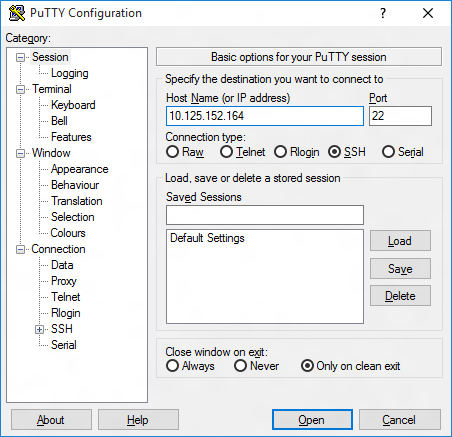
Теперь запустите выводимый текст и введите IP-адрес в Host Name текстовое поле и убедитесь, что SSH выбран переключатель. Now launch PuTTY and enter the IP address in the Host Name text box and make sure the SSH radio button is selected. Затем нажмите кнопку Open . Then click Open .

Если вы подключаетесь к устройству в первый раз с компьютера, вы можете увидеть следующее оповещение системы безопасности. If you’re connecting to your device for the first time from your computer, you may see the following security alert. Просто щелкните Yes , чтобы продолжить. Just click Yes to continue.

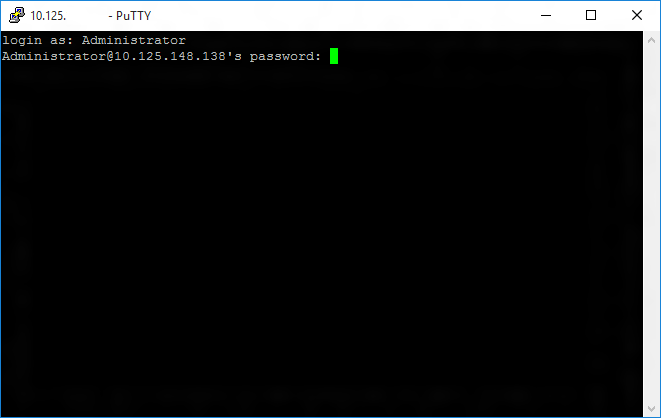
Если соединение прошло успешно, login as: на экране появится запрос на вход. If the connection was successful, you should see login as: on the screen, prompting you to login.
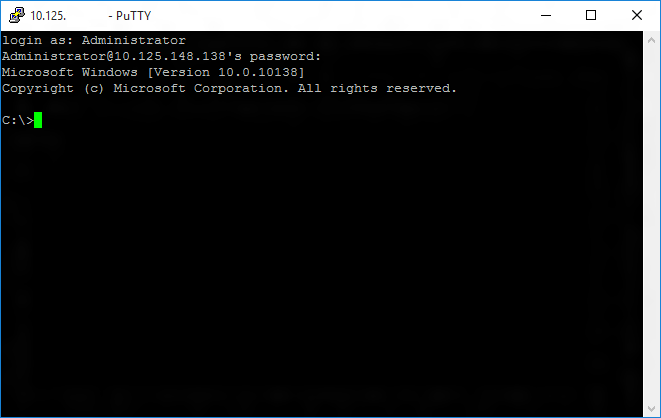
Введите Administrator и нажмите клавишу ВВОД. Enter Administrator and press enter. Затем введите пароль по умолчанию в p@ssw0rd качестве пароля и нажмите клавишу ВВОД. Then enter the default password p@ssw0rd as the password and press enter.
Если вы смогли успешно войти в систему, вы увидите нечто вроде: If you were able to login successfully, you should see something like this:

Обновление пароля учетной записи Update account password
Настоятельно рекомендуется обновить пароль по умолчанию для учетной записи администратора. It is highly recommended that you update the default password for the Administrator account.
Для этого введите следующую команду в консоли выводимых команд, заменив [new password] строгим паролем: To do this, enter the following command in the PuTTY console, replacing [new password] with a strong password:
Настройка устройства Windows IoT базовая Configure your Windows IoT Core device
Чтобы иметь возможность развертывать приложения из Visual Studio 2017, необходимо убедиться, что Удаленный отладчик Visual Studio работает на устройстве Windows IoT базовая. To be able to deploy applications from Visual Studio 2017, you will need to make sure the Visual Studio Remote Debugger is running on your Windows IoT Core device. Удаленный отладчик должен запускаться автоматически во время загрузки компьютера. The remote debugger should launch automatically at machine boot time. Чтобы дважды проверить, используйте команду TList, чтобы вывести список всех запущенных процессов из PowerShell. To double check, use the tlist command to list all the running processes from PowerShell. На устройстве должно быть открыто два экземпляра msvsmon.exe. There should be two instances of msvsmon.exe running on the device.
Время ожидания Удаленный отладчик Visual Studio может истекает после длительных периодов бездействия. It is possible for the Visual Studio Remote Debugger to time out after long periods of inactivity. Если Visual Studio не удается подключиться к устройству Windows IoT Core, попробуйте перезагрузить устройство. If Visual Studio cannot connect to your Windows IoT Core device, try rebooting the device.
При необходимости можно также переименовать устройство. If you want, you can also rename your device. Чтобы изменить имя компьютера, используйте setcomputername программу: To change the ‘computer name’, use the setcomputername utility:
Чтобы изменения вступили в силу, необходимо перезагрузить устройство. You will need to reboot the device for the change to take effect. Команду можно использовать shutdown следующим образом: You can use the shutdown command as follows:
Часто используемые служебные программы Commonly used utilities
Список команд и служебных программ, которые можно использовать с SSH, см. на странице служебной программы командной строки . See the Command Line Utils page for a list of commands and utilities you can use with SSH.
Secure Shell (SSH)
Secure Shell (SSH) allows you to remotely administer and configure your Windows IoT Core device
Using the Windows 10 OpenSSH client
The Windows OpenSSH client requires that your SSH client host OS is Windows 10 version 1803(17134). Also, the Windows 10 IoT Core device must be running RS5 Windows Insider Preview release 17723 or greater.
The OpenSSH Client was added to Windows 10 in 1803 (build 17134) as an optional feature. To install the client, you can search for Manage Optional Features in Windows 10 settings. If the OpenSSH Client is not listed in the list of installed features, then choose Add a feature.

Next select OpenSSH Client in the list and click Install.
To login with a username and password use the following command:
Where host is either the IP address of the Windows IoT Core device or the device name.
The first time you connect you see a message like the following:
Type yes and press enter.
If you need to login as DefaultAccount rather than as administrator, you will need to generate a key and use the key to login. From the desktop that you intend to connect to your IoT Device from, open a PowerShell window and change to your personal data folder (e.g cd
Register the key with ssh-agent (optional, for single sign-on experience). Note that ssh-add must be performed from a folder that is ACL’d to you as the signed-in user (Builtin\Administrators and the NT_AUTHORITY\System user are also ok). By default cd
from PowerShell should be sufficient as shown below.
If you receive a message that the ssh-agent service is disabled you can enable it with sc.exe config ssh-agent start=auto
To enable single sign, append the public key to the Windows IoT Core device authorized_keys file. Or if you only have one key you copy the public key file to the remote authorized_keys file.
If the key is not registered with ssh-agent, it must be specified on the command line to login:
If the private key is registered with ssh-agent, then you only need to specify DefaultAccount@host:
The first time you connect you see a message like the following:
Type yes and press enter.
You should now be connected as DefaultAccount
To use single sign-on with the administrator account, append your public key to c:\data\ProgramData\ssh\administrators_authorized_keys on the Windows IoT Core device.
You will also need to set the ACL for administrators_authorized_keys to match the ACL of ssh_host_dsa_key in the same directory.
To set the ACL using PowerShell
If you see a REMOTE HOST IDENTIFICATION CHANGED message after making changes to the Windows 10 IoT Core device, then edit C:\Users .ssh\known_hosts and remove the host that has changed.
Using PuTTY
Download an SSH client
In order to connect to your device using SSH, you’ll first need to download an SSH client, such as PuTTY.
Connect to your device
In order to connect to your device, you need to first get the IP address of the device. After booting your Windows IoT Core device, an IP address will be shown on the screen attached to the device:

Now launch PuTTY and enter the IP address in the Host Name text box and make sure the SSH radio button is selected. Then click Open .
If you’re connecting to your device for the first time from your computer, you may see the following security alert. Just click Yes to continue.

If the connection was successful, you should see login as: on the screen, prompting you to login.
Enter Administrator and press enter. Then enter the default password p@ssw0rd as the password and press enter.

If you were able to login successfully, you should see something like this:
Update account password
It is highly recommended that you update the default password for the Administrator account.
To do this, enter the following command in the PuTTY console, replacing [new password] with a strong password:
Configure your Windows IoT Core device
To be able to deploy applications from Visual Studio 2017, you will need to make sure the Visual Studio Remote Debugger is running on your Windows IoT Core device. The remote debugger should launch automatically at machine boot time. To double check, use the tlist command to list all the running processes from PowerShell. There should be two instances of msvsmon.exe running on the device.
It is possible for the Visual Studio Remote Debugger to time out after long periods of inactivity. If Visual Studio cannot connect to your Windows IoT Core device, try rebooting the device.
If you want, you can also rename your device. To change the ‘computer name’, use the setcomputername utility:
You will need to reboot the device for the change to take effect. You can use the shutdown command as follows:
Commonly used utilities
See the Command Line Utils page for a list of commands and utilities you can use with SSH.


