- Removable Storage Manager Functions
- Change Detection Functions
- Cleaner Management Functions
- Database Backup and Recovery Functions
- Database Notification Functions
- Library Control Functions
- Media Label Library Functions
- Media Services Functions
- Object Management Functions
- On-Media-Identifier Management Functions
- Operator Request Functions
- Session Management Functions
- Removable Storage Management in Windows 7 Home Premium — to use NT Backup Restore Utility .
- How to load Removable Storage Manager feature in Windows 10?
- Replies (4)
- Ограничение доступа к внешним накопителям CD, FD, USB с помощью Group Policy Preferences
Removable Storage Manager Functions
[Removable Storage Manager is no longer available as of WindowsВ 7 and Windows ServerВ 2008В R2.]
The following are the Removable Storage Manager functions.
Change Detection Functions
RSM does not detect inject and eject operations on standalone drives unless requested to do so by the application. Although some RSM functions automatically begin change detection of certain devices, applications that require current information on the presence or absence of media in standalone drives must use these functions to request RSM to detect the changes. With change detection enabled, an application can use database notification functions to be notified when media is injected and ejected. You can use the following functions:
Cleaner Management Functions
RSM can automatically clean tape drives that become dirty through use. Use the following functions to control drive cleaning:
Database Backup and Recovery Functions
RSM uses a database to store information about the removable media devices and cartridges in a system. Like any system resource, this database should be backed up in case it becomes lost or corrupted. Use the following functions for RSM database backup and recovery:
Database Notification Functions
You can use the following functions to get notifications when RSM database objects change:
Library Control Functions
Library control functions control injecting, ejecting, and moving media. They also enable and disable drive and changer resources. The following are the library control functions:
Media Label Library Functions
Your media label library must support the following functions. RSM uses these functions to communicate with media label libraries.
Media Services Functions
Media services functions are used for mounting and dismounting media and managing media pools. The following are the media services functions:
Object Management Functions
You can use the following functions to enumerate, get, and set information about RSM objects:
On-Media-Identifier Management Functions
RSM identifies media in a system by reading an on-media identifier (OMID) The following function updates the RSM database when a new OMID is written:
Operator Request Functions
You can use the following functions to manage and control requests to system operators:
Session Management Functions
Before calling any other functions, an application must open an RSM session, and the session must be closed before the application exits. The following session management functions open and close RSM sessions:
NoteВ В The Removable Storage Manager functions were defined when the technology was previously named NTMS. As a result, many function names contain the prefix «Ntms». Similarly, the «scratch» pool was renamed «free», and the «foreign» pool was renamed «unrecognized». The term «partition» was replaced with the term «side».
Removable Storage Manager Functions
[Removable Storage Manager is no longer available as of WindowsВ 7 and Windows ServerВ 2008В R2.]
The following are the Removable Storage Manager functions.
Change Detection Functions
RSM does not detect inject and eject operations on standalone drives unless requested to do so by the application. Although some RSM functions automatically begin change detection of certain devices, applications that require current information on the presence or absence of media in standalone drives must use these functions to request RSM to detect the changes. With change detection enabled, an application can use database notification functions to be notified when media is injected and ejected. You can use the following functions:
Cleaner Management Functions
RSM can automatically clean tape drives that become dirty through use. Use the following functions to control drive cleaning:
Database Backup and Recovery Functions
RSM uses a database to store information about the removable media devices and cartridges in a system. Like any system resource, this database should be backed up in case it becomes lost or corrupted. Use the following functions for RSM database backup and recovery:
Database Notification Functions
You can use the following functions to get notifications when RSM database objects change:
Library Control Functions
Library control functions control injecting, ejecting, and moving media. They also enable and disable drive and changer resources. The following are the library control functions:
Media Label Library Functions
Your media label library must support the following functions. RSM uses these functions to communicate with media label libraries.
Media Services Functions
Media services functions are used for mounting and dismounting media and managing media pools. The following are the media services functions:
Object Management Functions
You can use the following functions to enumerate, get, and set information about RSM objects:
On-Media-Identifier Management Functions
RSM identifies media in a system by reading an on-media identifier (OMID) The following function updates the RSM database when a new OMID is written:
Operator Request Functions
You can use the following functions to manage and control requests to system operators:
Session Management Functions
Before calling any other functions, an application must open an RSM session, and the session must be closed before the application exits. The following session management functions open and close RSM sessions:
The Removable Storage Manager functions were defined when the technology was previously named NTMS. As a result, many function names contain the prefix «Ntms». Similarly, the «scratch» pool was renamed «free», and the «foreign» pool was renamed «unrecognized». The term «partition» was replaced with the term «side».
Removable Storage Management in Windows 7 Home Premium — to use NT Backup Restore Utility .
How does one ‘turn on’ a feature in Windows 7 that apparently does not exist ? ..
found the procedure description in the NT Backup Restore site — but cannot find any reference to the feature in Windows 7.
Therefore, cannot restore BKF file from my XP ‘puter [which crashed/burned, unable to reload XP — motherboard was the conclusion by Geek Sqd].
Suggestions . short of purchasing specialty software for $100 or so ?: ..
Welcome to Microsoft Answers!
Method 1:
You may try running the restore utility in compatibility mode of Windows Vista and check if that helps.
To run the Program Compatibility troubleshooter
- Open the Program Compatibility troubleshooter by clicking the Start button, and then clicking Control Panel. In the search box, type troubleshooter, and then click Troubleshooting. Under Programs, click Run programs made for previous versions of Windows.
- Follow the instructions in the troubleshooter.
If you cannot install a program, insert the installation disc for the program and, using the troubleshooter, browse to the program’s setup file, usually called Setup.exe, Install.exe, or something similar. The troubleshooter is not designed to work on programs that have an .msi file name extension.
Method 2:
If that does not help then r efer to the link given below and try the steps given by ‘ChromaChem’
These are the steps mentioned by the user.
“ Copy 3 files from an xp installation into a folder on the Windows 7 machine:
ntbackup.exe
ntmsapi.dll
vssapi.dll
These files are located in c:\windows\system32
Run ntbackup.exe from the folder you created on the windows 7 machine.
Click on do not show this message again when warned that removable storage service is not running.
Click on OK
NTBackup starts up and runs just like on XP.”
You may check the discussion following the link given below.
Hope this information is helpful.
Microsoft Answers Support Engineer
Visit our Microsoft Answers Feedback Forum and let us know what you think.
2 people found this reply helpful
Was this reply helpful?
Sorry this didn’t help.
Great! Thanks for your feedback.
How satisfied are you with this reply?
Thanks for your feedback, it helps us improve the site.
How to load Removable Storage Manager feature in Windows 10?
Replies (4)
Hi Mark,
I am Sumit, an Independent Advisor and a 2-Year Windows Insider MVP here to help.
Flash drive drivers are built in into Windows and are plug and play so you do not need to add a 3rd party driver.
Did you backup files using a 3rd party utility and want to restore it on another computer?
Sumit
Available 6 PM — 8 AM PST
It is always good to include your PC Specs, make and model in the question
Never Call the Phone numbers received in Emails from the Microsoft Community
Was this reply helpful?
Sorry this didn’t help.
Great! Thanks for your feedback.
How satisfied are you with this reply?
Thanks for your feedback, it helps us improve the site.
How satisfied are you with this reply?
Thanks for your feedback.
Actually the client used the IOmega REV utility, which from research the NTBackup util will access. But the instructions for running it under Windows 10 is TOTALLY incomplete. So I have rigged up a Windows 7 box to access it, still would like to get it going.
The info Microsoft has on their download page instructions for the backup util to be able to run on Win10, tells you something to turn on, that you cannot get to.
Before you install and run Windows NT Backup — Restore Utility, you need to turn on or install the Removable Storage Management feature.
- Note: An NTSMAPI.dll error may occur if Removable Storage Management is not enabled.
To turn on Removable Storage Management in Windows Vista
- Click the Start button, click Control Panel, click Programs, and then click Turn Windows Features on or off. If you are prompted for an administrator password or confirmation, type the password or provide confirmation.
- Select the check box next to Removable Storage Management to turn the feature on, and then click OK.
To install Removable Storage Management on Windows Server 2008
- Click Control Panel and then click Administrative Tools.
- Open Server Manager, navigate to the Features Summary section, and click Add features.
- Select the check box next to Removable Storage Manager, click Next, and then click Install.
To install Windows NT Backup — Restore Utility
- Click the Download button next to a file listed below.
- To start the installation immediately, click Run.
-or-
To copy the download to your computer for installation at a later time, click Save.
To start Windows NT Backup — Restore Utility
- Click the Start button, click Programs, click Windows NT Backup Restore — Utility, and then click Ntbackup-RestoreUtility.
The NTBackup tells you to turn it on, no place to find Removable Storage Management.
And I am no dummy on this sort of stuff.
MS ClubWin (charter member)
Ограничение доступа к внешним накопителям CD, FD, USB с помощью Group Policy Preferences
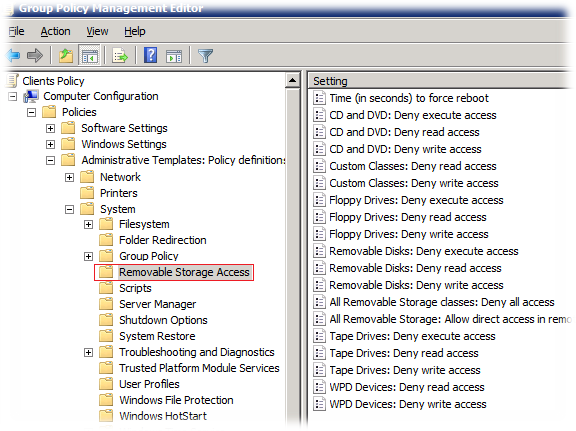
 Если по каким-то причинам возникает необходимость на некоторых компьютерах c OC Windows полностью заблокировать доступ пользователям к возможности использования съёмных носителей, – можно воспользоваться настройками доступными в стандартных Административных шаблонах групповых политик в разделе Computer Configuration > Administrative Templates > System > Removable Storage Access
Для того чтобы применить эти параметры к какой-то отдельной группе компьютеров -можно создать отдельную групповую политику с такими настроенными параметрами и прилинковать её например к контейнеру (OU) в домене или изменить разрешения безопасности для этой политики так чтобы применяться она могла лишь к конкретной доменной группе безопасности, в которую включены соответствующие компьютеры.
Более гибким походом для решения данного вопроса будет использование механизмов настройки реестра из состава Group Policy Preferences (GPP). Подход с использованием GPP вместо использования выше-обозначенных стандартных параметров Административных шаблонов позволит нам встроить нужные нам ограничения в любую уже существующую у нас групповую политику не плодя при этом новых объектов GPO. Более того внутри этой политики мы сможем настроить правила ограничений сразу для множества разных коллекций компьютеров с разными видами нацеливания (Item-level targeting)
Итак, рассмотрим маленький пример создания параметров GPP для решения нашей задачи. Сразу уточним имеющиеся у нас исходные данные, – нам необходимо ограничить доступ ко всем типам внешних съёмных носителей для всех пользователей работающих на определённой группе компьютеров под управлением ОС Windows XP, Windows Vista и Windows 7.
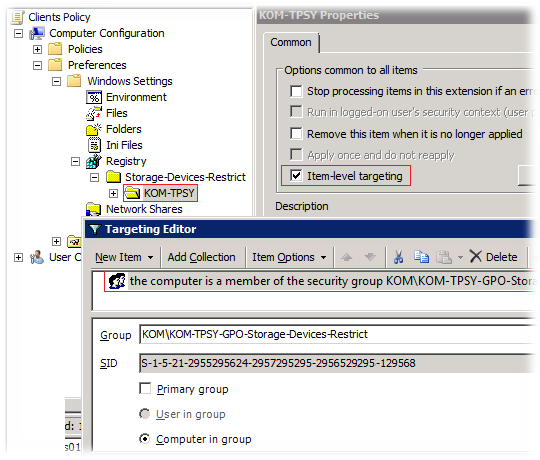
Создаём в домене группу безопасности в которую включаем учетные записи всех компьютеров, на которых нам необходимо ввести ограничения и после этого в разделе групповой политики Computer Configuration > Preferences > Windows Settings > Registry создаём логическую группу с удобным для нас названием, например Storage-Devices-Restrict. В моём случае внутри этой группы создана подгруппа, определяющая принадлежность компьютеров к конкретной физической локации и в свойствах этой подгруппы включён режим нацеливания на созданную в домене группу безопасности. Таким образом, все настройки которые мы создадим внутри этой подгруппы будут применяться к клиентским компьютерам лишь в том случае, если они включены в соответствующую доменную группу.
Прежде чем делать настройки внутри нашей подгруппы настроек, стоит отметить, что выше-обозначенные стандартные параметры Административных шаблонов GPO доступны лишь для Windows Vista и Windows 7. С Windows XP в этом плане всё гораздо грустнее. И поэтому наши настройки GPP будут разделены на две соответствующие подгруппы, обработка параметров которых будет выполняться в зависимости от клиентской ОС. То есть внутри подгруппы по локации мы создадим две подгруппы по типу ОС.
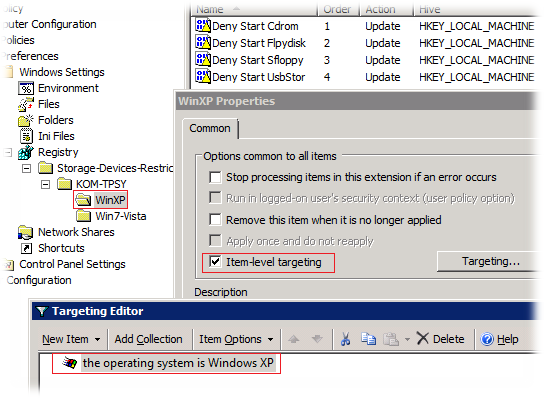
Внутри группы WinXP создадим четыре основных параметра, каждый из которых будет отвечать за выключение системного драйвера, обеспечивающего возможность работы с основными типами внешних носителей. Наша задача — изменить тип запуска этих драйверов с помощью ключа Start в ветках реестра:
Куст реестра: HKEY_LOCAL_MACHINE
Ветки реестра:
SYSTEM\CurrentControlSet\Services\Cdrom
SYSTEM\CurrentControlSet\Services\Flpydisk
SYSTEM\CurrentControlSet\Services\Sfloppy
SYSTEM\CurrentControlSet\Services\UsbStor
Ключ: Start REG_DWORD = 4
Таблица значений по умолчанию для ключа реестра Start y соответствующих драйверов:


