- Полное удаление драйвера с компьютера
- Полное удаление ПО компонентов
- Способ 1: Сторонние программы
- Способ 2: Системные средства
- Заключение
- How to Remove Old and Useless Drivers in Windows 10
- For Graphics and Sound Drivers, Use DDU
- Force Old Drivers to Appear
- Uninstall Old Drivers in Windows
- How to Completely Remove/Uninstall Drivers on Windows 10
- Common Methods to Remove Drivers on Windows 10
- Way 1. Uninstall Drivers from Programs and Features
- Way 2. Download Driver Talent to get a one-click solution
- Way 3. Remove Windows Drivers with Device Manager
- To solve such a «failed driver uninstallation» issue or to completely delete unnecessary drivers, you can follow the steps below.
- Completely Remove a Device Driver: Step 1
- Completely Remove a Device Driver: Step 2
- Completely Remove a Device Driver: Step 3
- Completely Remove a Device Driver: Step 4
Полное удаление драйвера с компьютера

Полное удаление ПО компонентов
Перед описанием методов считаем нужным отметить – удаление драйверов является крайней мерой, прибегать к которой следует лишь в случаях, когда иные решения не способны устранить возникающие проблемы.
Собственно, вариантов полного удаления драйверов существует два: посредством сторонних приложений или же системными средствами. У каждого из представленных вариантов есть свои преимущества и недостатки, поэтому рекомендуем ознакомиться с обоими, и выбирать подходящий, исходя из конкретной ситуации.
Обратите внимание! Предоставленные далее варианты универсальны, но если вам нужно удаление драйверов видеокарты или принтера, советуем обратиться к отдельным материалам.
Способ 1: Сторонние программы
Среди вариантов доступного для Виндовс софта существует отдельная категория программ, которые предназначены для деинсталляции драйверов. Один из наших авторов рассмотрел наилучшие решения из этой категории в отдельном обзоре.
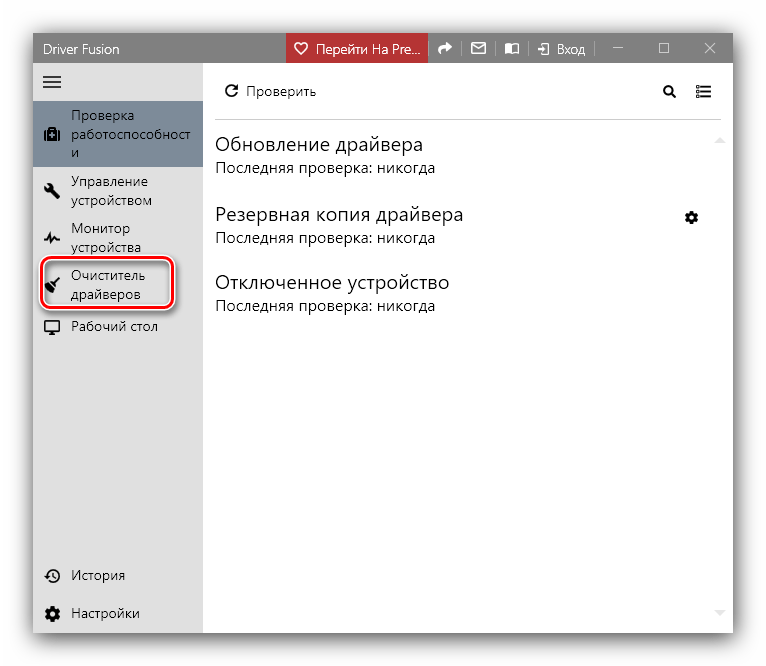
Работу с подобными приложениями рассмотрим на примере решения Driver Fusion.
- Загрузите и установите приложение на целевой компьютер, после чего запускайте его с иконки на «Рабочем столе». В главном меню программы воспользуйтесь пунктом «Очиститель драйверов».
В правой части окна Драйвер Фьюжн будут открыты распознанные категории устройств. Щёлкните по нужной для раскрытия.
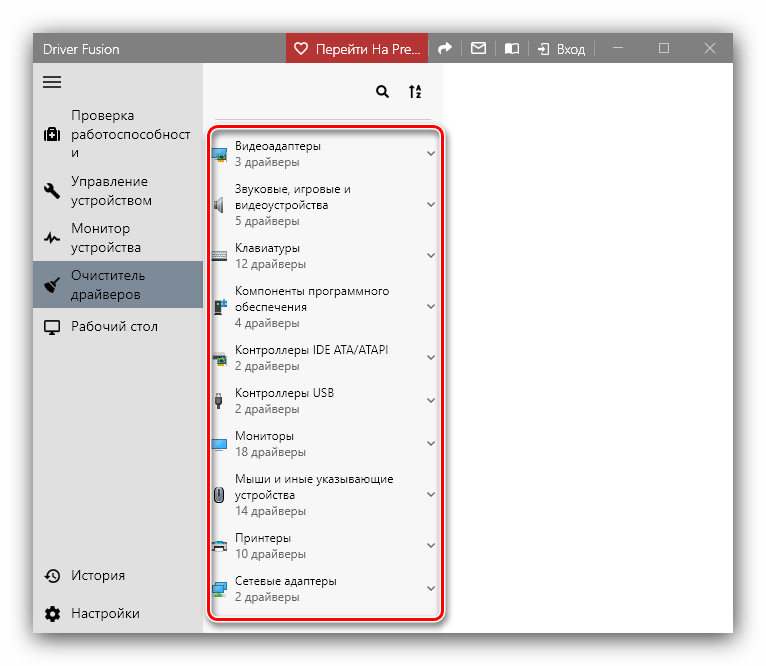
Будут представлены основные вендоры выбранного семейства девайсов. Найдите установленный на вашем компьютере, драйвер к которому желаете удалить.

Справа появятся распознанные сведения о драйверах: как физическое расположение в системной папке, так и записи в реестре Windows. Выделите одну из записей щелчком левой кнопки мыши и нажимайте на опцию «Очистить».

Повторите эту процедуру для всех найденных элементов и связанных с ними сведений.
Как видим, ничего сложного. Впрочем, бесплатная версия Драйвер Фьюжн не умеет распознавать некоторое специфическое оборудование, поэтому в таком случае можно использовать другую программу. Также кроме приложений, предназначенных для удаления драйверов, справиться с нашей сегодняшней задачей могут и определенные утилиты-драйверпаки: некоторые из них кроме опций установки и обновления, имеют в себе также функционал удаления ПО для распознанных компонентов.
Способ 2: Системные средства
Порой более надёжным и удобным вариантом удаления драйверов будет системный функционал – в частности, оснастка «Диспетчер устройств», которым мы и воспользуемся.
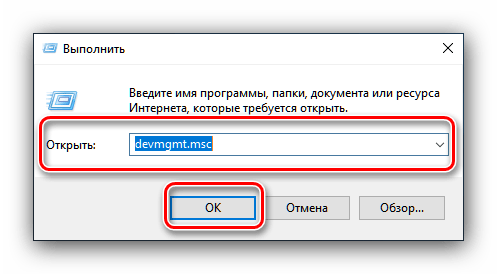
- Открыть нужную оснастку проще всего через окно «Выполнить»: нажмите сочетание клавиш Win+R, введите в появившееся окошко команду devmgmt.msc и нажмите «ОК».
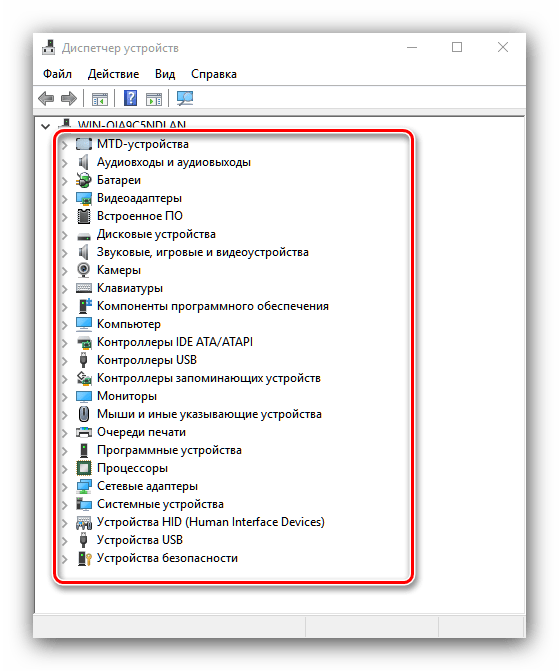
После открытия «Диспетчера устройств» найдите категорию устройства, драйвера для которого желаете удалить, и раскройте её.
Далее найдите само устройство. Выделите его, затем нажмите правую кнопку мыши и выберите пункт «Свойства» в контекстном меню.
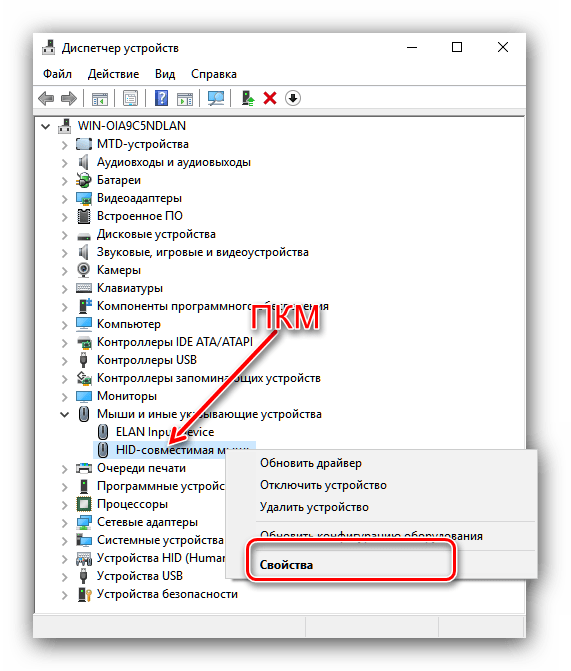
В окне свойств компонента перейдите к разделу «Драйвер». Затем найдите кнопку «Удалить» и нажмите на неё.


После подтверждения запустится процедура удаления драйверов. По её окончании вы получите соответствующее уведомление. В некоторых случаях также стоит перезагрузить компьютер.
Заключение
На этом завершаем обзор методов полного удаления драйверов для того или иного компьютерного устройства. Напоследок отметим, что рекомендуется использовать второй способ: в некоторых случаях сторонние приложения работают не слишком эффективно.
How to Remove Old and Useless Drivers in Windows 10

For every device you have in your Windows PC, you will need a driver for that device to work properly. The problem with this is that as time passes, your Windows machine will be bogged down with lots of unnecessary and old drivers, which eventually may result in problems on your PC.
Surely, you can easily uninstall any device driver using Windows’s built-in tools. The problem is that Windows device manager only shows currently connected devices, and there is no option to see hidden or old drivers. Here we show you how to force hidden drivers to appear and how to remove old drivers in Windows 10.
Note: this article is based on Windows 10, but it should work with any other previous versions, like Windows 7 and Windows 8, as well.
For Graphics and Sound Drivers, Use DDU
Graphics cards are complex things, and if you’ve either bought a new graphics card or have updated your old one, then you may find that it doesn’t work properly due to driver conflicts. (It may not work altogether or may be prone to crashes and restarts.)
If that happens, you should use the free Guru 3D tool DDU (or Display Driver Uninstaller) to completely uninstall your old graphics card drivers before installing the new ones.

Once you’ve extracted the tool, you’ll need to open Windows 10 in Safe Mode, then open DDU and select your device type (GPU or Audio) from the drop-down menu. Once you’ve made your selection, click “Clean and restart” for your drivers to be completely uninstalled.
Once you’re back in regular Windows 10, you can install new GPU or audio drivers without any conflicts or interference from the old ones.
Force Old Drivers to Appear
Before uninstalling old drivers, we need to force the old drivers to show up in the list.
1. To do that, press Win + X and select “Command Prompt (Admin)” from the list of options.

2. Type the following command and press the Enter button to execute the command:

What the above command does is force all the non-present or old and invisible drivers to show up in the Device Manager list. Once you have done this, you can proceed with the uninstallation.
Uninstall Old Drivers in Windows
1. To uninstall the old drivers, press Win + X and select “Device Manager” from the list of options.

2. Go to “view” and select the option “show hidden devices” to reveal all the hidden and old drivers.

The good thing about this feature is that all the old drivers are faded out, so you can easily identify the old or non-present drivers from current drivers.
3. Select the old driver you want to uninstall, right-click and select the Uninstall option.

That’s all there is to do. Using this tip, you can easily find and uninstall any old and hidden drivers. Always be careful not to remove any current device driver, as this may cause problems with your connected hardware device. Also, always check twice before uninstalling any device driver.
If you still have problems that need solving with your Windows 10 graphics, see our guide on fixing a faulty graphics card or check out our list of the latest Windows 10 update problems to see if you’ve been affected.
Related:
Content Manager at Make Tech Easier. Enjoys Android, Windows, and tinkering with retro console emulation to breaking point.
How to Completely Remove/Uninstall Drivers on Windows 10
Dec. 11, 2020 / Updated by Bessie Shaw to Windows 10
Windows 10 users often come across the Windows driver removal problem. Due to the automatic backup feature, Windows 10 will prevent users from completely removing drivers and will restore the driver installations when the drivers are deleted or broken. This may trigger a failure of uninstalling problematic drivers.
That’s why it seems there are no problems with the device drivers in Device Manager or the drivers are in the latest versions, but the computer is still stuck on no sound issue, no Wi-Fi available hitch, display problems, etc..
Common Methods to Remove Drivers on Windows 10
There are two known ways to uninstall drivers on Windows 10, but sometimes, the methods cannot remove the programs clearly due to the Windows 10 features we’ve mentioned above. Here we still show you the methods:
Way 1. Uninstall Drivers from Programs and Features
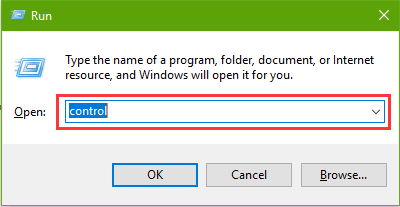
Step 1. Open Run with Windows shortcut keysWin + R.
Step 2. Type into control and hit the Enter key.
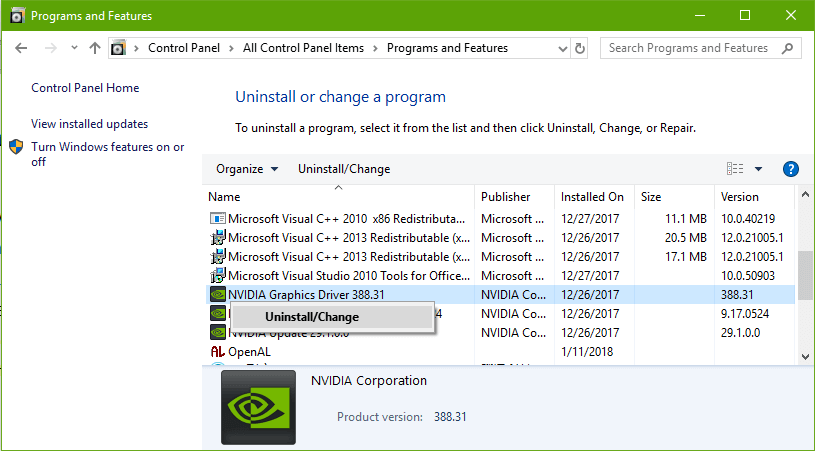
Step 3. In Control Panel, go to Programs and Features.
Step 4. Right-click the driver and select Uninstall.
Step 5. Restart the PC.
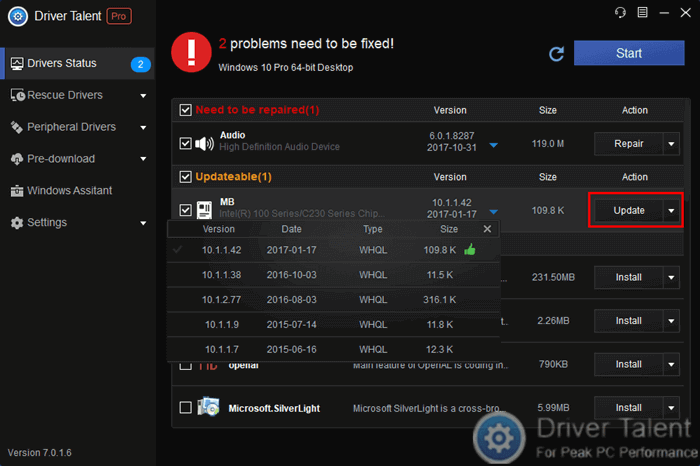
Way 2. Download Driver Talent to get a one-click solution
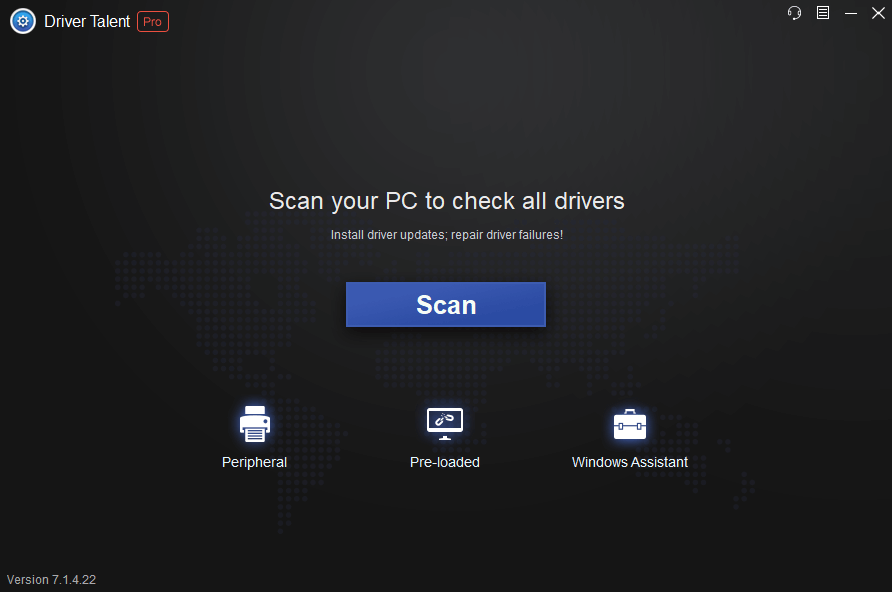
If you find it time-consuming to search proper driver downloads, or if you prefer a one-click solution, you can use Driver Talent. It is a reliable and professional Windows drivers download and update utility.
You can get and install the best-matched and safe driver updates you need in seconds. Also, you can use the software to quickly uninstall device drivers. Click the button above to save your time.
Step 1. Click the Scan button after you launch Driver Talent. It will automatically detect those missing, outdated or broken drivers.
Step 2. If you are going to update drivers, click the Update button directly after the scanning. The utility will download the compatible driver version for your machine.
If you want to remove some drivers, go to the Uninstall menu. Highlight the device and click the Uninstall button to delete the driver.
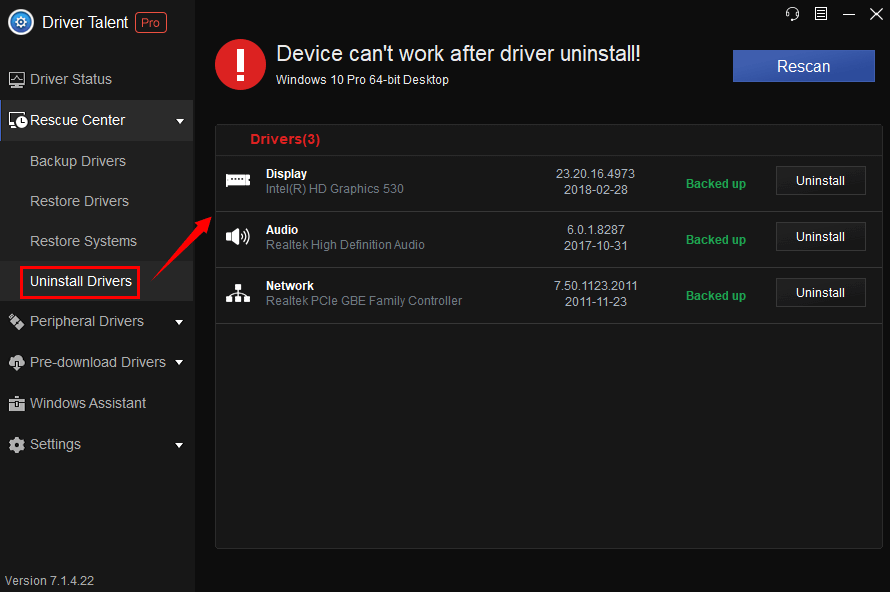
Step 3. Reboot to make the newly driver download or the driver change take effect.
Note: You’d better back up your drivers before any driver changes in case other system problems occur suddenly.
Way 3. Remove Windows Drivers with Device Manager
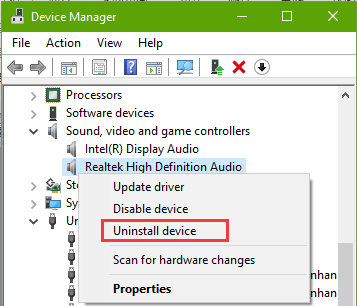
Step 1. Use shortcut keys Win + X on Windows 10.
Step 2. Select Device Manager.
Step 3. Expand the entry. Right-click the problematic device and select Uninstall device.
Step 4. You may need to check the option Delete the driver software for this device, and then click the Uninstall button.
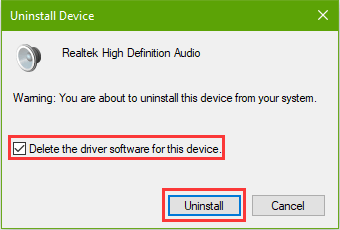
Step 5. Reboot the computer.
The three solutions above can help to delete a certain device, but you cannot completely remove the driver when you improperly install the program, especially with the first method. After you restart the machine, Windows 10 will still recognize the broken, incorrectly configured or incompatible driver, even if you’ve installed the appropriate one.
Windows 10 will detect drivers stored in C:\Windows\System32\Drivers during the PC startup, which has not been removed actually. Besides, if there is a damaged driver, Windows 10 will restore the working one from a backup folder during the restart.
To solve such a «failed driver uninstallation» issue or to completely delete unnecessary drivers, you can follow the steps below.
Before we begin, let’s learn about some important driver-related folders in your drive (C:).
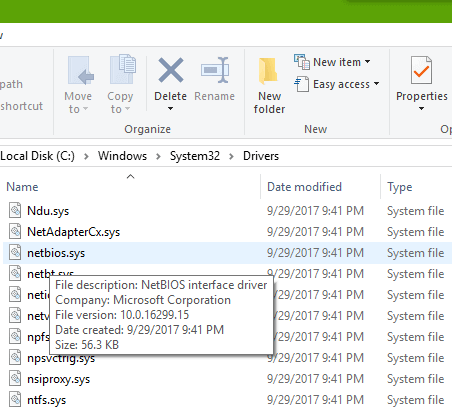
1. C:\Windows\System32\Drivers
You can find the .sys files of the exact device driver in the folder Drivers.
2. C:\Windows\System32\Inf
Some .inf files are saved in the folder Inf. The file names are not the original names of the driver package but are called in forms of oem#.inf or oem#.pnf (# stands an appropriate number).
3. C:\Windows\System32\DriverStore\FileRepository
This folder FileRepository stores all the driver package backups.
4. C:\Windows\System32
You have those .dll components of the drivers in the folder System32.
Here we’ll take the sound card device as an example to help you understand how to clearly delete a device driver from Windows 10 computer.
Completely Remove a Device Driver: Step 1
1. Open Device Manager and go to the sound device whose driver you need to uninstall.
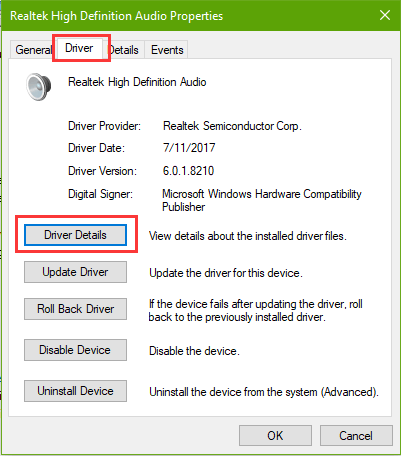
2. Double-click the device to open the device Properties, and click Driver tab. Then click Details button to open the Driver File Details box.
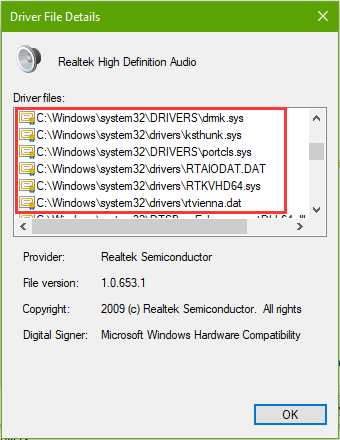
3. Check those driver file details. Write down those file names in .sys format in c:\windows\system32\drivers. For example, here we have drmk.sys, ksthunk.sys, portcls.sys and RTKVHD64.sys on the list.
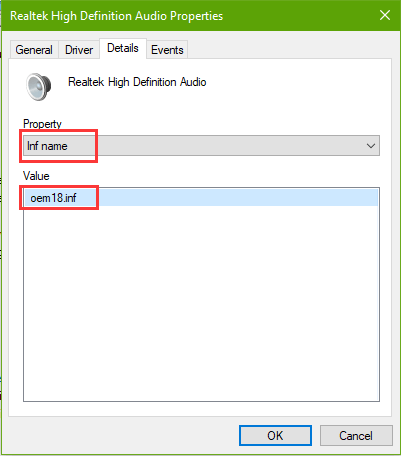
4. Back to the Properties of the device and go to Details tab.
5. Select Inf name from the drop-down menu of Property. Then write down the information displays in Value. Here we have oem18.inf in the box.
Then you need to find out the corresponding folder that stores the driver backup in C:\Windows\System32\DriverStore\FileRepository. Let’s go to Step 2.
Completely Remove a Device Driver: Step 2
If you received an error message after your driver installation, you can easily find out the backup folder in Device Manager: device Properties >Events tab >Information. But if there’s no such content in the box, you can use a command to check the corresponding folder.
1. Use shortcut keys Win + S (or directly use your search bar on Taskbar). Type into cmd and press the Enter key.
2. Right-click the icon and select Run as administrator.
3. Type into the command: pnputil /enum-drivers > c:\drivers.txt. Hit the Enter key.
4. Then go to your C: drive and open the .txt file generated just now. Scroll down and navigate to the device whose driver runs into a problem. Here we can see the Published Name of the sound card, namely oem18.inf, which is what we’ve recorded in Step 1.
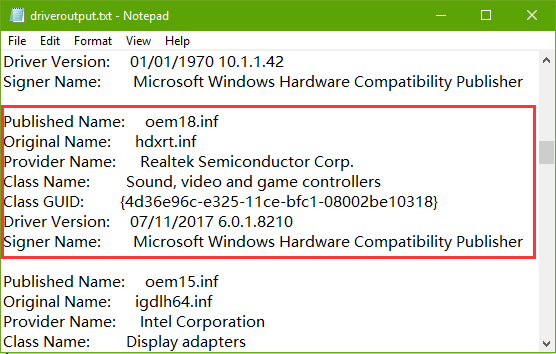
5. Then you need to take down the Original Name, hdxrt.inf, and look for the folder in C:\Windows\System32\DriverStore\FileRepository that starts with the same name.
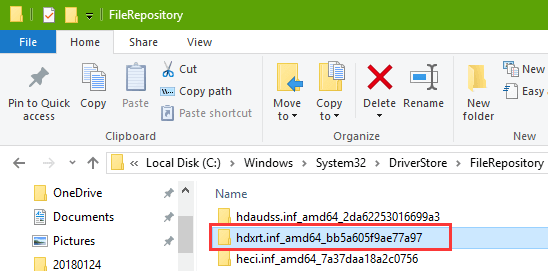
Open the folder and you will see all the driver backup files of the device. You can group the files in Date modified. Then find out the exact driver installer stored in this folder.
Completely Remove a Device Driver: Step 3
We’ve had those .sys files, .inf files and driver backups we need in the three folders. Now we need to delete those driver-related files from the folders in this step.
Note: If you don’t want the backup anymore, you can delete it. To prevent sudden system issues, like «display driver stopped responding and has recovered» error, WiFi adapter not working problem, mouse and keyboard not working, etc., we recommend you transfer the file to other drives.
If you have no access to change the files in the three folders, you can change to your administrator account, or do the following to unlock the access permissions.
1. Right-click the folder, for example, FileRepository. Select Properties.
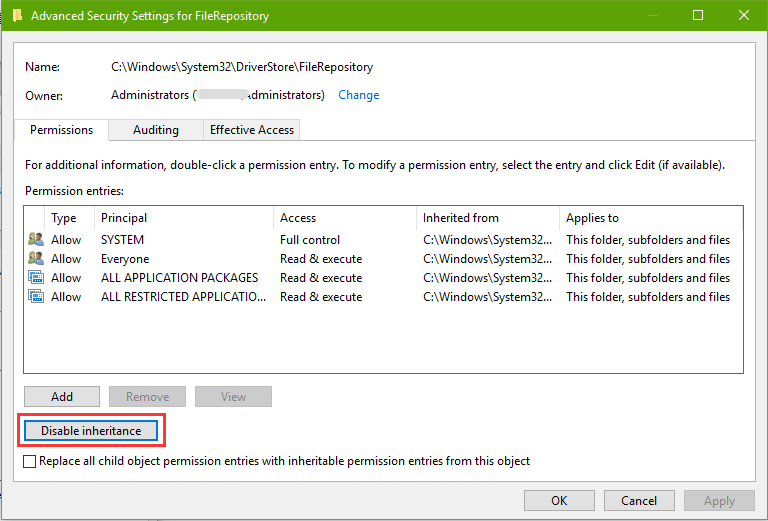
2. Go to Security tab and click the Advanced button.

3. Click Change beside Owner. Type into your current Windows account and click OK. Then you’ll see the account change.
4. Click OK of the Advanced Security Settings for FileRepository. Click OK on the Properties box. Then repeat 1 — 2. Click the Change permissions button.
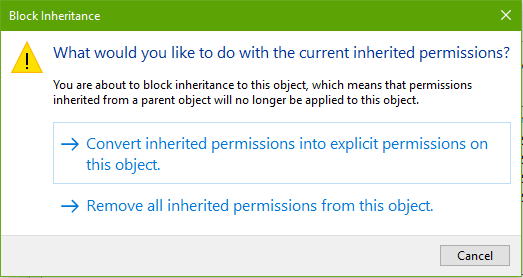
5. Click the Disable inheritance button.
6. Click Remove all inherited permissions from this object.
7. Then click the Add button above the Disable inheritance button.
8. Click Select a principal. Then type into your current account and click OK.

9. Check the option Full control and the option Only apply these permissions to objects and/or containers within this container.
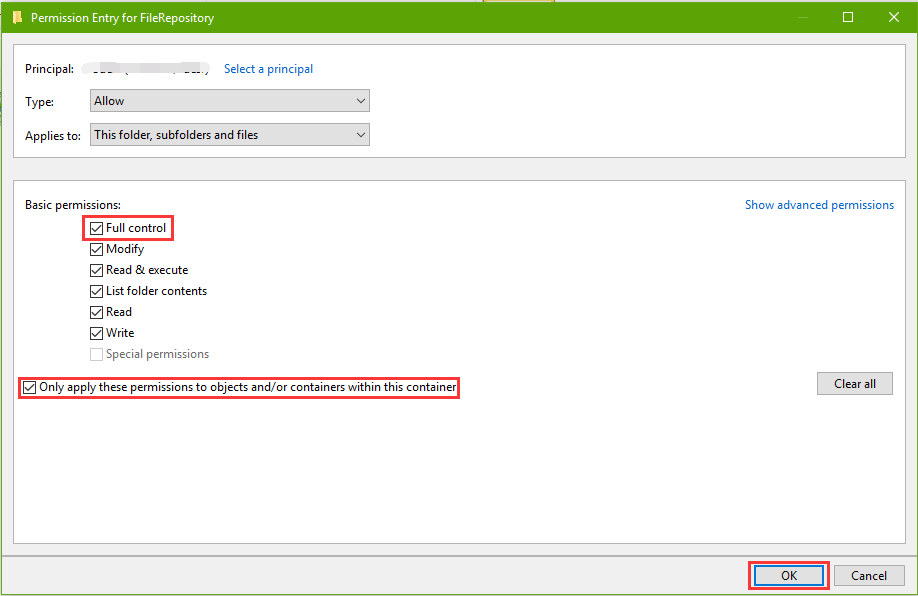
10. Click OK to get the full control of FileRepository.
After that, you can remove the driver installer or other driver-related files in the folder.
Completely Remove a Device Driver: Step 4
The last step is to clean those driver registry entries that feature in automatic driver recover in Windows Registry.
Note: Registry Editor is a database storing important Windows data. You’d better backup registry before any changes in case other serious computer crashes occur, such as black screen issue, boot loop glitch, blue screen error, etc..
1. Open Run with shortcuts Win + R.
2. Type into regedit and press the Enter.
3. Expand the entries in Registry with the following path:
HKEY_LOCAL_MACHINE\SOFTWARE\Microsoft\Windows\CurrentVersion\Setup\PnpLockdownFiles
4. On the left side, scroll down and look for those entries that contain related information of the device driver you are going to delete. For example, we will remove Realtek sound card driver and we have the entries:
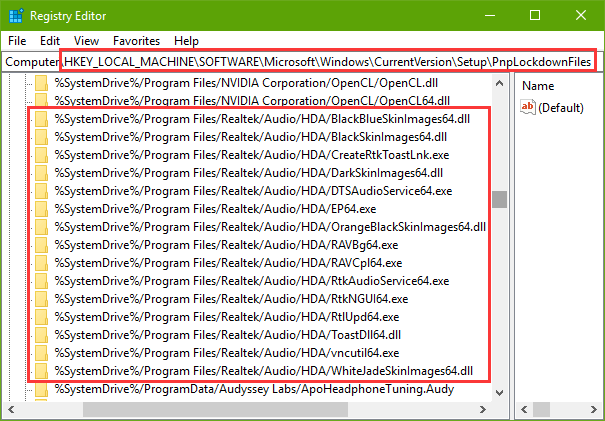
So we need to right-click to delete all of the corresponding .sys files and .dll files.
5. Then go to HKEY_LOCAL_MACHINE\SYSTEM to check if there is the services entry. If so, delete related driver keys under the entry.
After all of the 4 steps above, now you have completely removed the device driver from Windows 10. Restart the computer to make the changes take effect, and then you can download and install a new driver version to keep your Windows device up-to-date.
That’s it. All of the above are possibly the best ways to remove drivers completely from a Windows 10 computer. If you still fail to uninstall or delete the unnecessary/bad drivers, you can drop a line below in the comment section, or click the left menu on this page for more technical support. If you have any other Windows 10-related issues, see Windows 10 section on this site.


