- Как правильно удалять папку Windows.old после обновления Windows 10
- Зачем нужна папка Windows.old и можно ли её удалять?
- Как удалить папку Windows.old в Windows 10 штатными средствами?
- can i delete windows update folder after updating windows 7 ?
- Replies (7)
- www.makeuseof.com
- Follow MUO
- How to Delete Old Windows Update Files
- How to Delete Old Windows Update Files
- Subscribe To Our Newsletter
- One More Step…!
- How to delete downloaded Windows Update files
- How to delete downloaded Windows Update files
- Clear the Windows Update cache from the command line
- Как полностью удалить Windows old на ОС Виндовс 10 и убрать старую папку
- Откуда взялась папка Windows.old
- Как удалить Windows.old с компьютера
- Через временные файлы
- С помощью «Командной строки»
- Через «Очистку диска»
- Используя настройки памяти устройства
- Через «Планировщик заданий»
- Используя сторонние программы
- Что делать, если папка не удаляется
Как правильно удалять папку Windows.old после обновления Windows 10
После крупных обновлений Windows пользователи вдруг замечают, что куда-то вдруг подевалось свободное место на системном диске. В процессе перехода от версии к версии, ваша старая операционная система со всеми настройками сохраняется в папке Windows.old. Размеры данной папки порой превышают 30 GB и хранить ее постоянно не целесообразно, особенно на SSD дисках малого объёма.
Зачем нужна папка Windows.old и можно ли её удалять?
Как вы уже поняли, папка Windows.old появляется после глобальных обновлений, как это случилось несколько дней назад после перехода на версию 1909 , или переустановки Windows 10 поверх старой версии. Windows.old также появляется при переходе в Windows 7 или 8 на «десятку». Нужна она на случай, если вы захотите вернуться к предыдущей версии операционной системы. Соотвественно, удалив данную папку, откатиться назад уже не получится.
Впрочем, на нормально работающей системе её наличие не обязательно, а в некоторых случаях даже вредно (если у вас нетбук с твердотельным накопителем малого объёма). В большинстве случаев я удаляю Windows.old сразу после установки новой версии, ибо нечего тянуть за собой груз из прошлого. Да и обновление до новой версии, это наверняка обдуманный шаг.
Как удалить папку Windows.old в Windows 10 штатными средствами?
Просто удалить папку Windows.old из Проводника Windows не получится. Система заблокирует данное действие с вашей стороны. Конечно, загрузившись с флешки или подключив диск к другому компьютеру, никто не запретит вам проделать данный акт вандализма, но так можно вынести вообще всё, что душе угодно.
Для удаления папки Windows.old существует штатное средство по освобождению пространства на диске и избавления от старой версии Windows (все действия описаны для актуальной на данный момент версии Windows 1909).
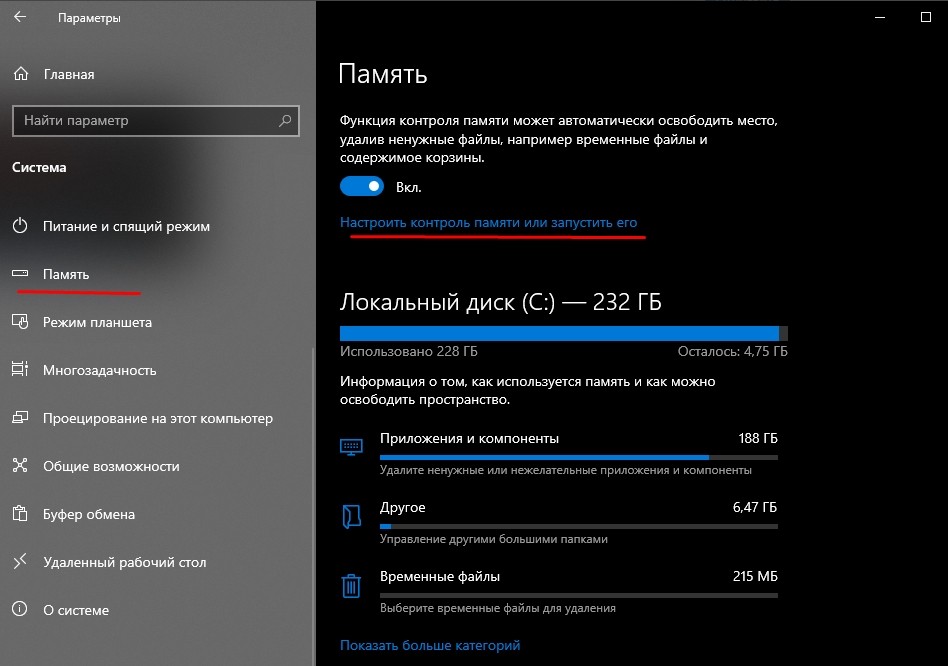
Открываем меню «Пуск», выбираем «Параметры» и заходим в раздел «Система». Выбрав пункт «Память устройства» кликаем по ссылке «Настроить контроль памяти или запустить его».
Отмечаем галочкой пункт «Удалить предыдущие версии Windows» и нажимаем кнопку «Очистить сейчас».
Подписывайтесь на канал Яндекс.Дзен и узнавайте первыми о новых материалах, опубликованных на сайте.
ЕСЛИ СЧИТАЕТЕ СТАТЬЮ ПОЛЕЗНОЙ,
НЕ ЛЕНИТЕСЬ СТАВИТЬ ЛАЙКИ И ДЕЛИТЬСЯ С ДРУЗЬЯМИ.
can i delete windows update folder after updating windows 7 ?
Replies (7)
which windows update folder and how does this pertain to microsoft security essentials functionality? [1]
is system restore functioning properly now or. ?
[1] A Moderator has moved your thread from the Microsoft Security Essentials forum to the Win7-specific Windows Update forum.
Robear Dyer (PA Bear)
Microsoft MVP (Windows Client) since October 2002
1 person found this reply helpful
Was this reply helpful?
Sorry this didn’t help.
Great! Thanks for your feedback.
How satisfied are you with this reply?
Thanks for your feedback, it helps us improve the site.
How satisfied are you with this reply?
Thanks for your feedback.
Was this reply helpful?
Sorry this didn’t help.
Great! Thanks for your feedback.
How satisfied are you with this reply?
Thanks for your feedback, it helps us improve the site.
How satisfied are you with this reply?
Thanks for your feedback.
which windows update folder and how does this pertain to microsoft security essentials functionality? [1]
is system restore functioning properly now or. ?
[1] A Moderator has moved your thread from the Microsoft Security Essentials forum to the Win7-specific Windows Update forum.
Was this reply helpful?
Sorry this didn’t help.
Great! Thanks for your feedback.
How satisfied are you with this reply?
Thanks for your feedback, it helps us improve the site.
How satisfied are you with this reply?
Thanks for your feedback.
Was this reply helpful?
Sorry this didn’t help.
Great! Thanks for your feedback.
How satisfied are you with this reply?
Thanks for your feedback, it helps us improve the site.
How satisfied are you with this reply?
Thanks for your feedback.
when windows 7 update automatically then stored folder is too large.
what «stored folder?»
Robear Dyer (PA Bear)
Microsoft MVP (Windows Client) since October 2002
Was this reply helpful?
Sorry this didn’t help.
Great! Thanks for your feedback.
How satisfied are you with this reply?
Thanks for your feedback, it helps us improve the site.
How satisfied are you with this reply?
Thanks for your feedback.
![]()
You can rename Windows Software Distribution Folder. It will recreate itself.
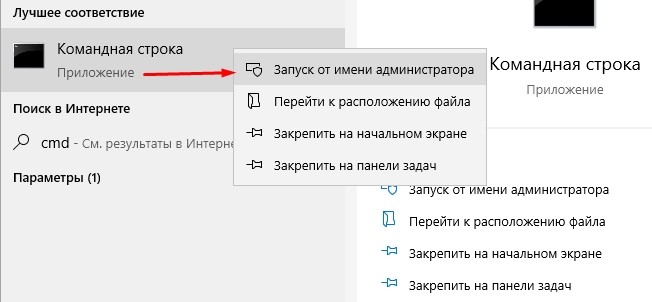
Start > Type CMD
Right click on CMD and select Run As Administrator
Before your rename the folder you must stop the Windows Update service. Here is how:
- type net stop wuauserv and press enter
- type rename c:\windows\SoftwareDistribution to softwaredistribution.oldand press enter
- type net start wuauserv and press enter
- type exitand press enter
Once you restarted Windows Update service, go back and verify the new folder was created
www.makeuseof.com
Follow MUO
How to Delete Old Windows Update Files
There is still one part of Windows Update that needs your attention: the old files that are left behind. They can take up a lot of space.
After what feels like an eternity, Microsoft has found a solution to the Windows updates conundrum — and more amazingly, users are happy with it.
Windows Update now relies on a combination of active hours, customizable restarts, and manual pauses. The upshot is you can be safe in the knowledge that you’re running the latest version of the operating system without worrying about checking for updates every day.
But there is still one part of Windows Update that needs your attention: the old files that are left behind. They can take up a lot of space. Rather than relying on Windows to clean things up, why not take matters into your own hands?
How to Delete Old Windows Update Files
- Open the Start menu, type Control Panel, and press Enter.
- Go to Administrative Tools.
- Double-click on Disk Cleanup.
- Select Clean up system files.
- Mark the checkbox next to Windows Update Cleanup.
- If available, you can also mark the checkbox next to Previous Windows installations. Doing so will delete the Windows.old file.
- Click OK.
- Wait for Windows to complete the uninstallation process.
After you delete old update files as we have outlined above, you might also want to delete these Windows files and folders to free up some space. And if you ever need to install certain updates, you can use the Microsoft Update Catalog.
There’s a new date for vaccine eligibility, and the Biden administration wants to make sure you know that.

Dan joined MakeUseOf in 2014 and has been Partnerships Director since July 2020. Reach out to him for inquires about sponsored content, affiliate agreements, promotions, and any other forms of partnership. You can also find him roaming the show floor at CES in Las Vegas every year, say hi if you’re going. Prior to his writing career, he was a Financial Consultant.
Subscribe To Our Newsletter
Join our newsletter for tech tips, reviews, free ebooks, and exclusive deals!
One More Step…!
Please confirm your email address in the email we just sent you.
How to delete downloaded Windows Update files
Windows Update works for the most part pretty reliable. It is an automated system of Microsoft’s Windows operating system that handles the downloading and installing of updates for the operating system.
At best, it is a silent service that runs in the background; it may ask you to restart the PC every now and then though as that is still required for many updates, and it sometimes may do so without user interaction.
When you run into issues though with updates, you may spend hours or even days figuring out what is going wrong.
I cannot update one of my PCs to the Windows 10 Fall Creators Update for instance because of a bluescreen that I get whenever I try to do so.
One of the things that you can try when it comes to updates, is to delete downloaded Windows Update files to start over.
If you suspect that something is wrong with the files, or if you want Windows Update to run a new check for updates to download new versions of updates that were released by Microsoft, then you may find the following tip useful for that.
If you run Windows Insider builds on a PC for instance, you may skip an already downloaded update to a new build to download a newer build and avoid having to update the system multiple times.
How to delete downloaded Windows Update files

It is thankfully pretty easy to delete all cached update files. This works on all supported versions of Windows, including Windows 7, Windows 8.1 and Windows 10.
- Open the Start Menu (tap on the Windows-key or click on it).
- Type services.msc.
- Right-click on the result, and select «run as administrator» from the context menu.
- Locate the Service Windows Update. The services listing is sorted alphabetically by default. Click on name to revert the order so that you don’t need to scroll as much.
- Right-click on the service Windows Update and select Stop from the menu.
- Go to C:\WINDOWS\SoftwareDistribution\Download using Explorer or any third-party file browser. If you navigate to the folder manually, you may need to enable the showing of hidden files first.
- Do so with a click on File > Change folder and search options.
- Go to View, and scroll down until you find «Hidden files and folders» listed.
- Select «Show hidden files, folders and drives».
- Remove the checkmark from «Hide protected operating system files (Recommended)».
- Click Apply, then OK.
- Select all files of the folder. The easiest way to do that is to use Ctrl-A while the folder is active.
- Hit the Delete-key on the computer keyboard.
- Windows may need administrator privileges to delete certain files. Select «do this for all current items» and click continue to grant the permissions.
- Go back to the Services window.
- Right-click on the Windows Update service, and select Start from the list of options.

You can re-run a check for updates once all files have been deleted. Please note that Windows Update will download all updates anew when you clear the update cache. This can lead to Gigabyte large downloads.
Clear the Windows Update cache from the command line

You may purge the Windows Update cache from the command line as well. While you can type the following commands on an elevated command prompt manually, you may create a small batch file as well toautomate the process.
Here is what you need to do:
- Tap on the Windows-key to bring up the Start Menu.
- Type cmd.exe.
- Hold down the Shift-key and the Ctrl-Key before you select the cmd.exe result. This opens an elevated command prompt.
- Accept the UAC prompt that Windows displays.
- Run the following commands and hit enter after each line:
- net stop wuauserv
- cd %Windir%\SoftwareDistribution
- del /f /s /q Download
- net start wuauserv
The commands explained:
- net stop wuauserv — This stops the Windows Update service.
- cd %Windir%\SoftwareDistribution — Switches to the SoftwareDistribution directory of the Windows installation.
- del /f /s /q Download — Deletes the Download folder of the SoftwareDistribution directory with
- /f — force the removal of read-only files.
- /s — include files in subdirectories.
- /q — in quiet mode to surpress prompts.
- net start wuauserv — Starts the Windows Update service.
We have uploaded a batch file to our own server which you may run to execute the commands automatically. You need to right-click on the file and select «run as administrator» as it requires administrative privileges.
You can download the file with a click on the following link: clear-windows-update-cache.zip
Note that it is supplied as an archive that you do need to extract before you may run it.
Tip: Check out these Windows Update related articles and guides
Как полностью удалить Windows old на ОС Виндовс 10 и убрать старую папку

Если Windows.old не нужен, желательно знать, как удалить его на Виндовс 10. Обычно старая операционка хранится на накопителе С. Система сама создает такую папку. Лучше не спешить удалять предыдущую версию. Возможно, придется ею воспользоваться, например, в случае конфликтов в новой ОС. Если система работает отлично, можно убрать старую версию. Такая процедура абсолютно безопасна.
Откуда взялась папка Windows.old
После переустановки операционки пользователи нередко замечают, что на накопителе С появилась папка под названием Виндовс.олд. Правда, Windows.old иногда создается и в процессе обновления. Например, если обновить Виндовс 7 или 8, 8.1 до «десятки». Windows.old может появиться и после чистой установки, если предварительно не было выполнено форматирование.

В Виндовс.олд находятся копии прежних ОС, а еще программные и пользовательские файлы. Содержимое старой папки можно извлечь и использовать. Например, оттуда разрешается забрать данные, созданные пользователем собственноручно. Хранящиеся в этой папке служебные файлы можно использовать для возвращения к предыдущей операционке. Откатить систему назад лучше через «Параметры», перейдя в «Обновление и безопасность», а оттуда – в «Восстановление».
Если пользователь не раз выполнял обновление системы или переустановку Win 10, то у него на накопителе С может быть несколько старых ОС. Иногда прежняя версия операционки, хранящаяся в Windows.old, достигает весьма внушительных размеров. Именно по этой причине пользователи хотят от этой папки избавиться. Если новая ОС работает без проблем, старые данные разрешается убрать.

Как удалить Windows.old с компьютера
Занимающий слишком много места Windows.old разрешается убрать с ПК. Обычно он хранится на накопителе С. Если прежнюю версию ОС удалить, то в случае неполадок воспользоваться ею не удастся. Желательно месяц протестировать новую операционку, а потом удалять старую.

Через временные файлы
Как убрать предыдущую установку:
- через «Параметры» зайти в «Систему»;


- перейти на накопитель, на котором хранится Windows.old (например, С);

- откроется окошко с содержимым накопителя С;
- отыскать «Временные файлы» и нажать на них;
- откроется окно с предложением «Удалить временные файлы», согласиться.

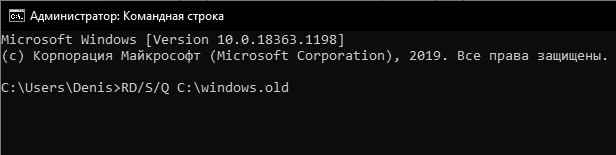
С помощью «Командной строки»
Как выполнить удаление из консоли:
- войти в командную консоль на администраторских правах;
- если старая версия находится на С, то написать: RD/S/Q C:\windows.old;
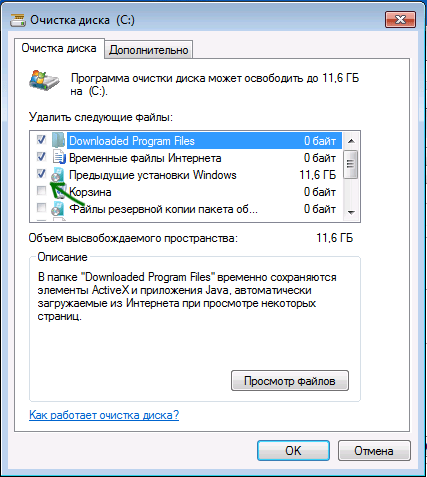
Через «Очистку диска»
Способ удаления через дисковую очистку:
- отыскать «Выполнить»;
- в появившемся окошке написать: cleanmgr;

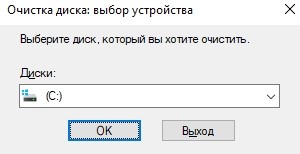

- вначале выполнится оценка;
- программа оценит объем места, которое можно освободить;
- потом откроется окошко «Очистка диска С»;
- активировать «Очистить системные файлы»;
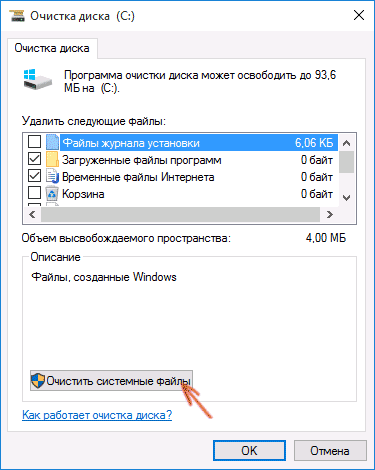
- откроется новое окошко;
- в списке «Удалить следующие…» отыскать «Предыдущие установки Win»;

- эту строчку отметить галочкой;
- нажать на «ОК» и полностью удалить прежнюю установку.
Еще один способ очистки:

- отыскать накопитель С;
- нажать по нему мышкой (правой клавишей);
- всплывет окошко «Свойства…»;
- кликнуть на «Очистку диска»;
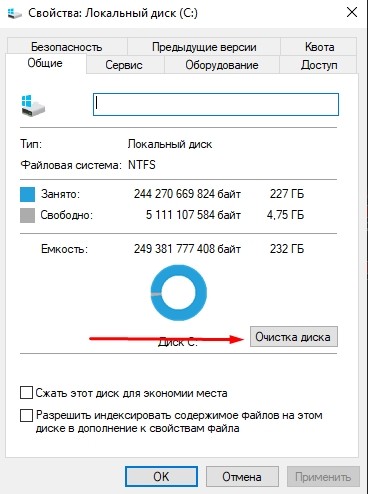
- выбрать «Предыдущие инсталляции Win»;
- нажать на «Очистить…».
Используя настройки памяти устройства
Способ удаления старой версии:
- через «Пуск» перейти в «Параметры»;
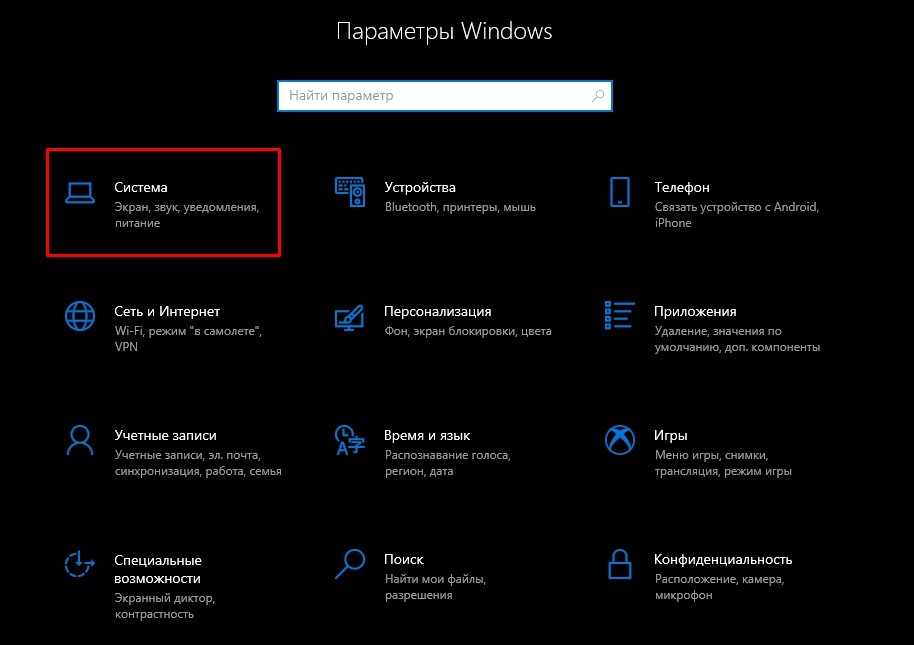
- перейти в «Память устройства»;
- отыскать «Контроль памяти»;
- активировать строчку «Освободить место сейчас»;
- откроется новое окошко с предложением выбрать элементы для удаления;

- отыскать в появившемся списке «Предыдущие установки…» и отметить галочкой;
- нажать (вверху списка) на «Удалить…»;
- дождаться окончания процесса.
Еще один способ удаления через память устройства:
- зайти в «Память устройства»;
- отыскать «Контроль памяти»;
- активировать «Изменить способ автоматического изменения места»;
- отыскать «Освободить пространство сейчас»;

- отметить галочкой «Удалить предыдущую версию…»;
- кликнуть на «Очистить сейчас».
Через «Планировщик заданий»
Способ удаления через Планировщик:
- зайти в «Поиск»;
- найти «Планировщик заданий»;

- в списке отыскать строчку «SetupCleanupTask» и два раза на нее нажать;
- кликнуть по заданию и выбрать «Выполнить».

Используя сторонние программы
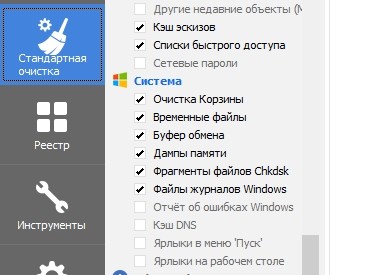
Способ удаления через стороннее приложение:
- скачать на свой компьютер утилиту Ccleaner;
- запустить приложение;

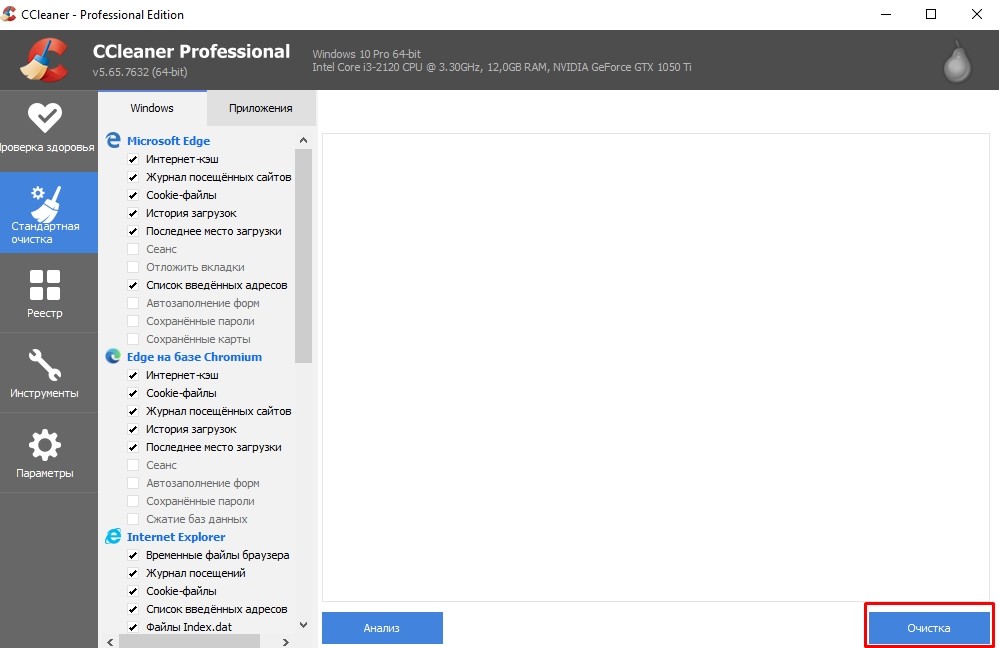
- откроется вкладка «Виндовс» со списком;
- найти «Прочее» (внизу списка);
- отметить галочкой «Старая установка Виндовс»;
- активировать «Очистку».
Что делать, если папка не удаляется
Windows.old, содержащий большой объем информации, может с первого раза полностью не удалиться. Если владелец ПК воспользовался одним из способов очистки, а некоторые файлы все равно сохранились, желательно выполнить процедуру удаления того же самого объекта повторно.
Правда, бывают случаи, когда Виндовс.олд вообще не реагирует на желание пользователя его убрать с накопителя С. Обычно такое случается, если в папке с предыдущей установкой сидят вирусы. В такой ситуации поможет запуск антивируски. Программа просканирует компьютер, найдет и удалит вирусы. После этой процедуры можно повторить попытку.
Если предыдущая установка не исчезнет даже после работы антивируски и повторной очистки, то можно попробовать установить чистую ОС, а перед инсталляцией сделать форматирование накопителя С. Правда, в таком случае удалятся все ранее загруженные на ПК программы и даже личные пользовательские файлы. Перед чистой установкой желательно перекинуть нужную информацию на флешку.
Папка с прежней версией может занимать несколько гигабайт места на накопителе С. Именно по этой причине ее стараются убрать с компьютера. Хотя хранящаяся в ней ОС поможет в случае неполадок с новой операционкой. Если есть Виндовс.олд. на компьютере, в любое время можно откатить систему назад. Ведь в такой папке хранятся файлы для резервного восстановления ОС. Пользователи также должны знать, что новая операционка нередко сама убирает старую спустя 30 дней после установки.


