- Add or Remove Programs
- How to open Add or Remove Programs in Windows 10
- Open Add or Remove Programs in Windows 7 and 8
- How to open Add or Remove Programs in Windows Vista
- How to open Add or Remove Programs in Windows XP
- How to open Add/Remove Programs in Windows ME and 98
- Should I write «Add/Remove Programs» or «Add or Remove Programs?»
- How to remove Startup Programs in Windows 10 [Full Guide]
- Windows 10 Guide to remove Startup Programs
- 1. Use the File Explorer
- 2. Use the registry
- 3. Use the Group Policy Editor
- 4. Use the Task Scheduler
- Remove Stuck Entries from Programs and Features
- Remove Stuck Programs – Registry
- Microsoft Fix It Solution
- Third-Party Tools
- How to Uninstall Apps From Windows 7, 8, and 10
- Remove old and unused apps to free space on your PC
- What to Know
- Remove an App With the Windows 10 Start Menu Option
- Windows 10 Settings App Option
- Windows 8.1 and 8
- Windows 7
Add or Remove Programs

The Add or Remove Programs is a feature in Microsoft Windows that lets a user uninstall and manage the software installed on their computer. This feature was introduced in Windows 98 as Add/Remove Programs, later renamed Programs and Features in Windows Vista and Windows 7, and then Apps & features in Windows 10.
How to open Add or Remove Programs in Windows 10
- Press the Windows key , type Apps & features or Add or Remove Programs, and press Enter .
- A window similar to the picture below should appear.

- From this window, you’ll be able to manage how Windows installs programs and also uninstall any programs that were installed.
- Open the Control Panel
- Click Programs and Features or under the Programs section click Uninstall a program.
- From this window, you’ll be able to manage how Windows installs programs and also uninstall any programs that were installed.
See the link below for additional help with uninstalling software in Windows.
Open Add or Remove Programs in Windows 7 and 8
- Open the Control Panel
- Under the Programs section, click Uninstall a program.
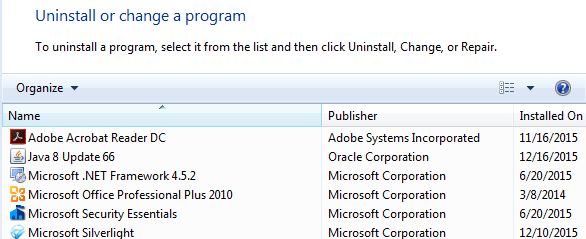
- A window similar to the one shown below should appear with a list of all the programs on your computer.

- From the Programs and Features section of Windows, you can uninstall a program, adjust Windows features, and view installed updates.
- Press the Windows key , type Programs and Features or Add and remove programs, then press Enter .
- A window similar to that shown above should appear.
- From the Programs and Features section of Windows, you can uninstall a program, adjust Windows features, and view installed updates.
See the link below for additional help with uninstalling software in Windows.
How to open Add or Remove Programs in Windows Vista
- Open the Control Panel
- Under the Programs section, click Uninstall a program. If the Control Panel is showing icons, click Programs and Features.
- From the Programs and Features window, you can uninstall a program, adjust Windows features, and view installed updates.
- Press the Windows key , type Programs and Features, then press Enter .
- A window similar to that shown above should appear.
- From the Programs and Features section of Windows, you can uninstall a program, adjust Windows features, and view installed updates.
See the link below for additional help with uninstalling software in Windows.
How to open Add or Remove Programs in Windows XP
- Open the Control Panel
- Double-click Add or Remove Programs.
- A window similar to the one below should appear with a list of all the programs on your computer.

- To remove a program, select it on the list, and then click the Change/Remove button.
See the link below for additional help with uninstalling software in Windows.
How to open Add/Remove Programs in Windows ME and 98
- Open the Control Panel
- Double-click Add/Remove Programs.
- A window should open that allows you to uninstall software in Windows.
Should I write «Add/Remove Programs» or «Add or Remove Programs?»
Unless you’re talking about very early versions of Microsoft Windows (Windows 98 or Windows ME), this section is called «Add or Remove Programs.»
With Windows Vista and Windows 7, if you’re writing about uninstalling and managing software in Windows, refer to this section as «Programs and Features.» With Windows 8 and Windows 10, it should be referred to as «Apps & features.»
How to remove Startup Programs in Windows 10 [Full Guide]

- If booting your OS seems to last forever, you might want to take action.
- Start by managing your startup apps so that you only keep those you need. Here’s how to quickly remove programs from the Startup.
- Check out more handy fixes on our Windows 10 Guides.
- Don’t be shy to explore the Tutorials Hub as well for more tech tricks and tips.

- Download Restoro PC Repair Tool that comes with Patented Technologies (patent available here).
- Click Start Scan to find Windows issues that could be causing PC problems.
- Click Repair All to fix issues affecting your computer’s security and performance
- Restoro has been downloaded by 0 readers this month.
Does it take a long time to start up your operating system? Maybe the boot process is lengthy because there are many applications that load at startup.
There are different tools to manage startup apps. It can be done via the Startup Manager, Task Manager, Explorer, or Registry editor. Below, you can find a few methods that will guide you through the process of adding or removing the startup apps.
You can, also, learn how to enable or disable different apps.
Windows 10 Guide to remove Startup Programs
- Right-click the empty space on the Taskbar.
- A new window will pop up. Drag your mouse pointer on the Task Manager feature and left-click on it.
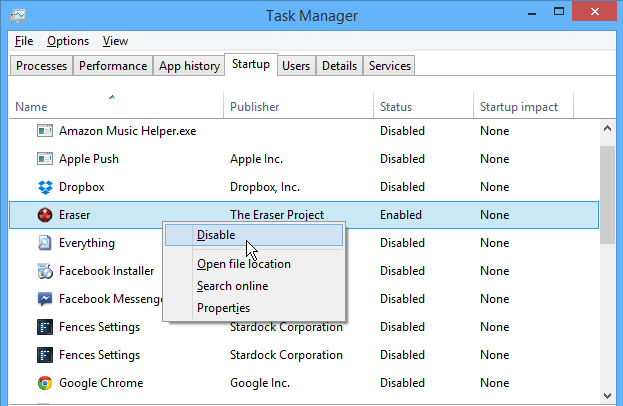
- The Task Manager window will open. Left-click on the Startup tab.
Note: You can navigate directly on the Startup tab by pressing the key combination: Win + R and enter the following command: taskmgr /0 /startup. - In the Startup tab, you can observe a list of applications that are starting with Windows;
- Disable startup application: Prevent any application in the list, from starting with your operating system. Right-click on it and select from the menu, the Disable feature.
- Enable startup application: Right-click on the application( from the startup list) and select from the menu the Enable feature. In this case, the application will start with the OS.
1. Use the File Explorer
- Press the Win + R key combination.
- Enter the following command: shell:Startup, and press the Enter key.
Note: If you want to add or remove startup apps for all users, you need to enter the following command: shell: Common Startup. - A Startup window will open. Find the application executable file that needs to load when Windows boots.
- Create a shortcut of this app. Copy it and paste it in the Startup window. This is the way for adding a startup application in Windows 10.
- To remove the application, delete the shortcut from the Startup folder.
2. Use the registry
- Press the Win + R key combination.
- Enter the following command: regedit without quotes and press the Enter key.
- Navigate to the following path or register key:
- In the name column, you can find the application that starts automatically, when Windows boots.
- Remove the application from the Startup:
- Right-click on the application name and choose Delete feature.
- Adding the application in the Startup:
- Right-click in the Registry Editor window and select New -> String value feature.
- Add value name (the name of the application).
- Add value data: enter the full path to the executable (*.exe) of the application that you wish to run at the startup.
3. Use the Group Policy Editor
If you want to add applications to startup, you can do so using Group Policy Editor. We have to mention that this tool isn’t available in Home versions of Windows, but if you’re using Pro or Enterprise version, this tool should be available for you.
To add an application to startup using Group Policy Editor, do the following:
- Press Windows Key + R and enter gpedit.msc. Press Enter or click OK.
- When Group Policy Editor opens, in the left pane navigate to User Configuration > Windows Settings > Scripts (Logon/Logoff). Now in the right pane double click on Logon.
- Logon Properties window will appear. Click on the Add button.
- When Add a script window opens, click on the Browse button.
- Select the application you want to start. After doing that, click on OK.
- Now click on Apply and OK to save changes. After saving the changes, restart your PC and check if the application starts automatically with Windows.
This is a simple method, but in order to use it, you need to have Pro or Enterprise version of Windows. If you’re a Home user, you’ll have to look for a different solution.
4. Use the Task Scheduler
Windows comes with a useful tool called Task Scheduler. Using this tool you can set certain applications to start at a specific time, but you can also use it to add applications to startup.
Remove Stuck Entries from Programs and Features
Windows 7, Vista, or XP users have this problem
Sometimes even after you’ve uninstalled a program, its entry will remain listed in the Add or Remove Programs or Programs and Features list under currently installed programs in the Control Panel.
This is usually caused by a badly written program that doesn’t properly uninstall itself. The entry is not removed from the registry and therefore remains in the list. If you try to uninstall it again, you’ll most likely just get an error message.
Newer versions of Windows will detect this problem and actually ask you if you want to remove the entry, which is nice. However, if you’re still running Windows 7 or Vista or XP, you’ll still run into this problem.
Remove Stuck Programs – Registry
Luckily, there is an easy way to manually remove these stuck entries from the list. It requires some registry editing, so be sure to make a backup of your registry first in case you mess something up.
To open the registry, click on Start and type in regedit. Now navigate to the following registry key and expand it.
You’ll see quite a few entries listed, some of which have friendly names and some that have a really long identifier.
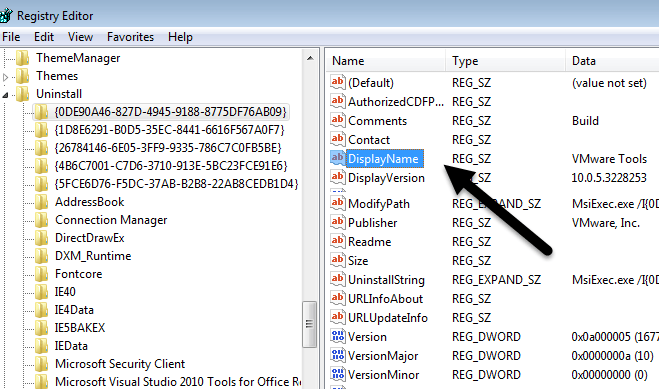
You can easily identify the programs with the long identifier by just clicking on it and looking for DisplayName at the right. In the above example, you can see one of them is for a program called VMware Tools.
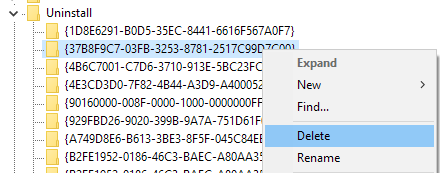
Find the program that is stuck in your program list and then right-click on it in the left-hand menu and choose Delete.
Now you might be wondering why all the programs you have listed under Programs and Features are not showing up under this registry key? The reason is because you might have 32-bit programs installed on a 64-bit version of Windows.
For all of these programs, you need to navigate to the following registry key where you will probably find a lot more entries:
Here, for example, you will find all the entries for Java, if you have that installed. You’ll also find a bunch of entries for Microsoft Office, if you have the 32-bit version installed. Again, just right-click on the entry and choose Delete to remove it.
Lastly, if the program was installed via a .MSI package, which might be the case in corporate environments, you also should check this registry key:
You’ll need to restart your computer and then open up the list of programs in Control Panel to see the changes. It should hopefully be gone.
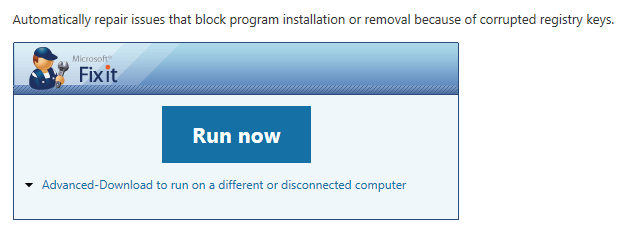
Microsoft Fix It Solution
If you don’t want to mess around with the registry yourself, Microsoft has a free Fix It tool you can download that specifically deals with this issue of programs that cannot be completely uninstalled.
The program will run on Windows XP, Vista, 7 and 8.1. It does not work on Windows 10, but hopefully you should never have this issue on Windows 10.
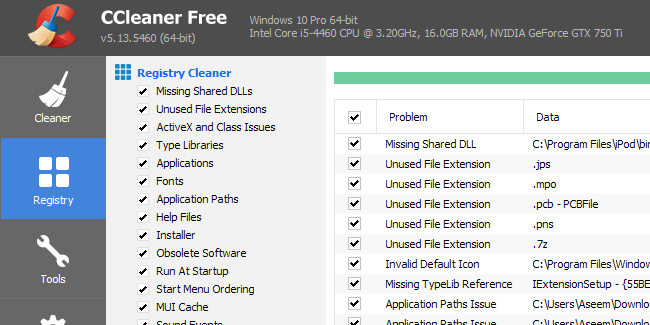
Third-Party Tools
Finally, there is one other way to go about fixing this problem and that is using third-party tools. One of my favorite programs for cleaning up the registry is CCleaner because it’s super safe to use. It’s actually the only program I recommend for fixing problems in the Windows registry.
Hopefully, using one of the methods above, you will be able to clear out any entries that were refusing to go away! If you have any questions, feel free to comment. Enjoy!
Founder of Online Tech Tips and managing editor. He began blogging in 2007 and quit his job in 2010 to blog full-time. He has over 15 years of industry experience in IT and holds several technical certifications. Read Aseem’s Full Bio
How to Uninstall Apps From Windows 7, 8, and 10
Remove old and unused apps to free space on your PC
What to Know
- Use the Apps & features or Add or Remove Programs function from the Control Panel.
- You can also open the uninstall function or program that may have come with the application.
This article explains how to remove specific apps you don’t like or just don’t use from a Windows 10, 8 or 7 operating system.
Remove an App With the Windows 10 Start Menu Option
The first way is the simplest and quickest method for removing an app.
Select Start.
:max_bytes(150000):strip_icc()/001-windows-uninstaller-to-remove-unused-programs-3506955-fa1949dbfd0848dd80509b853ea59d20.jpg)
Find the program you want to uninstall by scrolling down the All Apps list.
:max_bytes(150000):strip_icc()/002-windows-uninstaller-to-remove-unused-programs-3506955-c20c8ad110064756aaf46dbd077b3ed7.jpg)
When you find the program or Windows Store app you want to get rid of, hover over it with your mouse, and right-click.
From the menu that appears, select Uninstall.
:max_bytes(150000):strip_icc()/003-windows-uninstaller-to-remove-unused-programs-3506955-1dd26fbb4f7c468a9bb9a95374e4220c.jpg)
In Programs and Features, scroll until you find the app you want to uninstall, select it, then click Uninstall.
Windows 8 and 8.1 users can also use this method. Instead of right-clicking a program in the Start menu, however, you’d right-click from the Start or All Apps screens.
:max_bytes(150000):strip_icc()/004-windows-uninstaller-to-remove-unused-programs-3506955-09105e2321ec4c0f829f32d4781ec734.jpg)
Windows 10 Settings App Option
Another option is to follow the Settings app method. Get started by navigating to Apps & features. A list of all the installed Windows Store apps and desktop programs will populate on this screen of the Settings app.
Select the Start button then go to Settings.
:max_bytes(150000):strip_icc()/005-change-default-download-location-windows-10-4587317-ed009e660cfd4b54bc5c46e959e80d33.jpg)
Under Windows Settings, select Apps.
:max_bytes(150000):strip_icc()/005-windows-uninstaller-to-remove-unused-programs-3506955-01e50810dc3f44a79fa9fea9dcb2c721.jpg)
Under Apps & features, scroll down to find the app you want to uninstall.
:max_bytes(150000):strip_icc()/006-windows-uninstaller-to-remove-unused-programs-3506955-560c4ee5c4284f12bf8a0bf9c9880a82.jpg)
Select the app, and then select Uninstall.
:max_bytes(150000):strip_icc()/007-windows-uninstaller-to-remove-unused-programs-3506955-368bfda246864d5e83cff7d33e17239f.jpg)
Confirm removal by selecting Uninstall again.
:max_bytes(150000):strip_icc()/008-windows-uninstaller-to-remove-unused-programs-3506955-418dee0ab25a4283974572dae668b491.jpg)
Follow the program’s uninstall prompts.
:max_bytes(150000):strip_icc()/12-how-to-uninstall-apps-from-windows-2f7d0b5455ed49fd893987d6e2d02653.jpg)
Windows 8.1 and 8
Other than the right-click method listed in the Windows 10 section, Windows 8.1 has a similar way to remove apps through the Programs and Features control panel.
Press the Windows Key or select Start on the lower left-hand corner to open the Start Screen.
Locate the application you want to uninstall and right-click the app icon and select Uninstall.
The Programs and Features control panel applet will open. Make sure the correct app is selected.
Select Uninstall/Change and follow the uninstall wizard to complete removal.
You can also bypass and go straight to the Programs and Features control panel applet by doing the following:
Windows 8.1: Right-click the Start menu and select Programs and Features from the context menu.
Windows 8: Hover your cursor over the bottom left corner of your desktop until you see a small image of the Start Screen. Right-click on the context menu and select Programs and Features.
Windows 7
As of January 2020, Microsoft is no longer supporting Windows 7. You should upgrade to Windows 10 to continue receiving security updates and technical support.
Just as previous Windows systems, Windows 7 utilizes the Start menu to begin any uninstall.
Select the Start button.
Select Control Panel.
Select Programs.
Under Programs and Features, scroll to find the program you want to uninstall.
Select the program then select Uninstall.
Follow along with the uninstall prompts to complete the app removal.


