- Top 4 Solutions to Repair Windows 10 BCD Errors Easily
- What is BCD in Windows 10?
- When Boot BCD error occurs in Windows 10?
- 4 effective methods for Windows 10 BCD repair
- Method 1: Repair BCD store with Startup Repair
- Method 2: Rebuild BCD in Windows 10 with Bootrec.exe tool
- Method 3: Windows 10 BCD repair with Command Prompt
- Method 4: Windows 10 BCD repair via AOMEI Partition Assistant
- Summary
- Windows 7 Boot Repair via Command Prompt (5 Ways and 2 Tips included)
- What are the boot sector and master boot record?
- Five efficient ways to run Windows 7 boot repair
- Way 1: Startup Repair with Windows installation media
- Way 2: Windows 7 boot repair from Command Prompt
- Way 3: Repair boot sector in Windows 7
- Way 4: Rename and rebuild BCD via Command Prompt
- Way 5: Windows 7 boot repair without disk
- Extra tips for Windows 7 boot repair
- Summary
Top 4 Solutions to Repair Windows 10 BCD Errors Easily
How to do Windows 10 BCD repair in Windows operating system? Top 4 solutions are provided in this article to help you fix Windows 10 BCD errors.

By Ailsa  / Last Updated December 12, 2019
What is BCD in Windows 10?
In the Windows (10) OS, BCD stands for Boot Configuration Data . This crucial information in the Windows runtime environment will tell the Windows boot loader where to look for boot information. So it is of great importance for loading and running operating system successfully.
Where is the BCD file in Windows 10? It is stored in a file in folder “\Boot”. The full path to this file is “[active partition]\Boot\BCD”.For UEFI boot, the BCD file is located at /EFI/Microsoft/Boot/BCD on the EFI System Partition. For traditional BIOS boot, the BCD file is at /boot/BCD on the active partition.
When Boot BCD error occurs in Windows 10?
There are some situations that you might damage the BCD file, as follows:
Extend the System Active Partition;
An unexpected shutdown;
Blue screen or other errors that require a restart;
Hard drive failure;
Virus attack.
Usually, when BCD get corrupted or damaged, it will result in unbootable situations in Windows 10/8/7 and prompts one of the following BCD errors:
Your PC/Device needs to be repaired. The Boot Configuration Data for your PC is missing or contains errors. File:\Boot\BCD Error code: xc000000f
Windows failed to start. A recent hardware or software change might be the cause. File:\Boot\BCD Status: xc000000f Info: An error occurred while attempting to read the boot configuration data.
There was a problem with a device connected to your PC. An unexpected I/O error has occurred. Error code: 0xc00000e9
Your PC needs to be repaired. The Boot Configuration Data file doesn’t contain valid information for an operating system. File:\Boot\BCD Error code: xc0000098
File: \Boot\BCD Status: 0xc0000034 Info. The Windows Boot Configuration Data file is missing required information.
Well, how to repair Windows 10 BCD files easily while Windows 10 is unbootable? Take a rest, we will show you the top 4 ways step by step at the following description.
4 effective methods for Windows 10 BCD repair
Many users are asking “how do I manually rebuild BCD in Windows 10”. So, in this section, we will show you the top 4 ways step by step to do Windows 10 BCD repair.
Note: If you have a Windows installation disc, you could try the first 3 methods to manually repair BCD using command prompt. If the Windows installation disc is not available, you can skip to method 4 to rebuild BCD via a professional Windows 10 BCD repair tool.
Method 1: Repair BCD store with Startup Repair
The Startup Repair option in the Windows Recovery Environment should repair the BCD store. Follow these steps to fix:
1. Put the Windows 10 installation disc in the computer, and start the computer to boot from this media.
2. Constantly press F1, F2, F12, DEL or other function key (differ in computer manufacturers) to access the BIOS/UEFI of the machine.
3. Change the boot order so that the computer can boot from the installation disc before it boots from the internal hard drives.
4. Select a language, a time, a currency, and a keyboard or another input method, and then click «Next».
5. Click «Repair your computer».
6. When the “Choose an option” menu opens, select “Troubleshoot”.
7. Select “Advanced options” in the “Troubleshoot” window.
8. Select “Startup Repair” then.
9. Select your account and type in the password. Click “Continue” button.
Once you have completed the steps, the Startup Repair will start to scan, detect, and fix any problems that might prevent your Windows 10 from loading correctly.
After this, you could check if you can boot into Windows 10. If so, the problem has been solved.
Method 2: Rebuild BCD in Windows 10 with Bootrec.exe tool
If the startup repair method does not resolve the problem, you can rebuild the BCD store by using the Bootrec.exe tool in the Windows Recovery Environment (Windows RE). Generally, The BCD store is located on the partition where the detail shows “Active : Yes”, and Info is “System” using DiskPart. You must remove the BCD store and recreate it, these can be done in Command Prompt.
1. Access Command Prompt from Windows installation disc (Choose “Command Prompt” in the “Advanced options” screen as above).
2. In the command prompt window, type the following commands:
Bcdedit /export C:\BCD_Backup
ren c:\boot\bcd bcd.old
Bootrec /rebuildbcd
Partition C: might not be the correct volume letter in your case, you have to locate the volume letter using DiskPart for the system partition where the BCD store is located. Replace the right volume letter in these commands.
Method 3: Windows 10 BCD repair with Command Prompt
If the above ways not working, you could try other commands to repair BCD in Windows 10.
Run the following commands in turn:
Bootrec /fixmbr
Bootrec /fixboot
Bootrec /rebuildbcd
Method 4: Windows 10 BCD repair via AOMEI Partition Assistant
If you don’t have a Windows 10 installation disc, you can create a bootable media first then repair BCD. The best Windows 10 BCD repair tool — AOMEI Partition Assistant Standard is such a thing, which is a comprehensive and reliable partition tool to manage hard disk and partitions in Windows 10/8/7 and Windows XP/Vista.
Most importantly, it allows you to create bootable media and repair Windows 10 BCD file (Rebuild MBR) automatically. The steps listed below:
Before you do, prepare an empty USB flash drive (at least 16GB), a working Windows 10 computer has the same operating system as yours (32 bit or 64 bit). And then free download AOMEI Partition Assistant on this computer.
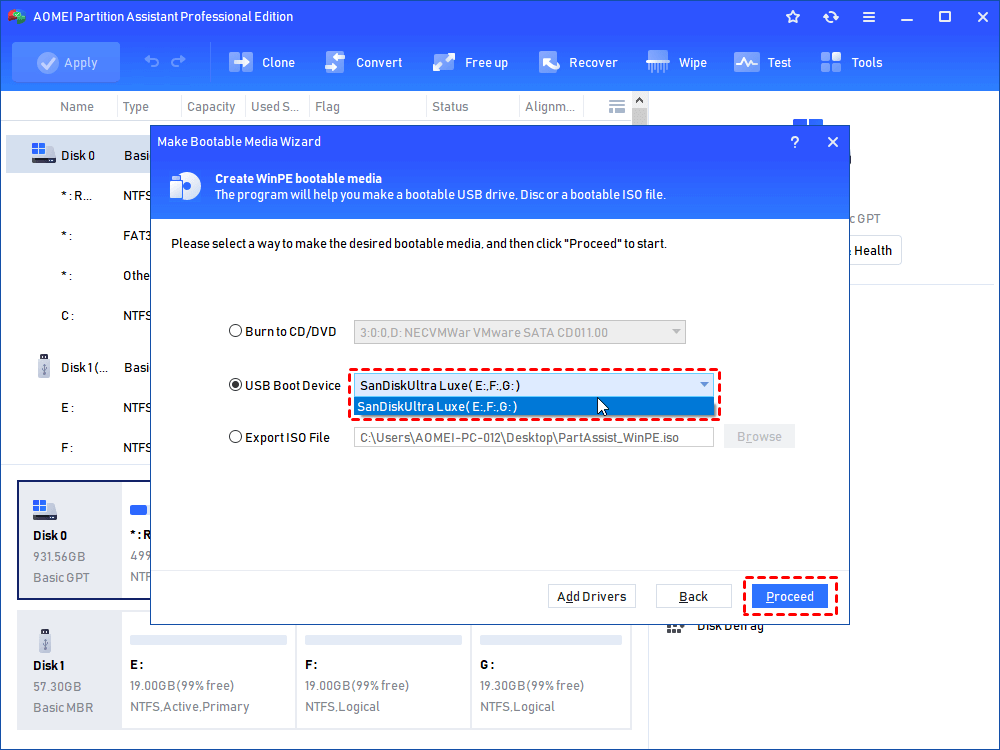
1. Put the USB drive into the working Windows 10 PC. Run AOMEI Partition Assistant, Please select Make Bootable Media under Wizards at the left panel on the main window. Hit Next.

2. Tick USB Boot Device, press Proceed to create Windows 10 bootable media.
3. Then boot your corrupted Windows 10 PC from this bootable media, you will see the AOMEI Partition Assistant running.
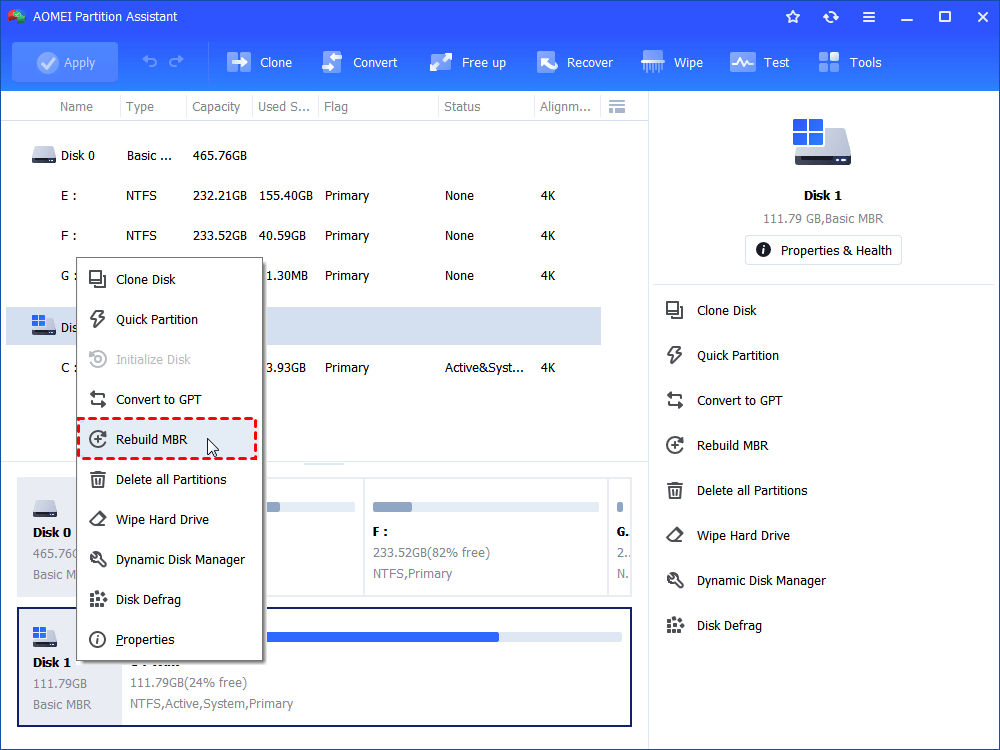
4. Select the system hard disk and choose Rebuild MBR at the drop down menu.
5. Choose MBR type for Windows 10.
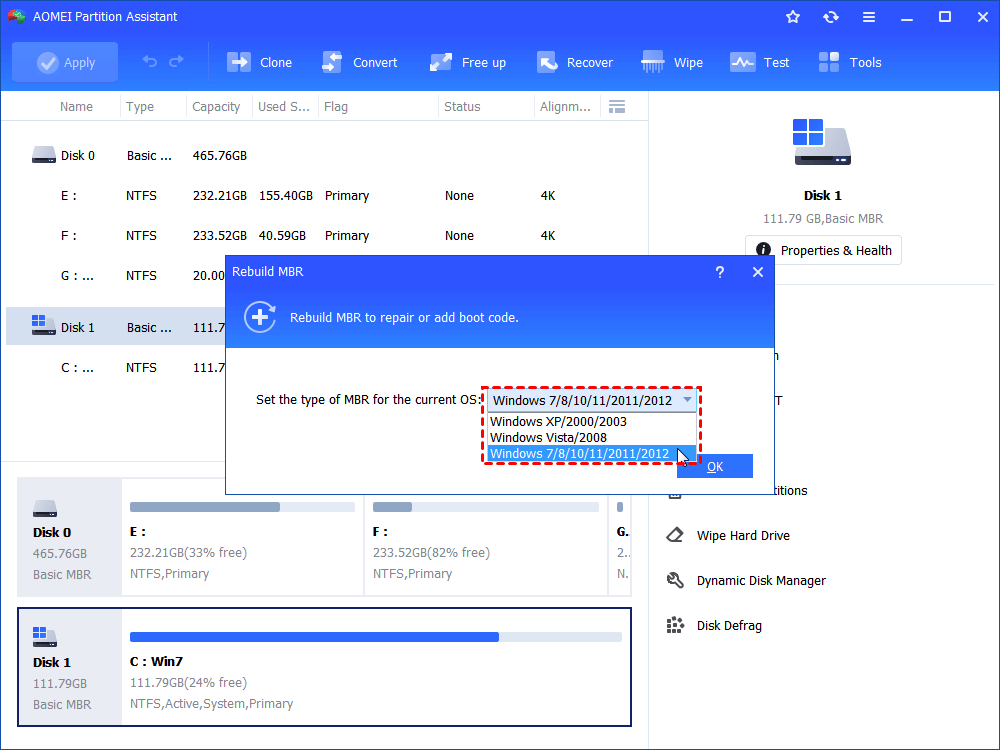
6. Click Apply at the top of the window to repair Windows10 BCD file.
Now, the Windows 10 BCD repair should be successful and the problem could never bother you again.
Summary
Now, you can choose a proper method to perform Windows 10 BCD repair based on your situation. By comparison, AOMEI Partition Assistant Standard provides the easiest way to rebuild BCD in Windows 10. Additionally, it can fix NTLDR is missing, BOOTMGR is missing and other unbootable issues.
Definitely, you could extend, split, move, format, resize, copy and delete partition if required. Or you could upgrade to Professional edition with all the advanced features. For server users, please take a look at the Server or Unlimited edition.
Windows 7 Boot Repair via Command Prompt (5 Ways and 2 Tips included)
Want to fix Windows 7 boot problems? You can see this article and learn Windows 7 boot repair via Command Prompt.

By Ivy  / Last Updated October 9, 2020
If you have Windows 7 boot problems, the boot sector or master boot record on your system partition may be damaged, corrupted, or has missing files. And you will receive an error message like the following before Windows actually begins to load.
Missing operating system
Reboot and select proper boot device
Invalid partition table
Bootmgr is missing
FATAL: No bootable medium found! System halted.
Then, what are the boot sector and master boot record exactly?
What are the boot sector and master boot record?
The boot sector is a small section at the beginning of a hard drive. It’s created when you format the hard drive.
The boot sector contains some code and data that helps BIOS hand off the startup process to Windows. It also hosts the Master Boot Record (MBR), which contains the disk signature, partition table for the disk, and a small bit of code called the master boot code.
When a PC starts, the BIOS will load the master boot code into the PC’s RAM. Then it will scan the partition table, determine the active partition, load a copy of the boot sector into the PC’s RAM, and hand off the startup process.
If you backup MBR in advance, you can use it to restore your computer and make it work as normal. If not, you can see the next part and learn to repair boot with command prompt in Windows 7.
Five efficient ways to run Windows 7 boot repair
Way 1: Startup Repair with Windows installation media
If your boot sector or MBR runs into problems, you cannot start Windows normally. That’s to say, you need a bootable media to boot your computer. You can choose to create the Windows installation media or create a repair disk on a working computer.
Start with the detailed steps:
Step 1. Create Windows 7 installation media on a working computer. You can download ISO image files from Microsoft Store and burn the ISO image files to a USB drive or CD/DVD via Windows 7 USB DVD download tool.
Step 2. Plug the USB drive into your computer.
Step 3. Start your computer and press the corresponding key to go to BIOS.
Step 4. Set boot priority to your drive in the Boot option.
Step 5. Restart your computer and press any key to boot from it.
Step 6. Wait for Windows 7 installation files to load.
Step 7. Click Repair your computer in the initial Windows installation screen.
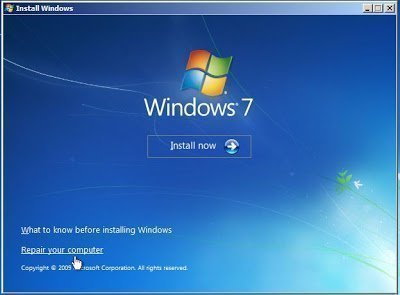
Step 8. Select the operating system in the window and click Next.
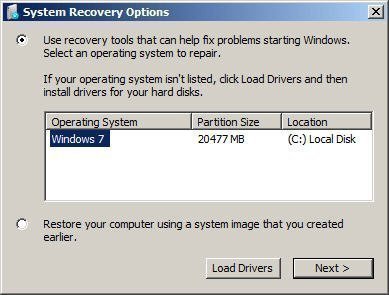
Step 9. Select Startup Repair in the System Recovery Options and it will automatically start to repair boot sector or MBR in Windows 7. Just wait patiently until the process is completed and click Finish.
If the startup repair not working in Windows 7, you still can click View advanced options for system recovery and support in the last page and back to the System Recovery Options page. Then, try command prompt in Windows 7 to repair boot.
Way 2: Windows 7 boot repair from Command Prompt
Step 1. Click Command Prompt in the System Recovery options
Step 2. Fix MBR in Windows 7. You can type the following command and hit Enter.
bootrec /fixmbr
Note: This command can write a new Windows-compatible MBR based on the version of your Windows to the boot sector. And it does not overwrite the existing partition table.
Step 3. Repair boot sector in windows 7. You can type the command below and hit Enter.
bootrec /fixboot
Note: This command can write a new boot sector to the system partition. And it does not overwrite the current partition table. If you install multiple operating systems on this computer, you need to reconfigure the boot options.
Step 4. Fix bootmgr is missing in windows 7 via command prompt. You can type the below command and press Enter.
bootrec /scannos
Step 5. Rebuild your BCD and get the missing Windows installations back. You can type the following command and press Enter to run it.
bootrec /rebuildbcd
Step 6. Rebuild the boot sector for Windows. You can type the following command and press Enter to start it.
bootsect.exe /nt60 all /force
The /nt60 parameter applies the master boot code that is compatible with BOOTMGR. The /all argument updates the master boot code on all partitions.
The /force parameter forcibly dismounts the volume(s) during the boot code update so that the Bootsect.exe tool does not gain exclusive volume access.
Way 3: Repair boot sector in Windows 7
If the bootrec /fixmbr and bootrec /fixboot doesn’t work, you can try to restore the boot sector code of your Windows 7 with steps below.
Step 1. Go to Command Prompt in the System Recovery Options and then type the following commands to find the drive letter of your installation media. Just see “Type” column which contains the word “CD-ROM”.
diskpart
select disk 0
list volume
Step 2. Take D: as an example and type commands below. If not, you can replace it.
d:
cd boot
dir
step 3. Type bootsect /nt60 SYS /mbr and hit Enter to restore boot sector code.
Step 4. Remove the installation media and restart your computer.
Way 4: Rename and rebuild BCD via Command Prompt
If the above command prompt does not work for you, you still can try to backup and rename BCD first and then rebuild it via CMD.
Step 1. Select Command Prompt in the System Recovery Options and type bcdedit /export C:\BCD_Backup command to create a backup for BCD.
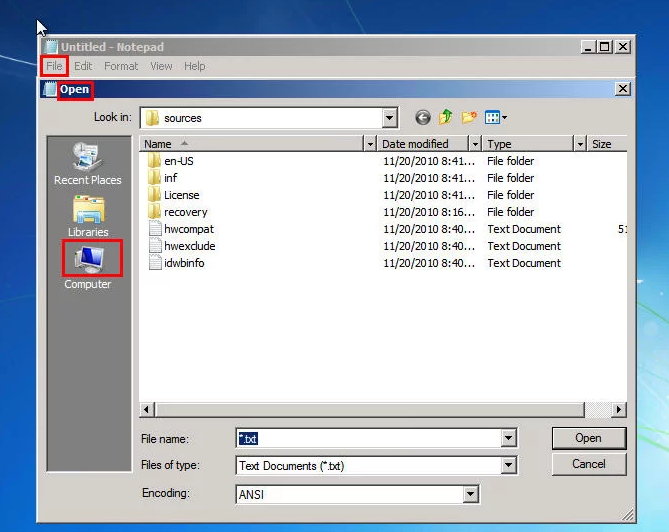
Step 2. Type notepad in the command prompt and then click File > Open > Computer, find the file BCD in the corresponding drive, rename it as BCD.old, and then save the change and exit this window.
Step 3. Type bootrec /rebuildbcd in the command prompt window and input Yes when prompt.
Step 4. Type bcdedit /enum all in the window.
Step 5. Type exit and reboot your computer.
If you want to rebuild BCD without notepad, you can choose to type the following commands and hit Enter in order.
bcdedit /export C:\BCD_Backup
c:
cd boot
attrib bcd -s -h -r
ren c:\boot\bcd bcd.old
bootrec /RebuildBcd
Note: cпјљrefers to the location of your Windows.
Way 5: Windows 7 boot repair without disk
Step 1. Turn on your computer, press and hold the F8 key to go to the Advanced Boot Options screen, then choose Safe Mode with Command Prompt.
Step 2. You can try command prompt for Windows boot repair above and see if it works.
Extra tips for Windows 7 boot repair
1. Scan the integrity of your file system and hard drive and run Windows startup repair command prompt via chkdsk.
Aside by problem of boot sector itself, the physical problem of your hard drive can also damage the boot sector and MBR. Thus, you need to rule out this possibility.
2. Backup your computer with a free backup software.
No one dares to say that you can recover your computer all the time. Once the recovery fails, you can only reinstall your computer and all the apps. What’s more, you will lose your files forever. Thus, you need to create a backup for your computer or files. With one or more backup in hand, you can restore it whatever happens. To backup your computer, you need a proper software. I recommend you the free backup software — AOMEI Backupper Standard.
With this software, you can backup system, disk, partition, even a single file. You can use email notification to get to know whether your backup is completed successfully or not. Also, you can create a Windows 7 schedule backup at an interval date, such as daily, weekly, monthly.
And you can manage backup disk space via Backup Scheme. But this feature is only available on the paid-version. If you want to free up disk space, you need to upgrade to AOMEI Backupper Professional. If you use server-based computer, you can directly download AOMEI Backupper Server edition.
If you want to protect unlimited PCs and servers within your company, you may choose AOMEI Backupper Technician Plus. It offers unlimited billable technical services to clients. It also enables you to copy installation directory for portable version creation.
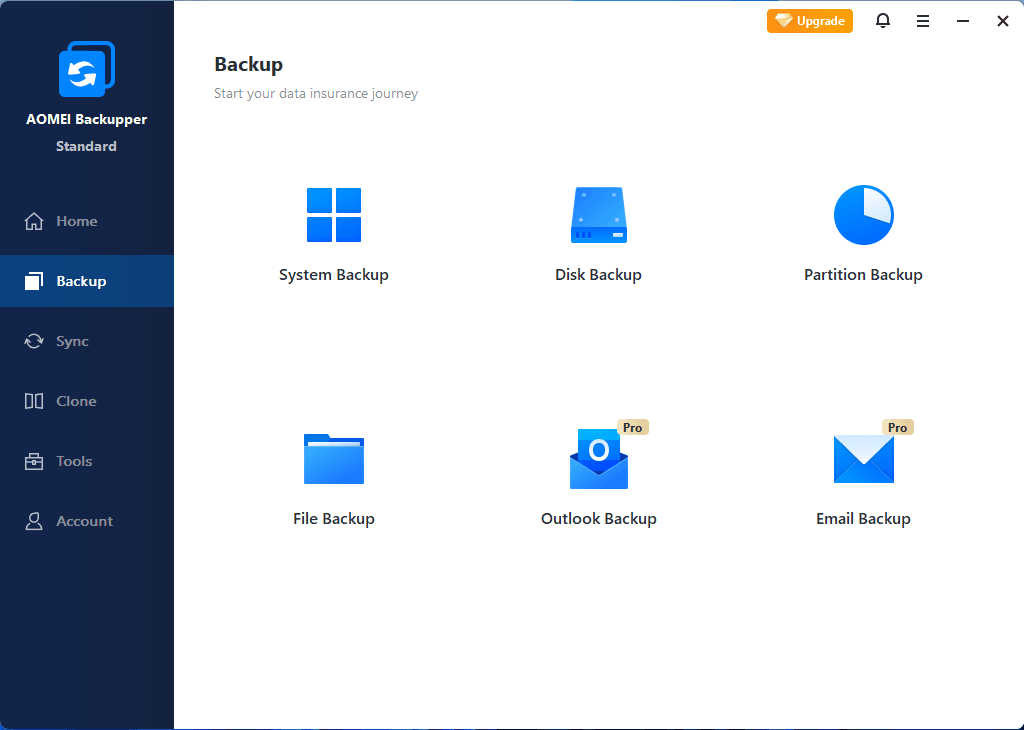
To backup your computer, you can download the backup software and open it. Then, click Backup and select the Backup type in the list. At last, follow the corresponding article to finish the backup.
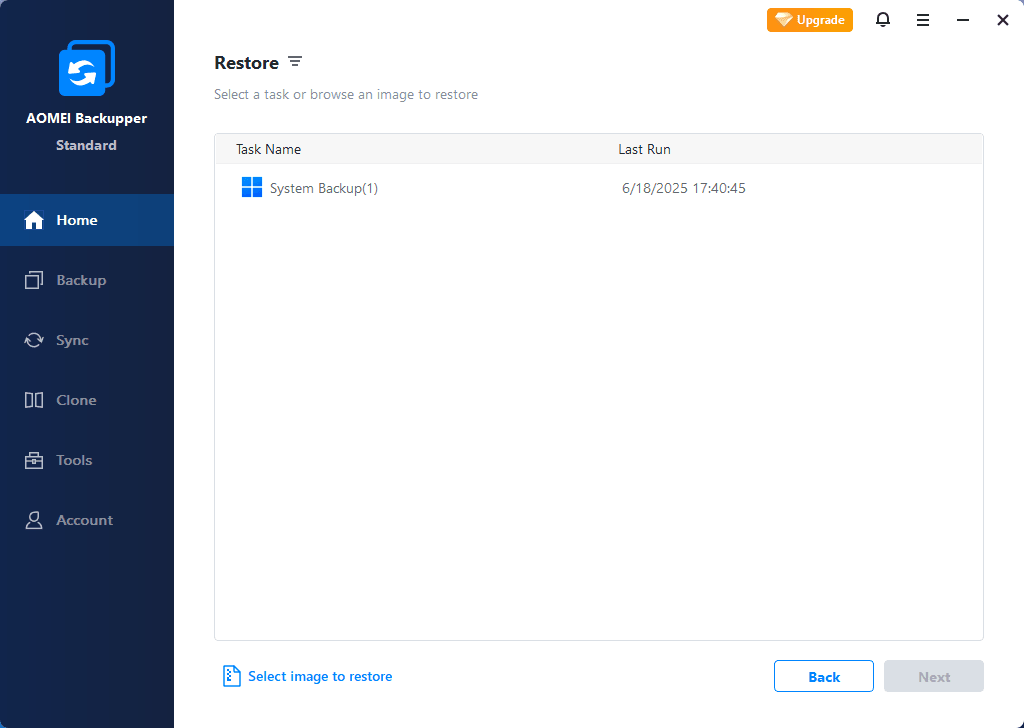
To restore your backup, you can click Restore and complete the rest of step via on-screen instructions.
If your computer cannot boot, you can create a bootable media on a working computer and boot the computer having trouble. Also, you can use PXE boot tool to boot the unbootable computer.
Summary
If you receive the above mentioned error message, the boor sector or MBR may be corrupted or damaged. You can use installation disk to run Startup Repair or do Windows 7 boot repair via Command Prompt.
If you can repair boot with command prompt in Windows 7, you are very luck. But, sometime, you will fail to repair startup issue. To ensure the security of your data and your computer, you’d better to create a backup in advance. With a backup in hand, you can restore it at any time.


