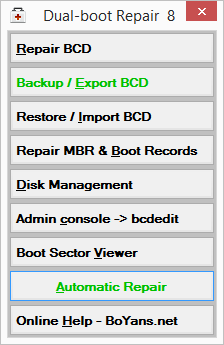
- Dual-boot Repair utility for Windows 8, Windows 7 and Vista
- Repairing your dual-boot or multi-boot system is a simple one-click task using the Automatic Repair option of «Dual-boot Repair» utility.
- «Repair Your Computer» is missing as boot choice in Advanced Boot Options (on F8 key).
- Восстановление загрузчика GRUB через Boot-Repair в Ubuntu
- Восстанавливаем загрузчик GRUB через Boot-Repair в Ubuntu
- Шаг 1: Установка Boot-Repair
- Шаг 2: Запуск Boot-Repair
- Шаг 3: Исправление найденных ошибок
- Windows Repair для Windows
- 5 best Windows 10 boot repair tools to rescue your PC
- The problem: Windows 10 fails to boot
- How do I fix Windows 10 boot repair tools?
- What are the best boot repair tools for Windows 10?
- Windows Boot Genius
- Windows Boot Genius
- Paragon Hard Disk Manager
Dual-boot Repair utility for Windows 8, Windows 7 and Vista
Dual-boot Repair will automatically fix boot environment of systems based on Windows 7, Windows 8 or Vista with Windows XP, Vista or Windows 7/8 as second operating system.
Many users are willing to move to Windows 7/8 from XP or Vista but want to keep their old system for many reasons. Dual-booting is a solution to have two or more OS installed side by side. A dual-boot system is also useful when testing software in different environments.
You have installed Windows 7/8 or Vista after having Windows XP or Vista on your system than everything should be OK. At boot time you will have the choice to boot either Windows XP/Vista or Windows 8/7/Vista. The only small problem here is that the boot menu entry for XP is called «Earlier version of Windows«. This can be solved easy when in Windows 8/7/Vista by using Visual BCD Editor for renaming the loader entry.
You can rename the loaders to your choice for example «Windows 7» or «Windows 7-32» or «Windows 7-64» so the boot menu will look better and suit your taste.
You have installed Windows XP after having Windows 8/7 or Vista and you can no longer boot into Windows 8/7/Vista. The problem is that the boot environment of Windows XP has replaced that of Windows 8/7/Vista. Installing an earlier Windows version when already having a later Windows version installed causes booting problems for the system installed earlier.
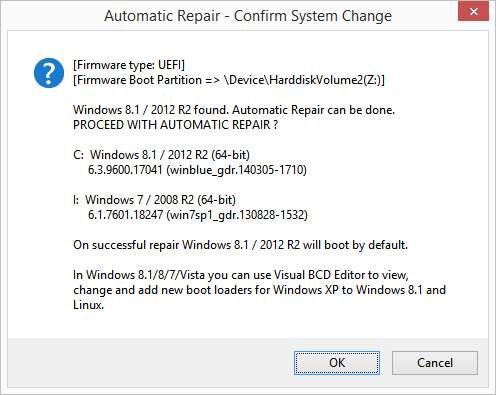
Repairing your dual-boot or multi-boot system is a simple one-click task using the Automatic Repair option of «Dual-boot Repair» utility.
The automatic repair option will recreate/repair Windows 8/7/Vista BCD and the boot environment, even in a multi-boot system, and allow the user to boot into Windows 8/7/Vista. The existing Windows 8/7/Vista Boot Configuration Data store — the system BCD — will be saved, if present, in case something goes wrong.
For Windows 7 or Vista:
For Windows 8.1 and earlier:
For Windows 10 and earlier:
Run «Dual Boot Repair». Click on «Automatic Repair». Confirm.
That’s it !
Now you will be able to boot into Windows 10/8/7/Vista.
Later when in Windows 8/7/Vista you can add a loader entry for Windows XP, Vista or Windows 7/8 installed on disk (if entry not already present in BCD) using Visual BCD Editor.
Automatic repair fixes or recreates the latest boot environment on active partition. The boot environment for Windows 8/7/Vista consists of:
- MBR and PBR (Master and Partition Boot Record) — repaired by using Windows bootsect.exe utility.
- bootmgr — Windows 7/Vista boot manager.
- «\boot» folder which includes BCD file/store. (2 and 3 are repaired by using Windows bcdboot utility)
bootmgr and \boot folder with BCD on active partition are the files needed to display the boot-menu.
Advanced options for repairing a dual or multi boot system:
- «Repair BCD» is based on bcdboot.exe utility and can be used to fix BCD file/store.
You can use this option also for creating a loader for Vista or Windows 7/8! - «Import and Export BCD» are based on bcdedit.exe.
- «Repair Boot Records» is based on bootsect.exe and can fix the MBR (master) and PBR (partition) boot records.
- «Disk Management» is a shortcut to Windows Disk Management (create/delete/shrink/extend partitions).
- «Admin console -> bcdedit» is a shortcut to command prompt with administrative rights. On clicking the command bcdedit is executed to list existing BCD entries.
(bcdedit.exe, bootsect.exe and bcdboot.exe are Windows utilities — they are installed in Visual BCD folder to assist the repair process)
Now let’s focus on how to attach Windows 8/7 recovery environment to the advanced boot options menu as Windows 8/7 BCD repair (bcdboot.exe utility) does not care about this.
«Repair Your Computer» is missing as boot choice in Advanced Boot Options (on F8 key).
The utility that comes with Windows 8/7 for dealing with configuration of recovery is «ReAgentC.exe».
The file containing Windows 7/8 Recovery environment is «WinRe.wim» and usually resides in the system folder «\Windows\System32\Recovery» before installation. After installation «winre.wim» is placed in a subfolder of hidden «\Recovery» folder either on drive C: or on special hidden Recovery partition.
If you don’t see Winre.wim file in mentioned folders you can extract the file «Boot.wim» from your installation DVD (or recovery CD) and place it under the mentioned system folder and name(winre.wim).
(Download link for 32-bit and 64-bit version of Windows 7 recovery files: download Windows 7 Recovery files — winre.wim + boot.sdi. This download is only for educational purposes when you quickly want to try operation of reagentc command.)
- Open a command prompt with administrative privileges.
- Type command reagentc /disable and execute.
- Type command reagentc /enable and execute. (Eventually reboot if the command reports an error and try again.)
You can examine with command reagentc /info the current state of recovery environment settings.
The result of the commands above you can view with Visual BCD Editor. You will see that there is a new «Windows Recovery Environment» loader. This loader is linked by element «Recovery Sequence» of Windows 7/8 loader. The Windows 7/8 loader element «Auto Recovery Enabled» is also present and set to true. The recovery loader and the elements mentioned above are added by reagentc /enable command and removed by reagentc /disable command from system BCD.
During execution of reagentc /enable also the files winre.wim+boot.sdi are moved from \windows\system32\recovery to \recovery\
Even small donations appreciated for site maintenance and further development. Thank you.
Copyright © 2012-2017 Bo Yans
Восстановление загрузчика GRUB через Boot-Repair в Ubuntu

Достаточно частой практикой у пользователей является установка двух операционных систем рядом. Чаще всего это Windows и один из дистрибутивов, основанных на ядре Linux. Иногда при такой инсталляции возникают проблемы с работой загрузчика, то есть загрузка второй ОС не производится. Тогда его нужно восстановить собственными силами, изменив системные параметры на правильные. В рамках данной статьи мы бы хотели обсудить восстановление GRUB через утилиту Boot-Repair в Ubuntu.
Восстанавливаем загрузчик GRUB через Boot-Repair в Ubuntu
Сразу хочется отметить, что дальнейшие инструкции будут приведены на примере загрузки из LiveCD с Ubuntu. Процедура создания такого образа имеет свои нюансы и сложности. Однако разработчики операционной системы максимально детально описали эту процедуру в своей официальной документации. Поэтому мы настоятельно рекомендуем ознакомиться с ней, создать LiveCD и загрузиться с него, а уже потом переходить к выполнению руководств.
Шаг 1: Установка Boot-Repair
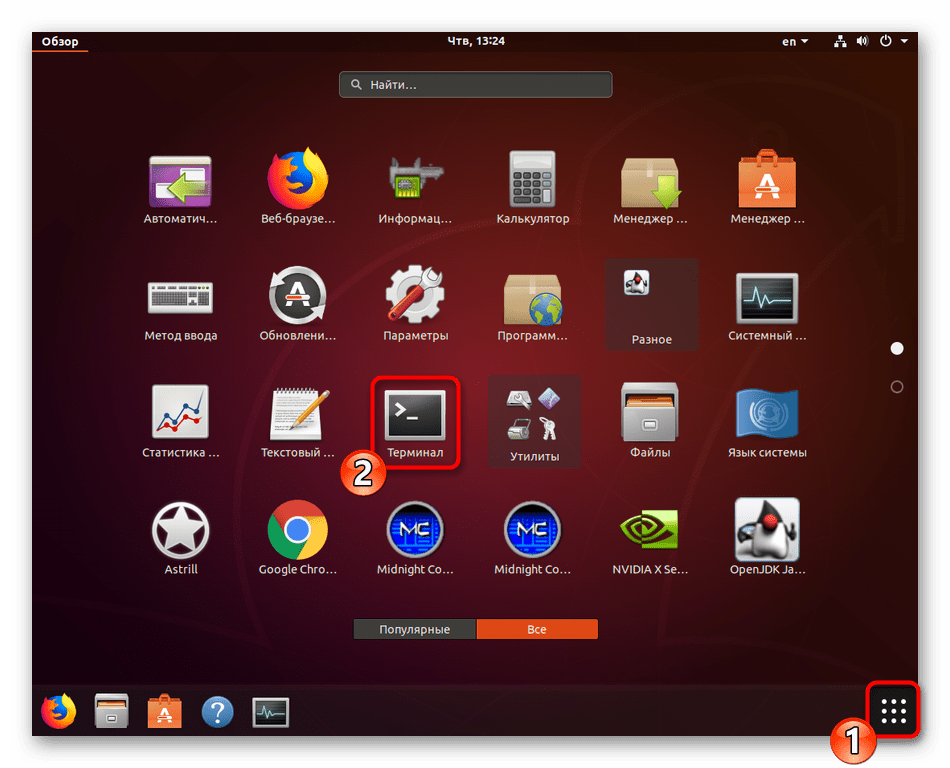
Рассматриваемая утилита не входит в стандартный набор инструментов ОС, поэтому ее придется установить самостоятельно, воспользовавшись пользовательским репозиторием. Все действия осуществляются через стандартный «Терминал».
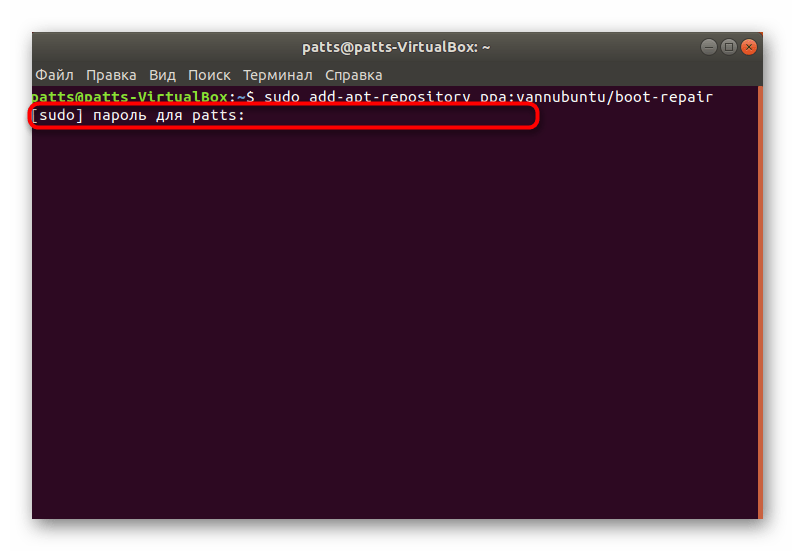
- Запустите консоль любым удобным способом, например, через меню или зажатие горячей клавиши Ctrl + Alt + T.
Загрузите необходимые файлы в систему, прописав команду sudo add-apt-repository ppa:yannubuntu/boot-repair .
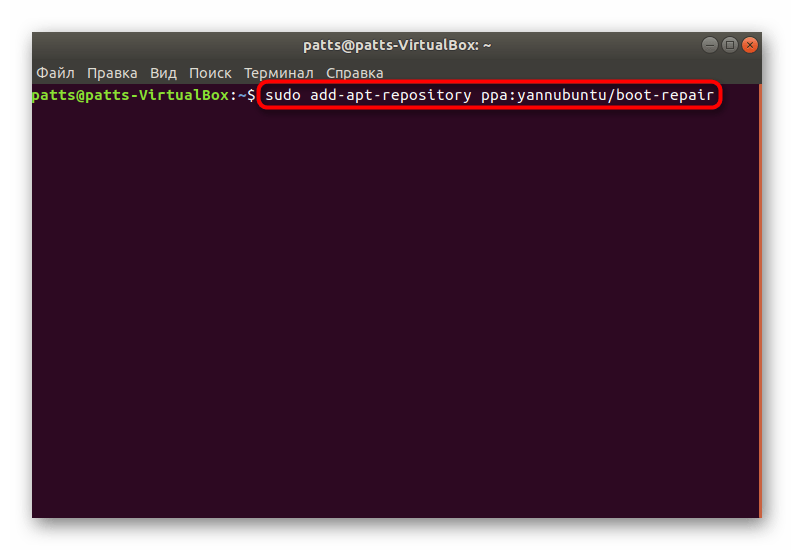
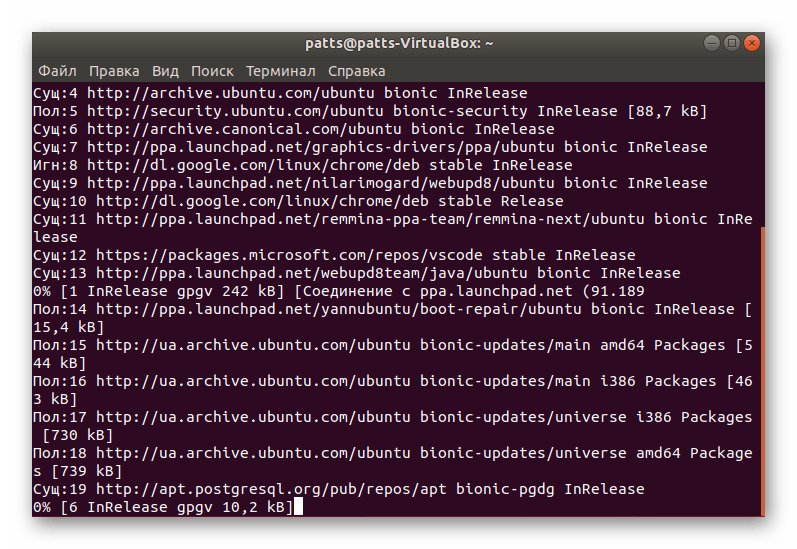
Ожидайте завершения загрузки всех необходимых пакетов. Для этого должно иметься активное подключение к интернету.
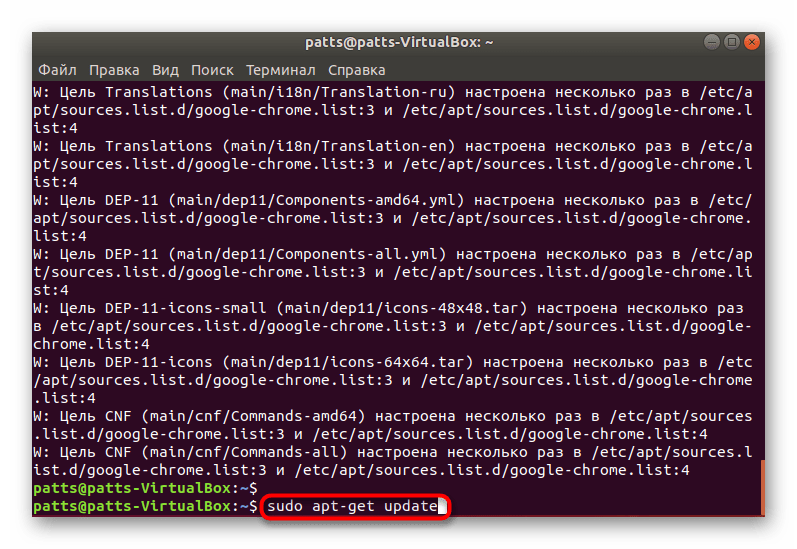
Обновите системные библиотеки через sudo apt-get update .
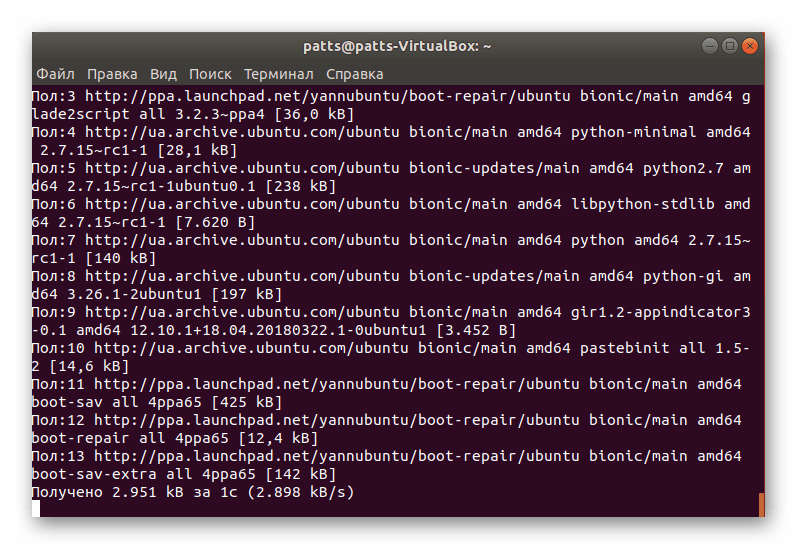
Запустите процесс инсталляции новых файлов, вписав строку sudo apt-get install -y boot-repair .

Когда вся процедура прошла успешно, можно смело переходить к запуску Boot-Repair и сканированию загрузчика на наличие ошибок.
Шаг 2: Запуск Boot-Repair
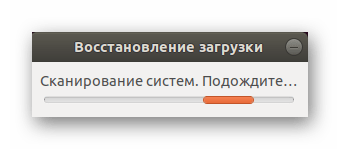
Для запуска установленной утилиты вы можете использовать иконку, которая была добавлена в меню. Однако не всегда получается работать в графической оболочке, поэтому достаточно просто ввести в терминале boot-repair .

Будет произведен процесс сканирования системы и восстановления загрузки. Во время этого не делайте ничего на компьютере, а также не завершайте принудительно функционирование инструмента.
Шаг 3: Исправление найденных ошибок
После окончания анализа системы программа сама предложит вам рекомендованный вариант восстановления загрузки. Обычно он исправляет самые часто встречающиеся проблемы. Для его запуска просто потребуется нажать на соответствующую кнопку в графическом окне.
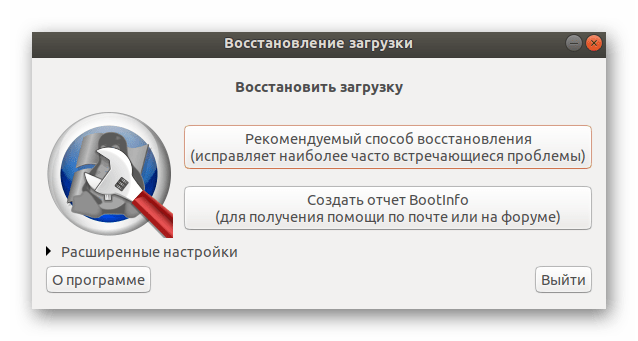
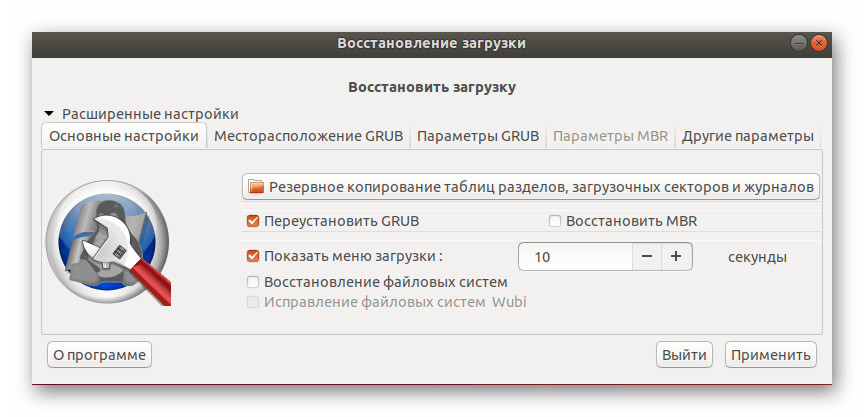
Если вы уже сталкивались с работой Boot-Repair или прочитали официальную документацию, в разделе «Расширенные настройки» можете применить собственные параметры восстановления, чтобы обеспечить стопроцентный результат.
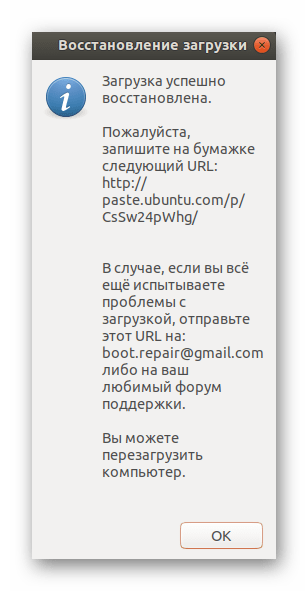
По окончании восстановления перед вами откроется новое меню, где будет видно адрес с сохраненными логами, а также отобразится дополнительная информация касаемо результатов исправления ошибок GRUB.
В случае когда у вас нет возможности использовать LiveCD, потребуется загрузить образ программы из официального сайта и записать его на загрузочную флешку. При ее запуске на экране сразу отобразятся инструкции, и потребуется выполнить их все, чтобы решить возникшую проблему.
Обычно с возникновением неполадок GRUB сталкиваются юзеры, которые поставили Ubuntu рядом с Windows, поэтому следующие материалы по теме создания загрузочного накопителя будут максимально полезны, советуем детально ознакомиться с ними.
В большинстве случаев применение простой утилиты Boot-Repair помогает быстро справиться с наладкой работоспособности загрузчика Ubuntu. Однако если вы и дальше сталкиваетесь с различными ошибками, рекомендуем запомнить их код и описание, а после обратиться к документации Убунту для поиска доступных решений.
Windows Repair для Windows
| Оценка: |
3.05 /5 голосов — 57 |
| Лицензия: | Бесплатная |
| Версия: | 4.11.2 | Сообщить о новой версии |
| Обновлено: | 18.03.2021 |
| ОС: | Windows 10, 8.1, 8, 7, XP |
| Интерфейс: | Английский |
| Разработчик: | Tweaking.com |
| Категории: | Реестр, Автозагрузка — Настройка, оптимизация |
| Загрузок (сегодня/всего): | 4 / 48 457 | Статистика |
| Размер: | 45,16 Мб |
| СКАЧАТЬ | |

Windows Repair — инструмент все-в-одном для ремонта системы. Предназначен для восстановления различных параметров Windows к их значениям по умолчанию. Помогает исправить большинство известных проблем, в том числе ошибки реестра и права доступа к файлам, а также проблемы с Internet Explorer, Windows Update, Windows Firewall и многое другое.
Перед запуском программы будет предложено выполнить 4 простых действия предупреждающие ошибки в работе системы: проверка на вирусы, проверка жесткого диска, проверка на поврежденные файлы системы и создание точки восстановления. Затем можно выбрать один из трех режимов Basic, Advanced и Custom, каждый из которых предлагает различные варианты ремонта системы.
Основные функции программы:
- Исправление ошибок реестра
- Исправление прав доступа к файлам
- Ремонт WMI
- Ремонт Windows Firewall
- Ремонт Internet Explorer
- Ремонт MDAC и MS Jet
- Ремонт Hosts файлов
- Удаление установленных вирусами ограничений
- Ремонт иконок
- Ремонт Winsock и DNS Cache
- Удаление временных файлов
- Исправление настроек Proxy
- Исправление Windows Updates и многое другое.
5 best Windows 10 boot repair tools to rescue your PC

- A Windows 10 boot repair tool for your disk will solve any startup problems that you have.
- Take a closer look at our selection of premium W indows boot repair tools below.
- We’ve also included some free software if you don’t play to spend any money.
- Note that some of these programs have other useful features which will benefit your PC.

- Download Restoro PC Repair Tool that comes with Patented Technologies (patent available here).
- Click Start Scan to find Windows issues that could be causing PC problems.
- Click Repair All to fix issues affecting your computer’s security and performance
- Restoro has been downloaded by 0 readers this month.
Windows 10 boot repair tools can be lifesavers for worried PC users. There’s nothing worse than your computer refusing to boot.
You can’t access your files or send critical emails since all your files and folders are locked. But there are cheap ways to fix that, without having to employ the expensive services of a PC expert.
The problem: Windows 10 fails to boot
Booting issues with Windows 10 are more common than you think. They can be caused by anything, from a single corrupt byte on your hard drive to a buggy boot driver or a missing registry key.
It happens because the MBR (Master Boot Record) is not infallible. It can become corrupt or damaged, or it can simply disappear. This results in Windows 10 runtime errors.
How do I fix Windows 10 boot repair tools?
Windows 10 has plenty of recovery options, such as Safe Mode, Last Known Good Configuration, and Startup Repair.
However, if these tools don’t fix the issue, you have to turn to software specialized in Windows 10 boot repair, system rescue, and data recovery.
For instance, if your problems are caused by malware, you can explore antivirus tools with boot scan. But if critical system files or even the hard drive structure was damaged, malware removal isn’t enough.
It’s time to look into solutions to fix your Windows 10 boot. In this article, we are exploring the best Windows 10 boot repair software for 2021.
What are the best boot repair tools for Windows 10?
Windows Boot Genius

Windows Boot Genius is a professional Windows boot repair tool that can fix computer booting issues, repair crashed or corrupted Windows, recover lost data, and restore broken partitions.
Thanks to this tool, you don’t have to worry about BSOD or black screen issues while trying to start your computer. You can gain access to your system after fixing it with a boot CD, DVD, or USB disk.
To get started, just put the bootable CD in your CD/DVD drive or plug the USB drive into your PC, and restart your computer to begin the system recovery process.
To create a bootable CD/DVD or USB drive, run the Windows 10 boot repair software tool, insert the preferred media into your PC, then click Burn.
After the setup is done, make sure to keep the rescue device connected to the PC before restart. When accessing the WinPE environment, you should spot the Windows Boot Genius icon.
Clicking the icon sends the corrupt PC in Windows Rescue mode. Here, you can recover boot files in Boot File Recovery mode or locate a master boot code in MBR Recovery mode.
Let’s quickly look at its key features:
- Create a Windows Boot CD/USB by easily burning bootable .iso file
- A wide array of boot repair tools – boot file repair, boot sector repair, registry repair, registry editor
- Reset/change or remove Windows 10 Local and Domain passwords
- Backup/clone/restore Windows operating system, hard disk, and partitions
- Recover lost, deleted or formatted data
- Recover Microsoft product keys for Windows 10, Microsoft Office, etc.
- Wipe data to make it unrecoverable
- Optimized UI for easy use
Windows Boot Genius requires no kind of expertise, so you can safely use it to create an emergency disk and fix your Windows 10 operating system when it fails to boot.
Windows Boot Genius
Paragon Hard Disk Manager

Part of Paragon Hard Disk Manager, Paragon Rescue Kit is a Windows 10 boot repair software solution with excellent compatibility and usability features.
It works with older Windows versions, too, including Windows XP. This program boasts a wide range of features, works fast and safe, and it has a user-friendly interface.
Let’s quickly look at its key features:
- User-friendly interface with log saver
- Sector back-up – ideal for making a backup image of an entire hard disk or system partitions
- Fast & easy recovery based on need – the entire disk, separate partitions, specific files, etc.
- Create a bootable recovery media with Recovery Media Builder
- Sector backup to save all on-disk information and also system service structures
- Backup to local or externally mounted storage
- Backup to network shares and virtual disks (VHD, pVHD, VMDK, VHDX)
- Restore entire disks, separate partitions or specific files from previously created backup images
- File Transfer Wizard
- Undelete Partition Wizard
- Network Configurator Wizard
Like all the other Windows 10 boot repair software solutions presented in this article, Paragon’s tool can create a system recovery environment using a CD, DVD, or USB flash drive.
Its Boot Correction Wizard is among the most powerful features on the market.
Here’s what you can do with the Boot Corrector Wizard:
- Repair drive letters in the System Registry of a selected Windows installation
- Fix boot.ini on the selected disk
- Restore BCD (Boot Configuration Data) files from partitions on a single or all disks
- Repair the MBR (Master Boot Record) executable code
- Reorder the primary partitions by changing the primary slots
- Correct the boot record for a Windows installation
- Set an active partition, hide and unhide partitions
- Change serial numbers or partition IDs
- Display the MBR in a more understandable format, along with partition properties
- Create, display, save or print a boot correction report