- Create a system repair disc
- Создание диска восстановления
- LiveCD для аварийного восстановления Windows
- Выбор LiveCD: подборка
- Live Disk WinPE 10-8 Sergei Strelec 👍
- Active@ Live CD
- Admin PE
- Hiren’s BootCD PE
- Еще несколько полезных альтернатив
- How to Create and Use Windows 7 Repair Disk with ISO?
- Where can I download Windows 7 ISO?
- How to create Windows 7 repair disk with ISO?
- How to create Toshiba/HP/ASUS/ACER/Lenovo recovery disk ISO?
- How to use Windows 7 system repair disk ISO?
- Final words
Create a system repair disc
System recovery options can help you repair Windows if a serious error occurs. To use system recovery options, you’ll need a Windows installation disc or access to the recovery options provided by your computer manufacturer. If you don’t have either of those choices, you can create a system repair disc to access system recovery options.
Open Backup and Restore by clicking the Start button, clicking Control Panel, clicking System and Maintenance, and then clicking Backup and Restore.
In the left pane, click Create a system repair disc, and then follow the steps.  If you’re prompted for an administrator password or confirmation, type the password or provide confirmation.
Note: If you’re prompted to insert a Windows installation disc, it means that the files needed to create the system repair disc can’t be found on your computer. Insert a Windows 7 installation disc.
Insert the system repair disc into your CD or DVD drive.
Restart your computer using the computer’s power button.
If prompted, press any key to start the computer from the system repair disc.
If your computer isn’t configured to start from a CD or DVD, check the information that came with your computer. You might need to change your computer’s BIOS settings.
Choose your language settings, and then click Next.
Select a recovery option, and then click Next.
Tip: Print these instructions and keep them in a safe location with your system repair disc.
Start your computer from a Windows 7 installation disc or USB flash drive
You might need to start, or boot, your computer using the Windows 7 installation disc or a USB flash drive if you want to:
Install or reinstall Windows 7.
Recover Windows 7 from a serious error. If your computer won’t start Windows at all, you can access Startup Repair and other tools in the System Recovery Options menu from the Windows 7 installation disc or USB flash drive. These tools can help you get Windows 7 running again.
Note: If you use a Tablet PC or other computer with a touchscreen, you might need to attach a keyboard and mouse in order to use Startup Repair and other tools in the System Recovery Options menu.
Turn on your computer, insert the Windows 7 installation disc or USB flash drive, and then turn off your computer.
Restart your computer.
Press any key when prompted to do so, and then follow any instructions that appear.
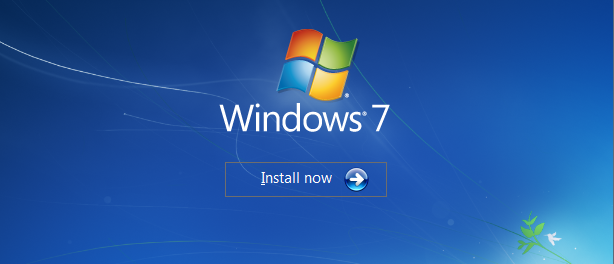
When the Install Windows page appears, click Install now to begin the installation process or click Repair your computer to access system recovery options.
Follow the instructions.
If the Install Windows page doesn’t appear, and you aren’t asked to press any key, you might have to specify that your computer uses its DVD drive or a USB flash drive as the first startup device. To do this, you need to change settings in the computer’s basic input/output system (BIOS).
Note: Most newer computers can start from a USB device, but some older computers might not have this capability. For more information, check the documentation that came with your computer or go to the manufacturer’s website.
Before you change BIOS settings, check the information that came with your computer or go to the computer manufacturer’s website. Specific procedures for accessing the BIOS and changing settings can differ depending on your computer’s manufacturer, or you might be able to choose which startup device your computer uses without changing BIOS settings.
Warning: Be careful when changing BIOS settings. The BIOS interface is designed for advanced users, and it’s possible to change a setting that could prevent your computer from starting correctly.
Turn on your computer, insert the Windows 7 installation disc or USB flash drive, and then restart your computer.
Newer computers often display a startup (or boot) menu. On the startup menu, choose «BIOS setup,» or «BIOS settings,» or something similar.
Procedures vary depending on the BIOS manufacturer. Usually, you must press a key (such as F2, F12, Delete, Esc) or a key combination immediately after you turn on your computer but before Windows starts. If the Windows logo appears, you need to try again by waiting until the Windows logon prompt appears, and then shutting down and restarting your computer again.
The BIOS setup screen appears. On the BIOS setup screen, choose the option called «Boot order,» or something similar. Boot order settings might also be listed under «Advanced settings» or something similar.
Select your DVD drive or USB flash drive as the first startup device. (The USB flash drive might be listed under «Removable devices» or something similar.)
Save the setting changes, and then exit the BIOS.
Restart your computer, and then start Windows 7 from the installation disc or USB flash drive as previously described.
Создание диска восстановления
Рекомендуется создать диск восстановления. Если в вашем компьютере когда-либо возникнет серьезная неисправность, например сбой оборудования, вы сможете использовать диск восстановления для переустановки Windows 10. Рекомендуется ежегодно повторно создавать диск восстановления, поскольку обновления Windows периодически улучшают безопасность и производительность компьютера. Резервное копирование личных файлов и любых приложений, которые не поставлялись вместе с вашим компьютером, не будет выполняться. Вам понадобится USB-накопитель объемом не менее 16 ГБ (диски использовать нельзя).
Предупреждение. Используйте пустой USB-накопитель, так как во время этого процесса будут удалены все сохраненные на нем данные.
Создание диска восстановления в Windows 10.
В поле поиска рядом с кнопкой Пуск выполните поиск по запросу создание диска восстановления и выберите найденный результат. Может потребоваться ввести пароль администратора или подтвердить выбор.
После открытия инструмента убедитесь, что установлен флажок Выполнить резервное копирование системных файлов на диск восстановления и нажмите кнопку Далее.
Подключите USB-накопитель к компьютеру, выберите его, а затем нажмите Далее.
Выберите Создать. На диск для восстановления будет скопировано много файлов — это займет некоторое время.
Если вам когда-либо понадобится использовать диск восстановления для переустановки Windows 10 на компьютере, инструкции см. в разделе Параметры восстановления в Windows 10. Рекомендуется часто создавать резервную копию файлов, так как диск восстановления не является системным образом. На нем не содержаться личные файлы, параметры или программы.
Нужны дополнительные способы создания диска восстановления?
Чтобы скачать установочный носитель Windows 10, см. раздел Параметры восстановления в Windows 10.
LiveCD для аварийного восстановления Windows
 Доброго времени суток!
LiveCD диск или флешка — крайне полезная вещь! Пока всё работает — о ней вроде и не вспоминаешь, но как только возникает проблема — без неё и не туда и не сюда! ☝
Например, перестала загружаться ОС Windows — при помощи LiveCD можно быстро загрузиться и скопировать все нужные документы и файлы. Удобно?! Я уж не говорю о том, как это удобно для тестирования и диагностики ПК/ноутбука (особенно, при его «покупке с рук. «).
В этой небольшой заметке предложу несколько весьма многофункциональных LiveCD, которые вас выручат при самых разных проблемах. В общем, рекомендую всем иметь хотя бы 1 LiveCD-флешку в качестве аварийного инструмента! Мало ли.
Как создать загрузочный LiveCD/DVD/USB-флешку или диск с операционной системой Windows [инструкция]

Выбор LiveCD: подборка
Live Disk WinPE 10-8 Sergei Strelec 👍
Как загрузиться с такой флешки: инструкция

Какие программы есть на диске «Стрельца. «
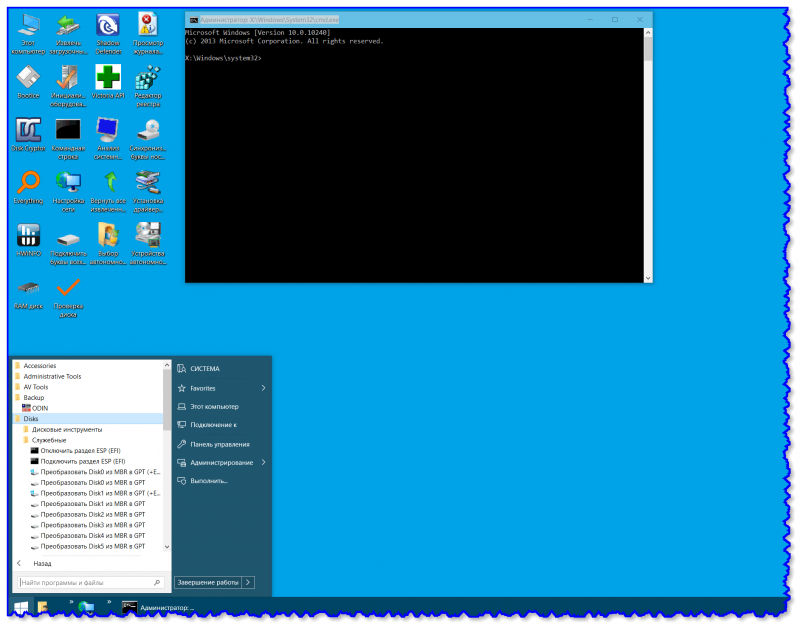
Один из лучших загрузочных LiveCD дисков на базе Windows 10 PE (интерфейс точно такой же, как в обычной ОС, и полностью на русском языке!).
Не могу не отметь, что Сергей Стрелец (автор сборки) собрал десятки самых нужных программ на «все случаи жизни»: есть и антивирусы, и HEX-редакторы, и ПО для работы с HDD, и для диагностики, и для графики и т.д.
Отлично подходит для решения практически любых проблем с ПК/ноутбуком:
В общем, однозначно рекомендую к знакомству!
✔👉Примечание: для записи LiveCD образа на флешку — можно:
- воспользоваться утилитой «ISO to USB», которая идет в одном архиве с ISO (пример настроек — см. на скрине ниже 👇);
- либо скопировать ISO-образ на флешку, подготовленную в Ventoy (этот вариант легче и универсальнее (Legacy + UEFI)).
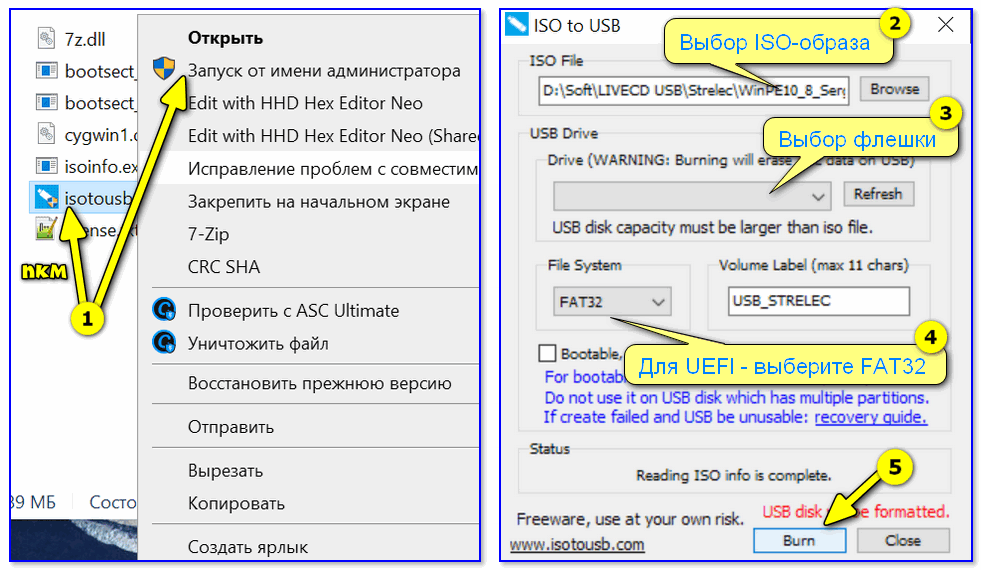
ISO to USB — как записать загрузочную флешку
Active@ Live CD
Active@ Live CD — пример работы ПО
Практически полноценная ОС, которую можно записать на CD/DVD-диск или USB-накопитель и пользоваться на любом ПК/ноутбуке! (Разумеется, без установки —достаточно просто загрузиться с заранее подготовленной флешки)
- инструменты для восстановления данных, сброса пароля, создания резервной копии системы;
- форматирование и работа с разделами жесткого диска;
- удаление информации с диска без возможности последующего восстановления (полезно при продаже ПК);
- мониторинг за температурой ЦП, диска, и др. компонентов, и показаниями SMART дисков;
- встроенные программы: блокнот, редактор реестра, калькулятор, HEX редактор и др.;
- возможность работы с файловыми системами: FAT12, FAT16, FAT32, NTFS, NTFS5, NTFS+EFS;
- поддержка IDE / ATA / SCSI дисков.
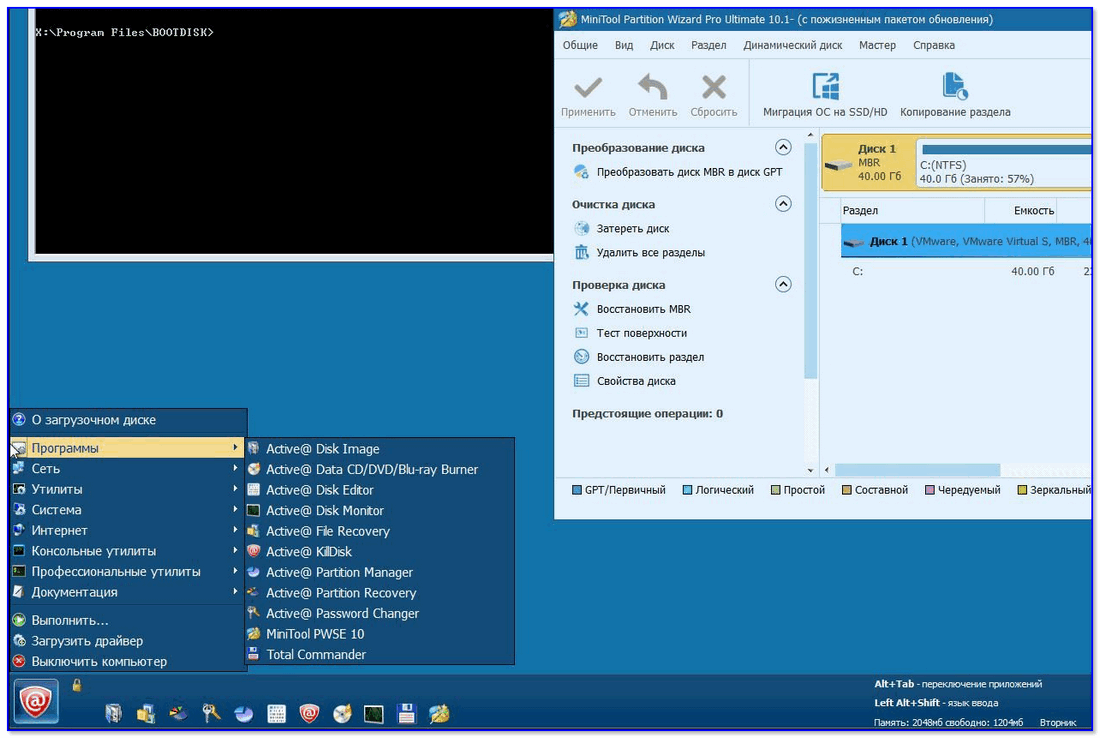
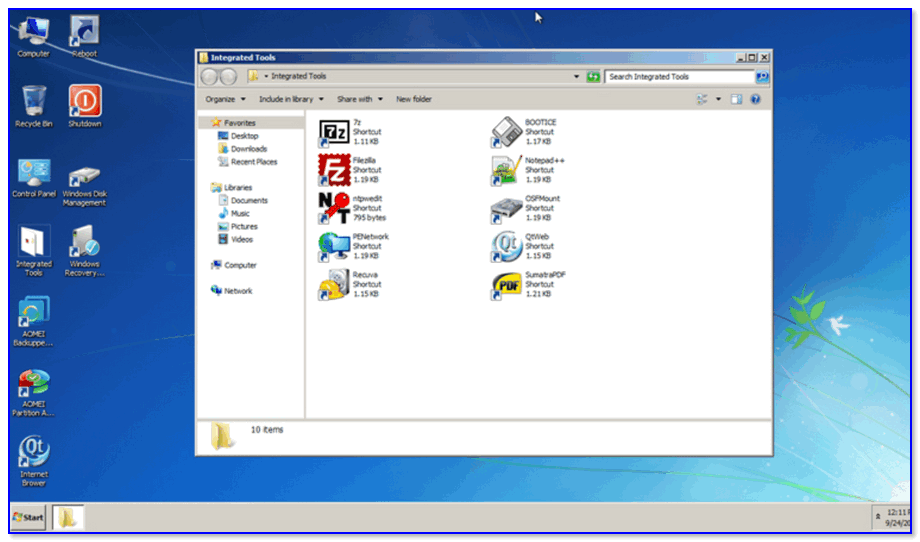
Admin PE
Admin PE — скриншот главного окна
Эта сборка основана на Win PE 10 (есть также и на Win PE 8). Предназначена для автономной работы с ОС Windows 10 (на «проблемных» и диагностируемых ПК).
В этом пакете есть достаточно много встроенного ПО:
- Total Commander;
- Acronis Disk Director;
- Paragon Hard Disk Manager;
- Minitool Partition Wizard;
- AIDA64;
- R-Studio;
- WinRAR;
- Reset Windows Password;
- Norton Ghost и многое другое.
Пожалуй, единственный минус : довольно редко у Admin PE бывают обновления (последний образ датируется 2018г. Впрочем, даже этого обычно хватает с избытком. ).
Admin PE — скриншот главного окна 2 (см. меню ПУСК, есть опции для преобразования диска MBR к GPT)
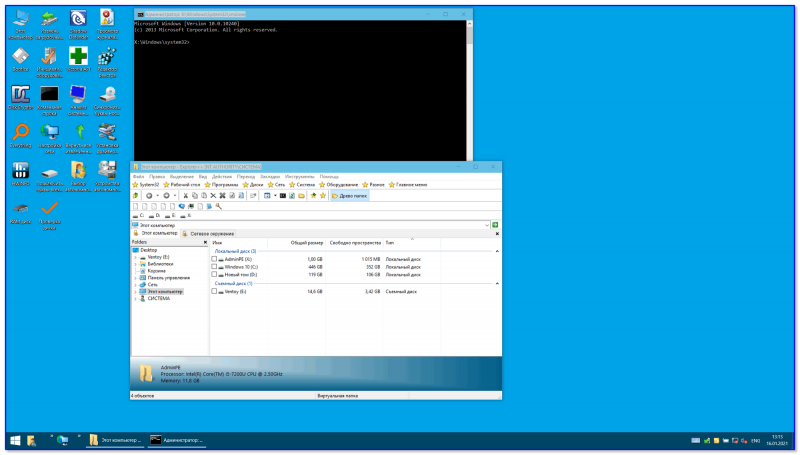
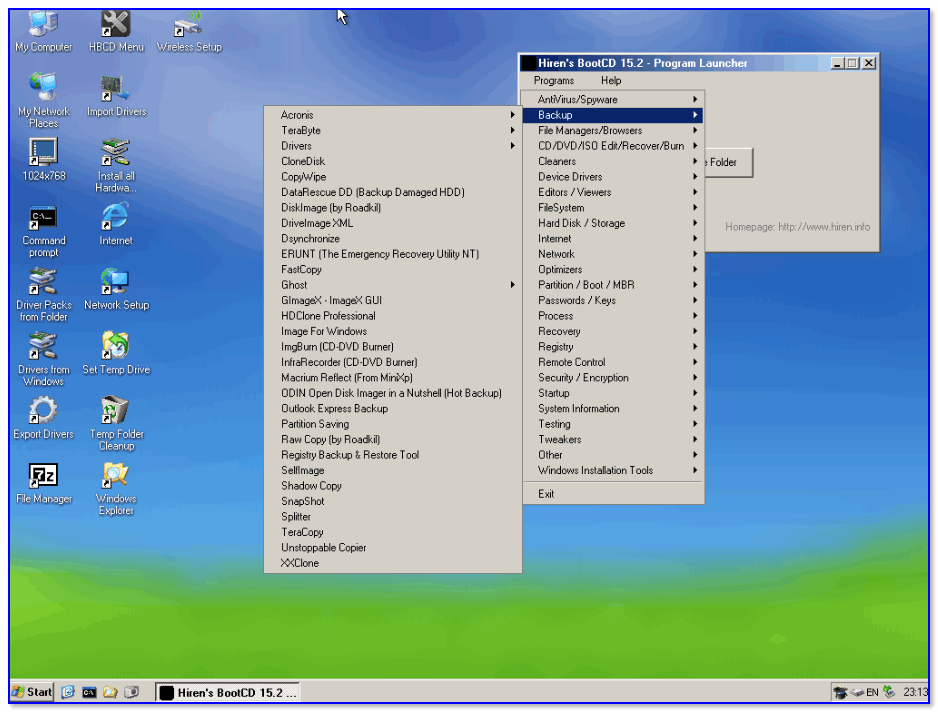
Hiren’s BootCD PE

Hiren’s BootCD PE — скриншот работы сборки
Hiren’s BootCD PE – этот диск основан на ОС Windows XP (урезанной версии) с полным комплектом различных программ. Позволяет относительно спокойно пользоваться ПК (в том числе и сетью) просто загрузившись с флешки.
Что есть в наборе:
- диагностика диска: HDDScan, HDTune, DiskExplorer;
- бэкап и работа с HDD: Acronis TrueImage, AOMEI Backupper, Partition Extender, HDD Low Level Format Tool и др.;
- офис и блокноты: Notepad++, Free Office, FSViewer, Sumatra PDF, и пр.;
- антивирус: ESET Online Scanner, Malwarebytes Anti-Malware;
- диагностика, тесты: CPU-Z, HWInfo, Speccy, CCleaner, SysInternals Suite и др.;
- сеть, интернет: Chrome, Mozilla Firefox, Aero Admin и др.
Hiren’s BootCD PE — еще один скриншот
Еще несколько полезных альтернатив
👉 Ultimate Boot CD
Несмотря на то, что этот пакет не обновлялся последние пару лет — он до сих пор в «форме». Позволяет в 2-3 клика мышки проверять системы на вирусы, восстанавливать удаленные файлы, смотреть характеристики ПК, форматировать диски, и многое другое.
Минус : только на англ. языке (если с ним не дружите — лучше выбрать что-то альтернативное).

Ultimate Boot CD — внешний вид
👉 AOMEI PE Builder
Хороший добротный инструмент с самыми нужными прикладными программами и системными утилитами. Более подробно о ней я рассказывал в одной из прошлых своих заметок.
AOMEI PE Builder — скриншот окна
👉 Dr.Web Live Disk
LiveCD от знаменитого антивируса. Позволяет проверить систему на вирусы и вредоносное ПО, если Windows отказалась загружаться. Кроме этого, LiveCD содержит файловый коммандер, браузер, терминал, почту и пр.
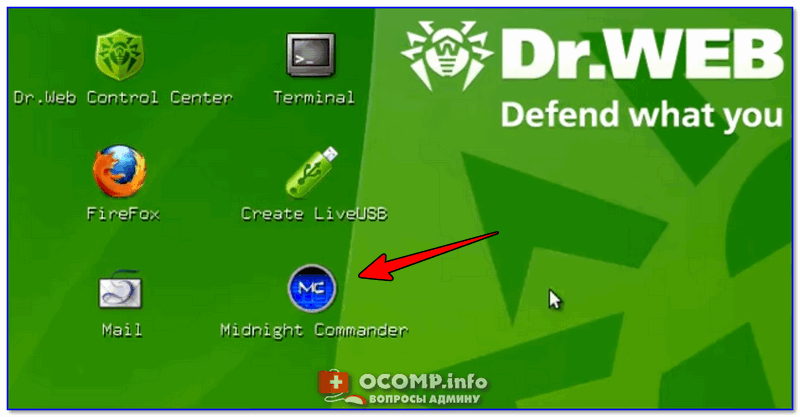
Midnight Commander — файловый коммандер / Доктор Веб LiveCD
👉 ESET NOD32 LiveCD
Аналогичный продукт от ESET. Содержит не так много инструментов, но для проверки системы, работы с диском и сетью — вполне достаточно!
How to Create and Use Windows 7 Repair Disk with ISO?
Want to create Windows 7 repair disk with ISO image files? See this article and I’ll show you how to create a Windows 7 Home Premium/Ultimate/ Professional repair disk ISO?

By Ivy  / Last Updated January 27, 2021
Where can I download Windows 7 ISO?
“After reading through numerous threads on similar topics, I am stumped. I am «simply» trying to create a USB stick with System Repair image so I can restore a system image. I do not have a CD/DVD drive and was hoping to download the ISO but no joy, because the link I found didn’t have a download URL, or it was paid. Thanks for help”
You can download windows 7 repair disk ISO from Microsoft as long as you have the product key of your computer. it’s a very authoritative website, which is used by many users in worldwide. You can use it with confidence.
How to create Windows 7 repair disk with ISO?
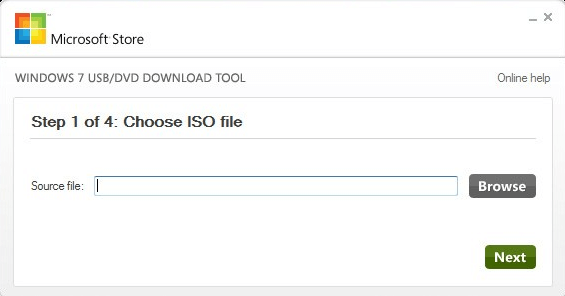
Before you start, you need to download Windows 7 repair disk ISO from Microsoft and Windows 7 USB DVD download tool. Besides, you still need a USB drive with 4GB capacity.
Step 1. Open Windows 7 USB DVD download tool, click Browse to find your ISO image files, then click Next.
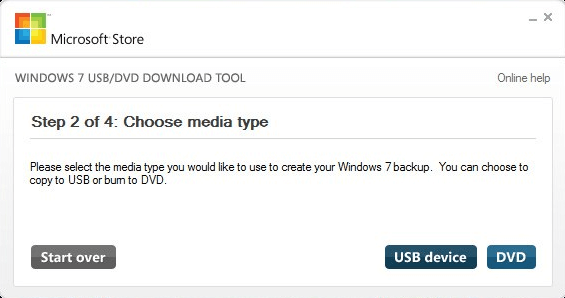
Step 2. Choose USB as your media type.
Step 3. Insert USB flash drive and select it, then click Begin copying.
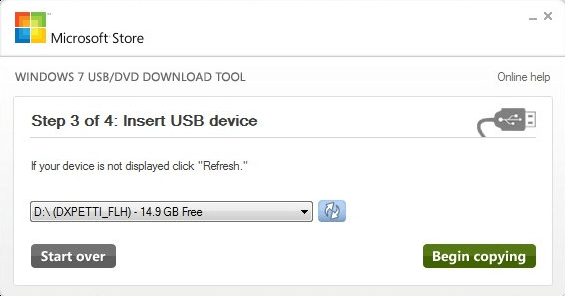
Note: This tool will format your USB flash drive first, then create bootable USB device. Thus, you need to make a file backup first if there is something important.
Step 4. Now, Windows 7 repair disk ISO USB is created successfully. All you need to do is to ensure that the files in recovery disk is exactly the same as your ISO file.
This way is used to repair the specified computer, because the recovery disk contains all the necessary drivers for the computer you are using. More so, you cannot use Windows 7 repair disk ISO 32 bit on 64 bit, vice versa.
How to create Toshiba/HP/ASUS/ACER/Lenovo recovery disk ISO?
To use a recovery disk on both 32-bit and 64-bit computer or different brands of computer, such as, HP, Lenovo, Dell, Samsung, you need a professional software. And here, I strongly recommend you free AOMEI Backkupper Standard. It supports CD/DVD, ISO, USB, so you can create repair disc or disk as you like.
Details are below:
Step 1. Download AOMEI Backupper Standard, install and launch it.
Step 2. Click Tools and Create Bootable Media.

Step 3. Choose the type of bootable disc and click Next. The first one is based on Linux and retain the basic functions while the second is based on Window PE and has full functions of AOMEI Backupper.

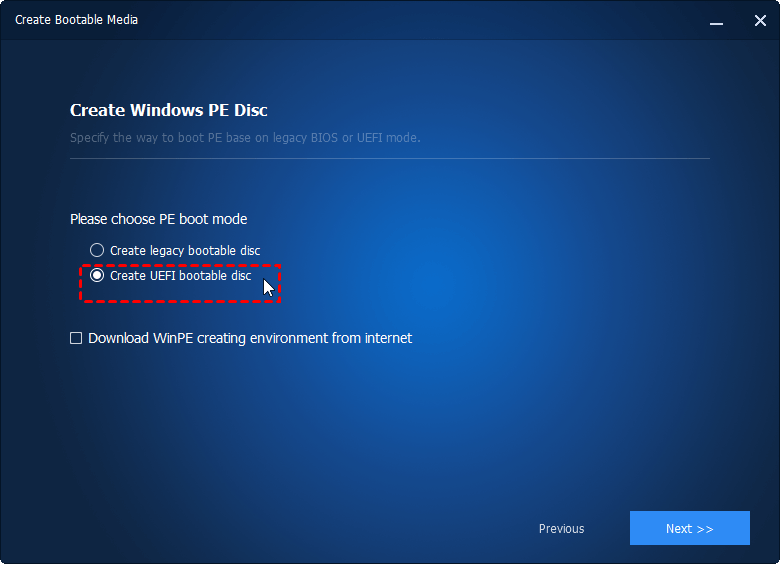
Step 4. Select boot mode according to partition style of your disk. If your disk is MBR, you can select the first one – Create legacy bootable disc. If your disk is GPT, you can choose the second one – Create UEFI bootable disc.
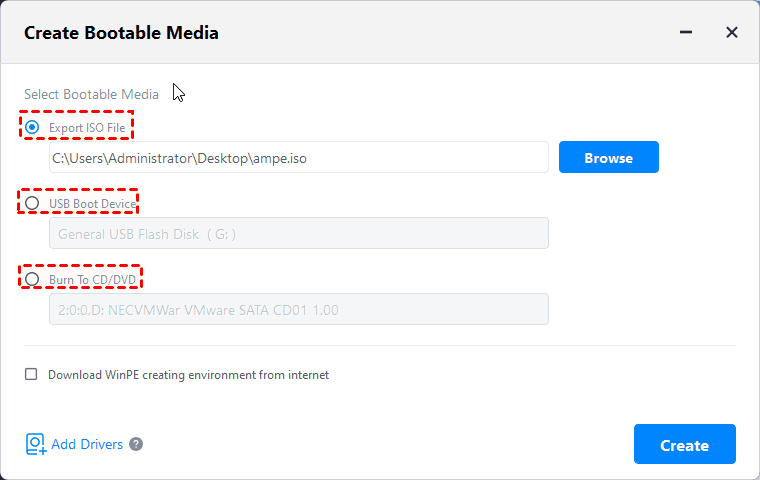
Step 5. Select bootable media depending on your own needs. Here, I’ll take USB Boot Device as an example. If you just want an ISO file, you can tick Explore ISO file.
Step 6. Wait patiently until the process is completed. Click Finish to exit.
Beside creating Windows 7 repair disk with ISO, AOMEI Backupper Standard can do more, such as, creating system backup, disk backup, file backup, restoring backup image, cloning hard drive to SSD, migrating OS to SSD, transferring files from one computer to another, etc.
How to use Windows 7 system repair disk ISO?
Windows 7 startup repair disk ISO gives you a chance to restore system image from external hard drive or other storage devices when your computer run into issues. Besides, you still can run Startup Repair, System Restore, Command Prompt with Microsoft Windows 7 repair disk ISO.
Now, coming to the point: how to use Windows 7 repair disk ISO?
Step 1. Connect the repair disk to computer via USB port.
Step 2. Start your computer and press the corresponding key to enter BIOS. The key to press are likely to be Dell, F1, F2, F3, ESC, or Delete.
Note: To find the specified key for different brands of computer, you see the following message. It implies the key to access BIOS.
Press Windows repair disk iso to enter setup
Setup: Windows repair disk iso
Enter BIOS by pressing Windows repair disk iso
Press Windows repair disk iso to enter BIOS setup
Press Windows repair disk iso to access BIOS
Press Windows repair disk iso to access system configuration
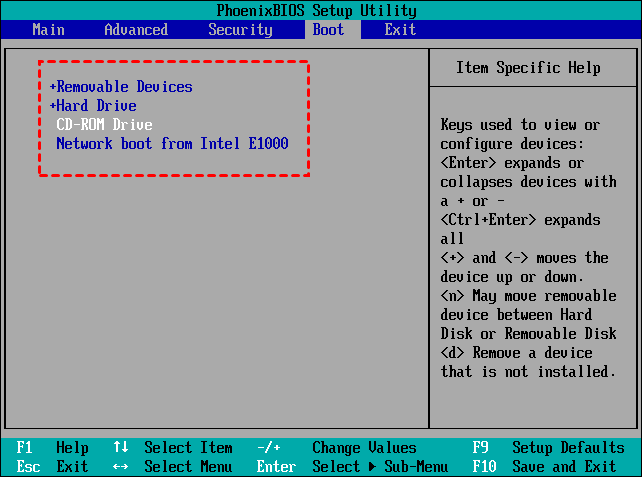
Step 3. Select the Boot option and move the Removable Devices to the first, then press F10 to save the changes and exit.
Step 4. Then, your computer will restart and you may be asked to press any key to boot from the removable devices. Just do as it said.
Step 5. Then, you will go to the initial Setup window or main page of AOMEI Backupper. For the first one, you can click Next and Repair your computer, then go to Choose an option > Troubleshoot > Advanced options and select the recovery tool you like. For the second, just connect the device that contain the backup image to your computer, then restore as the normal mode.
Final words
Want a free download Windows 7 repair disk ISO, you can go to Microsoft and search Windows 7 ISO. If you download ISO from Microsoft, you still need a ISO burner like Windows CD/DVD download tool. However, this kind of recovery disk can only be used on specified computer.
To work this issue out, you can use free AOMEI Backupper Standard, which allows you to create a recovery disk used for all brands of computer (both 32-bit and 64-bit) and restore system image when needed. If you want more advanced features, you can upgrade to AOMEI Backupper Professional.


