- Перезагрузите, чтобы устранить ошибки диска в Windows 10 — что делать?
- Почему Windows 10 пишет «Перезагрузите, чтобы устранить ошибки диска»
- Что делать, если уведомление об устранении ошибок диска появляется регулярно
- Restart to Repair Drive Error in Windows 10 | 5 Fixes
- User case: restart to repair drive error
- В Restart PC to repair drive error, fix it right now!
- Backup drive in case you need to perform disaster recoveryВ
- FixВ В Restart to repair drive errors easilyВ
- Fix 1: Restart your computer
- Fix 2: Using chkdsk command
- Fix 3: Using sfc /scannow and dism
- Fix 4: Run System Restore in safe mode
- Fix 5: Run automatic repair
- Final words
- FIX: Restart to repair drive errors on Windows 10
- How can I fix Restart to repair drive errors on Windows 10?
- 1. Restart your PC
- 2. Run SFC Scan
- 3. Run CHKDSK
Перезагрузите, чтобы устранить ошибки диска в Windows 10 — что делать?
 Иногда при работе в Windows 10 вы можете столкнуться с уведомлением «Перезагрузите, чтобы устранить ошибки диска» и не всегда ясно, о каких именно ошибках идет речь и что следует сделать, чтобы исправить ситуацию.
В этой инструкции подробно о том, что может вызывать появление такого уведомления и о том, что предпринять, чтобы сообщение о необходимости перезагрузки компьютера для исправления ошибок диска не появлялось.
Почему Windows 10 пишет «Перезагрузите, чтобы устранить ошибки диска»

Если на вашем компьютере или ноутбуке появилось уведомление «Перезагрузите, чтобы устранить ошибки диска», это говорит о том, что с точки зрения Windows 10 с одним из дисков (разделов на диске) возникли проблемы, связанные с файловой системой. Чаще всего это происходит после:
- Изменения структуры разделов на жестком диске или SSD с помощью сторонних программ.
- Восстановления разделов на диске, как это описано в инструкциях Как восстановить удаленный раздел диска, Как восстановить диск RAW.
Два указанных случая как правило не говорят о каких-либо реальных проблемах с диском, а лишь о том, что Windows 10 «заметила» что структура разделов на дисках неожиданно изменилась. И, если вы столкнулись с ситуацией после таких действий, обычно действительно достаточно лишь перезагрузить компьютер — и больше уведомление вас не побеспокоит.
Если же через какое-то время после перезагрузки вы снова видите сообщение о том, что нужно перезагрузить систему, чтобы устранить ошибки диска, попробуйте выполнить проверку ошибок файловой системы вручную:
- Запустите командную строку от имени Администратора. В Windows 10 для этого можно начать набирать «Командная строка» в поиске на панели задач, а затем, либо выбрать нужный пункт в списке действий справа, либо, нажав правой кнопкой мыши по найденному результату, выбрать пункт «Запуск от имени администратора».

- Введите команду chkdsk C: /f и нажмите Enter. Для диска C: вам вероятнее всего предложат выполнить проверку после перезагрузки, согласитесь на предложение и перезагрузите компьютер.
- После проверки системного диска (буква C: в команде выше), проверьте и другие разделы на жестких дисках и SSD, указав их букву в команде. В моем случае ошибки были найдены и исправлены на диске D:


В случае, если ошибки были исправлены, дальнейшие сообщения о необходимости перезагрузки появляться не должны. Однако, иногда случается, что такие уведомления после исправления проблем через некоторое время появляются снова без каких-либо действий с вашей стороны.
Что делать, если уведомление об устранении ошибок диска появляется регулярно
Если на вашем компьютере или ноутбуке сообщение «Перезагрузите, чтобы устранить ошибки диска» пропадает, но через какое-то время появляется вновь, причинами может быть:
- Частое принудительное выключение питание (удержанием кнопки питания или из розетки).
- Выключение ПК от электропитания на ночь. Да, в Windows 10 это может сказываться на диске негативно, если у вас включена функция «Быстрый запуск». Если отключение компьютер из розетки обязательно, отключите функцию быстрый запуск в Windows 10.
- Проблемы с кабелями, которыми подключен жесткий диск или SSD. Стоит проверить подключение (чтобы кабель SATA был плотно подключен как со стороны материнской платы, так и со стороны диска, также стоит проверить подключение кабеля питания), иногда разумным будет заменить кабель.
- Проблемы с питанием (блоком питания). Среди других симптомов — странное поведение компьютера при включении и выключении (не всегда включается с первого раза, после выключения может продолжать шуметь вентиляторами), внезапные выключения под нагрузкой (но этот симптом также может говорить и о перегреве).
- Проблемы с самим жестким диском или SSD.
Надеюсь, статья помогла разобраться с проблемой, а сообщения о необходимости устранения ошибок диска вас больше не побеспокоят. В контексте рассмотренной темы может быть полезным: Проверка жесткого диска на ошибки в Windows, Программы для проверки жесткого диска на ошибки, Как проверить SSD на ошибки.
Restart to Repair Drive Error in Windows 10 | 5 Fixes
«Restart to repair drive errors» always showing up is an anoying problem for many computer users, this article can help you fix it easily with 5 solutions.

By Ivy  / Last Updated February 26, 2021
User case: restart to repair drive error
Restart to repair drive errors keep showing up after reboot
Hi all,
I recently used the error checking tool to check my internal hard drive on Windows 10 Pro and it told me to restart my computer with error message “Restart to repair drive errors”. After that, every time I start the computer, this error occurs.В
I can’t seem to find any more details on the exact error.В Can anyone help me or point me in the right direction?»
— Question from Reddit
Don’t worry about it too much, because this error just indicates that the drive has error and you are supposed to repair it. It may be caused by hard drive issues, failed updates, boated Windows registry.В
And you are not the only Windows users who keep receiving the restart your PC to repair drive errors.В Here are some useful solutions to help you to fix it easily and quickly.В В
В Restart PC to repair drive error, fix it right now!
It’s annoying that you are not able to access your files and foldersВ until the problem is fixed. But fortunately you can fix it with given solutions below.
Before that, you need to backup the drive having issues, so you can restore it in time in the event of an unexpected failure.В
Backup drive in case you need to perform disaster recoveryВ
To backup hard drive in Windows 10, you could use all-in-one backup siftwareВ AOMEI Backupper Standard. It supportsВ system backup, file backup, disk backup, disk backup. And you can schedule backup drive in daily/weekly/monthly plus full/incremental/differential backup. Also, you can enable email notification to get backup result in time and compress larger image file with normal or high compressional level.
Download and install free backup software AOMEI Backupper Standard.
Prepare an external hard drive or USB drive to store image file. Please be sure it can be detected.В
Then, let’s get started to backup drive.В
Step 1.В Launch AOMEI Backupper Standard, you will see its deep-blue screen. Click Backup and Disk Backup.В

Note: If you clearly know which drive have issues, you canВ directly backup the drive having issues with «System Backup» or «Partition Backup».
Step 2. Click Add Disk, then select disk you want to backup and click Add to move on.
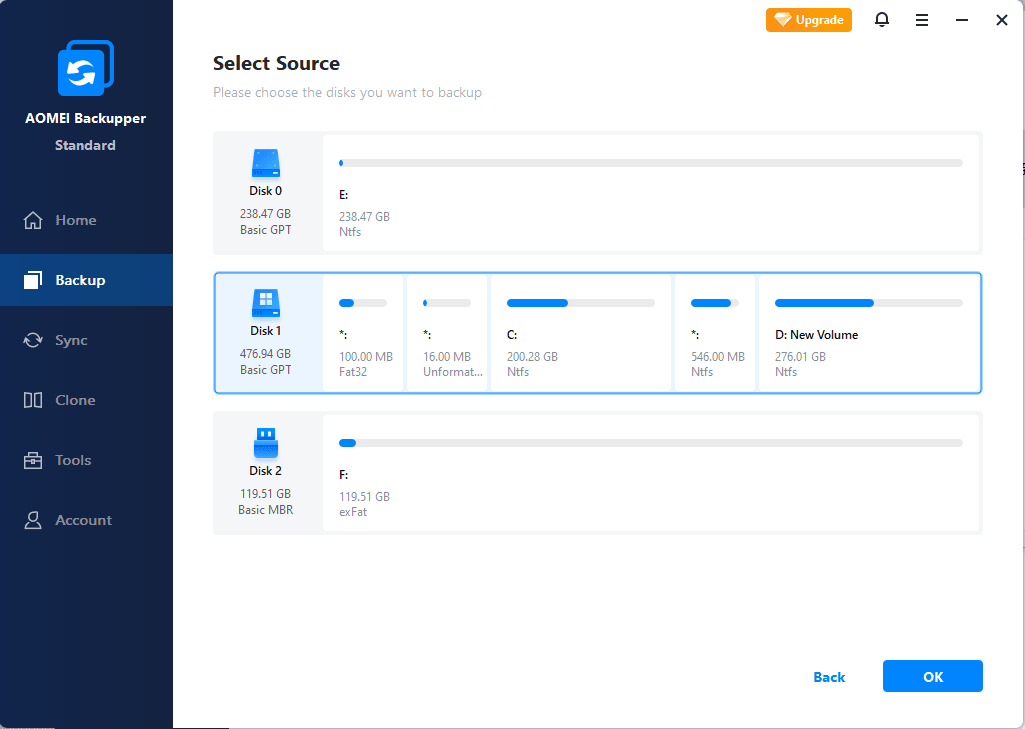
Step 3.В Select the drive you prepare by clicking the folder shapped button and selecting it. Then, click Options, Schedule, Scheme to set up backup settings per your needs and clickВ Start Backup.

Notes:
Options: You can set emailВ notification, pre/post-command, enable encryption for backup, normal or high compression level etc.
Schedule: You can backup your hard driveВ and its changes continuously by daily incremental backup(default option). Also, you can change daily to weekly or monthly or from incremental to differential. Note the scheduled differential backup is charged and available on AOMEI Backupper Professional or higher version.
Scheme: You can delete old backup images to free up disk space, thereby saving you much disk space. It’s availble on AOMEI Backupper Professional at least.
FixВ В Restart to repair drive errors easilyВ
Here you will learn 5 solutions to restart to repair drive errors in Windows 10, please try the Fix 1 first. It works in some cases. Below is a quick navigation for all solutions, click the anchor text to jump to the specific fix.
Fix 1: Restart your computer
Restart can solve most of computer problems, thus it’s worth to have a try. Restart your computer right now and check if the «Restart to repair drive errors» occurs.В В
If the probmen persists, you could try further solutions below.
Fix 2: Using chkdsk command
CHKDSK can check and repair disk error. Follow the details below.
Step 1. Go to start menu and type cmd in the search box, then run it as administrator.
Step 2. Type chkdsk C: /f and hit Enter to run this command.

Step 3. Type chkdsk C: /rand press Enter.
Step 4. Restart your computer after the operation is competed.
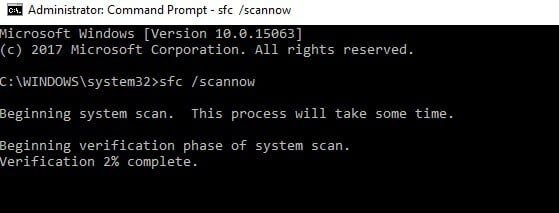
Fix 3: Using sfc /scannow and dism
SFC and DISM are command-line utility, which is used to repair system files in Windows 7/8/10. You should try SFC first and then run DISM command if sfc /scannow does not work.
Step 1. Go to command prompt window with admin priority, type sfc / scannow and hit Enter.
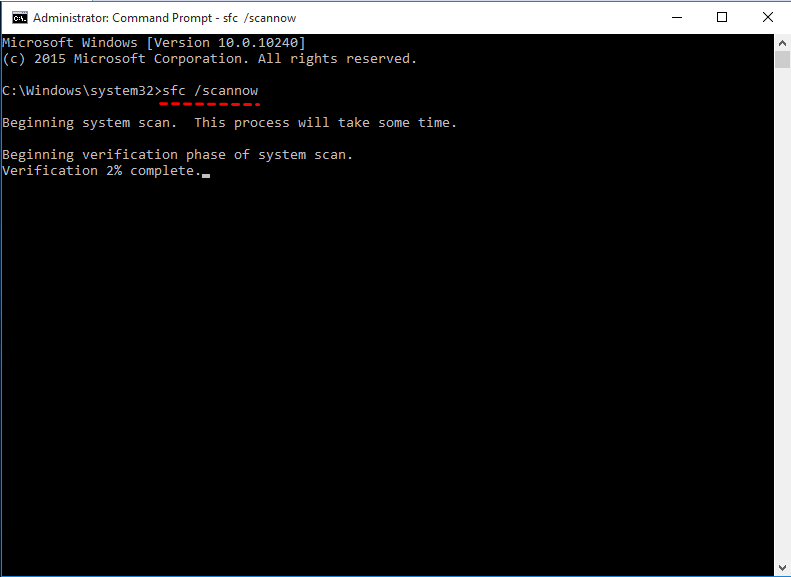
Step 2. Wait until the scan and repair process is finished, then restart your computer.
If sfc scannow not working, you still can try dism command, which is used to repair the problems sfc /scannow cannot. Continue to see below.
Step 3. Type the following command in the window and hit Enter. If DISM cannot use file online, you can try the seccond command with an installation disc. And you should replace “C:RepairSourceWindows” path of your DVD or USB.
DISM.exe /Online /Cleanup-image /Restorehealth
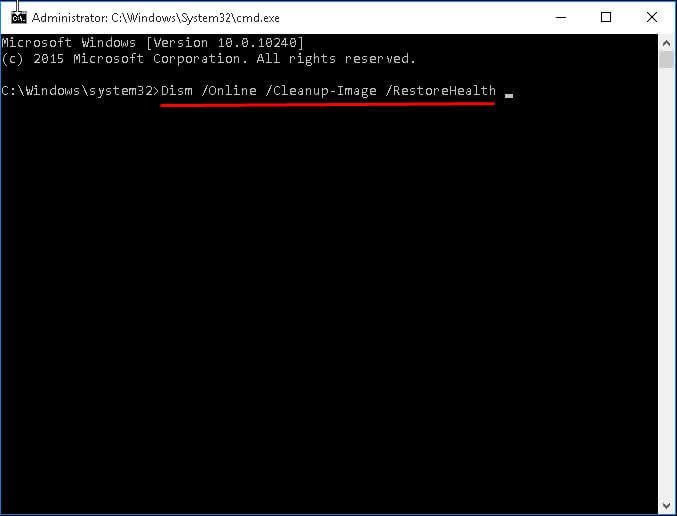
DISM.exe /Online /Cleanup-Image /RestoreHealth /Source:C:RepairSourceWindows /LimitAccess
Step 4. Restart your computer and see if you can receive “Restart to repair drive error” again. If not, you do not need to do more.
Fix 4: Run System Restore in safe mode
System restore can restore your computer to an earlier date and make everything work as normal. However, the recently installed software will be deleted.
Step 1. Click Restart while press and hold Shift key, and then Windows will restart into Safe Mode. This works for Windows 8/8.1/10.
Step 2. Type system restore in the search box, select it from the result list. Then, click Next.
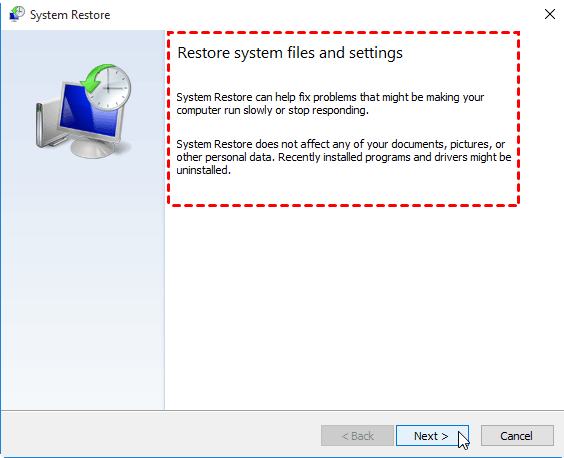
Step 3. Select the recommended restore point and click Next. If it’s not available, you can tick the second option and select a restore point.
Step 4. Follow the on-screen instructions to finish the restoration. Then, restart your computer.
Fix 5: Run automatic repair
Step 1. Connect the installation disc to your computer, set boot priority for it in BIOS, press F10 to save the changes and restart.
Step 2. Press any key to boot from CD/DVD when prompted.
Step 3. On the first initial setup window, click Next.
Step 4. Click Repair your computer at the lower left corner.
Step 5. Click Troubleshoot under the Choose an option interface, then go to Advanced options and Automatic Repair or Startup repair.
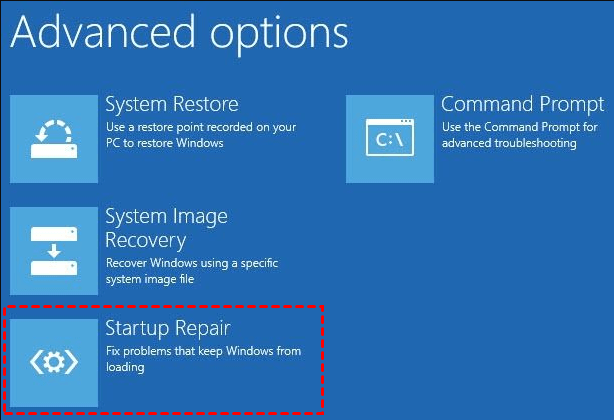
Step 6. Restart your computer and ensure if this error “Restart Computer to repair drive errors” disappears.
Above ways can be used to fix “Restart to repair drive errors Server 2012/2016” except for method 3, because system restore is removed from server-based operating system.
But it has a similar feature called Windows Server Backup, you can try to restore with created backup image.
Before you start to fix this issue in server computer, please remember to backup your server. You could use AOMEI Backupper Server, it supports Windows Server 2003/2008/2011/2012/2016/2019 and its R2 version.
Final words
You can solve “Restart to repair hard drive error” with given solutions in most cases. But I still want to remind you that any unexpected eror will cause data loss, thus please backup the entire disk or the specific partition having issues ahead of time.В
AOMEI Backupper Standard can be a great choice for home users, it supports all the basic features, such as, system backup, disk backup, schedule backup, incremental or differential backup, create bootable media etc.
But if you want to unlock all features a nd protect unlimited computers within your company, you couldВ pickВ AOMEI Backupper TechnicianВ or AOMEI Backupper TechPlus. With the inbuilt AOMEI Image Deploy tool, you are also allowed to deploy/restore system image file to multiple client computers over network.
FIX: Restart to repair drive errors on Windows 10

- You’re not the only Windows 10 computer owner who keeps getting the Restart to repair drive errors notification.
- To quickly solve this, don’t hesitate to restart your PC or use the System File Checker tool.
- For more accurate tips and tricks, you may take a look at our Disk drive section as well.
- Moreover, bookmark our Windows 10 Troubleshooting Hub for professional help at any hour.

- Download Restoro PC Repair Tool that comes with Patented Technologies (patent available here).
- Click Start Scan to find Windows issues that could be causing PC problems.
- Click Repair All to fix issues affecting your computer’s security and performance
- Restoro has been downloaded by 0 readers this month.
Today, Windows Report will show you how to act when getting the notification message Restart to repair drive errors (Important) in Windows 10.
This issue you are experiencing could be due to hard drive issues, failed updates, as well as the bloated Windows registry.
Therefore, you need to try out any of the enlisted solutions in order to fix this problem.
How can I fix Restart to repair drive errors on Windows 10?
- Restart your PC
- Run SFC Scan
- Run CHKDSK
- Run DISM
- Run System Restore in Safe Mode
- Run Automatic Repair
1. Restart your PC

The first applicable workaround in resolving the Restart to repair drive errors Windows 10 issue is to restart your PC.
This could potentially fix the problem in some cases. However, if this does not resolve the issue on your Windows 10 PC, you can proceed to other workarounds,
2. Run SFC Scan
SFC can also be utilized in fixing drive errors. Here’s how to run the SFC scan:
- Press Windows+Q and type cmd.
- From the search results, right-click Command Prompt and choose Run as Administrator.
- A new cmd window appears. Type sfc /scannow and hit the Enter key.
- Wait until the scan and repair process is finished.
3. Run CHKDSK
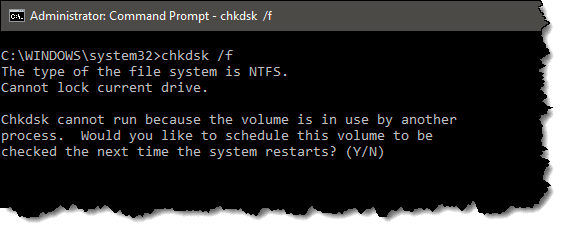
Due to the fact that the Restart to repair drive errors Windows 10 problem is disk related error, CHKDSK can be used as well to fix the problem. CHKDSK process cleans up disk-related errors on your PC.
Here’s how to perform CHKDSK:
- Go to Start > Type command prompt >Right-click on it, and select Run as administrator.
- Now, type CHKDSK C: /F.
- Hence, type CHKDSK C: /R in the Command Prompt and hit the Enter key.
- After the CHKDSK process, restart your PC.
Alternatively, you can run CHKDSK from the File Explorer window. Follow these steps to do that:
- Click on the File Explorer button on the Windows taskbar.
- Locate and click on This PC at the left pane of the File Explorer window.
- Now, you can right-click the C: drive.
- Select Properties from the context menu.
- Select the Tools tab, which includes a Check button.
- Press the Check button and click Scan drive to run a CHKDSK scan.


