- Windows 10 Repairing Disk Errors
- Fix Error Repairing Disk Errors on Windows 10 (Solved)
- How to Fix Repairing Disk Errors
- 1. Using Startup Repair
- 2. Fix Disk Errors using Check Disk Command
- 3. Using PowerShell
- 4. Perform System Restore
- Quick Fixes for Windows Stuck on Repairing Disk Error in Windows 10/8/7
- Method 1. Fix with a Bootable Disk (No data loss!)
- Method 2. Restart PC from Safe Mode with Networking
- Method 3. Proceed System Restore
- Method 4. Perform Automatic RepairВ
Windows 10 Repairing Disk Errors
Hi. Can you help me solve this problem? Please.
My laptop is Samsung Series 5 Ultra NP530U4E, i3, 500 gb, 4gb ram.
Last 4 days it began to slow down, opening and while working on it. I ran a virus scan it detected something then I was successful in deleting it (i think). Its back to its speed after, then this last 2 days, it began slowing down again, i ran an antivirus scan, it detected none, then i tried sfc scannow, it has corrupted system files which can’t be fixed, i tried Dism to repair it, then ran sfc again, it still gives me the same output. I searched almost everything to fix the problem nothing works. I got a notif to restart my pc to repair disk error. I did it but everytime i log back, it keeps notifying me the same and the performance is the same, everytime i right click white blank square always appear, i hover my mouse to it to make the selection appear.
The last thing i did. I open my system restore, trying to restore it to a previous working state, but then it give me an error saying, i have error on my disk and i need to repair it first. So i did. It gives me an option to restart to start the repair. I did restart it, it repairs my main drive it took almost a day before completing 100%, then the last message it gives me until now is the «Repairing disk errors. This might take an hour to complete» is still running for almost 2 days. I forceshutdown it, when i started it again it gives me a blue screen error «NSTF file system» and then it loads and keeps doing the same, repairing disk error loop, now. I can’t log in my computer, im stuck with repairing disk, i cant go to my desktop. Nothing T____T please help me.
Fix Error Repairing Disk Errors on Windows 10 (Solved)
August 11, 2018 By Ansh R
Windows 10 comes with a lot of new features. Sure, it is very different from the older Windows OS versions. But, Windows 10 is also very much like its predecessors. Just like Windows XP, Windows 7 and Windows 8/8.1, Windows 10 also comes with a number of errors and bugs.
The latest Windows 10 error which is leaving users scratching their heads is “Repairing disk errors. This might take over an hour to complete”. This is a very annoying error and it shows up on the boot screen. Sometimes the computer will start working after an hour, but the error will most probably show up again. And most of the times it doesn’t even let the Windows to take you to sign in screen.
The error says it is repairing the disk errors and even after waiting for hours, nothing happens. If you are also one of the Windows 10 users who are stuck with this error, you are on the right page. We will help you fix this problem using our methods.
How to Fix Repairing Disk Errors
This error causes the computer to get stuck at booting screen. As we mentioned, sometimes it will let you use your computer. So, some of the methods require you to be logged in on your computer, while others can be performed without signing in. All the details are given below to perform the methods. Simply follow the steps to perform the methods.
1. Using Startup Repair
In this method, we will try to fix this error using Startup Repair. To perform this method, you will need a Windows Installation Media. If you don’t have it, you can create a bootable Windows Installation Media.
If you are unable to sign in, create the Windows Installation Media using some other Windows 10 computer. Make sure to enter the correct version of Windows 10 installed on your computer (the one with disk error) while creating it. When you are ready with the disk/USB drive, follow the steps.
Step 1. Plug in the Windows Installation Media USB flash drive to your computer.
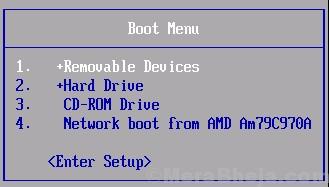
Step 2. Turn on your computer by pressing the power button and start pressing F12 (boot menu option) key.
Step 3. When you see the Boot Menu, use arrow keys to select Bootable USB Drive Name or Removable devices (whichever’s present on screen) or CD-ROM drive and press Enter.
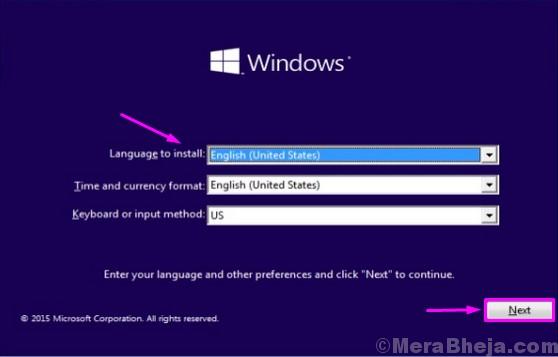
Step 4. Next, you will see the Windows Setup screen. Here, seelct the language and click on Next.
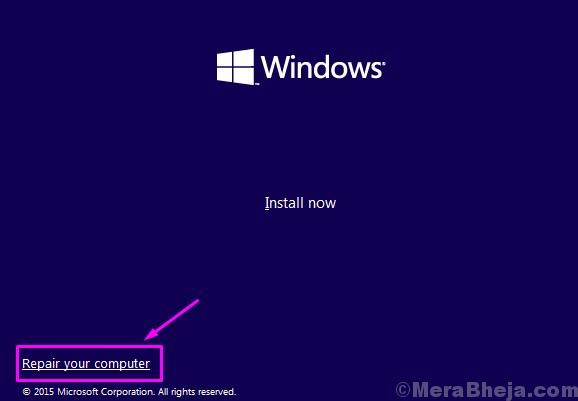
Step 5. Go to Repair your computer.
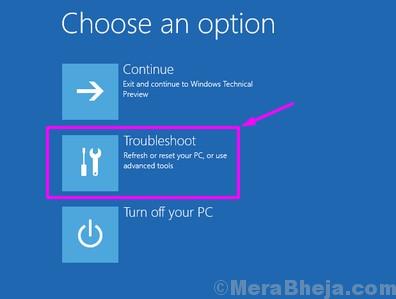
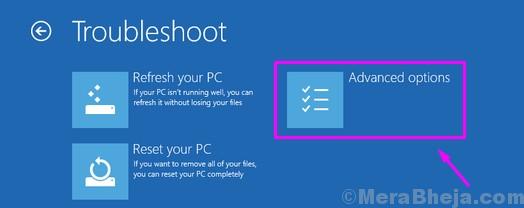
Step 6. Select Troubleshoot in Choose an option screen.
Step 7. Go to Advanced options in Troubleshoot screen.
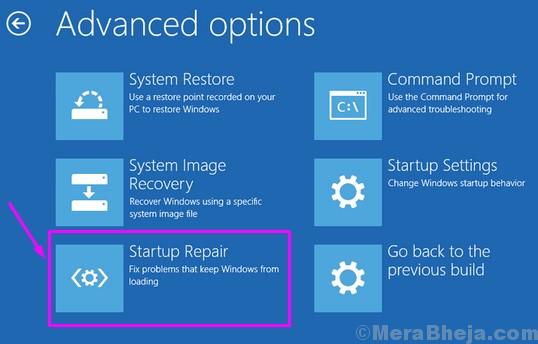
Step 8. Click on Startup Repair on Advanced options screen.
Now, wait for the repairing process to complete. When the process is done, restart your computer. You will no longer see the error. If it is still bothering you, follow the next method.
2. Fix Disk Errors using Check Disk Command
In this method, we will try to solve the problem using the chkdsk command. This command repairs the bad sectors and logical file system, which could be causing the disk error.
Note: To perform this method, you have to be signed in on your computer. So, if you are unable to sign in on your computer, you will have to boot into Safe Mode. To boot into Safe Mode you can use Method 6 from How to Boot Windows 10 into Safe Mode.
When you are signed in on your computer, follow the steps.
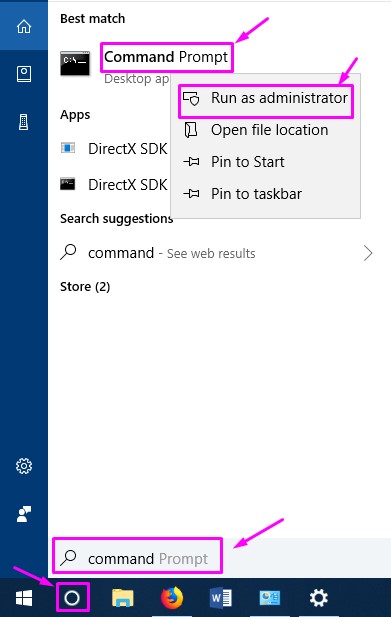
Step 1. Go to Cortana and type Command Prompt. Right-click on Command Prompt from results and select Run as administrator.
Step 2. Now, in the Command Prompt window, you have to enter the following command and press Enter.
Note: here “C” in the command is the drive partition where Windows 10 is installed. If it is installed on some other drive on your computer, then use the alphabet assigned to that drive.
Step 3. When asked if you wish to run the command before next boot, type Y and press Enter.
Step 4. Restart your computer.
When your computer reboots, it will scan and fix the disk errors. Now you will be able to sign in without any errors. If this method didn’t work, follow the next one.
3. Using PowerShell
In this method, we will try to fix the error using Repair-volume command on PowerShell.
Note: To perform this method, you have to be signed in on your computer. So, if you are unable to sign in on your computer, you will have to boot into Safe Mode. To boot into Safe Mode you can use Method 6 from How to Boot Windows 10 into Safe Mode
Follow the steps to perform this method.
Step 1. Go to Cortana and type powershell. Right-click on Windows PowerShell from results and select Run as administrator.

Step 2. Now, enter the following command in PowerShell and press Enter. This command will scan the C drive for errors. If you have Windows installed on another drive, use the respective alphabet in place of C.
Step 3. Now, type the following command and press enter. This command will run a scan and will fix the errors on the drive. Again, if you have Windows installed on another drive, use its letter in place of C.
Step 4. Wait for the process to finish scanning and fixing the disk errors. When it’s done, restart your computer.
The error must be gone by now. If you are still facing the same problem, follow the next method.
4. Perform System Restore
If none of the methods has done the job for you, it’s time to perform a System Restore to the point when your computer was working well. To perform this method, you will need a Windows Installation Media. If you don’t have it, you can create a bootable Windows Installation Media.
Step 1. Plug in the Windows Installation Media USB flash drive to your computer.
Step 2. Turn on your computer by pressing the power button and start pressing F12 (boot menu option) key to acess boot menu.
Step 3. When you see the Boot Menu, use arrow keys to select Bootable USB Drive Name or Removable devices (whichever’s present on screen) or CD-ROM drive and press Enter.
Step 4. Next, you will see the Windows Setup screen. Here, select language and click on Next.
Step 5. Go to Repair your computer on the next screen.
Step 6. Select Troubleshoot on Choose an option screen.
Step 7. Go to Advanced options on Troubleshoot screen.
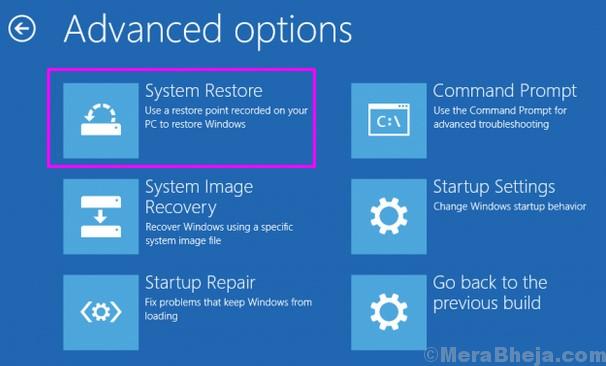
Step 8. Select System Restore on Advanced options screen.
Now, wait for the process to complete and restore your computer to the earlier working state.
This will fix the error.
In case, even the last method hasn’t worked for you, then your hard drive has malfunctioned. You will need to replace the hard drive. Take your computer to an authorized service centre and ask them to replace the hard drive.
We hope we were able to help you fix this error. If you solved this problem using some other method, or if you have any questions regarding this issue, mention them below in comments.
Quick Fixes for Windows Stuck on Repairing Disk Error in Windows 10/8/7
Computer or laptop gets stuck on «Repairing disk error» while booting? Laptop or PC stuck on the booting screen with «Repairing disk errors. This might take over an hour to complete» message? You wait and wait, and it turns out that nothing changed? Relax! Don’t let this annoying problem bother you anymore. Here now in this article, we’ll provide you with practical and powerful solutions and fixes to quickly fix Windows 10, 8 or 7 stuck on repairing disk error. You may follow any one of the below-offered tips or fixes to get your problem solved now.
Note: If you are not familiar with computer administrating jobs or computer repairing stuff, please follow method 1 to get your problem solved and rescue your computer from Windows stuck on ‘repairing disk’ error.
Method 1. Fix with a Bootable Disk (No data loss!)
Windows fail to boot or gets stuck with ‘Repairing disk errors’ message, it means that something was wrong on the boot disk which leads system unable to boot from the disk. When such a problem occurs, the best choice is to create a WinPE bootable disk from another healthy computer and let the bootable disk to restore Windows 10/8/7 into a healthy state so to fix the stuck error.В
EaseUS Partition Master
Create bootable disk to remove ‘Windows stuck on repairing disk’ error with tips below now.
To create a bootable disk, you may turn to professional partition manager software for help. Here you may try EaseUS Partition Master which allows you to create a bootable disk, reboot Windows from the bootable disk and even help to fix Windows repairing disk error without losing any data.
Just follow below steps to create a new bootable disk and fix Windows stuck on ‘Repairing Disk error’ now:В
Step 1. Select the target partition that has a problem.В
Step 2. Choose «Advanced» > «Check File System».В
Step 3. In the Check File System window, check the «Try to fix errors if found» option. В
Step 4. Click «Start» to check errors on your partition.
You can also apply EaseUS Partition Master with its check partition feature to fix disk/system errors in the Windows system.В
Note: If you lose some important files or data in the system partition after fixing Windows stuck on ‘Repairing disk error’, relax, and you can apply professional data recovery software — EaseUS Data Recovery Wizard to restore all your lost data with ease.
Method 2. Restart PC from Safe Mode with Networking
When your computer or laptop gets stuck on ‘Repairing Disk errors’, you may try restart PC or laptop from Safe Mode with networking. Here below are the detail steps.
- Restart PC: holdВ «Shift» and select «Power» when sign-in screen show up > «Restart»;
- After PC/laptop restarts to «Choose an option screen», selectВ «Troubleshoot»В > «Advanced options»В >В «Startup Settings» > «Restart»;
- After PC/laptop restarts, you’ll see a list of options. Select 5 or F5 to start PC from Safe Mode with Networking.
Method 3. Proceed System Restore
System Restore is a way to undo system changes with restore point that you’ve created so to return system files and settings to an earlier point without losing personal data. If Windows PC or laptop cannot start, you can use installation or recovery media to enter startup settings.
Let’s see how to fix Windows stuck on ‘Repairing Disk errors’ with system restore now:
- Create installation media with a USB drive: you can go to Microsoft to download a media creation tool (for Windows 10) or Windows 8/7 installation packs;
- Insert USB drive or DVD into PC or laptop and restart it;
- Set Windows to boot from a drive and you can change the boot order in BIOS.В
- On the Install Windows screen, select «Repair your computer».В
- On the «Choose an option»В screen, select «Troubleshoot»В > «Advanced option» > «System Restore».
All you need is to wait patiently to let Windows restore to a healthy state and then all problems including Windows stuck on ‘Disk Repairing’ error will all be fixed.В
Method 4. Perform Automatic RepairВ
To fix Windows 10/8/7 stuck on ‘Repairing Disk’ error by performing the automatic repair, you need an installation disk or USB, and you can create a media creation tool for Windows 10/8/7 before starting automatic repair.
- Boot PC or laptop from the installation media: When Windows show manufacturer logo, press F12 to enter boot menu and set PC or laptop to boot from the installation tool. If you cannot find the boot menu, restart PC/laptop and press Boot menu option key when Windows logo shows up; and set system to boot from CD/DVD ROM;
- When a gray text shows up on a black screen, telling «Press any key to boot from CD or DVD», press any key;
- Select the correct time and Keyboard type;
- Click «Repair your computer» in the lower left corner;
- Click on «Troubleshooting»В > «Advanced option» > «Automatic repair».


