- Window manager
- Contents
- Overview
- Замена клиента Windows 7 с пакетом обновления 1 (SP1) на Windows 10 при помощи Configuration Manager Replace a Windows 7 SP1 client with Windows 10 using Configuration Manager
- Инфраструктура Infrastructure
- Создание последовательности задач замены Create a replace task sequence
- Связывать новое устройство со старым компьютером Associate the new device with the old computer
- Создание коллекции устройств и добавление компьютера PC0004 Create a device collection and add the PC0004 computer
- Создание нового развертывания Create a new deployment
- Проверка резервного копирования Verify the backup
- Развертывание нового компьютера Deploy the new computer
Window manager
A window manager (WM) is system software that controls the placement and appearance of windows within a windowing system in a graphical user interface (GUI). It can be part of a desktop environment (DE) or be used standalone.
Contents
Overview
Window managers are X clients that control the appearance and behaviour of the frames («windows») where the various graphical applications are drawn. They determine the border, title bar, size, and ability to resize windows, and often provide other functionality such as reserved areas for sticking dockapps like Window Maker, or the ability to tab windows like Fluxbox. Some window managers are even bundled with simple utilities like menus to start programs or to configure the WM itself.
The Extended Window Manager Hints specification is used to allow window managers to interact in standard ways with the server and the other clients.
Some window managers are developed as part of a more comprehensive desktop environment, usually allowing the other provided applications to better interact with each other, giving a more consistent experience to the user, complete with features like desktop icons, fonts, toolbars, wallpapers, or desktop widgets.
Other window managers are instead designed to be used standalone, giving the user complete freedom over the choice of the other applications to be used. This allows the user to create a more lightweight and customized environment, tailored to their own specific needs. «Extras» like desktop icons, toolbars, wallpapers, or desktop widgets, if needed, will have to be added with additional dedicated applications.
Some standalone WMs can be also used to replace the default WM of a DE, just like some DE-oriented WMs can be used standalone too.
Prior to installing a window manager, a functional X server installation is required. See Xorg for detailed information.
Замена клиента Windows 7 с пакетом обновления 1 (SP1) на Windows 10 при помощи Configuration Manager Replace a Windows 7 SP1 client with Windows 10 using Configuration Manager
Область применения Applies to
В этом разделе вы узнаете, как заменить компьютер с Windows 7 SP1 с помощью Microsoft Endpoint Configuration Manager. In this topic, you will learn how to replace a Windows 7 SP1 computer using Microsoft Endpoint Configuration Manager. Этот процесс похож на обновление компьютера, но поскольку вы заменяете устройство, необходимо выполнить задание резервного копирования отдельно от развертывания Windows 10. This process is similar to refreshing a computer, but since you are replacing the device, you have to run the backup job separately from the deployment of Windows 10.
В этом разделе будет создаваться последовательность задач только для резервного копирования, которую вы запустите на PC0004 (устройство, которое вы заменяете), развернуть компьютер PC0006 под управлением Windows 10, а затем восстановить это резервное копирование PC0004 на PC006. In this topic, you will create a backup-only task sequence that you run on PC0004 (the device you are replacing), deploy the PC0006 computer running Windows 10, and then restore this backup of PC0004 onto PC006. Это похоже на процесс замены MDT: замените компьютер Windows 7 на компьютер с Windows 10. This is similar to the MDT replace process: Replace a Windows 7 computer with a Windows 10 computer.
Инфраструктура Infrastructure
Существующая инфраструктура Configuration Manager, интегрированная с MDT, используется для следующих процедур. An existing Configuration Manager infrastructure that is integrated with MDT is used for the following procedures. Дополнительные сведения о настройке для этой статьи см. в статье Подготовка к установке нулевого касания Windows 10 с помощью диспетчера конфигурации. For more information about the setup for this article, see Prepare for Zero Touch Installation of Windows 10 with Configuration Manager.
Для целей этой статьи мы будем использовать один серверный компьютер (CM01) и два клиентских компьютера (PC0004, PC0006). For the purposes of this article, we will use one server computer (CM01) and two client computers (PC0004, PC0006).
- CM01 — это рядовой сервер домена и точка распространения программного обеспечения Configuration Manager. CM01 is a domain member server and Configuration Manager software distribution point. В этом руководстве CM01 — это автономный первичный сервер сайта. In this guide CM01 is a standalone primary site server.
- Важно: cm01 должен включать роль точки миграции государства для последовательности замены задач, используемой в этой статье для работы. Important: CM01 must include the State migration point role for the replace task sequence used in this article to work.
- PC0004 — это клиентский компьютер участника домена с Windows 7 SP1 или более поздний вариант Windows с установленным клиентом Configuration Manager, который будет заменен. PC0004 is a domain member client computer running Windows 7 SP1, or a later version of Windows, with the Configuration Manager client installed, that will be replaced.
- PC0006 — это клиентский компьютер для членов домена под управлением Windows 10 с установленным клиентом Configuration Manager, который заменит PC0004. PC0006 is a domain member client computer running Windows 10, with the Configuration Manager client installed, that will replace PC0004.
PC0004 и PC006 могут быть VMs на сервере HV01, который является Hyper-V хост-компьютером, который мы использовали ранее для создания эталонного изображения Windows 10. PC0004 and PC006 can be VMs hosted on the server HV01, which is a Hyper-V host computer that we used previously to build a Windows 10 reference image. Однако для запуска последовательности задач Configuration Manager OSD у VMs должно быть достаточно ресурсов. However, the VMs must have sufficient resources available to run the Configuration Manager OSD task sequence. Рекомендуется использовать 2 ГБ оперативной памяти или более. 2GB of RAM or more is recommended.
Все серверы работают под управлением Windows Server 2019. All servers are running Windows Server 2019. Однако вы также можете использовать более раннюю поддерживаемую версию Windows Server. However, an earlier, supported version of Windows Server can also be used.
Все серверные и клиентские компьютеры, указанные в этом руководстве, находятся в одной подсети. All server and client computers referenced in this guide are on the same subnet. Это не обязательно, но каждый серверный и клиентский компьютер должны иметь возможность подключения друг к другу для обмена файлами и разрешения всех DNS-имен и сведений Active Directory для домена contoso.com. This is not required, but each server and client computer must be able to connect to each other to share files, and to resolve all DNS names and Active Directory information for the contoso.com domain. Также требуется подключение к Интернету для скачивания обновлений ОС и приложений. Internet connectivity is also required to download OS and application updates.
В этой статье предполагается, что вы настроили разрешения Active Directory в указанном OU для учетной записи CM_JD, а учетная запись компьютера Active Directory клиента находится в OU contoso > Computers > Workstations. This article assumes that you have configured Active Directory permissions in the specified OU for the CM_JD account, and the client’s Active Directory computer account is in the Contoso > Computers > Workstations OU. Используйте консоль Active Directory Users and Computers, чтобы просмотреть расположение компьютерных объектов и при необходимости переместить их. Use the Active Directory Users and Computers console to review the location of computer objects and move them if needed.
Создание последовательности задач замены Create a replace task sequence
На CM01: On CM01:
С помощью консоли Configuration Manager в рабочей области библиотеки программного обеспечения расширяйте операционные системы, щелкните правой кнопкой мышипоследовательности задач и выберите Создание последовательности задач MDT. Using the Configuration Manager console, in the Software Library workspace, expand Operating Systems, right-click Task Sequences, and select Create MDT Task Sequence.
На странице Выбор шаблона выберите шаблон Последовательность задач замены клиента и нажмите кнопку Далее. On the Choose Template page, select the Client Replace Task Sequence template and click Next.
На странице Общие задайте следующие параметры и нажмите кнопку Далее. On the General page, assign the following settings and click Next:
- Имя последовательности задач: последовательность задач замены Task sequence name: Replace Task Sequence
- Комментарии к последовательности задач: Только резервное копирование USMT Task sequence comments: USMT backup only
На странице Образ загрузки найдите и выберите пакет образа загрузки Zero Touch WinPE x64. On the Boot Image page, browse and select the Zero Touch WinPE x64 boot image package. Затем нажмите кнопку Next. Then click Next.
На странице Пакет MDT найдите и выберите пакет OSD/MDT. On the MDT Package page, browse and select the OSD / MDT package. Затем нажмите кнопку Next. Then click Next.
На странице Пакет USMT просмотрите и выберите средство миграции пользователей OSD/Microsoft Corporation для пакета Windows. On the USMT Package page, browse and select the OSD / Microsoft Corporation User State Migration Tool for Windows package. Затем нажмите кнопку Далее. Then click Next.
На странице Пакет параметров найдите и выберите пакет OSD/Windows 10 x64 Settings. On the Settings Package page, browse and select the OSD / Windows 10 x64 Settings package. Затем нажмите кнопку Далее. Then click Next.
На странице Сводка просмотрите сведения и нажмите кнопку Далее. On the Summary page, review the details and then click Next.
На странице Подтверждение нажмите кнопку Готово. On the Confirmation page, click Finish.
Просмотрите последовательность задач замены. Review the Replace Task Sequence.
Эта последовательность задач содержит намного меньше действий, чем обычная последовательность задач клиента. This task sequence has many fewer actions than the normal client task sequence. Если он не кажется другим, при создании последовательности задач убедитесь, что вы выбрали шаблон последовательности клиентской замены задач. If it doesn’t seem different, make sure you selected the Client Replace Task Sequence template when creating the task sequence.
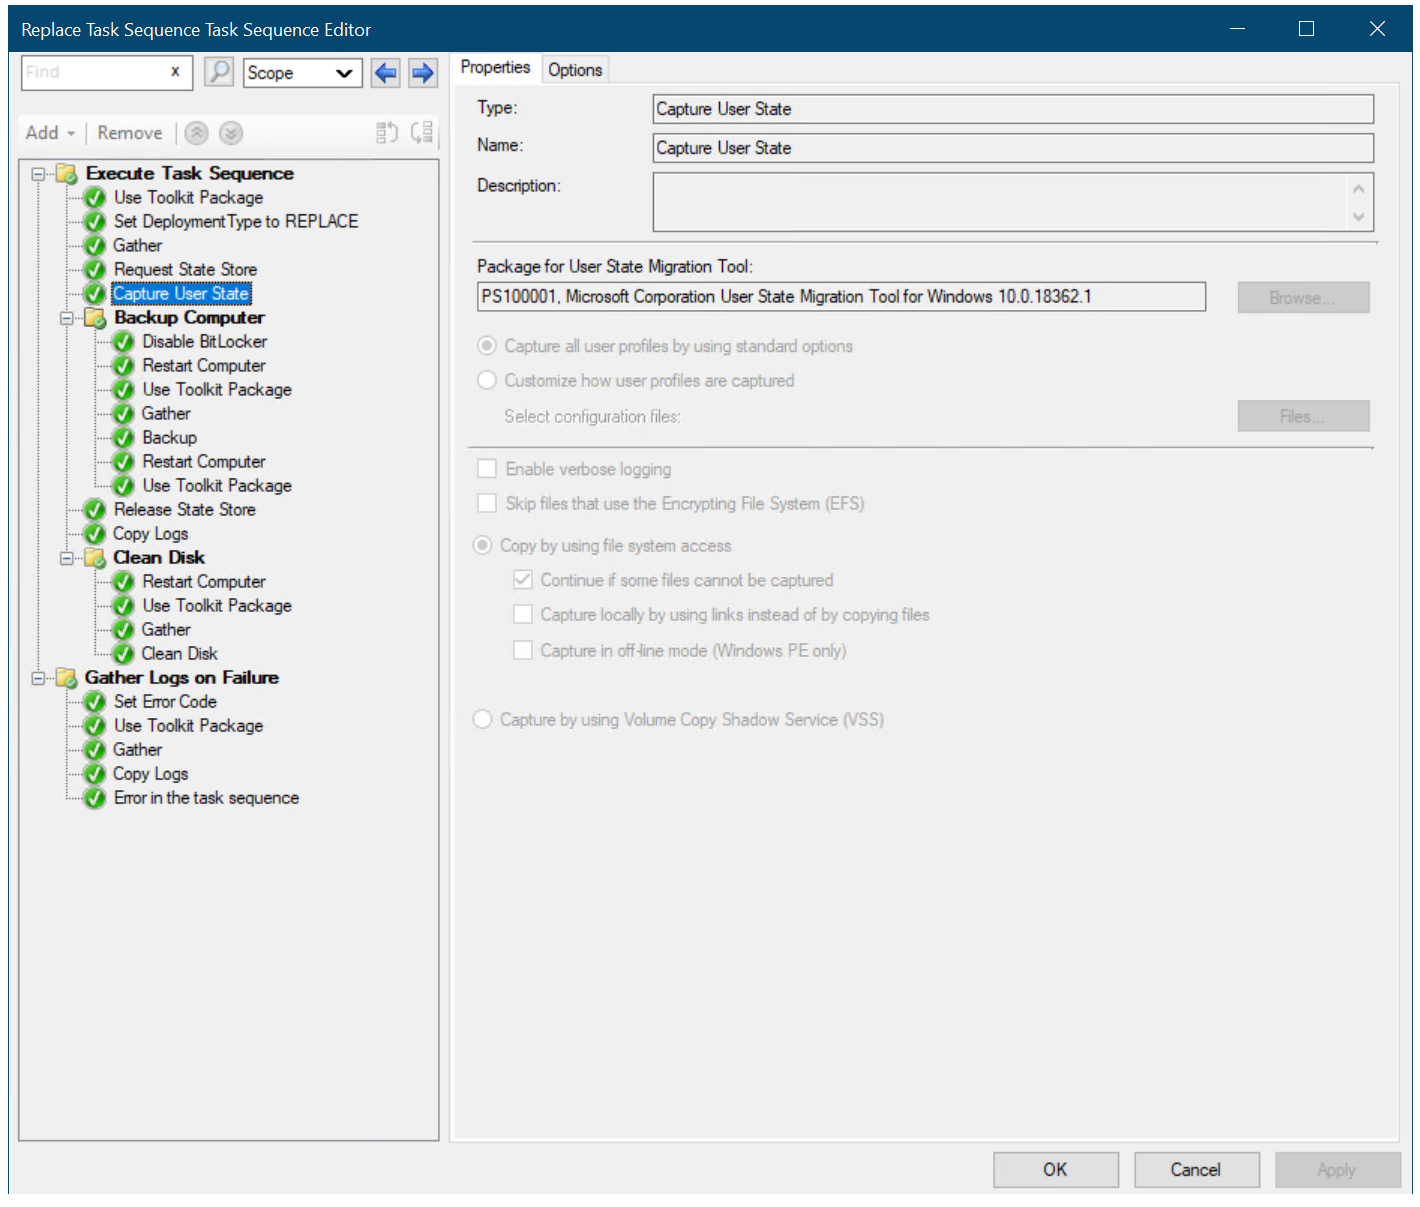
Последовательность задач только для резервного копирования (под именем «Последовательность задач замены»). The backup-only task sequence (named Replace Task Sequence).
Связывать новое устройство со старым компьютером Associate the new device with the old computer
В этом разделе вы проходите процесс связывания нового пустого устройства (PC0006) с существующим компьютером (PC0004), чтобы заменить PC0004 на PC0006. This section walks you through the process of associating a new, blank device (PC0006), with an existing computer (PC0004), for the purpose of replacing PC0004 with PC0006. PC0006 может быть либо физическим компьютером, либо виртуальной машиной. PC0006 can be either a physical or virtual machine.
На HV01 (если PC0006 является VM) или в BIOS PC0006: On HV01 (if PC0006 is a VM) or in the PC0006 BIOS:
- Обратите внимание на mac-адрес для PC0006. Make a note of the MAC address for PC0006. (Если PC0006 — виртуальный компьютер, MAC-адрес содержится в параметрах виртуального компьютера.) В нашем примере MAC-адрес PC0006 — 00:15:5D:0A:6A:96. (If PC0006 is a virtual machine, you can see the MAC Address in the virtual machine settings.) In our example, the PC0006 MAC Address is 00:15:5D:0A:6A:96. Не пытайтесь PXE загрузки PC0006 еще. Do not attempt to PXE boot PC0006 yet.
На CM01: On CM01:
С помощью консоли Configuration Manager в рабочей области Assets and Compliance щелкните правой кнопкой мышиУстройства и нажмите кнопку Импорт компьютерной информации. Using the Configuration Manager console, in the Assets and Compliance workspace, right-click Devices, and then click Import Computer Information.
На странице Выбор источника выберите Импортировать один компьютер и нажмите кнопку Далее. On the Select Source page, select Import single computer and click Next.
На странице Один компьютер введите следующие параметры и нажмите кнопку Далее: On the Single Computer page, use the following settings and then click Next:
- Имя компьютера: PC0006 Computer Name: PC0006
- MAC-адрес: MAC Address:
- Исходный компьютер: PC0004 Source Computer: PC0004
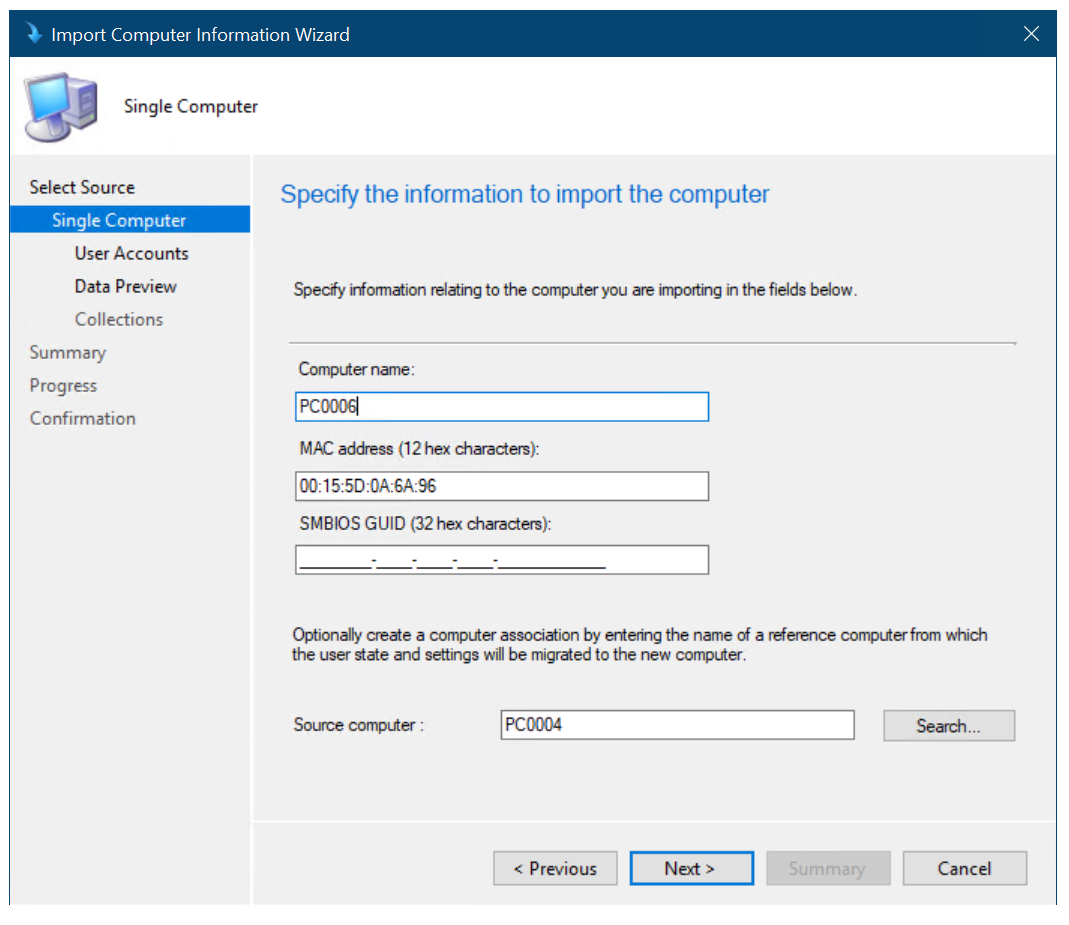
Создание связи между компьютерами PC0004 и PC0006. Creating the computer association between PC0004 and PC0006.
На странице Учетные записи пользователей выберите Записать и восстановить все учетные записи пользователей и нажмите кнопку Далее. On the User Accounts page, select Capture and restore all user accounts and click Next.
На странице Просмотр данных нажмите кнопку Далее. On the Data Preview page, click Next.
На странице Выбор дополнительных коллекций щелкните Добавить, а затем выберите коллекцию Install Windows 10 Enterprise x64. On the Choose additional collections page, click Add and then select the Install Windows 10 Enterprise x64 collection. Выберите почтовый ящик рядом с только что добавленной коллекцией Install Windows 10 Enterprise x64, а затем нажмите кнопку Далее. Now, select the checkbox next to the Install Windows 10 Enterprise x64 collection you just added, and then click Next.
На странице Сводка нажмите кнопку Далее и затем кнопку Закрыть. On the Summary page, click Next, and then click Close.
Выберите узел миграции состояния пользователя и просмотрите ассоциацию компьютера в области правой руки. Select the User State Migration node and review the computer association in the right hand pane.
Щелкните правой кнопкой мыши ассоциацию PC0004/PC0006 и нажмите кнопку Просмотр данных восстановления. Right-click the PC0004/PC0006 association and click View Recovery Information. Обратите внимание, что ключ восстановления уже назначен, а расположение хранения состояния пользователя — нет. Note that a recovery key has been assigned already, but a user state store location has not.
Просмотрите коллекцию Install Windows 10 Enterprise x64. Review the Install Windows 10 Enterprise x64 collection. Не продолжайте, пока не увидите компьютер PC0006 в коллекции. Do not continue until you see the PC0006 computer in the collection. Возможно, вам придется обновить членство и обновить коллекцию еще раз. You might have to update membership and refresh the collection again.
Создание коллекции устройств и добавление компьютера PC0004 Create a device collection and add the PC0004 computer
На CM01: On CM01:
С помощью консоли Configuration Manager в рабочей области Asset и Compliance щелкните правой кнопкой мышиколлекции устройств, а затем выберите Создать коллекцию устройств. Using the Configuration Manager console, in the Asset and Compliance workspace, right-click Device Collections, and then select Create Device Collection. Используйте следующие параметры: Use the following settings:
- Общие General
- Имя: USMT Backup (Replace) Name: USMT Backup (Replace)
- Ограниченная коллекция: все системы Limited Collection: All Systems
- Правила членства: Membership rules:
- Добавление правила: прямое правило Add Rule: Direct rule
- Класс ресурсов: системный ресурс Resource Class: System Resource
- Имя атрибута: имя Attribute Name: Name
- Значение: PC0004 Value: PC0004
- Выбор ресурсов: Select Resources:
- Выберите PC0004 Select PC0004
- Добавление правила: прямое правило Add Rule: Direct rule
Используйте параметры по умолчанию для оставшихся страниц мастера, а затем нажмите кнопку Закрыть. Use default settings for the remaining wizard pages, then click Close.
Просмотрите коллекцию резервного копирования (замены) USMT. Review the USMT Backup (Replace) collection. Не продолжайте, пока не увидите компьютер PC0004 в коллекции. Do not continue until you see the PC0004 computer in the collection.
Создание нового развертывания Create a new deployment
На CM01: On CM01:
С помощью консоли Configuration Manager в рабочей области библиотеки программного обеспечения разверни операционные системы, выберите последовательности задач, щелкните правой кнопкой мыши Заменитепоследовательность задач, а затем выберите Развертывание. Using the Configuration Manager console, in the Software Library workspace, expand Operating Systems, select Task Sequences, right-click Replace Task Sequence, and then select Deploy. Используйте следующие параметры: Use the following settings:
- Общие General
- Коллекция: USMT Backup (Replace) Collection: USMT Backup (Replace)
- Параметры развертывания Deployment Settings
- Цель: доступно Purpose: Available
- Сделать доступной для: только клиенты Configuration Manager Make available to the following: Only Configuration Manager Clients
- Расписание Scheduling
- Взаимодействие с пользователем User Experience
- Оповещения Alerts
- Точки распространения Distribution Points
Проверка резервного копирования Verify the backup
В этом разделе предполагается, что у вас есть компьютер с именем PC0004 с установленным клиентом Configuration Manager. This section assumes that you have a computer named PC0004 with the Configuration Manager client installed.
На PC0004: On PC0004:
Если она еще не запущена, запустите компьютер PC0004 и откройте панель управления Configuration Manager (управление smscfgrc). If it is not already started, start the PC0004 computer and open the Configuration Manager control panel (control smscfgrc).
На вкладке Действия выберите цикл & машинной политики , нажмите кнопку Выполнитьсейчас, а затем нажмите кнопку ОК в всплывающее диалоговое окно, которое отображается. On the Actions tab, select Machine Policy Retrieval & Evaluation Cycle, click Run Now, and then click OK in the popup dialog box that appears.
Можно также использовать функцию «Уведомление клиента» в консоли Configuration Manager, как показано в разделе Восстановление клиента Windows 7 SP1 с развертыванием Windows 10 при помощи Configuration Manager. You also can use the Client Notification option in the Configuration Manager console, as shown in Refresh a Windows 7 SP1 client with Windows 10 using Configuration Manager.
Откройте Центр программного обеспечения, выберите развертывание заменить развертывание последовательности задач и нажмите кнопку Установите. Open the Software Center, select the Replace Task Sequence deployment and then click Install.
Подтверди, что вы хотите обновить операционную систему на этом компьютере, нажав кнопку Установить еще раз. Confirm you want to upgrade the operating system on this computer by clicking Install again.
Дождитесь завершения последовательности задач замены. Allow the Replace Task Sequence to complete. Компьютер PC0004 собирает данные пользователей, загружается в Windows PE и собирает больше данных, а затем загружается обратно в полную ОС. The PC0004 computer will gather user data, boot into Windows PE and gather more data, then boot back to the full OS. Весь процесс должен занять всего несколько минут. The entire process should only take a few minutes.
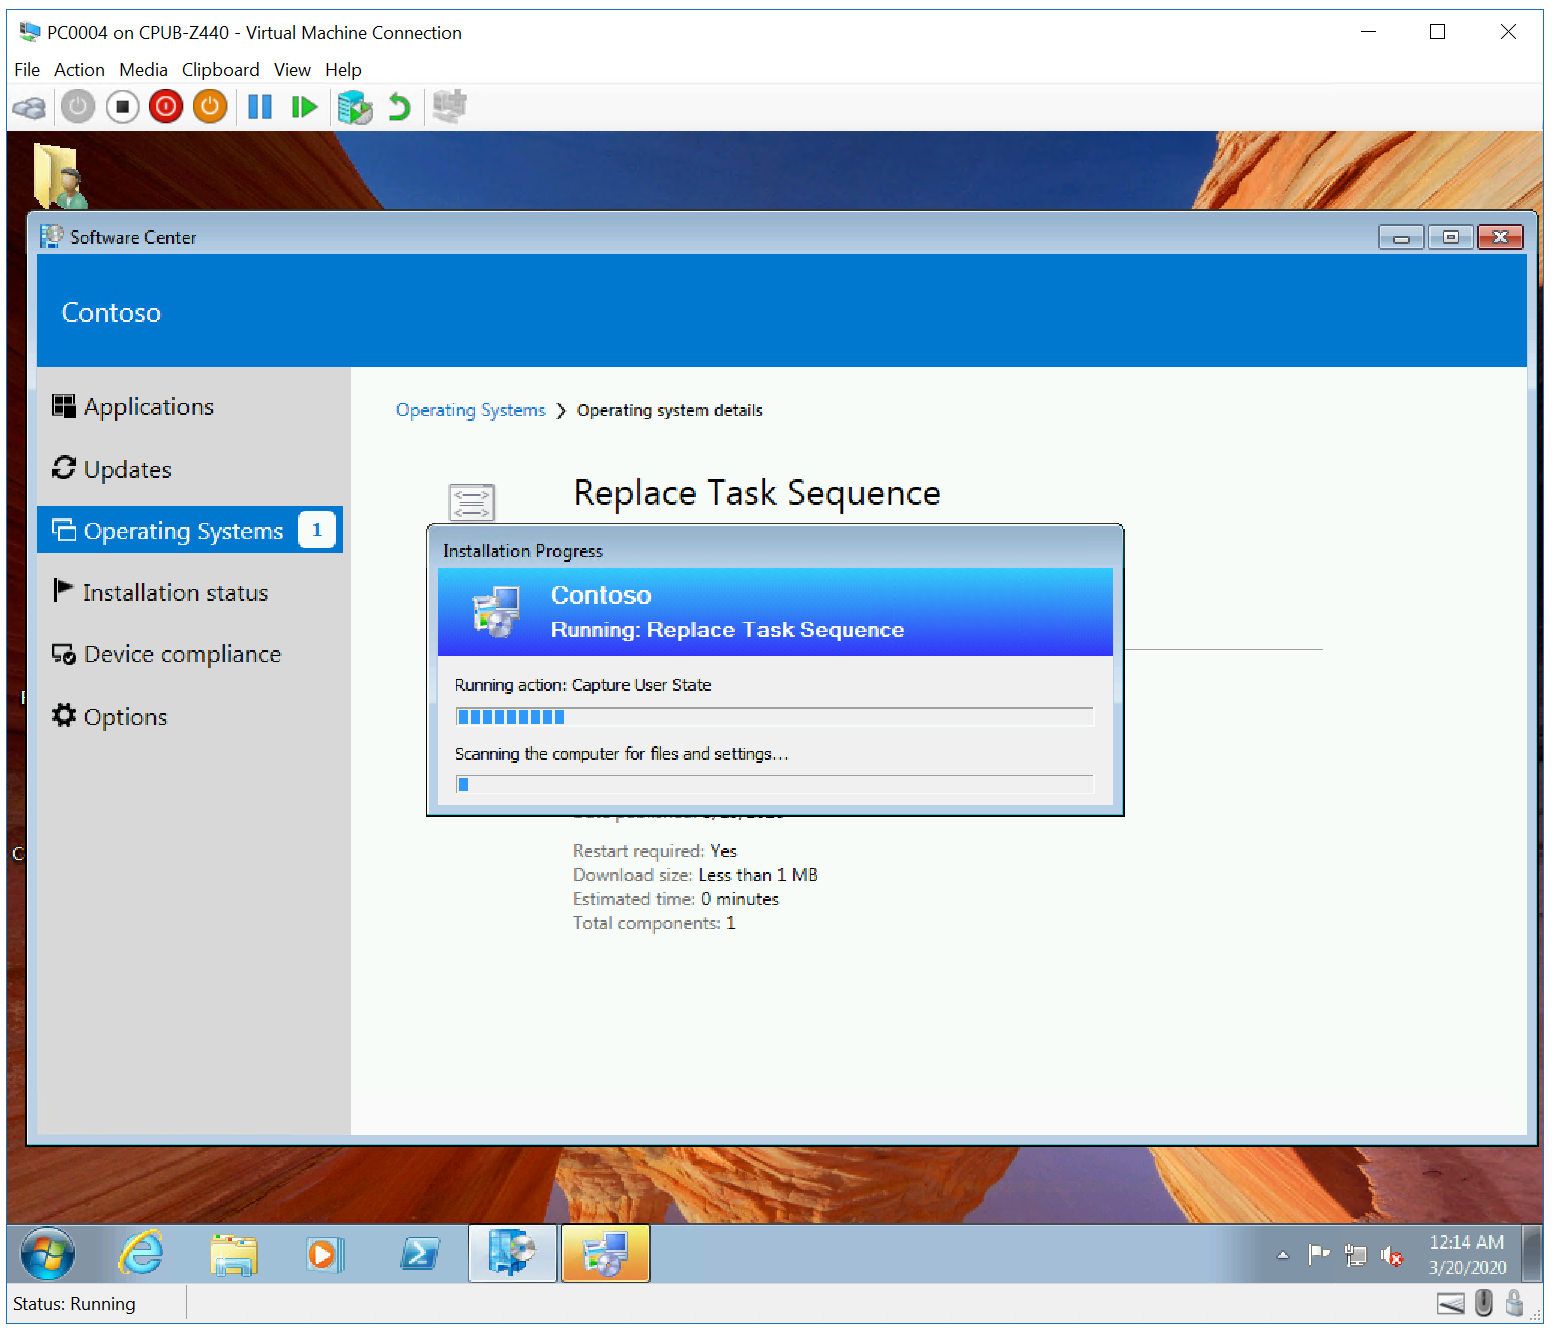
Захват состояния пользователя Capturing the user state
На CM01: On CM01:
Откройте папку хранения точеи миграции состояния (например: D:\Migdata) и убедитесь, что была создана папка, содержащая резервную копию USMT. Open the state migration point storage folder (ex: D:\Migdata) and verify that a sub-folder was created containing the USMT backup.
С помощью консоли Configuration Manager в рабочей области Assets and Compliance выберите узел миграции состояния пользователя, щелкните правой кнопкой мыши ассоциацию PC0004/PC0006 и выберите сведенияо восстановлении представления. **** Using the Configuration Manager console, in the Assets and Compliance workspace, select the User State Migration node, right-click the PC0004/PC0006 association, and select View Recovery Information. Обратите внимание, что объекту теперь также назначено расположение хранения состояния пользователя. Note that the object now also has a user state store location.
Заполнение расположения хранения состояния пользователя может занять несколько минут. It may take a few minutes for the user state store location to be populated.
Развертывание нового компьютера Deploy the new computer
На PC0006: On PC0006:
Запустите виртуальную машину PC0006 (или физический компьютер), нажмите F12 на загрузку среды предварительного выполнения загрузки (PXE) по запросу. Start the PC0006 virtual machine (or physical computer), press F12 to Pre-Boot Execution Environment (PXE) boot when prompted. Загрузите среду предустановки Windows (Windows PE) и выполните мастер развертывания со следующими параметрами: Allow it to boot Windows Preinstallation Environment (Windows PE), and then complete the deployment wizard using the following settings:
- Пароль: pass@word1 Password: pass@word1
- Выберите последовательность задач для выполнения на данном компьютере: Windows 10 Корпоративная x64 RTM Select a task sequence to execute on this computer: Windows 10 Enterprise x64 RTM
Запустится программа установки и выполнит следующие действия. The setup now starts and does the following:
- Установка операционной системы Windows 10 Installs the Windows 10 operating system
- Установка клиента Configuration Manager Installs the Configuration Manager client
- Его присоединение к домену Joins it to the domain
- Установка приложений Installs the applications
- Восстановление резервной копии PC0004 Restores the PC0004 backup
По завершению процесса в домене будет восстановлен новый компьютер Windows 10 с восстановленными пользовательскими данными и настройками. When the process is complete, you will have a new Windows 10 computer in your domain with user data and settings restored. См. следующие примеры: See the following examples:


