- How to Reset Windows 7 Password Using Command Prompt
- Way 1: Reset Windows 7 administrator password with command on accessible computer
- Way 2: Reset Windows 7 password with command prompt in safe mode
- Way 3: Reset Windows 7 password with command prompt on login screen
- How to Repair Windows 10 Using Command Prompt (5 Ways)?
- How do I repair Windows 10 with command prompt?
- Method 1. How to repair Windows 10 using SFC?
- Method 2. How to repair Windows 10 using DISM?
- Method 3. How to reset Windows 10 with command line?
- Method 4. How to run system restore with command prompt?
- Method 5. How to repair Windows 10 with AOMEI.exe?
How to Reset Windows 7 Password Using Command Prompt
Do you know command prompt can be run in different cases in Windows 7 computer and reset Windows 7 login password effectively? If you have no idea, please learn to run Command Prompt here in three cases. Then you would get 3 effective ways to reset Windows 7 password using Command Prompt.
Way 1: Reset Windows 7 administrator password with command on accessible computer
While you have accessed computer with administrator, now just open command prompt with it in Windows 7. If not, you can switch to log in Windows 7 with admin account at first and then run command prompt, or run command prompt with built-in administrator instead.
1. Click Start and type «cmd» in search box, then right-click «cmd.exe» and Run as administrator.
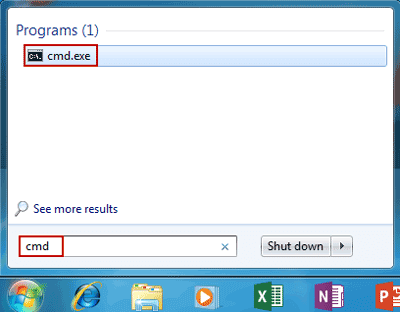
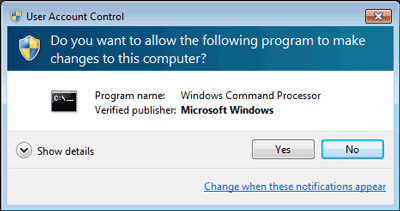
2. Click Yes on pop-up UAC dialog and successfully run Command Prompt.
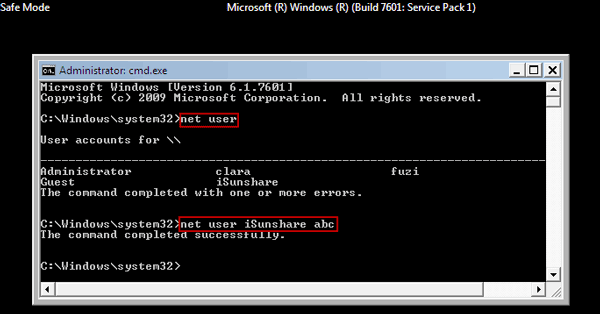
3. Enter net user command to reset Windows 7 administrator password.
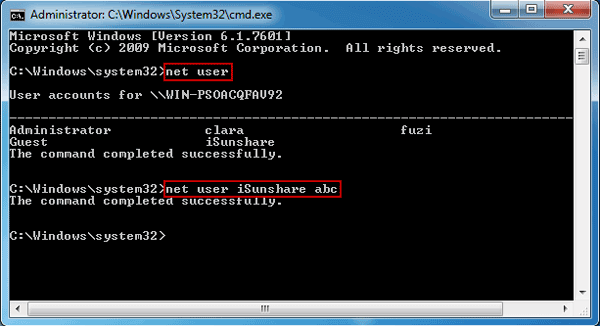
If you don’t know what the Windows 7 user accounts are, type command net user firstly to view all the user accounts. Then change password for specified user account. For example, if you want to create new password for user «iSunshare», just need to enter command «net user iSunshare newpassword» and press Enter. From then on, when log in Windows 7 with user «iSunshare», you have to enter its new password.
Way 2: Reset Windows 7 password with command prompt in safe mode
While Windows 7 computer cannot start normally, or you just want to run Windows 7 in safe mode to use command prompt, follow this way.
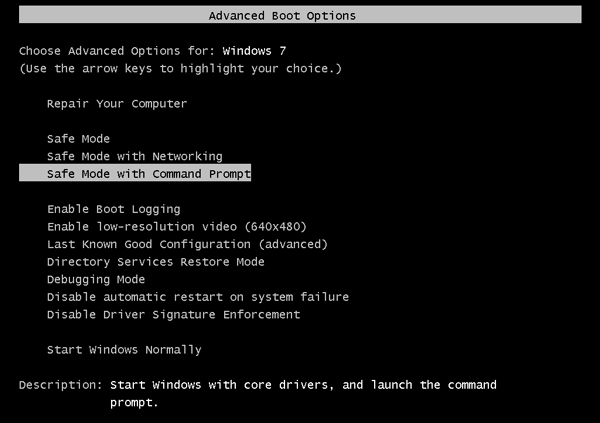
Step 1: Start computer and press F8 while the computer boots up.
Step 2: When Advanced Boot Options screen appears, select Safe Mode with Command Prompt and press Enter. Then your computer will start in safe mode with command prompt.
Step 3: Run command prompt with default Administrator privileges.
Generally, Administrator is disabled and has no password protection by default. So usually you don’t need to choose Administrator and enter its password. But if you see, please select Administrator on login screen and enter command prompt. Then Command Prompt will be run as Administrator automatically.
Step 4: Reset Windows 7 password with command prompt just like way 1 on accessible computer.
Note:
If this way still cannot help you to reset Windows 7 password using command prompt because of built-in administrator password forgot, please try way 3 or get effective Windows 7 Password Genius to directly remove Windows 7 forgotten password from locked computer.
Way 3: Reset Windows 7 password with command prompt on login screen
If Windows 7 computer is locked, can command prompt be run to reset Windows 7 forgotten password? The answer is yes, but the operation will be a little complicated. Now this way will walk you through how to reset forgotten password with command prompt on locked Windows 7 computer step by step. If you want a software to reset Windows 7 password easily, please see Reset Admin Password for Windows 7 with Recovery Tool.
Step 1: Force power off your computer.
Start your computer and when you see it saying Starting Windows. Hold down the Power button for at least 5 seconds to force power off your computer.
Step 2: Restart computer and choose «Launch Startup Repair (Recommended)».
Next time, when you power on your computer, two options will be available, launch startup repair and start normally. If you have no admin password to access computer, please choose the recommended option.
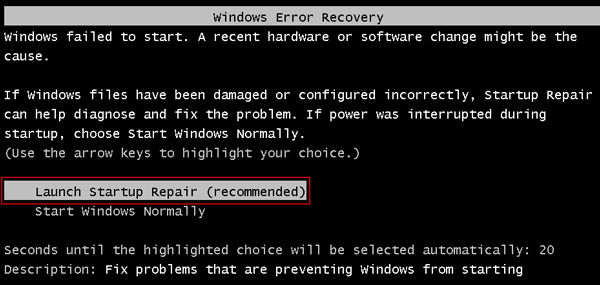
Note: Startup Repair will boot up and when it asks if you want to restore computer, click «Cancel» button.
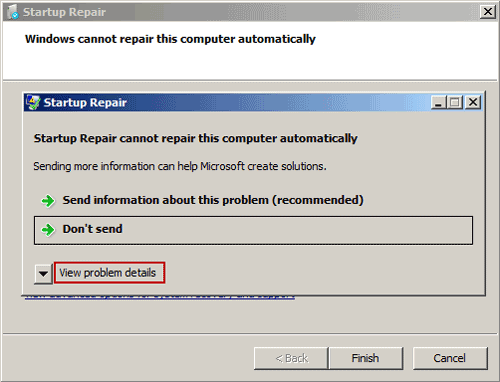
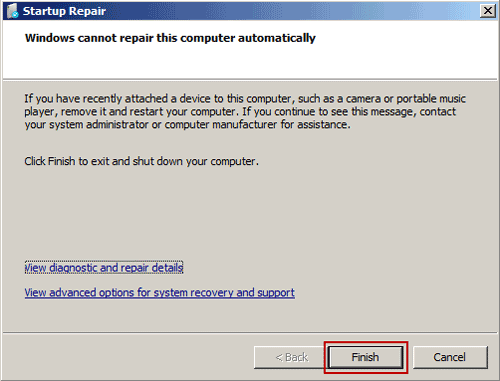
Step 3: Click on «View problem details» while Startup Repair cannot repair computer automatically.
Startup Repair tool automatically checks the system problems and tries to fix them. After a long time, you will get a dialog saying that Startup Repair cannot repair this computer automatically. Click on View problem details.
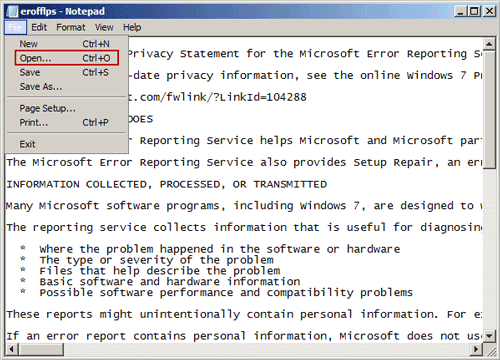
Step 4: Pop up «File Open» dialog by opening Microsoft’s offline privacy statement in notepad.
1. Click the last link to read Microsoft’s offline privacy statement in notepad.
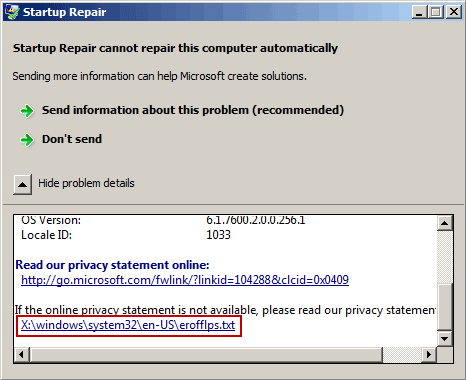
2. Click on the File menu and Open in notepad. Then File Open dialog box would pop up.
Step 5: Run command prompt instead of Sticky Keys application on login screen.
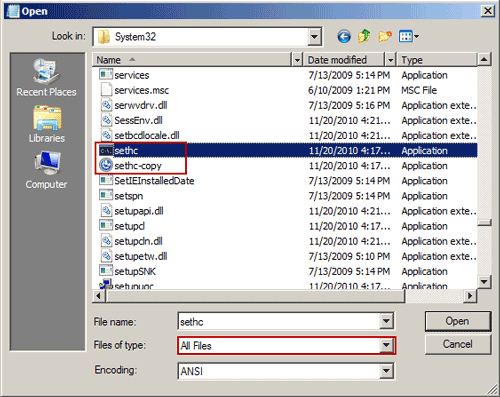
1. Change the File of type option to All Files and browse to C:\windows\system32\sethc.exe. Rename this file as a backup, just like «sethc-copy«.
2. Find the cmd.exe file in the same folder and rename it to sethc.exe.
3. Close all the dialogs, click Finish button and computer restarts.
4. Once go to Windows 7 login screen, hit the Shift key 5 times and Command Prompt will be opened instead of Sticky Keys application.
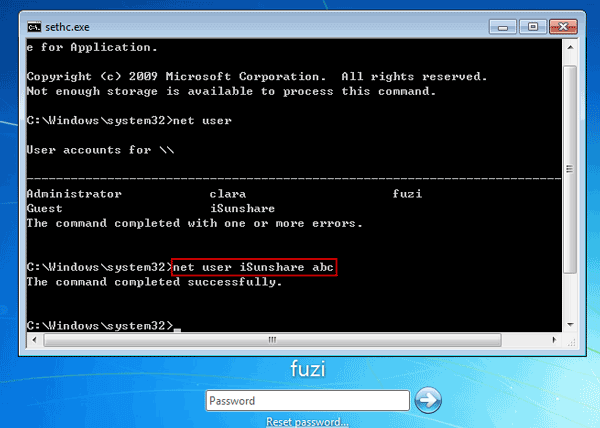
Step 6: Reset Windows 7 password with command prompt.
After Windows 7 password reset with command line, you can follow step 1-5 again to restore sethc.exe and cmd.exe.
Tips:
Command Prompt used above applies to all Windows 7 user password reset, because there is only local user available in Windows 7 computer. But if you have upgraded Windows 7 to Windows 8/10, and Microsoft account is used on computer, the command prompt would still only work for local account, but not Microsoft account. So if you want to reset forgotten Microsoft account password, just could take other ways, such as Windows Password Genius Advanced or Microsoft account password reset page.
How to Repair Windows 10 Using Command Prompt (5 Ways)?
When your computer won’t work properly, you can learn how to repair Windows 10 using command prompt from this article.

By AOMEI  / Last Updated March 9, 2021
How do I repair Windows 10 with command prompt?
When there is some problem happens to Windows, you can repair your windows with some basic repair like Windows directory repair, boot directory repair. When the error is too serious, you can run advanced repair like system restore. For Windows 10, you can also use DISM command line utility to repair Windows 10 image. Next, this article will introduce you how to repair Windows 10 using command prompt with five methods.
Method 1. How to repair Windows 10 using SFC?
SFC (System File Checker) is a command-line utility that can scan for corruption in Windows system files and replace any corrupted or missing protected system files with a known good version. When you feel buggy with your computer or notice problems during boot, you can use SFC to diagnose problems and repair it.В
To repair Windows 10 using SFC with detailed steps:
1. Open «Start», search for the Command Prompt, select it and run as administrator.
2. Then type the command: «sfc /scannow» and press «Enter».
If SFC is unable to fix the problem, probably the utility cannot get the necessary files from the Windows image, which might have become broken. In this situation, you can use DISM to repair the Windows image.
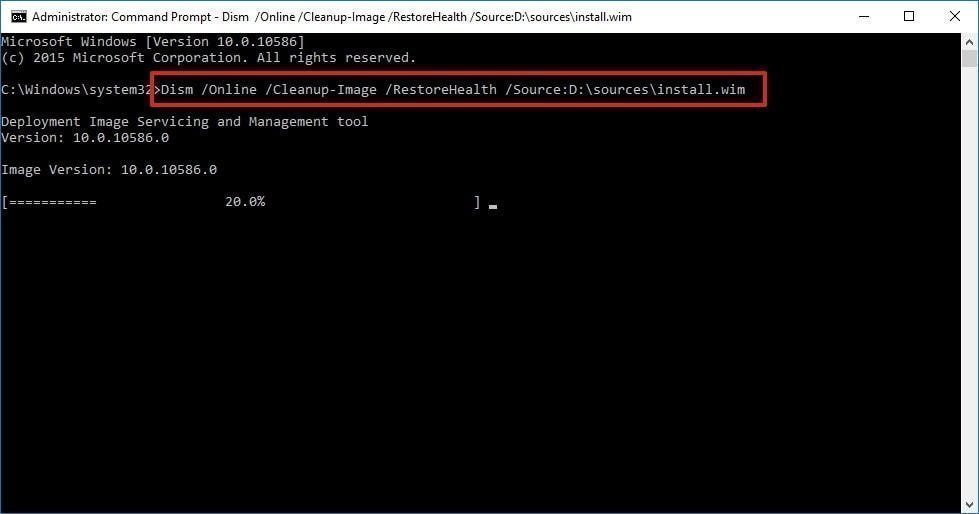
Method 2. How to repair Windows 10 using DISM?
Windows 10 includes a command-line utility known as DISM (Deployment Image Servicing and Management). DISM command Windows 10 can be used to repair and prepare Windows images, including, Windows Setup, Windows Recovery Environment, and Windows PE. Also, DISM can be used to fix the recovery image within an installation of the operating system.
To repair Windows 10 using DISM commands:
To check whether there is any corruption, Run command line as administrator, then type the following syntaxВ and press «Enter».
DISM /Online /Cleanup-Image /CheckHealth
To scan the Windows image for any corruption, type below command and hit «Enter».
DISM /Online /Cleanup-Image /ScanHealth
To fix Windows image, type the following command and hit «Enter».
DISM /Online /Cleanup-Image /RestoreHealth /Source:repairSource\install.wim
Method 3. How to reset Windows 10 with command line?
To reset Windows 10 with «Reset this PC», follow the instructions below:
Type “systemreset -cleanpc” in an elevated command prompt and press «Enter».В (If your computer cannot boot, you can boot into recovery mode and select «Troubleshoot», and then choose «Reset this PC».)
Method 4. How to run system restore with command prompt?
If the problem is too severe, you can try to restore your Windows 10 to the previous state as long as you have enabled system restore. But, it willВ notВ restoreВ documents, music, emails, or personal files of any kind. If this is what you need, see below.
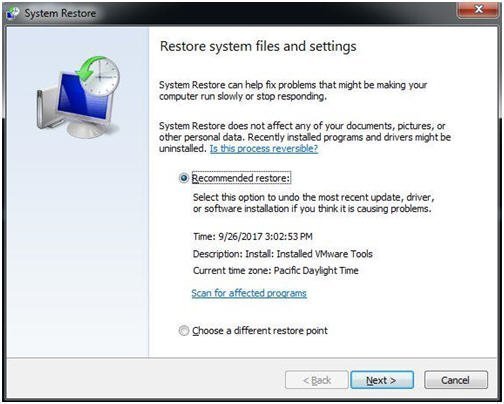
To run system restore in safe mode, follow the steps below:
1. Start your computer and press «F8» repeatedly until the Windows advanced options menu appears.
2. Click «Safe Mode with command prompt» and press «Enter». If your computer can boot normally, type «cmd» in the search box and click «Command Prompt» to continue.
3. Sign in using an administrator account if needed. Once the command prompt is showing, enterВ «rstrui.exe» at first in the Command Prompt Window andВ press «Enter» to continue.
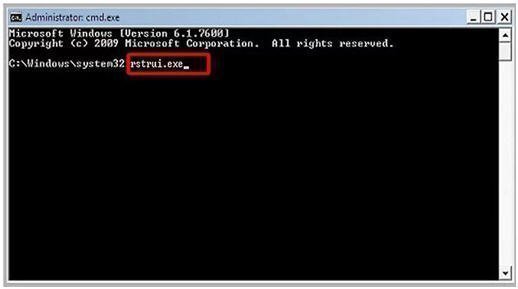
4. This command will bring you to the interface of System Restore. You can either use the recommended restore point or click «Next» to choose an available restore point. Then, follow the instruction to complete system restore.
Method 5. How to repair Windows 10 with AOMEI.exe?
Besides system restore, you can also repair Windows 10 with AOMEI.exe. AOMEI Backupper is a reliable backup and restore software which is designed for Windows 10/8/7/XP/Visa. You can either backup and restore from graphic users interface or command line. It has some features that Windows built-in tool does not have. For example, you can use AOMEI Backupper to create incremental backup, and you can restore to a dissimilar hardware.
Suppose you have created system image backup with AOMEI Backupper. Before restoring system, you can use a utility named Check Image to check if system image backup is intact and without error.В
Then, use the following steps to restore windows 10 with AOMEI.exe:
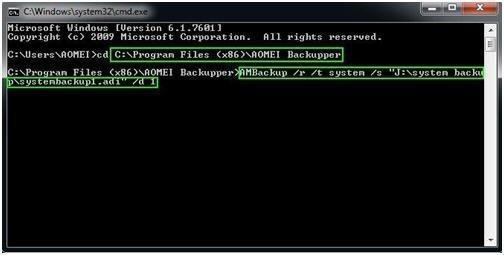
1. Navigate to AOMEI Backupper installation directory by typing the following command in command line and press «Enter». For example: cd C:\Program Files (x86)\AOMEI Backupper.
Note: If you run this command under Windows PE environment, the drive letters might change.
2. Run the following command to start restore: AMBackup /r /t [backup type] /s «[backup location path]» /d [destination location]. For example: To restore the system backup saved in J:\systembackup1 to disk 1. You should type the command: AMBackup /r /t system /s “J:\system backup\systembackup1.adi” /d 1
Tip: If you need to restore to another computer, AOMEI Backupper «Universal Restore» feature can make this very easy. For example: Run system restore in the image named «systembackup1.adi» to the partition 0 on disk 0 and perform a universal restore. AMBackup /r /t system /s «D:\system backup\systembackup1.adi» /d 0:0 /x
Now you have learned how to repair Windows 10 using command line with five methods. You can choose one based on your preference. It is also suggested to keep backup software AOMEI Backupper installed on your computer to provide continuous protection (try 30-day free trial).В
Also, you can find «Recovery Environment» utility in «Tools» toВ enable the boot option of AOMEI Backupper recovery environment. When system crashes, it enables you to perform backup/restore from boot easily.
If you want to protect unlimited computers within your company, you can pick AOMEI Backupper Technician. With the inbuilt AOMEI Image Deploy tool, you are also allowed to deploy/restore system image file on server-side computer to multiple client-side computers over network.


