- Freely and Easily Change Partition Size in Windows 10
- Why change partition size in Windows 10?
- How to resize partition in Windows 10 (3 ways)?
- Change partition size within Disk Management
- Resize partition via Diskpart
- Change partition size via a free yet powerful tool
- Conclusion
- How to change partition size in Windows 10
- Change partition size with Windows 10 Disk Management
- How to decrease partition size in Windows 10:
- How to increase partition size in Windows 10:
- Adjust partition size with partition editor
- Take care of data while resizing disk partition
- Resize-Partition
- Syntax
- Description
- Examples
- EXAMPLE 1
- Parameters
Freely and Easily Change Partition Size in Windows 10
You can easily change partition size in Windows 10 via Disk Management, Diskpart utility or a free and easy-to-use partition manger – AOMEI Partition Assistant Standard.

By AOMEI  / Last Updated October 16, 2019
Why change partition size in Windows 10?
As times goes, you might be unsatisfied with the current size of the hard drive partition and want to resize partition in Windows 10 under different situations:
A partition like Partition C (system drive) is allocated with small capacity and it is almost running out of space. To avoid the possible follow-up issues, you may want to extend the partition.
A partition is too large. It is possible that there is only one partition on your large hard drive. To manage data better, it’s wise to shrink the partition and create new partition with the unallocated space.
Whatever the reasons, you can find out a proper way to resize your partition in Windows 10 in the following content.
How to resize partition in Windows 10 (3 ways)?
Pick up one method about changing hard drive partition size in Windows 10 based on the specific condition.
Change partition size within Disk Management
Disk Management is a built-in tool in Windows 10, which is able to shrink/extend/create/delete/format partition. With this tool, you should shrink partition to gain unallocated space or extend the partition with contiguous unallocated space.
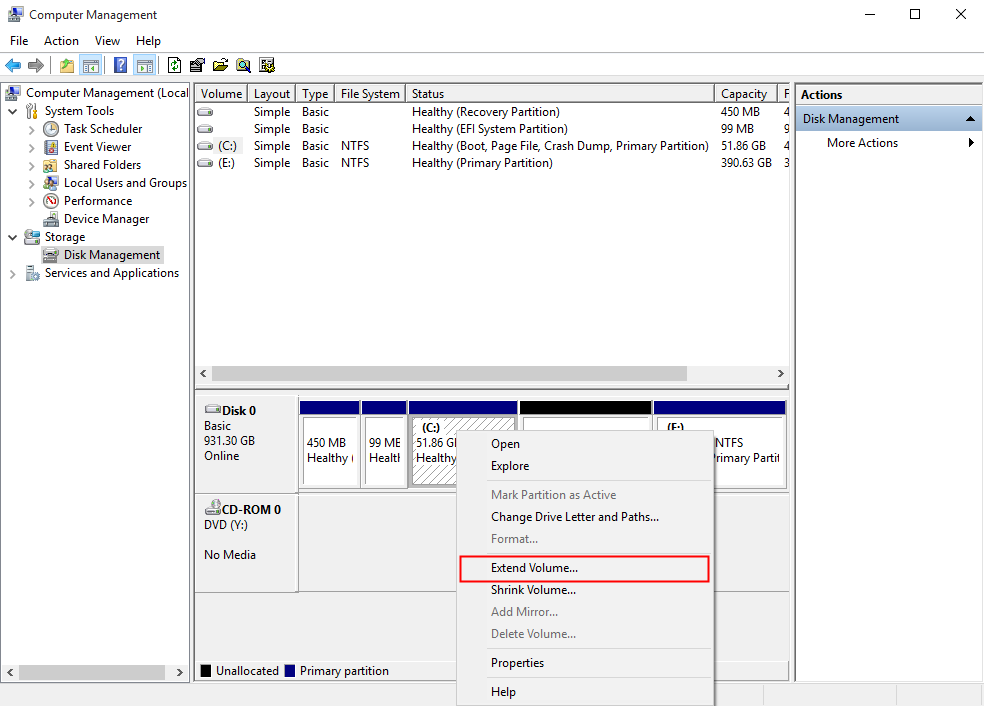
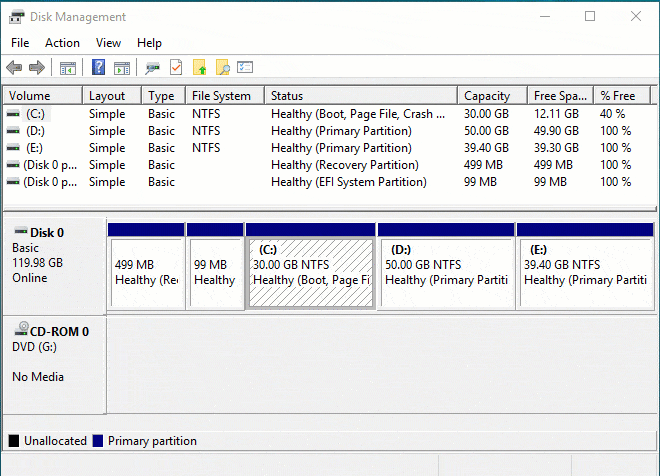
1. Press Windows + R, input “diskmgmt.msc” and hit Enter key to open Disk Management.
2. In Disk Management, right click the partition that you want to extend or shrink.
3. In the pop-up menu, choose Extend Volume or Shrink Volume and follow the wizard to complete the operation.
Notices:
Extend Volume will be greyed out if there is no adjacent unallocated space behind the partition that you want to extend.
You might be unable to shrink C drive out of unmovable files, even when it has free space.
Resize partition via Diskpart
It is also available to increase or decrease partition capacity via Diskpart utility. Here are detailed steps:
1. Press Windows + R simultaneously, input “diskpart” and click OK.
2. Type” list disk” and hit Enter.
3. Input “select disk n” and press Enter key. (n is the number that holds the partition that you want to resize.)
4. Run “list partition” command.
5. Run “select partition m” command. (m refers to the number of the disk that you need to extend or shrink.
To extend the partition, input “extend size = x” and press Enter (x is the size in MB that you want to add to the partition).
To shrink partition in Windows 10, input “shrink desired=x” and hit Enter (y is the size in MB that you want to shrink the partition by).
Note: To extend partition, please ensure that there exists a contiguous unallocated space behind the partition that going to be extended; otherwise, you can’t extend the partition.
Change partition size via a free yet powerful tool
When it is not available to get an unallocated space behind the partition that you are going to extend, it is time to employ a trusted and full-featured partition manager – AOMEI Partition Assistant Standard, specially designed for Windows system. It can work under Windows 10/8.1/8/7, XP and Vista.
It allows you to extend partition with non-adjacent unallocated space without data loss via Merge Partitions function and enables you to shrink partition beyond its half size. Free download it and have a look at how it works.
Step 1. Install and run the software. Right click the partition (here is D drive)that you want to shrink and choose Resize Partition.
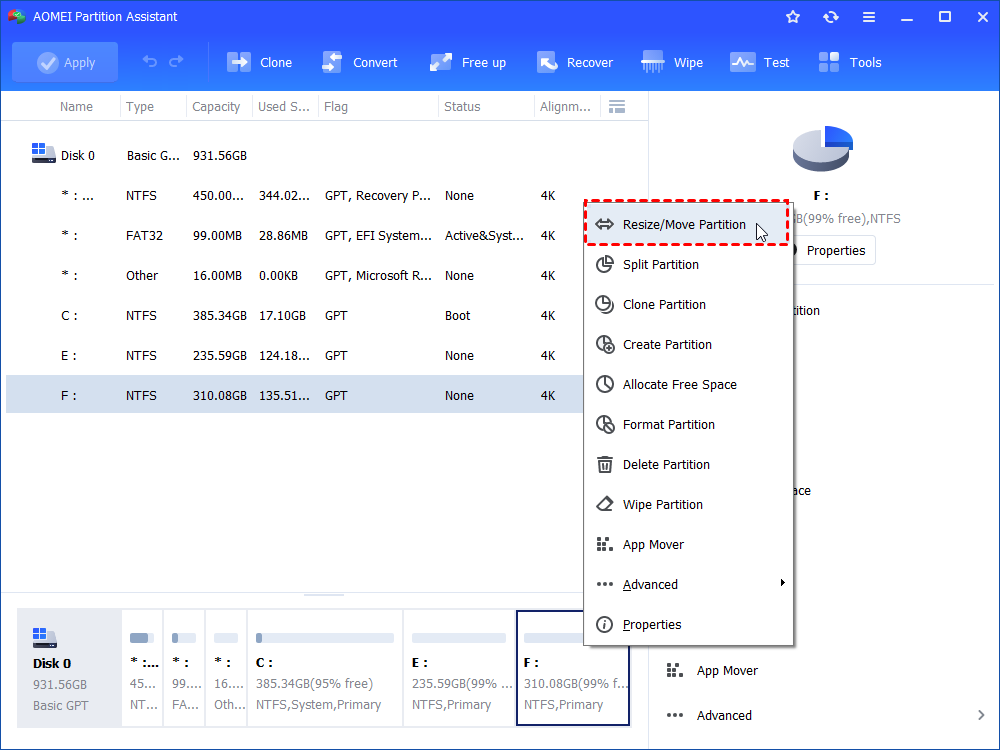
Step 2. In the pop-up window, drag leftward to shrink the partition. Then, click OK.

Step 3. Then, there will be an unallocated space on the hard drive. To extend C drive, right click it and choose Merge Partitions.
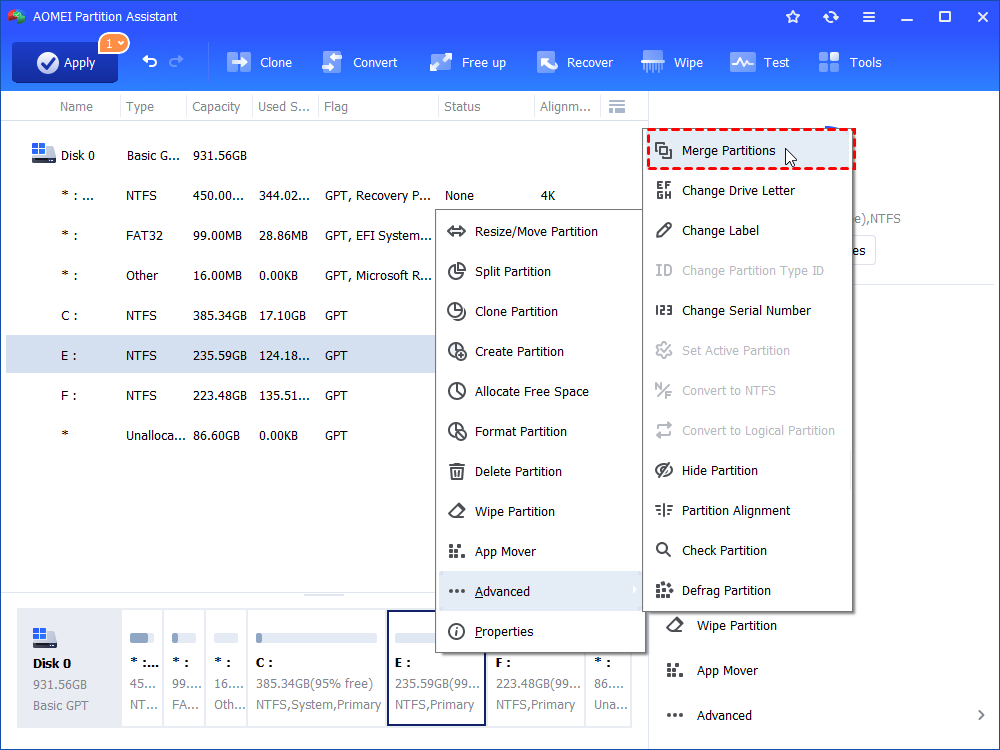
Step 4. Tick C drive and Unallocated. Then, click OK.
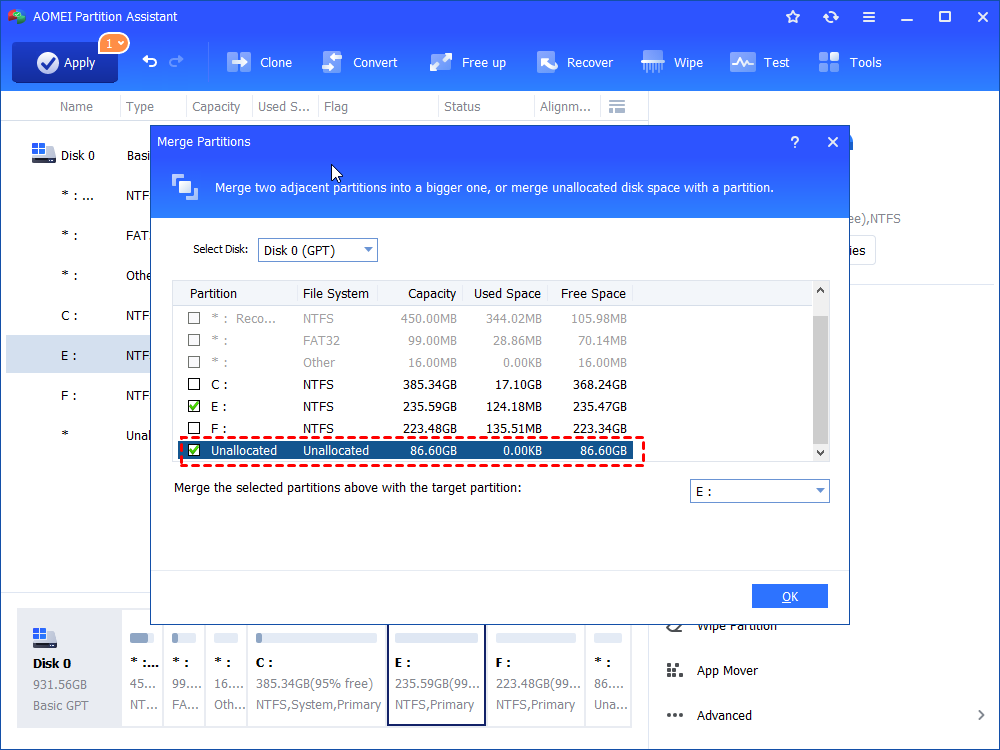
Step 5. Back to the main interface, click Apply and Proceed to execute operation.

PS.:
If the hard drive has unallocated space, you can skip Step 1 and Step 2.
You can upgrade AOMEI Partition Assistant Standard to Professional version and you can use more functions, such as allocating free space, quick partition, partition recovery, etc.
Conclusion
It’s easy to change partition size in Windows 10 and you can choose a proper way from what aforementioned. If your current hard disk is too small, it is not practical to fix partition full issue completely. You can choose to replace your current small disk with a larger one.
How to change partition size in Windows 10
by Andy, Updated on: March 1, 2021
This article introduces how to change partition size for Windows 10 computer without losing data. Resize disk partition with native Disk Management and partition editor software.
When system C drive is running out of space, nobody wants to start from scratch, so many people search by Google to find a better way. In technical forums, many people have similar questions such as:
- Is it possible to change partition size in Windows 10 without reinstalling OS.
- Is it safe to re-size partition and which tool is better to change allocated partition size.
The answer is definitely yes. To change volume size in Windows 10 laptop and desktop, there are 2 options: Windows built-in Disk Management and third party partition editor software. Because of many shortages, Disk Management is not the best tool to change partition size.
Change partition size with Windows 10 Disk Management
Windows 10 Disk Management inherited Shrink Volume and Extend Volume functions from previous version. Shrink Volume can decrease the size of both system C drive and data volumes. Extend Volume can increase size of a drive when there is adjacent Unallocated space. Both functions are safe to change partition size in Windows 10 (32 & 64 bit).
However, if you want to extend a volume by shrinking another one, Disk Management cannot help you, learn why.
How to decrease partition size in Windows 10:
- Press Windows and X on the keyboard and select Disk Management from the list.
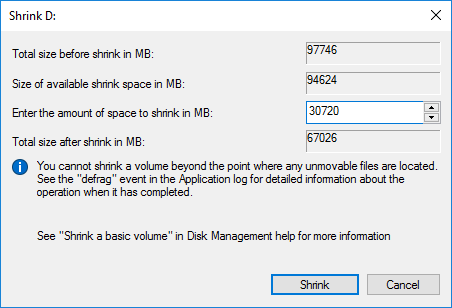
- Right click the drive you want to decrease and select Shrink Volume.
- Enter the amount of space (1024MB=1GB) and click Shrink to execute.
This drive will be shrunk within a short time in most cases.
Restrictions of Shrink Volume function:
- Only NTFS partition can be shrank, FAT32 and other types of volumes are not supported.
- Unallocated space can only be generated on the right side.
- Sometimes you can only shrink little space because of some unmovable files are located, even though there is large amount of free space in this drive.
How to increase partition size in Windows 10:
Only when your disk drive configuration meet the requirements below, Extend Volume is workable to increase partition size.
- There must be adjacent Unallocated space on the right side of the drive that you want to extend. If there’s no such Unallocated space, you must delete the right contiguous partition.
- The drive that you want to extend must be formatted with NTFS, FAT32 and other types of partitions are not supported.
- On MBR disk, the partitions to be deleted and extended must be the same Primary or Logical drive. Otherwise, you still cannot extend partition after deleting the right contiguous one.
To increase volume size with Disk Management:
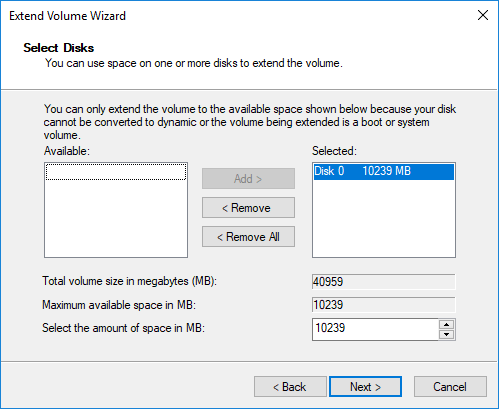
- Right click the NTFS partition that has right adjacent Unallocated space and select Extend Volume.
- Simply click Next in the pop-up Extend Volume Wizard window.
- Click Next to use default selected disk and space, or change manually.
- Click Finish to execute.
Adjust partition size with partition editor
Comparing with Windows 10 Disk Management, NIUBI Partition Editor has advantages while resizing partition, for example:
- Both NTFS and FAT32 partitions are supported to shrink and extend.
- Unallocated space can be made on either left or right when shrinking a drive.
- Partitions can be extended via 1 step with adjacent Unallocated space on either side.
- Unallocated space can be moved and combined to any nonadjacent partition on the same disk.
- If there is not plenty of space in the same disk, NIUBI can copy to a larger one and extend partition with extra space.
How to change partition size in Windows 10 with NIUBI Partition Editor:
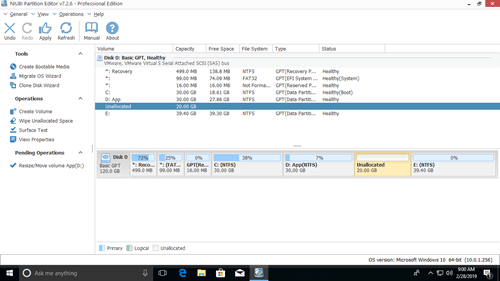
Download this program and you’ll see all disk partitions with structure and other information. In my test computer, there are drive C, D, E and system reserved partitions.
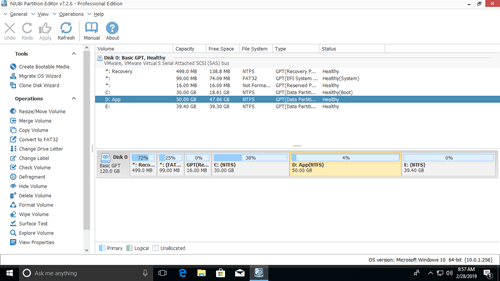
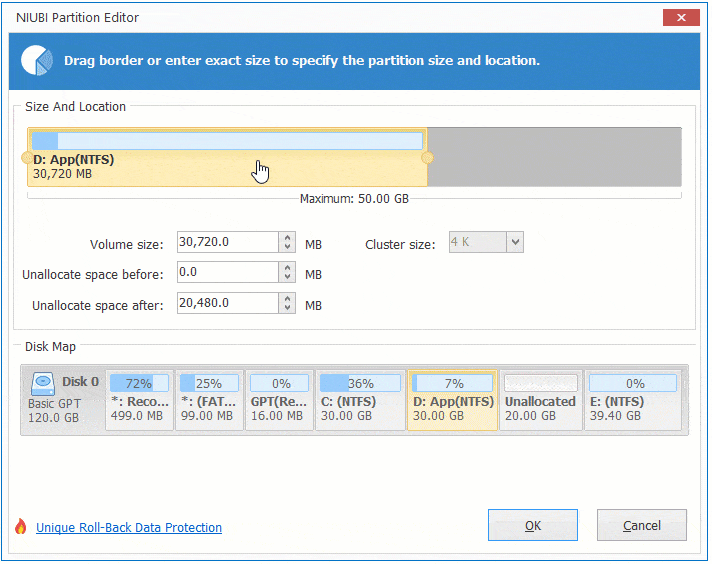
There are two options when decrease partition size, right click this partition (here is D:) and select «Resize/Move Volume».
Option 1: If you drag left border towards right in the pop-up window,
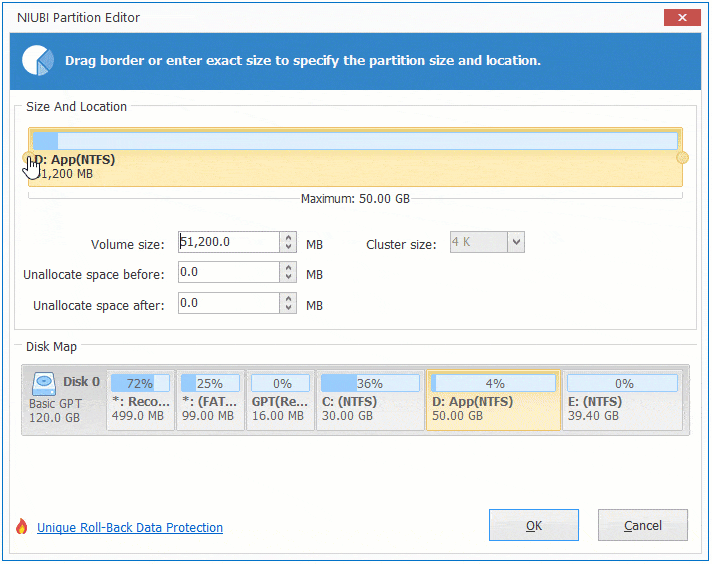
Then Unallocated space will be produced on the left side.
Option 2: If you drag right border towards left in the pop-up window,
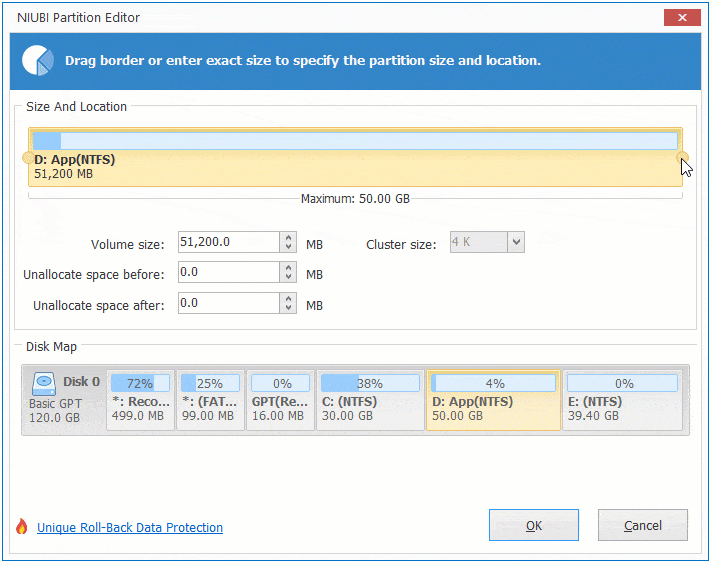
Then Unallocated space will be produced on the right side.
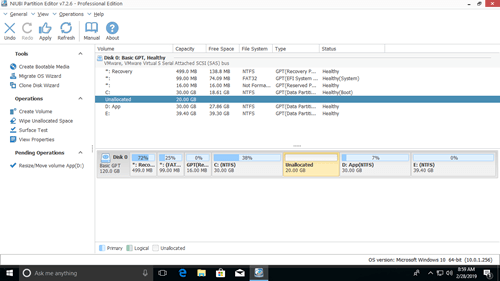
These Unallocated space can be used to create new volume or combine to other partition.
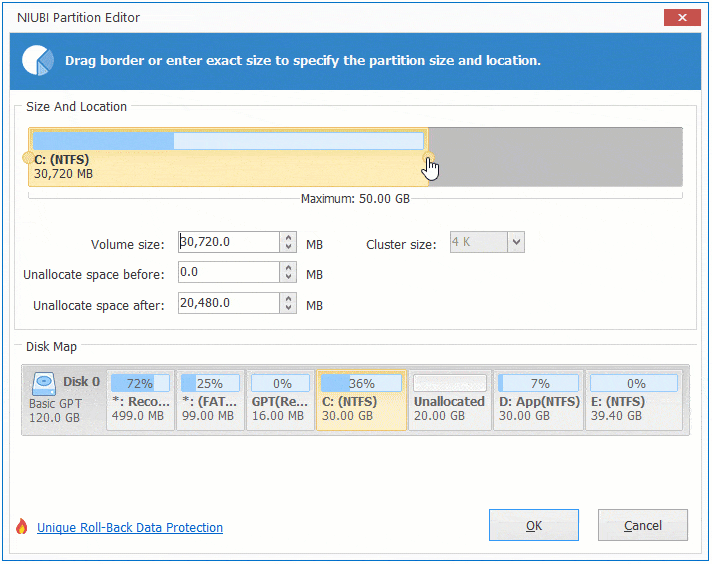
To increase size of partition C:
Right click C and select «Resize/Move Volume» again, drag right border rightwards to combine Unallocated space.
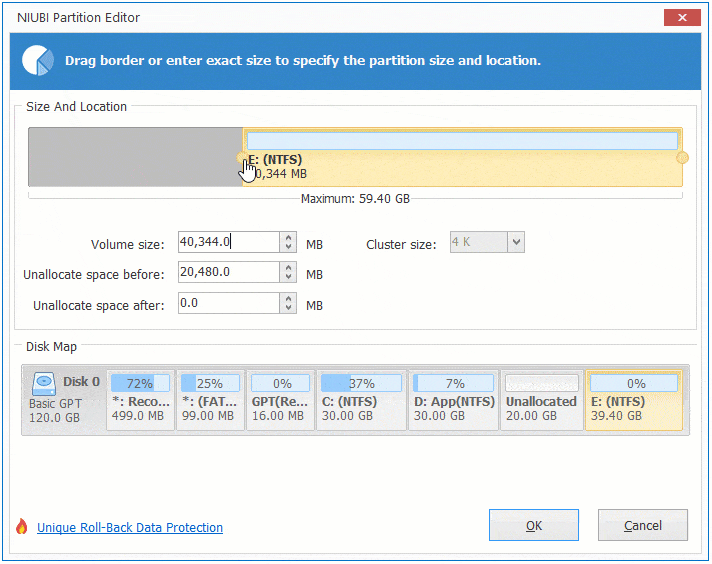
To increase size of partition E:
Right click E and select «Resize/Move Volume» again, drag left border leftwards to combine Unallocated space.
If you want to decrease E to increase C, follow Option 1 to make Unallocated space on the left side of E. Before adding Unallocated space to C drive, there is an additional step to move Unallocated space to left side of D. To do this, right click drive D and select «Resize/Move Volume», drag middle position towards right in the pop-up window.
Take care of data while resizing disk partition
There is potential system and data damage risk while change partition size for Windows 10 computer. So you’d better back up first and use safe partitioning software. Better than other software, NIUBI Partition Editor provides powerful 1 Second Rollback, Virtual Mode and Cancel-at-well technologies to protect system and data.
Besides changing partition size, it helps you do many other operations such as: merge, convert, defrag, copy, hide, wipe and scan partition. Initialize, convert, set read-only attribute to disk, etc.
Resize-Partition
Resizes a partition and the underlying file system.
Syntax
Description
The Resize-Partition cmdlet resizes a partition and the underlying file system.
Examples
EXAMPLE 1
This example starts with a 931.39 GB partition.
Parameters
Runs the cmdlet as a background job. Use this parameter to run commands that take a long time to complete.
| Type: | SwitchParameter |
| Position: | Named |
| Default value: | None |
| Accept pipeline input: | False |
| Accept wildcard characters: | False |
Runs the cmdlet in a remote session or on a remote computer. Enter a computer name or a session object, such as the output of a New-CimSession or Get-CimSession cmdlet. The default is the current session on the local computer.
| Type: | CimSession [ ] |
| Aliases: | Session |
| Position: | Named |
| Default value: | None |
| Accept pipeline input: | False |
| Accept wildcard characters: | False |
Prompts you for confirmation before running the cmdlet.
| Type: | SwitchParameter |
| Aliases: | cf |
| Position: | Named |
| Default value: | False |
| Accept pipeline input: | False |
| Accept wildcard characters: | False |
Specifies an ID used to identify a disk in the system.
| Type: | String [ ] |
| Position: | Named |
| Default value: | None |
| Accept pipeline input: | True |
| Accept wildcard characters: | False |
Specifies an array of disk numbers.
| Type: | UInt32 [ ] |
| Position: | 0 |
| Default value: | None |
| Accept pipeline input: | True |
| Accept wildcard characters: | False |
Specifies a letter used to identify a drive or volume in the system.
| Type: | Char [ ] |
| Position: | Named |
| Default value: | None |
| Accept pipeline input: | True |
| Accept wildcard characters: | False |
Specifies the input object that is used in a pipeline command.
| Type: | CimInstance [ ] |
| Position: | Named |
| Default value: | None |
| Accept pipeline input: | True |
| Accept wildcard characters: | False |
Specifies the starting offset, in bytes.
| Type: | UInt64 [ ] |
| Position: | Named |
| Default value: | None |
| Accept pipeline input: | True |
| Accept wildcard characters: | False |
Specifies the number of the partition. The number of the partition to be resized.
| Type: | UInt32 [ ] |
| Aliases: | Number |
| Position: | 1 |
| Default value: | None |
| Accept pipeline input: | False |
| Accept wildcard characters: | False |
Sends items from the interactive window down the pipeline as input to other cmdlets. By default, this cmdlet does not generate any output.
To send items from the interactive window down the pipeline, click to select the items and then click OK. Shift-click and Ctrl-click are supported.
| Type: | SwitchParameter |
| Position: | Named |
| Default value: | None |
| Accept pipeline input: | False |
| Accept wildcard characters: | False |
Specifies the size of the partition to create. If not specified, then the number will default to Bytes. The acceptable values for this parameter are: Bytes, KB, MB, GB, or TB. The size may be defined by a user.
| Type: | UInt64 |
| Position: | 2 |
| Default value: | None |
| Accept pipeline input: | False |
| Accept wildcard characters: | False |
Specifies the maximum number of concurrent operations that can be established to run the cmdlet. If this parameter is omitted or a value of 0 is entered, then Windows PowerShellВ® calculates an optimum throttle limit for the cmdlet based on the number of CIM cmdlets that are running on the computer. The throttle limit applies only to the current cmdlet, not to the session or to the computer.
| Type: | Int32 |
| Position: | Named |
| Default value: | None |
| Accept pipeline input: | False |
| Accept wildcard characters: | False |
Shows what would happen if the cmdlet runs. The cmdlet is not run.


