- Windows 10 Fast Startup — как отключить?
- Windows 10 Fast Startup — как выключить?
- Windows 10 Fast Startup — отключение через реестр
- Start your PC in safe mode in Windows 10
- How to start and stop services manually on Windows 10
- How to manage services using Services console
- Stop service
- Start service
- Disable service
- Enable service
- How to manage services using Task Manager
- How to manage services using PowerShell
- Stop service
- Start service
- Disable service
- Enable service
- How to manage services using Command Prompt
- Stop service
- Start service
- Disable service
- Enable service
- More Windows 10 resources
- Halo: MCC’s live service elements make it better, not worse
- Microsoft’s Surface Duo is not ‘failing up’
- Here’s what you can do if Windows 10 update KB5001330 is causing issues
- These are the best PC sticks when you’re on the move
Windows 10 Fast Startup — как отключить?
 Всем привет. Значит Fast Startup в Windows 10 это технология, которая по умолчанию включена и позволяет ПК быстрее запустить операционку после выключения (но не после перезагрузки).
Секрет заключается в использовании механизма гибернации: при включенной функции Windows при завершении работы сохраняет ядро и загруженные драйверы в файл hiberfil.sys, а при включении происходит обратный процесс.
Windows 10 Fast Startup — как выключить?
Теперь рассмотрим как выключить этот режим.
Сперва откройте панель управления, в Windows 10 это уже может быть проблемой, поэтому попробуйте так — зажмите Win + R, появится окошко Выполнить, напишите команду:

Теперь проверьте что в правом верхнем углу, там где Просмотр, то там должно быть указано крупные значки — вам нужен значок Электропитание:

Потом нажмите по Действия кнопок питания:

Далее нажмите по Изменение параметров, которые сейчас недоступны:

Потом будут галочки — вам нужно снять одну а именно с Включить быстрый запуск:

После этого обязательно нажмите Сохранить изменения!
Все, быстрый запуск отключен, можно и протестировать! Выключите ПК, и через пару сек — включите снова))
Важно: если у вас отключена гибернация, то быстрый запуск будет отключен автоматом.
Windows 10 Fast Startup — отключение через реестр
Возможно что по некоторым причинам вам будет удобнее для отключения использовать реестр. Например при помощи него можно создать файлики reg вкл и выкл быстрой загрузки, но это уже для продвинутых юзеров))
Такс, запустите реестр, это сделать можно так — зажмите Win + R, напишите потом команду:

Появится окно Редактор реестра, тут слева — разделы, а справа — параметры (или ключи). Вам нужно перейти в этот раздел:

Там будет параметр HiberbootEnabled, так вот значение его 1 — быстрая загрузка включена, 0 — соответственно отключена. Чтобы изменить — два раза по параметру и потом задаете значение:

Возможно кому-то через реестр будет намного удобнее, так что смотрите)))
Если у вас нет желания выключать ПК так, чтобы потом был быстрый запуск — тогда в меню пуск Завершение работы нажимайте с зажатой кнопкой шифт.
На этом все, удачи вам и всего хорошего, до новых встреч господа!
Start your PC in safe mode in Windows 10
Safe mode starts Windows in a basic state, using a limited set of files and drivers. If a problem doesn’t happen in safe mode, this means that default settings and basic device drivers aren’t causing the issue. Observing Windows in safe mode enables you to narrow down the source of a problem, and can help you troubleshoot problems on your PC.
There are two versions of safe mode: Safe Mode and Safe Mode with Networking. Safe Mode with Networking adds the network drivers and services you’ll need to access the Internet and other computers on your network.
Select from the following sections to find out how to start your PC in safe mode from Settings, from the sign-in screen, or from a black or blank screen.
Press Windows logo key + I on your keyboard to open Settings. If that doesn’t work, select the Start button, then select Settings .
Under Advanced startup, select Restart now.
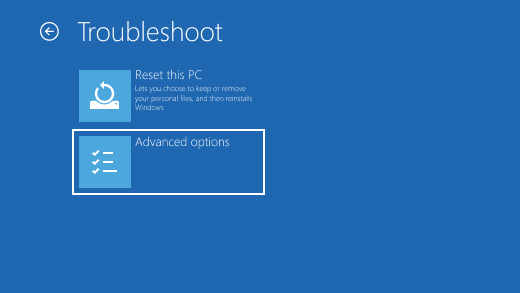
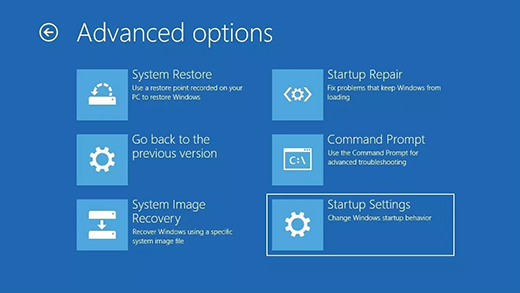
After your PC restarts to the Choose an option screen, select Troubleshoot > Advanced options > Startup Settings > Restart. You may be asked to enter your BitLocker recovery key.


After your PC restarts, you’ll see a list of options. Select 4 or press F4 to start your PC in Safe Mode. Or if you’ll need to use the Internet, select 5 or press F5 for Safe Mode with Networking.
When you can’t open Settings to get into safe mode, restart your device from the Windows sign-in screen.
On the Windows sign-in screen, press and hold the Shift key while you select the Power > Restart .
After your PC restarts to the Choose an option screen, select Troubleshoot > Advanced options > Startup Settings > Restart. You may be asked to enter your BitLocker recovery key.
After your PC restarts, you’ll see a list of options. Select 4 or F4 to start your PC in safe mode. Or if you’ll need to use the Internet, select 5 or F5 for Safe Mode with Networking.
Note: If you’ve encrypted your device, you’ll need your BitLocker key to start in safe mode.
Before you enter safe mode, you need to enter the Windows Recovery Environment (winRE). To do this, you will repeatedly turn your device off, then on:
Hold down the power button for 10 seconds to turn off your device.
Press the power button again to turn on your device.
On the first sign that Windows has started (for example, some devices show the manufacturer’s logo when restarting) hold down the power button for 10 seconds to turn off your device.
Press the power button again to turn on your device.
When Windows restarts, hold down the power button for 10 seconds to turn off your device.
Press the power button again to turn on your device.
Allow your device to fully restart. You will enter winRE.
Now that you are in winRE, you will follow these steps to take you to safe mode:
On the Choose an option screen, select Troubleshoot > Advanced options > Startup Settings > Restart.
After your device restarts, you’ll see a list of options. Select option 5 from the list or press F5 for Safe Mode with Networking.
If you need more info on a black or blank screen error, see Troubleshoot black or blank screen errors.
Notes: If you need to exit safe mode, simply restart your device, or:
Press the Windows logo key + R.
Type msconfig in the Open box and then select OK.
Select the Boot tab.
Under Boot options, clear the Safe boot checkbox.
How to start and stop services manually on Windows 10
 Source: Windows Central
On Windows 10, services are programs that run in the background without a user interface and enable system features (such as printing, networking, remote access, File Explorer, Windows Search, updates, etc.) and apps to operate as intended.
Although the system does a pretty good job managing background services, sometimes, you may need to control them manually when a feature or app isn’t working correctly, or an app requires you to manage its services manually.
Whatever the case it might be, Windows 10 includes at least four methods to stop, start, disable, or enable services using the Services console, Task Manager, Command Prompt, and PowerShell.
In this Windows 10 guide, we’ll walk you through the steps to manage system and apps services on your computer.
How to manage services using Services console
Using the Services consoles is perhaps the simplest method to stop, start, disable, or enable one or multiple services on Windows 10.
Stop service
To stop a running service using Services, use these steps:
- Open Start.
- Search for Services and click the top result to open the console.
- Double-click the service that you intend to stop.
Click the Stop button.
 Source: Windows Central
Quick tip: You can also manage the state by right-clicking the service and selecting the option. Or you can select the service and then use the controls at the top to start, stop, pause, or restart.
Once you complete the steps, the service will stop running on the device.
If you’re unable to stop a system service, consider that some services are required for the operation of Windows 10, and they can’t be stopped.
Start service
To start a service on Windows 10, use these steps:
- Open Start.
- Search for Services and click the top result to open the console.
- Double-click the service that you intend to stop.
Click the Start button.
Source: Windows Central
After you complete the steps, the service you specified will start for the current session.
Disable service
To set a service a disabled, use these steps:
- Open Start.
- Search for Services and click the top result to open the console.
- Double-click the service that you intend to stop.
- Click the Stop button.
Use the «Start type» drop-down menu and select the Disabled option.
Source: Windows Central
Once you complete the steps, the service will no longer start automatically after restarting your device.
Enable service
To enable a specific service, use these steps:
- Open Start.
- Search for Services and click the top result to open the console.
- Double-click the service that you intend to stop.
- Click the Start button.
Use the «Start type» drop-down menu and select the Automatic option.
These are the Startup types on Windows 10:
- Automatic – service starts at boot.
- Automatic (Delayed Start) – service start after boot.
- Manual – starts service manually as needed.
- Disabled – stops service from running.
Source: Windows Central
After you complete the steps, the Windows 10 or app service will enable, but if it was in a stopped state, you’d need to start it manually or restart the device for the service to run.
How to manage services using Task Manager
Task Manager also includes a section to quickly manage services for Windows 10 and apps.
To stop, start, or restart a service using Task Manager, use these steps:
- Open Start.
Search for Task Manager and click the top result to open the app.
Quick tip: Windows 10 includes many other ways to open the experience, including right-clicking the taskbar and selecting the Task Manager option and using the Ctrl + Shift + ESC keyboard shortcut.
Right-click the service name, and select one of the options:
- Stop.
- Start.
- Restart.
Source: Windows Central
Quick note: Task Manager only displays the service name, not the display name. For example, if you’re using this method, you’ll the «Print Spooler» defined as «Spooler.»
Once you complete the steps, the service will respond to the option you selected.
How to manage services using PowerShell
You can also use PowerShell commands to manage background services for Windows 10 and apps.
Stop service
To stop a specific service with PowerShell, use these steps:
- Open Start.
- Search for PowerShell, right-click the top result, and select the Run as administrator option.
(Optional) Type the following command to view a list of all the services and press Enter:
 Source: Windows Central
Type the following command to stop a service and press Enter:
Stop-Service -Name «SERVICE-NAME»
For example, this command stops the printer spooler service on Windows 10:
Stop-Service -Name «spooler»
Source: Windows Central
In the command, replace «SERVICE-NAME» for the name of the service that you intend to stop. If you want to use the display name, replace -Name for -DisplayName and then specify the display name of the service.
Alternatively, you can also use this variant of the command to stop the service:
Set-Service -Name «SERVICE-NAME» -Status stopped
Source: Windows Central
In the command, replace «SERVICE-NAME» for the name of the service that you intend to stop. If you want to use the display name, replace -Name for -DisplayName and then specify the display name of the service. You only need the quotation marks if there’s a space within the name.
Quick tip: If you’re getting a dependency error, you can append the -force option in either of the commands to stop the service. For example, Stop-Service -Name «SERVICE-NAME» -Force .
After you complete the steps, the PowerShell command will stop the service on your device.
Start service
To start a Windows 10 or app service with PowerShell, use these steps:
- Open Start.
- Search for PowerShell, right-click the top result, and select the Run as administrator option.
Type the following command to start a service and press Enter:
Start-Service -Name «SERVICE-NAME»
For example, this command starts the printer spooler service on Windows 10:
Start-Service -Name «spooler»
Source: Windows Central
In the command, replace «SERVICE-NAME» for the name of the service. Using the display name is supported, replacing -Name for -DisplayName and then specify the display name of the service.
Alternatively, you can also use this variant of the command to start a service:
Set-Service -Name «SERVICE-NAME» -Status running
Source: Windows Central
In the command, replace «SERVICE-NAME» for the name of the service. If you want to use the display name, replace -Name for -DisplayName and then specify the display name of the service.
Once you complete the steps, the service will start on your computer.
Disable service
To disable a service using a PowerShell command, use these steps:
- Open Start.
- Search for PowerShell, right-click the top result, and select the Run as administrator option.
Type the following command to disable a service and press Enter:
Set-Service -Name «SERVICE-NAME» -Status stopped -StartupType disabled
In the command, update «SERVICE-NAME» for the name of the service. If you want to use the display name of the service, then replace -Name for -DisplayName and specify the service name. If you want to disable the service without stopping it immediately, you can remove the -Status stopped portion of the command.
For example, this command disables the printer spooler service on Windows 10:
Set-Service -Name «spooler» -Status stopped -StartupType disabled
Source: Windows Central
After you complete the steps, the PowerShell command will disable the specified service.
Enable service
To enable a specific background service with PowerShell, use these steps:
- Open Start.
- Search for PowerShell, right-click the top result, and select the Run as administrator option.
Type the following command to enable a service and press Enter:
Set-Service -Name «SERVICE-NAME» -Status running -StartupType automatic
For example, this command enables the printer spooler service using PowerShell:
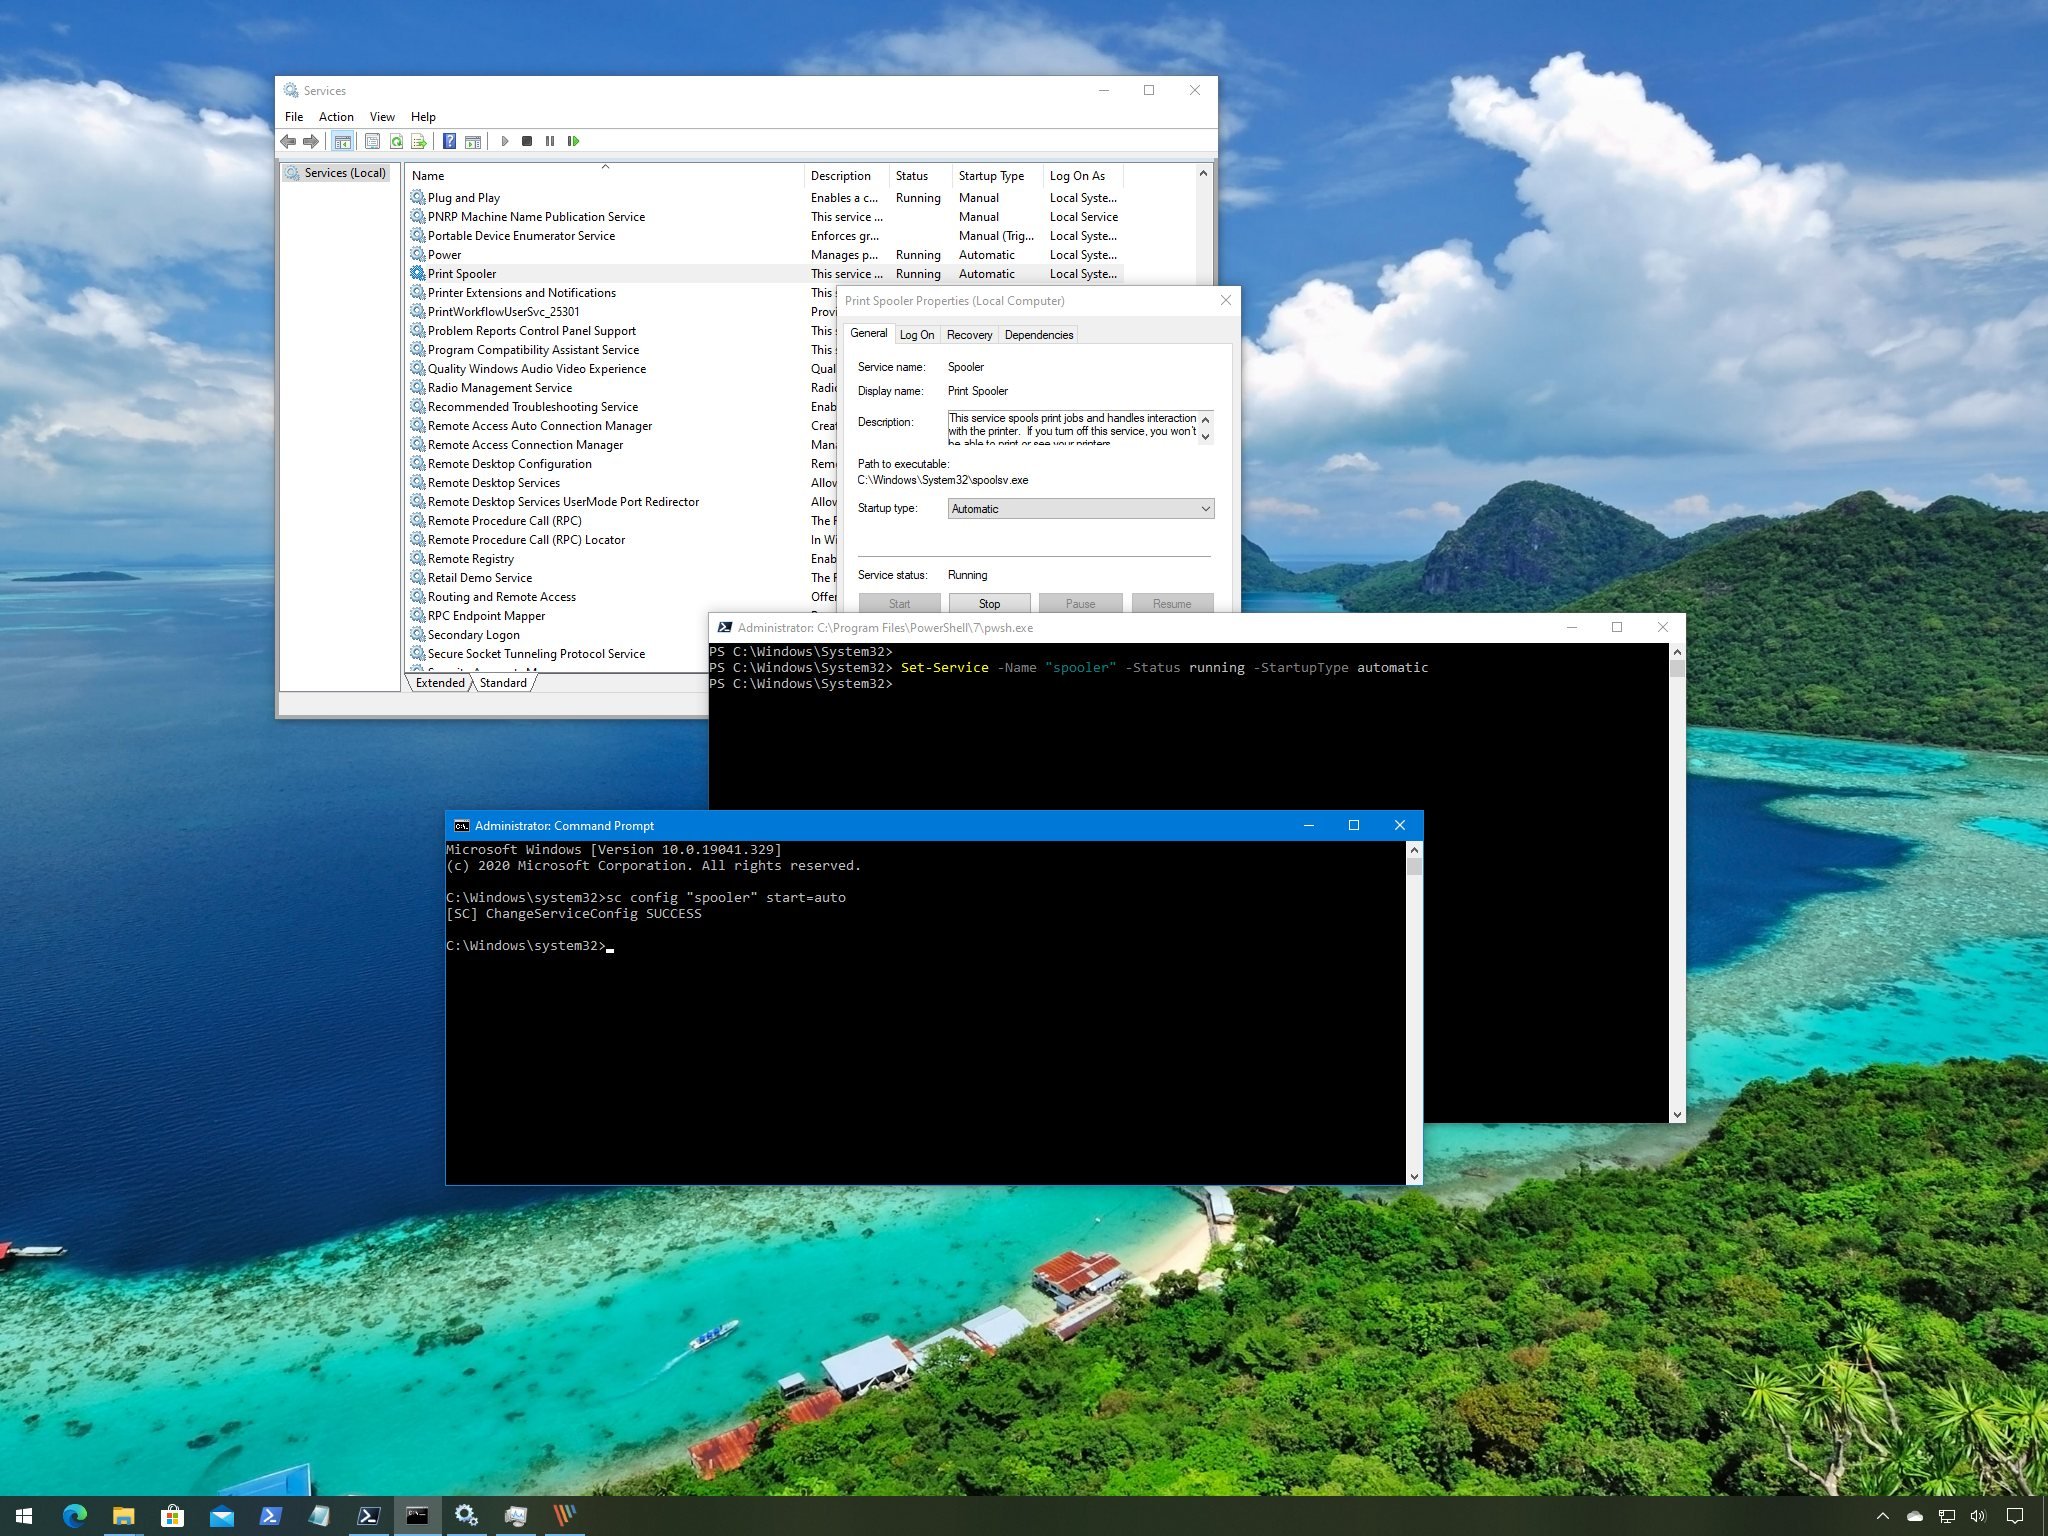
Set-Service -Name «spooler» -Status running -StartupType automatic
Source: Windows Central
Quick note: You may able to use the display -DisplayName option, but the command may also prompt you to supply the name of the service, adding an extra step to the process. If you want to enable the service without starting it immediately, you can remove the -Status running portion of the command.
Once you complete the steps, PowerShell will enable the service specified with the command.
How to manage services using Command Prompt
If you’re comfortable using the command line, Command Prompt offers the «net» command (older) to stop or start, or the «sc» command (newer) to stop, start, disable, or enable services on Windows 10.
Stop service
To stop a Windows 10 or app service with Command Prompt, use these steps:
- Open Start.
- Search for Command Prompt, right-click the top result, and select the Run as administrator option.
(Optional) Type the following command to view a list of all the services and press Enter:
sc queryex state=all type=service
Source: Windows Central
Type the following command to stop a service and press Enter:
net stop «SERVICE-NAME»
In the command, replace «SERVICE-NAME» for the name or display name of the service. You only need the quotation marks if there’s a space within the name.
For example, this command stops the printer spooler using the service name:
net stop «spooler»
Source: Windows Central
Alternatively, you can also use the more advanced «sc» command:
sc stop «SERVICE-NAME»
For example, this command stops the printer spooler using the service name:
sc stop «spooler»
Source: Windows Central
After you complete the steps, the command will stop the specified service on Windows 10.
Start service
To start a service with the command line, use these steps:
- Open Start.
- Search for Command Prompt, right-click the top result, and select the Run as administrator option.
Type the following command to start a service and press Enter:
net start «SERVICE-NAME»
In the command, replace «SERVICE-NAME» for the name or display name of the service. You only need the quotation marks if there’s a space within the name.
For example, this command starts the printer spooler using the service name:
net start «spooler»
Source: Windows Central
Alternatively, you can also use the «sc» command:
sc start «SERVICE-NAME»
For example, this command starts the printer spooler using the service name:
sc start «spooler»
Source: Windows Central
Once you complete the steps, the command will execute and start the service you specified.
Disable service
To disable a service with Command Prompt, use these steps:
- Open Start.
- Search for Command Prompt, right-click the top result, and select the Run as administrator option.
Type the following command to disable a service and press Enter:
sc config «SERVICE-NAME» start=disabled
In the command, replace «SERVICE-NAME» for the name of the service that you want to disable.
For example, this command disables printer spooler using the service name:
sc config «spooler» start=disabled
Source: Windows Central
(Optional) Type the following command to stop the service and press Enter:
sc stop «SERVICE-NAME»
Quick note: When you disable a service, it doesn’t stop the current state of the service. You can either restart your computer or stop the service using the above command.
After you complete the steps, the sc command will run disabling the Windows 10 or app service you specified.
Enable service
To enable a service with a command, use these steps:
- Open Start.
- Search for Command Prompt, right-click the top result, and select the Run as administrator option.
Type the following command to enable a service and press Enter:
sc config «SERVICE-NAME» start=auto
In the command, replace «SERVICE-NAME» for the name of the service that you want to enable.
For example, this command enables the printer spooler automatically using the service name:
sc config «spooler» start=auto
Source: Windows Central
These are alternative commands to enable a particular service:
- Manual: sc config «SERVICE-NAME» start=demand
- Automatic Delayed: sc config «SERVICE-NAME» start=delayed-auto
(Optional) Type the following command to start the service and press Enter:
sc start «SERVICE-NAME»
Once you complete the steps, the service will enable and start automatically on reboot according to the command you used.
You can only use the «net» command to start or stop services. The «sc» command allows you to perform more tasks, including start, stop, enable, or disable services, among other options. If you’re choosing to manage services with command lines, then, in either case, it’s best to use the service name instead of the display name.
Also, when using any of the methods outlined above, consider that making modifications to the default settings can alter the operation of one or more features that depend on that service negatively affecting the experience. Furthermore, if you restart a service, you might be required to start its dependencies manually as well to make the app or feature operational again.
We’re focusing this guide on Windows 10, but the ability to manage services has been available for several years, which means that you can refer to this guide if you’re still running Windows 8.1, Windows 7, and older versions.
More Windows 10 resources
For more helpful articles, coverage, and answers to common questions about Windows 10, visit the following resources:
![]()
Halo: MCC’s live service elements make it better, not worse
Halo: The Master Chief Collection is more popular than ever, but some fans don’t agree with the live service approach 343 Industries has taken with it. Here’s why those elements are, at the end of the day, great for the game and for Halo overall.
![]()
Microsoft’s Surface Duo is not ‘failing up’
Microsoft announced this week that it was expanding Surface Duo availability to nine new commercial markets. While Surface Duo is undoubtedly a work in progress, this is not a sign of a disaster. It’s also doesn’t mean that Surface Duo is selling a ton either. Instead, the reason for the expansion is a lot more straightforward.
![]()
Here’s what you can do if Windows 10 update KB5001330 is causing issues
In this guide, we’ll show you the steps to get rid of the update KB5001330 to fix profile, gaming, and BSoD problems with the Windows 10 October 2020 Update and May 2020 Update.
![]()
These are the best PC sticks when you’re on the move
Instant computer — just add a screen. That’s the general idea behind the ultra-portable PC, but it can be hard to know which one you want. Relax, we have you covered!


