- How to refresh, reset, or restore your PC
- Before you start to refresh or reset your PC
- Refresh, reset, or restore
- To refresh your PC
- To reset your PC
- To restore your PC to an earlier point in time
- Windows Server 2008/2012/2016 Backup: Restore from Network Location
- Windows Server 2012 Backup — cannot restore from network location
- How to restore Windows Server 2012 backup from network location?
- Method 1: Recover backup from network via AOMEI Backupper Server
- Method 2: Restore backup over network via Windows Server Backup
- Plus: Restore files from Windows Server 2012 backup
- Wrapping things up
- Windows 10 restore system image from network location fails with error 0x80070520, then 0x80070035
How to refresh, reset, or restore your PC
Note: For information about this topic in Windows 10, see Recovery options in Windows 10.
If you’re having problems with your PC, you can:
Refresh your PC to reinstall Windows and keep your personal files and settings. Refresh also keeps the apps that came with your PC and the apps you installed from the Microsoft Store.
Reset your PC to reinstall Windows but delete your files, settings, and apps—except for the apps that came with your PC.
Restore your PC to undo recent system changes you’ve made.
If you’re having trouble starting (booting) your PC, see Windows Startup Settings (including safe mode), and go to the “Get to Windows Startup Settings in the Windows Recovery Environment” section. You can refresh, reset, or restore your PC from the Windows Recovery Environment.
If you want to back up and restore your personal files using File History, see Set up a drive for File History.
Before you start to refresh or reset your PC
In most cases, once you start to refresh or reset your PC, it’ll finish on its own. However, if Windows needs missing files, you’ll be asked to insert recovery media, which is typically on a DVD disc or thumb drive. If that happens, what you’ll need depends on your PC.
If your PC came with Windows 8.1 or Windows RT 8.1, you’ll need the discs or thumb drive that came with your PC. Check the info that came with your PC to see if your PC manufacturer provided these discs or media. In some cases, you might have created them when you first set up your PC.
If you don’t have either of those, you can make them if you have a USB thumb drive of 16 GB or larger. Having a recovery drive can help you troubleshoot and fix problems with your PC, even if it won’t start. For more info, see Create a USB recovery drive.
If you upgraded your PC to Windows 8.1 or Windows RT 8.1 with a DVD, use that disc. If you don’t have Windows 8.1 or Windows RT 8.1 media, contact Microsoft Support.
Refresh, reset, or restore
Select any of the following for more detailed info.
If your PC isn’t performing as well as it once did, and you don’t know why, you can refresh your PC without deleting any of your personal files or changing your settings.
Note: If you upgraded your PC from Windows 8 to Windows 8.1 and your PC has a Windows 8 recovery partition, refreshing your PC will restore Windows 8. You’ll need to upgrade to Windows 8.1 after the refresh has finished.
Warning: Apps you installed from websites and DVDs will be removed. Apps that came with your PC and apps you installed from Microsoft Store will be reinstalled. Windows puts a list of removed apps on your desktop after refreshing your PC.
To refresh your PC
Swipe in from the right edge of the screen, tap Settings, and then tap Change PC settings.
(If you’re using a mouse, point to the upper-right corner of the screen, move the mouse pointer down, click Settings, and then click Change PC settings.)
Tap or click Update and recovery, and then tap or click Recovery.
Under Refresh your PC without affecting your files, tap or click Get started.
Follow the instructions on the screen.
If you want to recycle your PC, give it away, or start over with it, you can reset it completely. This removes everything and reinstalls Windows.
Note: If you upgraded your PC from Windows 8 to Windows 8.1 and your PC has a Windows 8 recovery partition, resetting your PC will restore Windows 8. You’ll need to upgrade to Windows 8.1 after the reset has finished.
Warning: All of your personal files will be deleted and your settings will be reset. All apps that you installed will be removed. Only apps that came with your PC will be reinstalled.
To reset your PC
Swipe in from the right edge of the screen, tap Settings, and then tap Change PC settings.
(If you’re using a mouse, point to the upper-right corner of the screen, move the mouse pointer down, click Settings, and then click Change PC settings.)
Tap or click Update and recovery, and then tap or click Recovery.
Under Remove everything and reinstall Windows, tap or click Get started.
Follow the instructions on the screen.
Note: You’ll be asked to choose whether you want to erase data quickly or thoroughly. If you choose to erase data quickly, some data might be recoverable using special software. If you choose to erase data thoroughly, this will take longer but it makes recovering data less likely.
If you think an app or driver that you recently installed caused problems with your PC, you can restore Windows back to an earlier point in time, called a restore point. System Restore doesn’t change your personal files, but it might remove recently installed apps and drivers.
System Restore isn’t available for Windows RT 8.1.
Windows automatically creates a restore point when you install desktop apps and new Windows updates, if the last restore point is older than 7 days. You can also create a restore point manually at any time.
To restore your PC to an earlier point in time
Swipe in from the right edge of the screen, and then tap Search.
(If you’re using a mouse, point to the upper-right corner of the screen, move the mouse pointer down, and then click Search.)
Enter Control Panel in the search box, and tap or click Control Panel.
Enter Recovery in the Control Panel search box, and then tap or click Recovery.
Tap or click Open System Restore, and then follow the instructions.
If you need additional help refreshing, resetting, or restoring your PC, check out the Repair and Recovery community pages in the Windows forum for solutions that other people have found for problems they’ve experienced.
Windows Server 2008/2012/2016 Backup: Restore from Network Location
In this article, you are going to learn how to restore Windows Server backup in 2008/2012/2016 from network location, including system backup and file backup.

By Ivy  / Last Updated June 22, 2020
Windows Server 2012 Backup — cannot restore from network location
«I am having trouble in restoring Windows Server 2012 backup from network location with WSB. All the steps are normal. But when I enter the path of network shared folder, it says: «The specified remote share does not contain any backups. Provide a path to a remote shared folder that contains backups.» Then, I check my path and make sure there is nothing wrong. Any thoughts? «
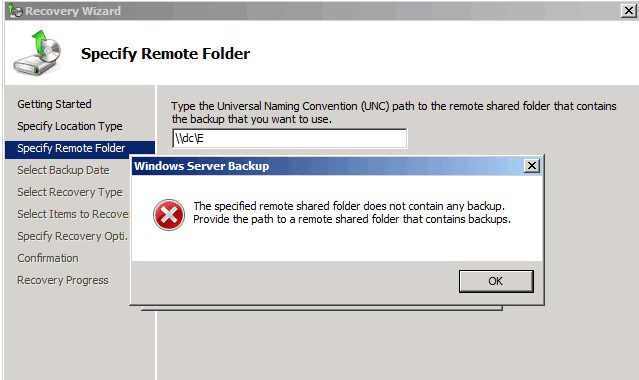
For this problem, there are 2 possible reasons.
Your backup image is corrupted.
You are not using the root folder of the backup path. eg: You create a backup on \\server\share but use \\server\share\WindowsImageBackup to restore your server.
Now, continue to see below and learn the detailed steps.
How to restore Windows Server 2012 backup from network location?
To restore Windows Server 2008/2012/2016 backup over network, you need to schedule backup to network drive first. Then, you could use it to restore windows server 2012 backup to another machine when needed.
Here are 2 methods for you. One is using the built-in tool Windows Server Backup, the other one is to make use of a reliable third-party tool like AOMEI Backupper Server.
Both ways could help you restore Windows Server 2008/2012/2016 and its R2 version from network. But the second one is much easier. More so, it could restore image to a computer with different hardware and ensure secure boot. Also, it allows you to restore files from all kinds of backup image. Therefore, I’ll describe this method at first. If you want to restore with Windows Server Backup, the built-in tool, go to method 2.
Method 1: Recover backup from network via AOMEI Backupper Server
To restore image backup using AOMEI Backupper Server, you need to do some preparations:
Download AOMEI Backupper Server and install it.
Create a bootable media with AOMEI Backupper Server, which could help you start all the servers when it fails.
Detailed steps to restore Windows Server 2012 from network location:
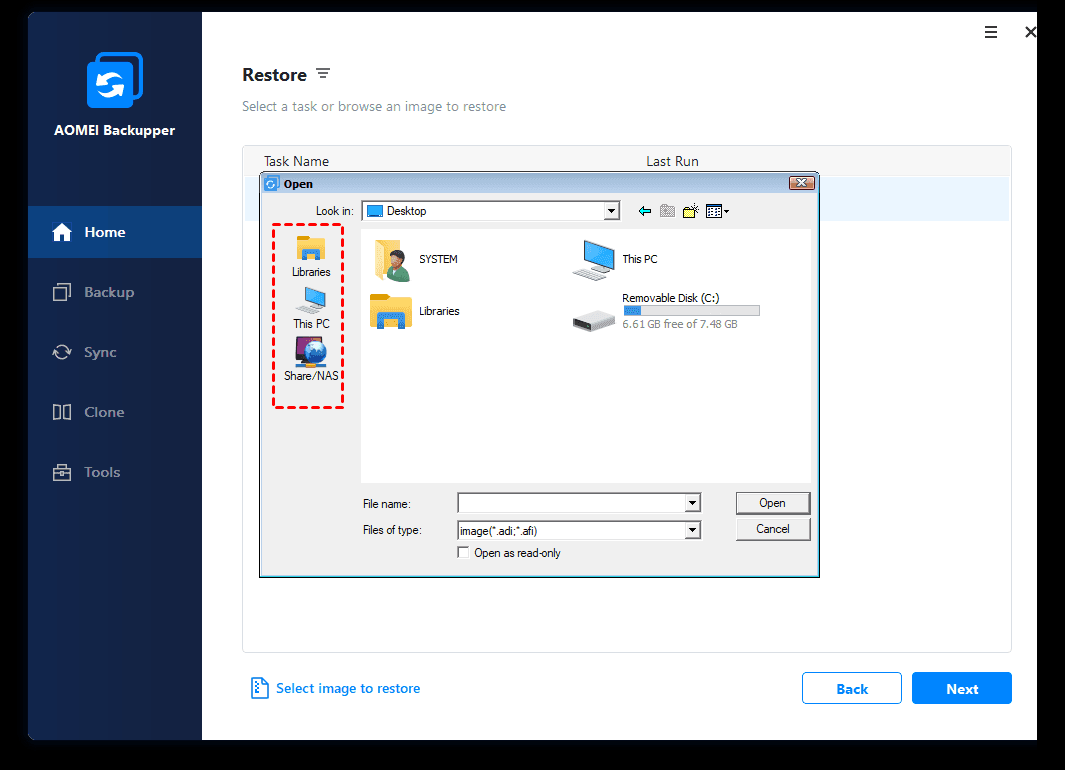
Step 1. Set boot priority for your bootable media and start from it. Wait until you see the interface of AOMEI Backupper Server. Click Select Image File in the main page.

Step 2. Click Share/NAS in the pop-up window.
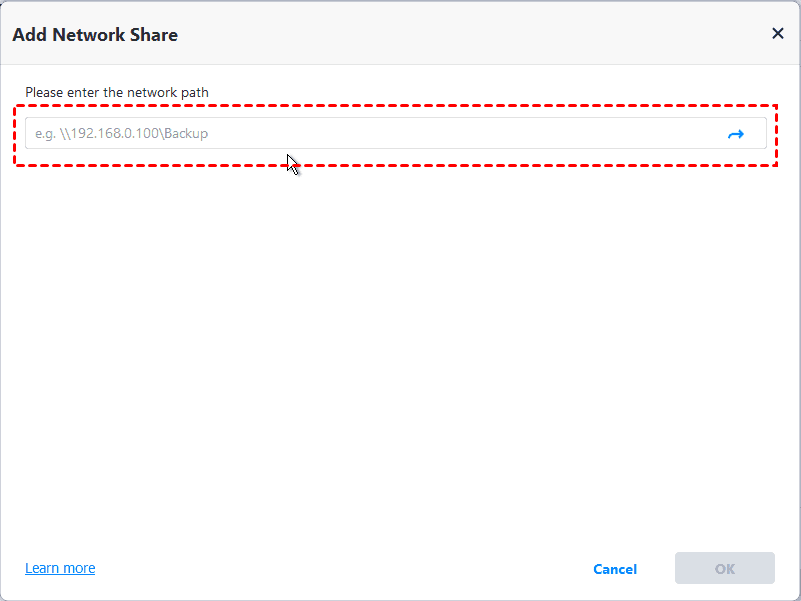
Step 3. Click Add Network Location and then type network path, username, password in the next window.
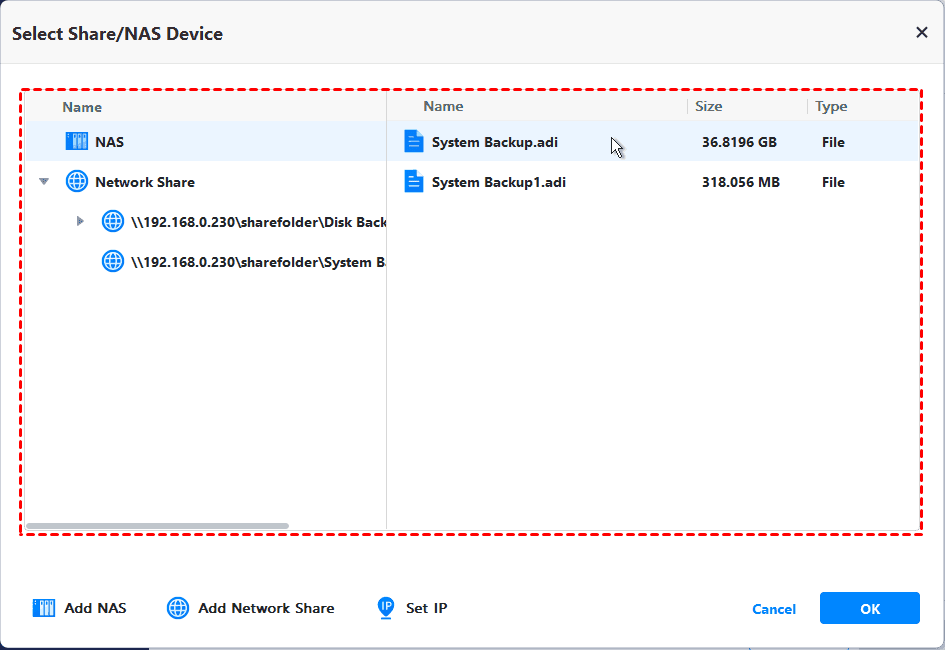
Step 4. Select the system image in the network path.
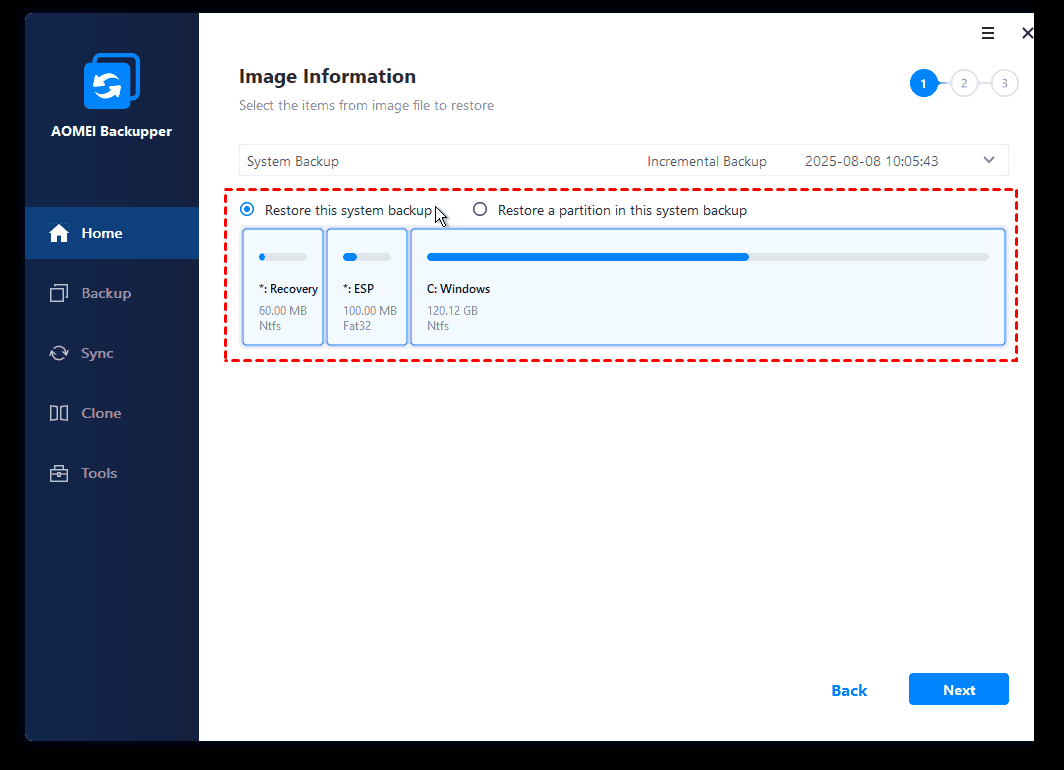
Step 5. Tick Restore this system backup and click Next.
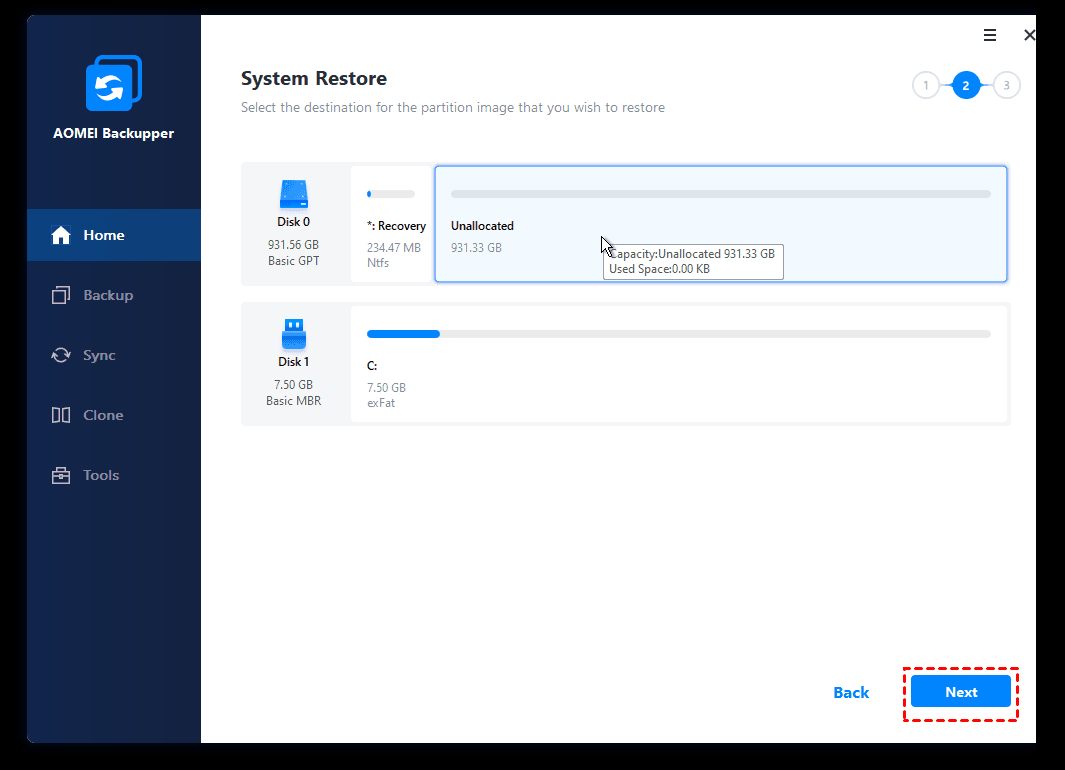
Step 6. Select a location for your backup and click Next.
Step 7. If your target drive is SSD, please tick SSD Alignment. Because it could accelerate the writing and reading speed of SSDs. If you are restoring to a computer with different hardware, please tick Universal Restore.
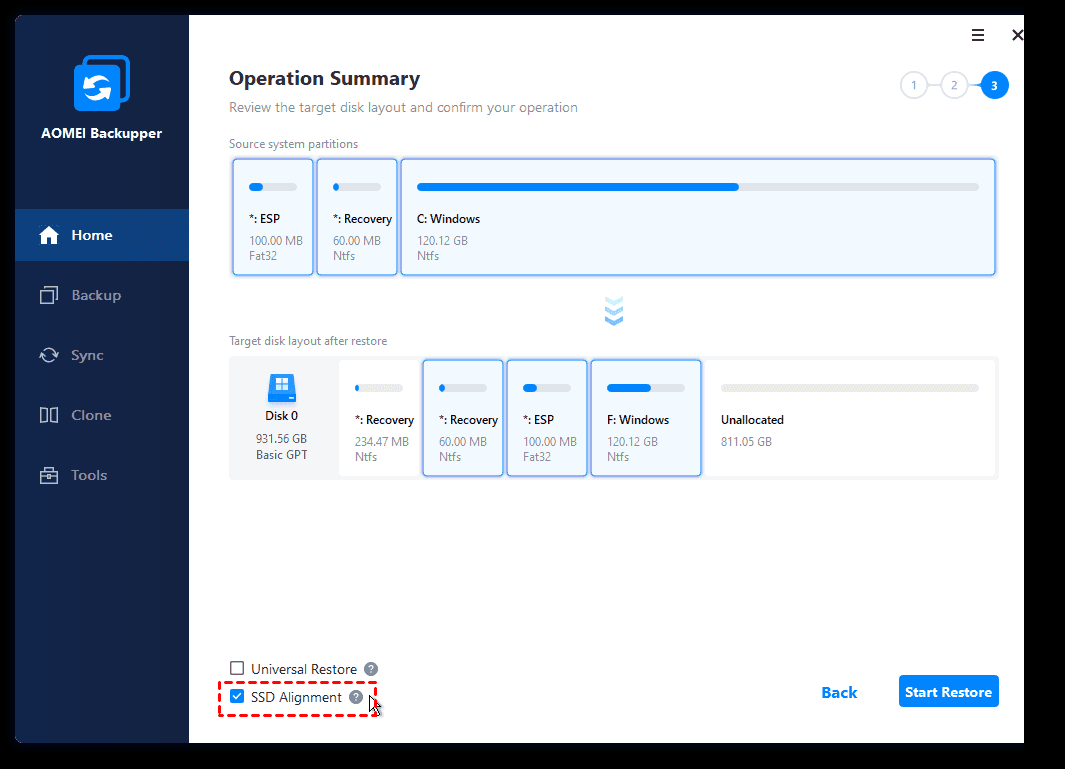
Step 8. Preview the details and click Start Restore. Then, just wait until the process is 100% completed and click Finish.
Method 2: Restore backup over network via Windows Server Backup
Before using this method, you need to get an installation disc from the manufacturer. It’s used to boot your computer and restore Windows Server 2008/2012/2016 image to different hardware.
The steps in different operating system have a little difference. Here, I’ll take server 2012 as an example to show you the detailed steps.
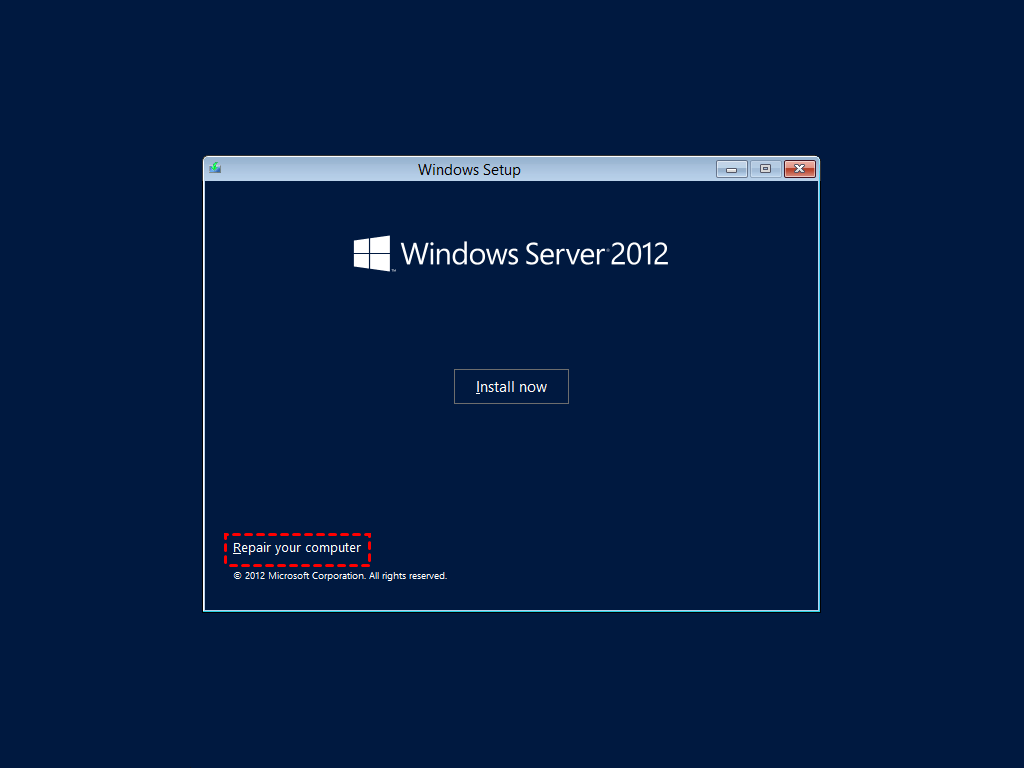
Step 1. Start your computer using the specified installation disc. Please change the boot order to CD/DVD in BIOS at first.
Step 2. Click Next > Repair your computer when your enter the recovery environment.
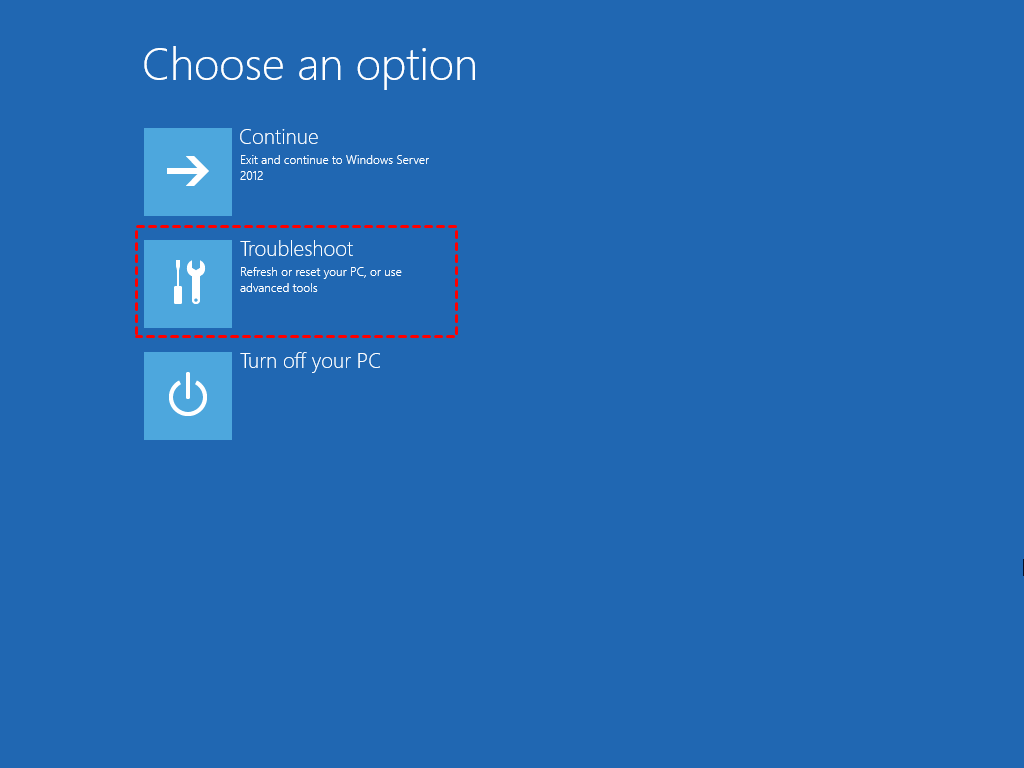
Step 3. Click Troubleshoot at the Choose an option window.
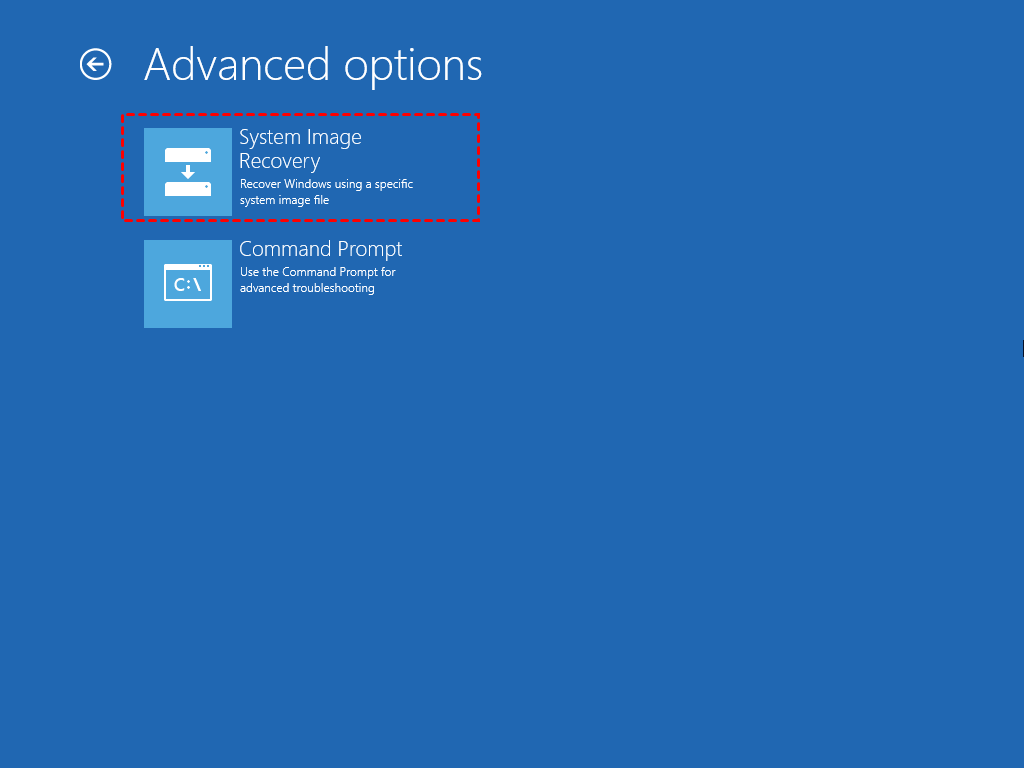
Step 4. Choose System Image Recovery at the Advanced options window.
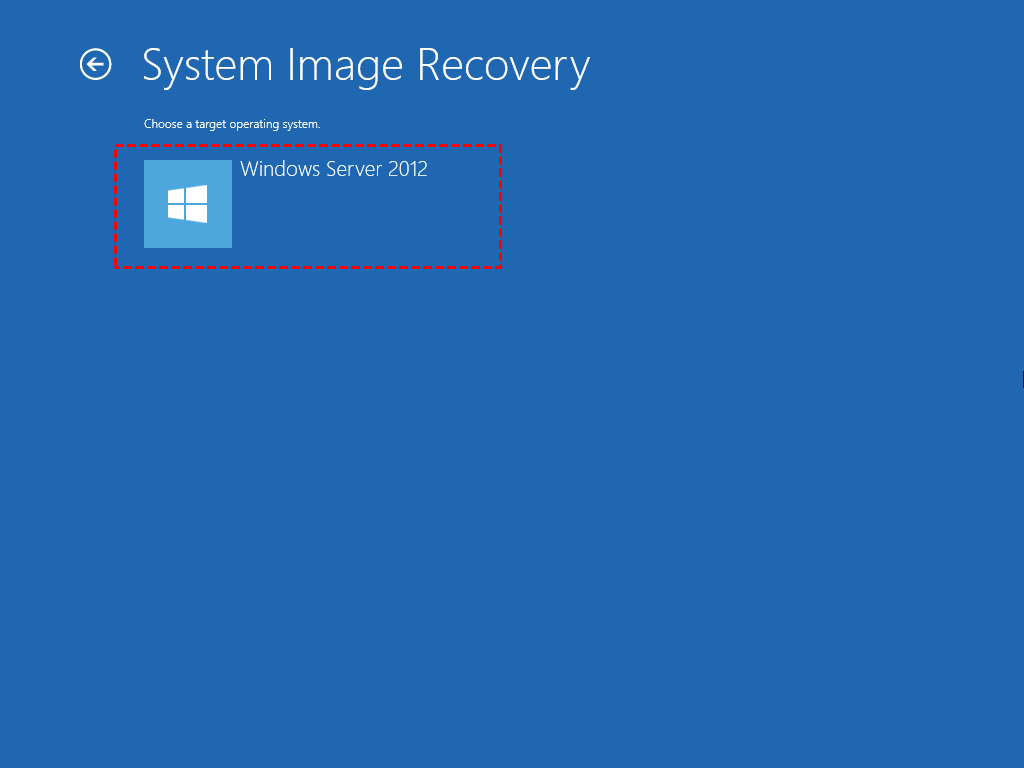
Step 5. Select the operating system (Here is Windows Server 2012).
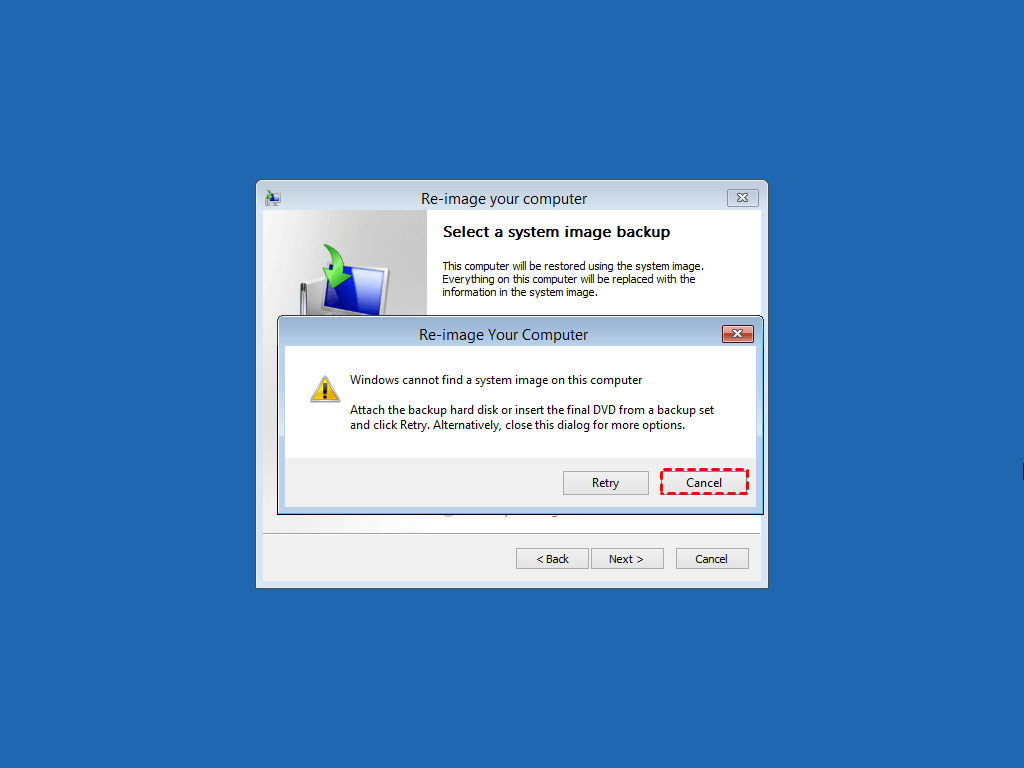
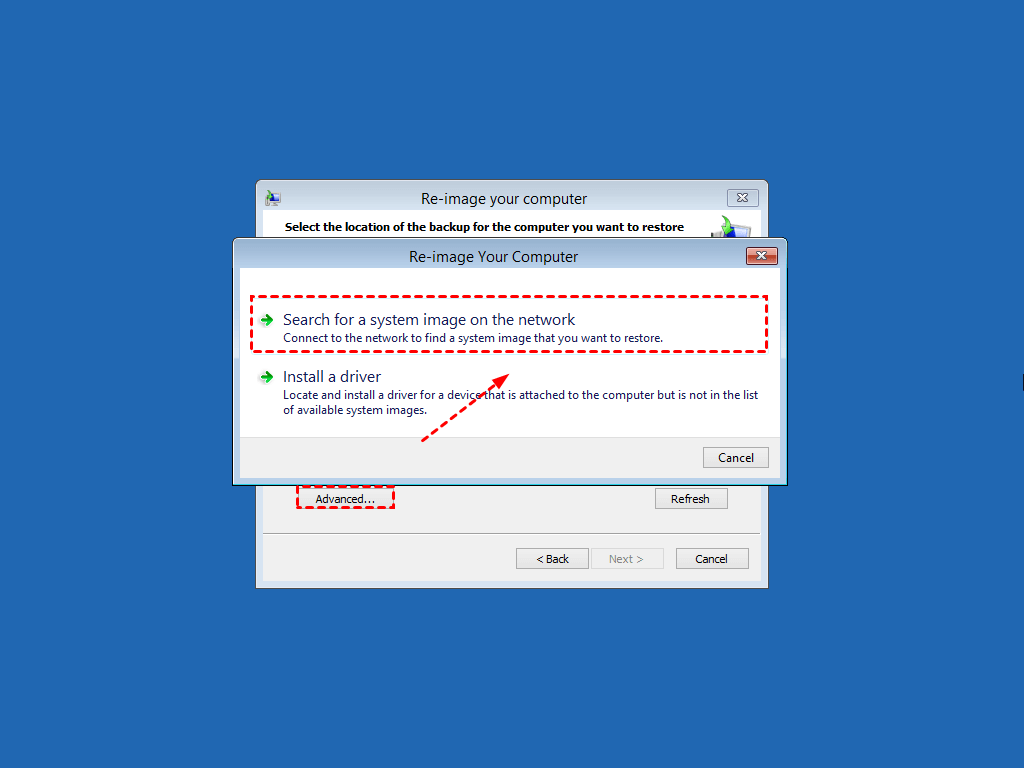
Step 6. Then, you will receive a message like”Windows cannot find a system image on this computer”, just click Cancel and click Next to select a system image on the network.
Step 7. Click Advanced and select “Search for a system image on the network ” in the pop-up window.
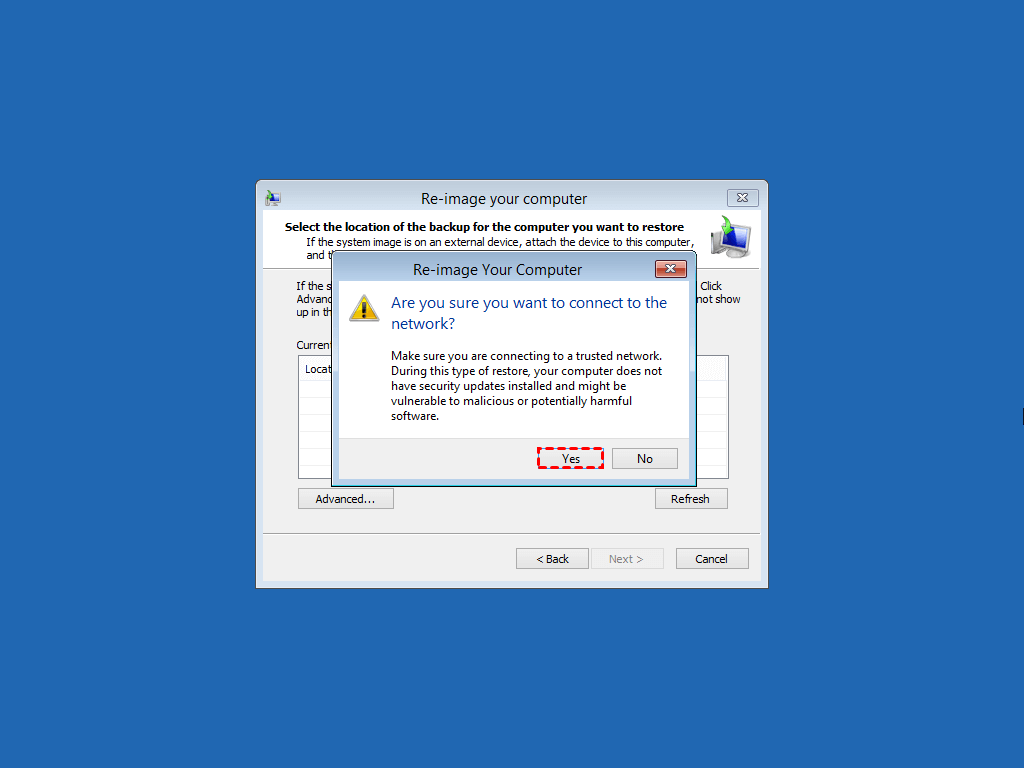
Step 8. After that, click Yes to confirm that you want to connect to network and type the path of network shared folder which contain a system image. Type username and password if you are asked.
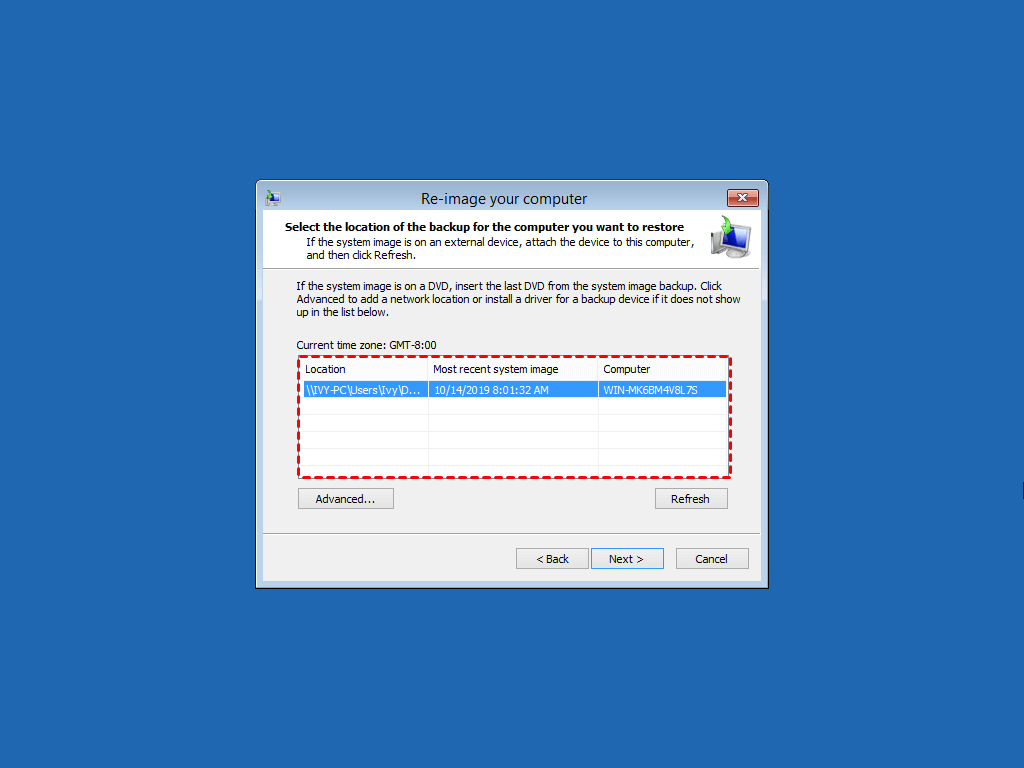
Step 9. Select the image and follow the on-screen instructions to finish the rest of steps.
Plus: Restore files from Windows Server 2012 backup
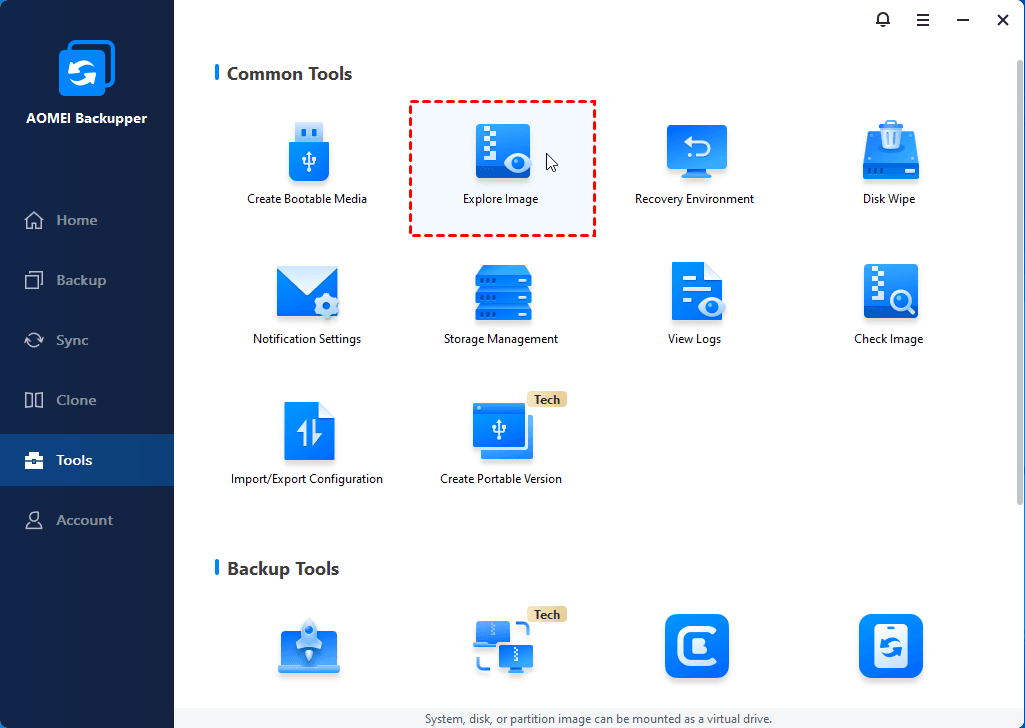
Some users just want to restore files from Windows Server 2012 backup instead of the entire backup. To realize this goal, you could use Explore Image of AOMEI Backupper Server in the working computer.
The detailed steps: Open AOMEI Backupper Server, click Home>Tools>Explore Image, select image and assign the drive letter for the partition you want to explore, then click Next to finish.
Wrapping things up
To restore Windows Server 2008/2012/2016 backup from network location, you could use both Windows Server Backup and AOMEI Backupper Server.
However, to be honest, I personally prefer the second one, because it’s much easier. The only problem is that this version could only be used on several computers. To protect or recover unlimited servers, you could consider using AOMEI Backupper TechPlus.
Windows 10 restore system image from network location fails with error 0x80070520, then 0x80070035
The hard drive on my Toshiba laptop failed, so I installed a new one. This laptop was originally a Windows 8 machine, and was upgraded to Windows 10 during the free «window». I booted from the Toshiba provided Windows 8 USB flash drive, and navigated through the advance options to find the restore image on the network. (I used a hardwired connection to the network, so there was no setup needed for WiFi.) I could see images from all our PCs, and when I tried to restore the Windows 10 image for this laptop, I received the error that the version of the OS was incompatible (after a few minutes). Seems reasonable that the Win 8 boot doesn’t want to restore a Win 10 image, but at least I knew I was able to access the image on a network drive.
Next, I used a Windows 10 recovery USB drive to boot. I tried the same navigation to the system restore image, but received error 0x80070520. I used the same login credential (user, password) that worked from the Windows 8 boot, but now I received the error message. This error was SOLVED by specifying the login name with a «domain» (or workgroup) in the form of: \server_name\user. (In the Win 8 boot, I just used «user»). I learned this trick from the question at: https://answers.microsoft.com/en-us/windows/forum/windows_10-update/access-to-system-image-backup-folder-blocked-when/45f22566-6a6a-459d-ad14-7405a3ee779c (which asked the question «Access to System image backup folder blocked when trying to re-image my Windows 10 PC»).
Now when I try to login, it takes a few seconds longer, but I receive the error 0x80070035 » The network path was not found» . I know the network path works, because it was OK when I tried it from the Win 8 boot. My network server is a Western Digital MyCloud DL4100. Any ideas?


