- Start your PC in safe mode in Windows 10
- How to Do System Restore in Safe Mode Windows 10 Easily?
- Why to perform System Restore in Safe Mode?
- How to boot into Safe Mode in Windows 10?
- Method 1: Start Safe Mode from Power options
- Method 2: Start Safe Mode from Settings
- Method 3: Start Safe Mode from a black or blank screen
- Run System Restore from Safe Mode in Windows 10
- Easier way to backup and restore computer system
- Conclusion
- How to directly reboot in Safe Mode in Windows 10
- Reboot in Safe Mode
- Shortcut to reboot in Safe Mode
- BootSafe
- Восстановление системы в безопасном режиме Windows
- Восстановление Windows 10: безопасный режим работы ПК
- Восстановление системы в безопасном режиме Windows 7
- Выводы статьи
Start your PC in safe mode in Windows 10
Safe mode starts Windows in a basic state, using a limited set of files and drivers. If a problem doesn’t happen in safe mode, this means that default settings and basic device drivers aren’t causing the issue. Observing Windows in safe mode enables you to narrow down the source of a problem, and can help you troubleshoot problems on your PC.
There are two versions of safe mode: Safe Mode and Safe Mode with Networking. Safe Mode with Networking adds the network drivers and services you’ll need to access the Internet and other computers on your network.
Select from the following sections to find out how to start your PC in safe mode from Settings, from the sign-in screen, or from a black or blank screen.
Press Windows logo key + I on your keyboard to open Settings. If that doesn’t work, select the Start button, then select Settings .
Under Advanced startup, select Restart now.
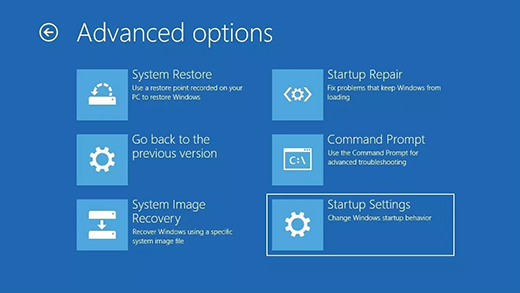
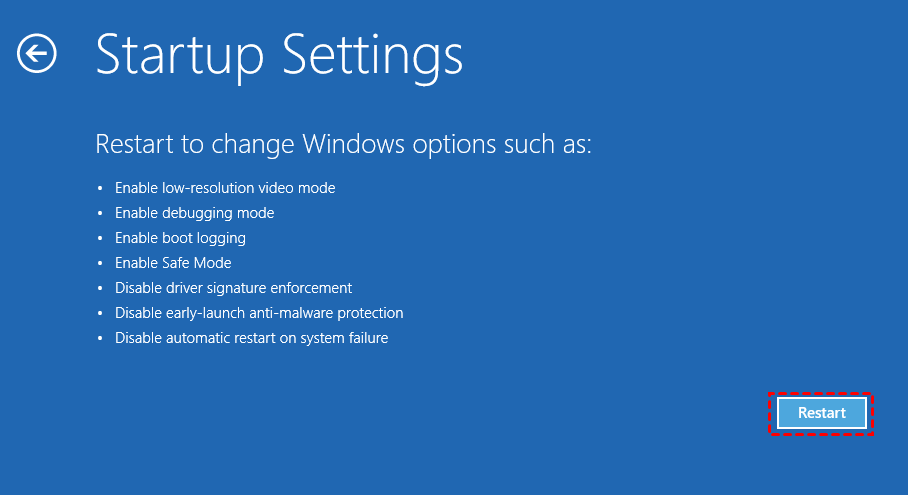
After your PC restarts to the Choose an option screen, select Troubleshoot > Advanced options > Startup Settings > Restart. You may be asked to enter your BitLocker recovery key.


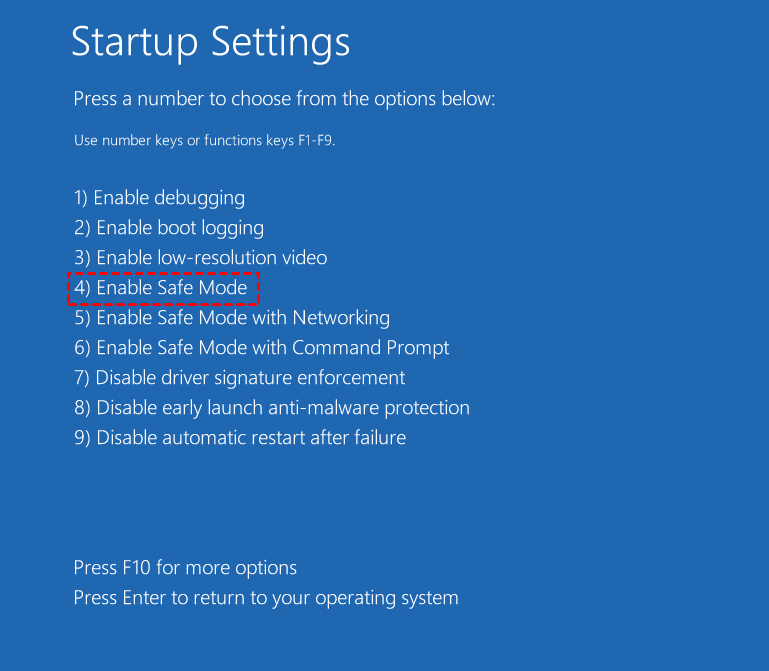
After your PC restarts, you’ll see a list of options. Select 4 or press F4 to start your PC in Safe Mode. Or if you’ll need to use the Internet, select 5 or press F5 for Safe Mode with Networking.
When you can’t open Settings to get into safe mode, restart your device from the Windows sign-in screen.
On the Windows sign-in screen, press and hold the Shift key while you select the Power > Restart .
After your PC restarts to the Choose an option screen, select Troubleshoot > Advanced options > Startup Settings > Restart. You may be asked to enter your BitLocker recovery key.
After your PC restarts, you’ll see a list of options. Select 4 or F4 to start your PC in safe mode. Or if you’ll need to use the Internet, select 5 or F5 for Safe Mode with Networking.
Note: If you’ve encrypted your device, you’ll need your BitLocker key to start in safe mode.
Before you enter safe mode, you need to enter the Windows Recovery Environment (winRE). To do this, you will repeatedly turn your device off, then on:
Hold down the power button for 10 seconds to turn off your device.
Press the power button again to turn on your device.
On the first sign that Windows has started (for example, some devices show the manufacturer’s logo when restarting) hold down the power button for 10 seconds to turn off your device.
Press the power button again to turn on your device.
When Windows restarts, hold down the power button for 10 seconds to turn off your device.
Press the power button again to turn on your device.
Allow your device to fully restart. You will enter winRE.
Now that you are in winRE, you will follow these steps to take you to safe mode:
On the Choose an option screen, select Troubleshoot > Advanced options > Startup Settings > Restart.
After your device restarts, you’ll see a list of options. Select option 5 from the list or press F5 for Safe Mode with Networking.
If you need more info on a black or blank screen error, see Troubleshoot black or blank screen errors.
Notes: If you need to exit safe mode, simply restart your device, or:
Press the Windows logo key + R.
Type msconfig in the Open box and then select OK.
Select the Boot tab.
Under Boot options, clear the Safe boot checkbox.
How to Do System Restore in Safe Mode Windows 10 Easily?
System Restore is a useful tool to help you recover from system malfunctions. Sometimes you may need to run System Restore from Safe Mode. Learn how to perform it from this page.

By Lily  / Last Updated February 26, 2021
Quick Navigation:
Why to perform System Restore in Safe Mode?
System Restore is a recovery tool that allows users to revert their computer’s state (including system files, installed applications, Windows Registry, and system settings) to that of a previous point in time. It is of great help to recover from system malfunctions or other problems.
Safe Mode is a diagnostic mode that starts your PC with a minimal set of drivers and services. No third-party software or drivers get loaded, and even the built-in Windows stuff is limited to just what’s necessary. It enables you to narrow down the source of a problem and troubleshoot problems.
There are times when you need to perform System Restore in Safe Mode:
You can’t start Windows normally. You can only start it in Safe Mode.
Your computer is unstable and crashing. You may run System Restore without crashing from Safe Mode.
Then, how to do System Restore in Safe Mode Windows 10? First, you should boot into Safe Mode.
How to boot into Safe Mode in Windows 10?
There are three methods you can use to boot into Safe Mode in Windows 10:
Method 1: Start Safe Mode from Power options
1. Press and hold the Shift key while you select Power > Restart from the Start menu.
2. After your PC restarts to the Choose an option screen, select Troubleshoot > Advanced options > Startup Settings > Restart.
3. After your PC restarts, you’ll see a list of options. Select 4 or F4 to start your PC in Safe Mode.
Method 2: Start Safe Mode from Settings
1. Select Start > Settings > Update & Security > Recovery.
2. Under Advanced startup, select Restart now.
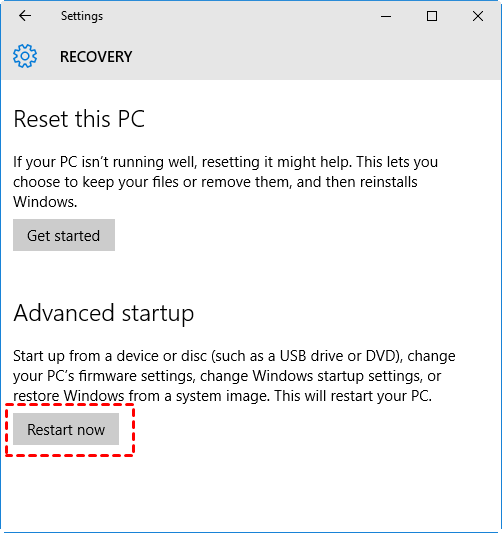
3. After your PC restarts to the Choose an option screen, you can repeat Step 2 and 3 in Method 1.
Method 3: Start Safe Mode from a black or blank screen
1. Hold down the power button for 10 seconds to turn off your PC.
2. Press the power button again to turn on your PC. On the first sign that Windows has started, hold down the power button to turn off your PC.
3. Turn on and off your computer like you do above.
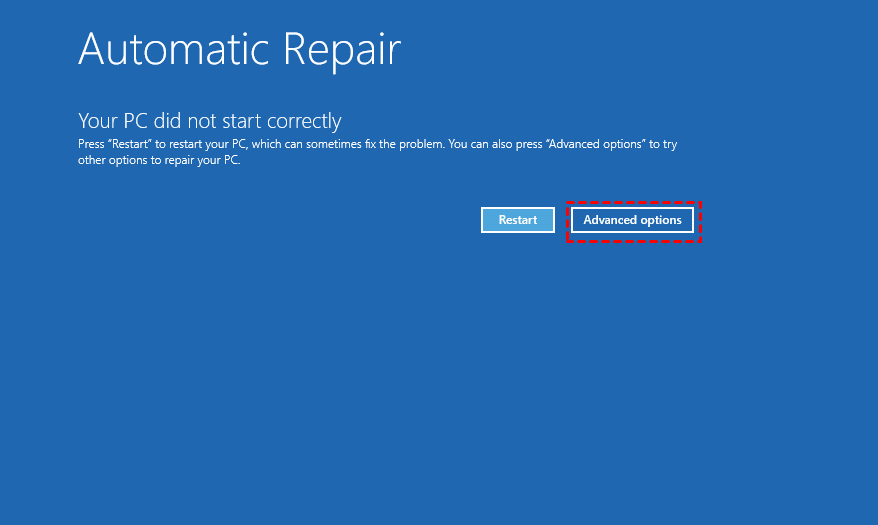
4. Turn on your computer and let it fully restart this time. You will enter WinRE. Choose Advanced options in the Automatic Repair screen.
5. When you access the Choose an option screen, you can repeat Step 2 and 3 in Method 1.
Run System Restore from Safe Mode in Windows 10
After you enter Safe Mode, you can follow the instructions below to perform System Restore from Safe Mode:
Note: You must have turned on system protection and created at least one restore point before you can restore from a system restore point using System Restore.
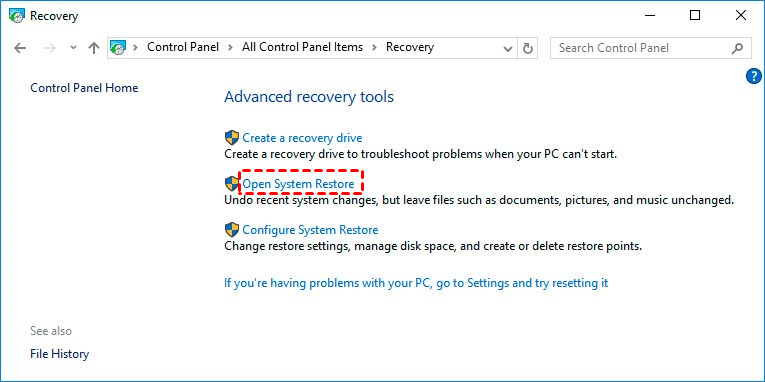
1. Search “recovery” in the Windows 10 search box and select the top result Recovery.
2. In the pop-up window, click Open System Restore.
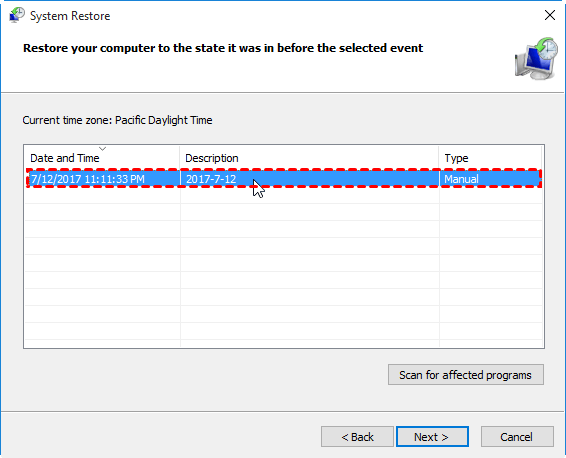
3. When you launch System Restore, click Next.
4. Select one of the available restore points to do system restore in Safe Mode. It is recommended to scan for affected programs before starting system restore. Click Next to continue.
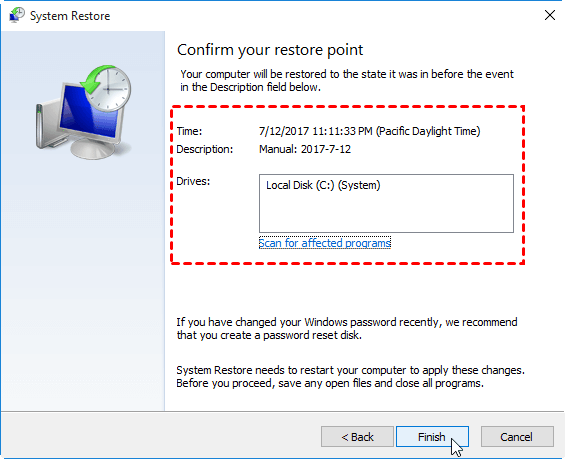
5. Confirm the restore point and click Finish to start system restore in Windows 10.
Tips: If you prefer to use Command Prompt, you can enter Safe Mode with Command Prompt. Then, type “rstrui.exe” and press Enter to open System Restore.
Easier way to backup and restore computer system
Now you know how to run System Restore in Safe Mode Windows 10. Nevertheless, the process may fail because system restores points are gone. Some users even find they can’t create restore point in the beginning. Is there another way to backup and restore Windows?
AOMEI Backupper Standard, the best free backup software, offers you full backup and recovery solutions.
There are four types of backup available: System/Disk/Partition/File Backup, which meets your different needs.
You are allowed to restore your computer to an earlier date and recover lost files easily from the backup image.
If your computer fails to boot, you are able to restore your computer under WinPE using the Windows recovery drive made by AOMEI Backupper.
All Windows PC operating systems like Windows 10/8.1/8/7/Vista/XP are supported. Just download this freeware to have a try.

Conclusion
When you want to do System Restore in Safe Mode Windows 10, you can refer to the detailed steps offered in this article. To double ensure your computer safety, you can turn to AOMEI Backupper. Apart from the backup & restore functions, AOMEI Backupper is capable of clone. You may use it to upgrade hard drive to SSD in Windows 10. Why not try it now?
How to directly reboot in Safe Mode in Windows 10
The Safe mode in Windows, start the computer with a limited set of drivers and system files. Startup programs, add-ons, etc. first, do not run in Safe Mode, and only the basic drivers needed to start Windows 10/8/7 are started. This mode is quite useful for troubleshooting Windows problems.
If you want to restart and boot directly into Safe Mode, you have to watch the computer reboot, watch the various BIOS messages, select which operating system you want to boot with, and then press F8 at the exact moment to enable the Advanced Boot menu. In Windows 10/8, of course, things are a bit different. You have to first enable F8 key if you want to use it to boot in Safe Mode.
Reboot in Safe Mode
But you wish you can directly reboot into Safe Mode. To do this, open Run box, type msconfig and hit Enter to open the System Configuration utility.
Select the Boot tab, and under Boot Options, check Safe Mode. The Minimal option will get selected automatically. If you need other Safe Mode options like Networking, etc.on, you can select those.
Click on Apply > OK. You will now see a prompt. Click on the Restart button, and the computer will initiate the process to reboot your computer directly in safe mode. So before you click the Restart button, make sure that you have saved all your work.
Do note that, if you reboot again from Safe Mode, you will again reboot back into Safe Mode. So once you have completed your work in Safe Mode, again run msconfig and uncheck the Safe Boot option, Click Apply, and then restart your computer. This will bring you back to your desktop, after the restart.
Shortcut to reboot in Safe Mode
If you need to reboot in Safe Mode frequently, you can create its shortcut. Right-click on your desktop, select New > Shortcut. In the Location field, copy-paste the following path:
Click next and name the shortcut as, say, Restart Options.
BootSafe
Alternatively, you can download and use a simple .exe utility called BootSafe.
However, when you want to leave Safe Mode and return to Normal mode, you need to use this program again to get a reboot into Normal mode.
Восстановление системы в безопасном режиме Windows
При некоторых обстоятельствах, например, в случае возникновения проблем в работе компьютера, пользователю может понадобиться выполнить восстановление Windows в безопасном режиме. Восстановление системы, выполненное в безопасном режиме, поможет восстановить нормальную работу ПК, если на устройстве возникли неполадки.
Безопасный режим Windows — специальный, диагностический режим работы операционной системы с ограниченной функциональностью. При использовании безопасного режима, ОС загружается только с минимальным количеством самых необходимых компонентов, служб и драйверов.
Это помогает выявить и исправить проблемы в работе Windows или удалить вирусы с компьютера.
При использовании операционной системы на компьютере случаются проблемы, вызванными разными причинами: ошибками пользователя, неправильной работой программного обеспечения, воздействием вирусов и т. п. Пользователю нужно решить проблему, чтобы продолжить дальнейшую эксплуатацию своего ПК.
Необходимо вернуть системе обычное состояние. Один из самых простых способов решения проблемы: восстановление предыдущего работоспособного состояния Windows.
Пользователь может воспользоваться следующими методами:
- Выполнение восстановления с помощью ранее созданных точек восстановления системы.
- Восстановление Windows из резервной копии, если на данном ПК было выполнялось резервное копирование, с помощью которого был создан резервный образ системы.
В этом руководстве мы рассмотрим вариант восстановления системы, выполняемый с помощью контрольных точек восстановления Windows. Встроенный инструмент защиты системы проведет откат Windows до более раннего состояния, имевшегося на ПК в момент создания точки восстановления.
Если на компьютере возникли проблемы в работе, не всегда получается запустить процесс восстановления в штатном режиме. Из-за воздействия вирусов или неполадок в работе программного обеспечения, ОС не реагирует на команды пользователя. В результате, на данном ПК не получится запустить встроенное средство восстановления системы.
Есть способ решить эту проблему: нужно запустить восстановление системы Windows в безопасном режиме (Safe Mode). Восстановление через безопасный режим проходит в два этапа:
- Происходит вход в безопасный режим Windows.
- Запускается восстановление системы через безопасный режим.
В инструкциях этой статьи показаны операции по восстановлению операционных систем Windows 10 и Windows 7 после перехода в безопасный режим работы.
Восстановление Windows 10: безопасный режим работы ПК
Сначала рассмотрим восстановление Windows 10 через безопасный режим. Сам процесс отката системы к предыдущему состоянию проходит одинаково в операционных системах Windows 10, Windows 8.1 (Windows 8), Windows 7.
На первом этапе необходимо войти в безопасный режим. На сайте есть подробная статья, в которой описано несколько вариантов входа в диагностический режим Windows 10.
После этого необходимо запустить восстановление системы Windows 10 в безопасном режиме. Для этого мы используем системные средства — командную строку Windows и встроенный инструмент для запуска команд из окна «Выполнить».
Чтобы запустить восстановление Windows через безопасный режим, выполните следующие действия:
- После загрузки в безопасном режиме, введите в поле поиска «cmd».
- Среди результатов поиска появится «Командная строка», по которой нужно щелкнуть курсором мыши.
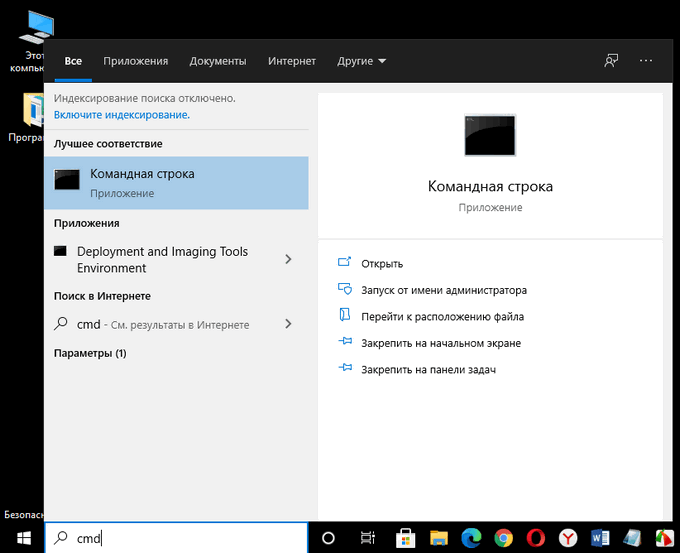
- В окне интерпретатора командной строки введите команду «rstrui.exe», а затем нажмите на клавишу «Enter».

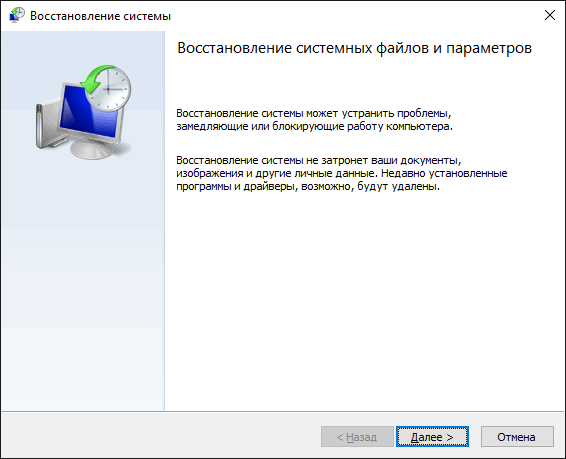
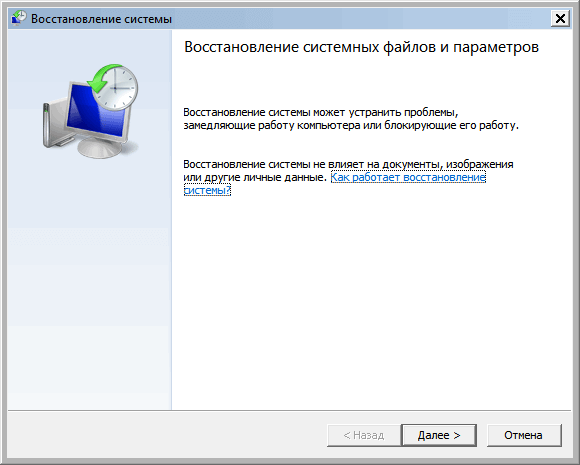
- На компьютере запустится системный инструмент. Откроется окно «Восстановление системных файлов и параметров», в котором нужно нажать на кнопку «Далее».
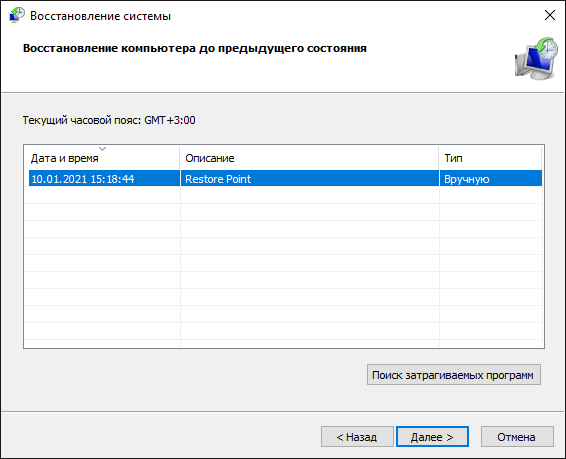
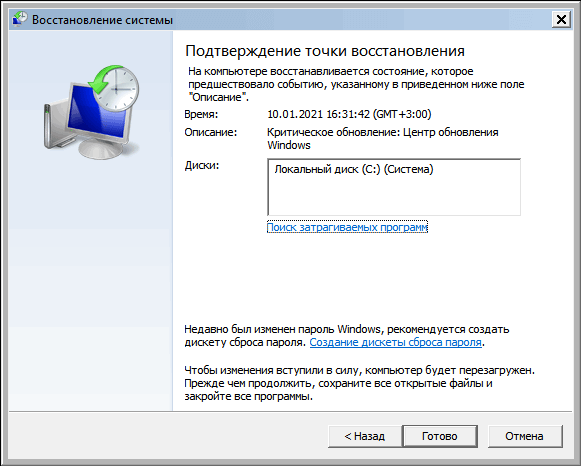
- В окне «Восстановление системы» выберите подходящую точку восстановления (на ПК может быть в наличии несколько контрольных точек).
Можете нажать на кнопку «Поиск затрагиваемых программ», чтобы ознакомиться с дополнительными сведениями о затрагиваемом программном обеспечении.
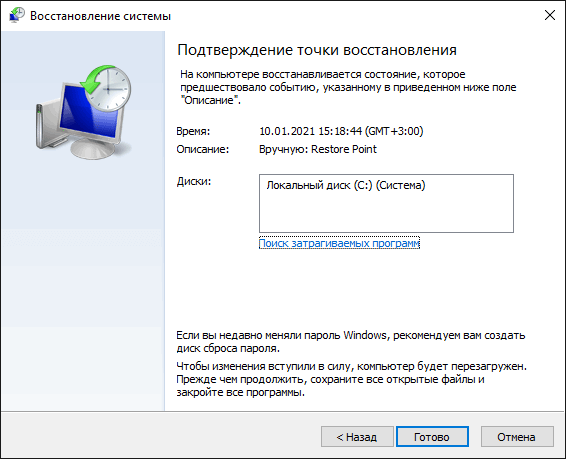
- В окне «Подтверждение точки восстановления» указана выбранная точка восстановления. Примите к сведению эту информацию, нажмите на кнопку «Готово».
- Происходит запуск восстановления операционной системы. В это время, на экране отобразится окно с информацией о прогрессе процесса восстановления.
- По завершению операции, компьютер перезагрузится.
После того, как восстановление Виндовс в безопасном режиме завершено, можете продолжать использование компьютера в обычном режиме. Если на ПК у вас возникают трудности с выходом из безопасного режима, воспользуйтесь подробной статьей на моем сайте, посвященной решению этой проблемы.
Если вариант с командной строкой вам не подходит, можно использовать другой способ, чтобы запустить восстановление системы через безопасный режим Windows. Для этого, нужно пройти следующие шаги:
- Нажмите на клавиши «Win» + «R».
- В диалоговое окно «Выполнить» введите команду: «rstrui», а затем нажмите на кнопку «ОК».

- После этого на рабочем столе откроется окно стандартного средства восстановления Windows, в котором нужно пройти шаги, уже описанные в первом способе этой статьи.

Восстановление системы в безопасном режиме Windows 7
Сейчас мы выполним восстановление Виндовс 7 в безопасном режиме. На первом этапе необходимо войти в безопасный режим работы компьютера. Прочите подробную статью о разных способах входа в диагностический режим работы ОС.
Восстановление системы Windows 7 через безопасный режим проходит следующим образом:
- Нужно нажать на клавиатуре на клавиши «Win» + «R».
- В открывшемся окне «Выполнить», в поле «Открыть:» необходимо ввести команду: «rstrui.exe».
- Нажимайте на клавишу «Enter».
- Начинается восстановление Виндовс через безопасный режим. В открывшемся окне нажмите на кнопку «Далее».
- На следующем этапе необходимо выбрать подходящую точку восстановления.

- В завершающем окне мастера восстановления необходимо ознакомиться с информацией о выбранной точке восстановления.
- Чтобы запустить процесс сброса Windows к предыдущему состоянию, нажмите на кнопку «Готово».
- На ПК происходит процесс восстановления, занимающий некоторое время.
- После автоматической перезагрузки операционная система Windows 7 запустится в обычном режиме, в рабочем состоянии.
- В меню кнопки «Пуск», в списке программ откройте папку «Стандартные».
- Там вы найдете системную утилиту «Командная строка».
- Запустите командную строку.
- В окне командной строки нужно выполнить команду: «rstrui.exe».

- После выполнения команды начнется восстановление Windows 7 из безопасного режима. Сначала потребуется выбрать точку восстановления, а затем выполнить откат системы. Все подробности этого процесса описаны в первом способе этой статьи.
Выводы статьи
В некоторых ситуациях полезно узнать о том, как запустить восстановление системы в безопасном режиме, потому что другие способы вызова системного средства не работают из-за неполадок в работе компьютера. Восстановление Виндовс через безопасный режим поможет провести откат системы, если это не получается сделать обычным способом из функционирующей ОС.
После входа в диагностический режим системы, можно запустить процесс восстановления Windows с помощью заранее созданных контрольных точек восстановления. В результате выполнения этой операции, операционная система вернется к работоспособному состоянию, которое она имела во время создания конкретной точки восстановления Windows.


