- Recover lost or deleted files
- The Quickest Way to Restore Deleted Files from Windows
- Contents
- Part 1. The Program for Windows Files Restoration
- Part 2. How to Restore Files Deleted in Windows
- How to refresh, reset, or restore your PC
- Before you start to refresh or reset your PC
- Refresh, reset, or restore
- To refresh your PC
- To reset your PC
- To restore your PC to an earlier point in time
Recover lost or deleted files
Note: If you’ve recently updated Windows 10 and are having problems finding files, see Find lost files after the upgrade to Windows 10.
If you can’t find a file on your computer or you accidently modified or deleted a file, you can restore it from a backup (if you’re using Windows backup) or you can try to restore it from a previous version. Previous versions are copies of files and folders that Windows automatically saves as part of a restore point. Previous versions are sometimes referred to as shadow copies.
To restore a file from a backup, make sure the media or drive that your backup is saved on is available, and then follow these steps:
To restore files from a backup
Open Backup and Restore by selecting the Start button  , selecting Control Panel, selecting System and Maintenance, and then selecting Backup and Restore.
Select Restore my files, and then follow the steps in the wizard.
Restore deleted files and folders or restore a file or folder to a previous state.
To restore a deleted file or folder
Open Computer by selecting the Start button , and then selecting Computer.
Navigate to the folder that used to contain the file or folder, right-click it, and then select Restore previous versions. If the folder was at the top level of a drive, for example C:\, right-click the drive, and then select Restore previous versions.
You’ll see a list of available previous versions of the file or folder. The list will include files saved on a backup (if you are using Windows Backup to back up your files) as well as restore points, if both types are available.
Note: To restore a previous version of a file or folder that’s included in a library, right-click the file or folder in the location where it’s saved, rather than in the library. For example, to restore a previous version of a picture that’s included in the Pictures library but is stored in the My Pictures folder, right-click the My Pictures folder, and then select Restore previous versions.
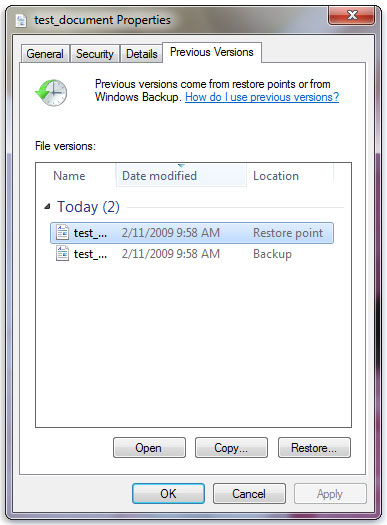
Some previous versions of files
Double-click a previous version of the folder that contains the file or folder you want to restore. (For example, if a file was deleted today, choose a version of the folder from yesterday, which should contain the file.)
Drag the file or folder that you want to restore to another location, such as your desktop or another folder.
The version of the file or folder is saved to the location that you selected.
Tip: If you don’t remember the exact file or folder name or its location, you can search for it by typing part of the name in the search box in the Documents library.
To restore a file or folder to a previous state
Right-click the file or folder, and then select Restore previous versions.
You’ll see a list of available previous versions of the file or folder. The list will include files saved on a backup (if you’re using Windows Backup to back up your files) as well as restore points, if both types are available.
The Previous Versions tab, showing some previous versions of files
Before restoring a previous version of a file or folder, select the previous version, and then click Open to view it to make sure it’s the version you want.
Note: You can’t open or copy previous versions of files that were created by Windows Backup, but you can restore them.
To restore a previous version, select the previous version, and then select Restore.
Warning: The file or folder replaces the current version on your computer, and the replacement can’t be undone.
Note: If the Restore button is unavailable, you can’t restore a previous version of the file or folder to its original location. You might be able to open it or save it to a different location.
The Quickest Way to Restore Deleted Files from Windows
Contents
- 1.1 Best Windows Recovery
- 1.2 Windows Recovery Tools
- 1.3 Windows 10 Recovery Tools
- 1.4 Windows Recovery Freeware
- 1.5 Stellar Phoenix Alternative
- 1.6 Remo Recover Alternative
2. Recover Files from Windows
- 2.1 Recover Deleted Files
- 2.2 Recover Permanently Deleted Files
- 2.3 Restore Deleted Files
- 2.4 Recover Files from Recycle Bin
- 2.5 Recover Folder
- 2.6 Recover Mail
- 2.7 Recover Document
- 2.8 Recover Photo
- 2.9 Recover Partition
- 2.10 Recover Password
3. Windows Recovery Solutions
- 3.1 Windows Backup Recovery
- 3.2 Windows Restore
- 3.3 Windows System Recovery
- 3.4 Windows Error Recovery
- 3.5 Windows Recovery Disk
- 3.6 Windows Recovery Disc
- 3.7 Windows USB Recovery
- 3.8 Windows Recovery Mode
- 3.9 Windows Unexpected Shutdown
We live in a world of technology where most of the important data such as home and office documents, pictures and videos of a memorable event or tour and music is stored on the computer. Whenever we want to remove any file from our computer, we are given an option to send it to the Recycle Bin before it can be erased permanently from the windows computer.
However, sometimes people delete their files using Shift + Delete or empty the Recycle bin mistakenly which will lead into the loss of the important data from the computer. Another problem which people may face is the faulty partition on the hard drive of the computer which will result in the permanent loss of the important files and folder. Sometimes extra storage devices such as external hard drives, USB, memory cards and smartphones have the important data which is lost due to a virus on the computer. If you are a victim of such problems, you can restore deleted files in Windows by following this guide.
Part 1. The Program for Windows Files Restoration
One of the basic qualities of a good data recovery software is the simplest and easy to use interface which can be used by the newbies without a single problem. iSkysoft Data Recovery for Windows doesn’t only have the simplest user-interface but it will also recover the lost files with three simple steps. The basic theme behind the usage of this software is the scan, preview and restore.
It can not only recover the lost data from the internal hard drives on a computer but also works perfectly with the external storage media. Using Recoverit (IS), you can not only recover the deleted files using Shift + Del shortcut, but it will also work to recover the lost files from Recycle Bin. This software is fully compatible with Windows 10.
Part 2. How to Restore Files Deleted in Windows
The first step is to get the latest version of Recoverit (IS) for Windows. After downloading the software, follow the on-screen instructions to install it on your computer. (Unlike Standard Mode, Wizard Mode is the targeted mode to recover the files, you can select the location and even the type of the file that you want to recover making this whole process even simpler. )
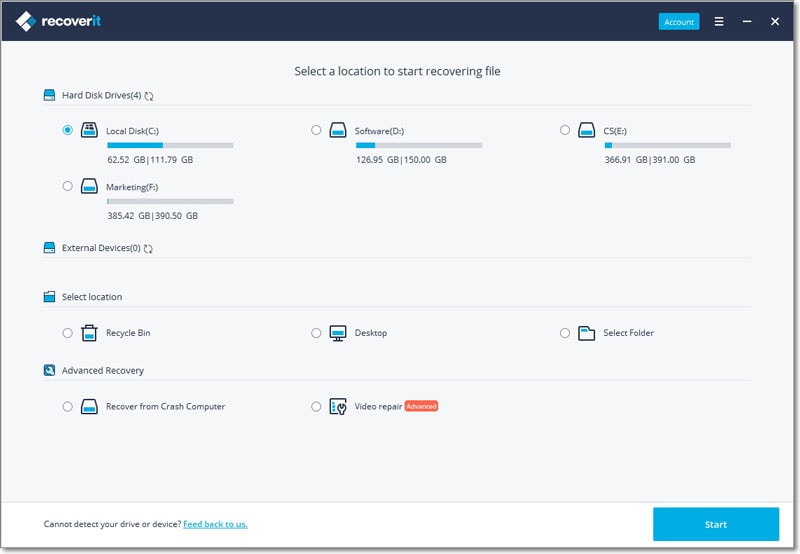
Step 1: Right click on the recently installed software and run it as administrator on your computer. The main screen will show the wizard. As you recover the deleted files from windows, click on the Lost file types as shown in the screenshot.
Step 2: Select the location of your files, if you don’t know the exact location of the file, you can select the whole partition which has the deleted files. After selecting the file, click on the Start button at the bottom right corner. Now, it will start the scan process which may take some time depending upon the location that you selected.
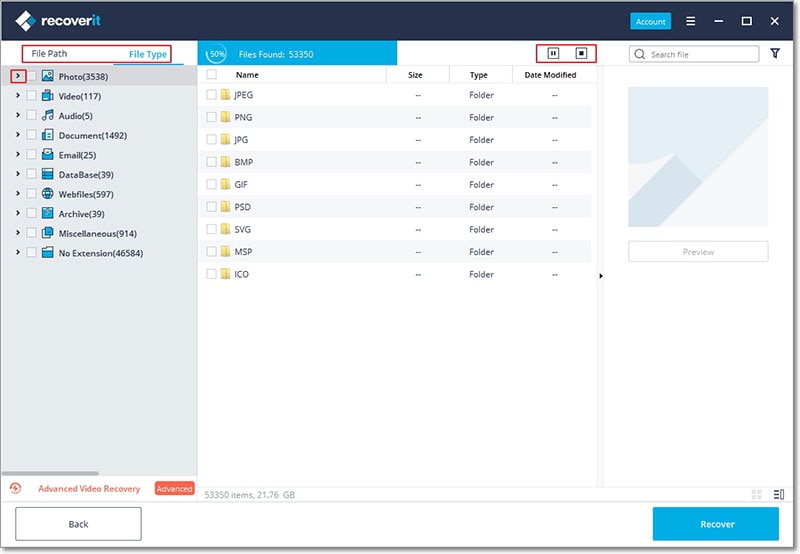
Step 3: Once the scanning process is complete, you will see a list of all the recovered files. Once you have found the files, select them and hit the Recover button to recover them.
Tips: From the left panel, you can select the Type of the file that you are looking for and the right panel will let you preview the file; If you have recovered many files, you can use the search bar to search for the exact file that you are looking. Write the file name in the search bar and click on Filter to search for the exact file.
How to refresh, reset, or restore your PC
Note: For information about this topic in Windows 10, see Recovery options in Windows 10.
If you’re having problems with your PC, you can:
Refresh your PC to reinstall Windows and keep your personal files and settings. Refresh also keeps the apps that came with your PC and the apps you installed from the Microsoft Store.
Reset your PC to reinstall Windows but delete your files, settings, and apps—except for the apps that came with your PC.
Restore your PC to undo recent system changes you’ve made.
If you’re having trouble starting (booting) your PC, see Windows Startup Settings (including safe mode), and go to the “Get to Windows Startup Settings in the Windows Recovery Environment” section. You can refresh, reset, or restore your PC from the Windows Recovery Environment.
If you want to back up and restore your personal files using File History, see Set up a drive for File History.
Before you start to refresh or reset your PC
In most cases, once you start to refresh or reset your PC, it’ll finish on its own. However, if Windows needs missing files, you’ll be asked to insert recovery media, which is typically on a DVD disc or thumb drive. If that happens, what you’ll need depends on your PC.
If your PC came with Windows 8.1 or Windows RT 8.1, you’ll need the discs or thumb drive that came with your PC. Check the info that came with your PC to see if your PC manufacturer provided these discs or media. In some cases, you might have created them when you first set up your PC.
If you don’t have either of those, you can make them if you have a USB thumb drive of 16 GB or larger. Having a recovery drive can help you troubleshoot and fix problems with your PC, even if it won’t start. For more info, see Create a USB recovery drive.
If you upgraded your PC to Windows 8.1 or Windows RT 8.1 with a DVD, use that disc. If you don’t have Windows 8.1 or Windows RT 8.1 media, contact Microsoft Support.
Refresh, reset, or restore
Select any of the following for more detailed info.
If your PC isn’t performing as well as it once did, and you don’t know why, you can refresh your PC without deleting any of your personal files or changing your settings.
Note: If you upgraded your PC from Windows 8 to Windows 8.1 and your PC has a Windows 8 recovery partition, refreshing your PC will restore Windows 8. You’ll need to upgrade to Windows 8.1 after the refresh has finished.
Warning: Apps you installed from websites and DVDs will be removed. Apps that came with your PC and apps you installed from Microsoft Store will be reinstalled. Windows puts a list of removed apps on your desktop after refreshing your PC.
To refresh your PC
Swipe in from the right edge of the screen, tap Settings, and then tap Change PC settings.
(If you’re using a mouse, point to the upper-right corner of the screen, move the mouse pointer down, click Settings, and then click Change PC settings.)
Tap or click Update and recovery, and then tap or click Recovery.
Under Refresh your PC without affecting your files, tap or click Get started.
Follow the instructions on the screen.
If you want to recycle your PC, give it away, or start over with it, you can reset it completely. This removes everything and reinstalls Windows.
Note: If you upgraded your PC from Windows 8 to Windows 8.1 and your PC has a Windows 8 recovery partition, resetting your PC will restore Windows 8. You’ll need to upgrade to Windows 8.1 after the reset has finished.
Warning: All of your personal files will be deleted and your settings will be reset. All apps that you installed will be removed. Only apps that came with your PC will be reinstalled.
To reset your PC
Swipe in from the right edge of the screen, tap Settings, and then tap Change PC settings.
(If you’re using a mouse, point to the upper-right corner of the screen, move the mouse pointer down, click Settings, and then click Change PC settings.)
Tap or click Update and recovery, and then tap or click Recovery.
Under Remove everything and reinstall Windows, tap or click Get started.
Follow the instructions on the screen.
Note: You’ll be asked to choose whether you want to erase data quickly or thoroughly. If you choose to erase data quickly, some data might be recoverable using special software. If you choose to erase data thoroughly, this will take longer but it makes recovering data less likely.
If you think an app or driver that you recently installed caused problems with your PC, you can restore Windows back to an earlier point in time, called a restore point. System Restore doesn’t change your personal files, but it might remove recently installed apps and drivers.
System Restore isn’t available for Windows RT 8.1.
Windows automatically creates a restore point when you install desktop apps and new Windows updates, if the last restore point is older than 7 days. You can also create a restore point manually at any time.
To restore your PC to an earlier point in time
Swipe in from the right edge of the screen, and then tap Search.
(If you’re using a mouse, point to the upper-right corner of the screen, move the mouse pointer down, and then click Search.)
Enter Control Panel in the search box, and tap or click Control Panel.
Enter Recovery in the Control Panel search box, and then tap or click Recovery.
Tap or click Open System Restore, and then follow the instructions.
If you need additional help refreshing, resetting, or restoring your PC, check out the Repair and Recovery community pages in the Windows forum for solutions that other people have found for problems they’ve experienced.


