- Add, Remove, Edit Context Menu items in Windows 10 with Context Menu Editors
- Edit Context Menu in Windows 10
- Using Registry Editor
- Context Menu Editors for Windows 10
- 1) Ultimate Windows Customizer, Right-Click Extender, Ultimate Windows Tweaker, & Context Menu Editor
- 2) ContextEdit
- 3) ShellExtView or ShellMenuView
- 4) Easy Context Menu
- 5) MenuMaid
- 6) File Menu Tools
- How to add any application to right-click menu in Windows 10
- Add any application to right-click menu in Windows 10
- Related Posts
- Set as default printer Context Menu item is missing in Windows 10
- How to remove Edit with Photos and Edit with Paint 3D from Context Menu in Windows 10
- Image Preview missing from Context Menu in Windows 10
- [email protected]
- Primary Sidebar
- How to Manually Edit the Right Click Menu in Windows
- Edit Right Click Menu for Files
- Edit Right Click Menu for Folders
- Edit Right Click Menu for Desktop
- Windows 10 Start Right-Click Context Menu Items Don’t Open
- 3 Answers 3
Add, Remove, Edit Context Menu items in Windows 10 with Context Menu Editors
Edit Context Menu in Windows 10
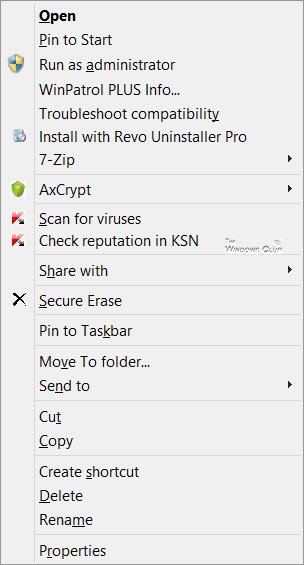
If you wish to reduce this clutter or remove items from this menu which are no longer useful, you can do so. Most programs will offer the explorer integration in their Settings, and if you look around, you may be able to find it and disable the File Explorer context menu integration. If not, you will have to edit the registry or use a third-party freeware.
Using Registry Editor
Run regedit to open the Registry Editor and navigate to the following key:
Here you need to simply delete the keys you don’t want. There are other registry locations too where this data may be stored.
Context Menu Editors for Windows 10
You can also use 3rd-party freeware context menu editors to remove context menu items or to add or edit them. Go through the list and see which supports your version of Windows OS.
- Ultimate Windows Customizer, Right-Click Extender, Ultimate Windows Tweaker, & Context Menu Editor
- ContextEdit
- ShellExtView or ShellMenuView
- Easy Context Menu
- MenuMaid
- File Menu Tools.
1) Ultimate Windows Customizer, Right-Click Extender, Ultimate Windows Tweaker, & Context Menu Editor
Some of our following freeware like Ultimate Windows Tweaker will help you edit the right-click context menu easily.
Ultimate Windows Customizer, Right-Click Extender , Ultimate Windows Tweaker, and Context Menu Editor are freeware releases from TheWindowsClub, and you may want to check them out. They have been developed for Windows 7 but may work on Windows 10 too.
2) ContextEdit
ContextEdit will allow you to easily control the items that appear on your context menu of Windows File Explorer.
The context menu often contains submenu rarely-used commands. These commands come from one of two places: shell commands stored within the system Registry, and context menu handlers. Get it here
3) ShellExtView or ShellMenuView
You can also try ShellExtView or ShellMenuView. They are small utilities that display the list of static menu items that appear in the context menu when you right-click a file/folder in Windows Explorer and allow you to easily disable or edit unwanted menu items.
4) Easy Context Menu
Easy Context Menu freeware will let you add a Program or Icon to the right-click menu.
5) MenuMaid
If you are you looking for a fast and easy way to clean up your Window Explorer and Internet Explorer right-click context menu, try MenuMaid.
Simply download the portable freeware app MenuMaid and uncheck the items you don’t want to show up. It also lets you disable or remove items from the Internet Explorer context menu. If you want to restore them, check them again.
6) File Menu Tools
File Menu Tools (link removed) lets you add, delete & customize the context menu items of the Windows Explorer – but it NOW comes bundled with a lot of crapware, according to the comments below.
It lets configure the following aspects:
- Add some build-in utilities in order to do operations over files and folders.
- Add customized commands which let run external applications, copy/move to a specific folder or delete specific file types.
- Configure the “Sends to…” submenu”.
- Enable/disable the commands which are added by other applications to the context menu and much more!
TIP: Read this post if you want to remove items from the “New” Context Menu.
Do let us know, how you manage to keep your Explorer right-click context menu clean and tidy!
How to add any application to right-click menu in Windows 10
By editing the Windows Registry, you can add Open with for any application to the Windows desktop right-click context menu in Windows 10. This can be quite useful if you use any program frequently. Let us see how to do it.

Add any application to right-click menu in Windows 10
Type regedit in the Start search box and hit Enter. Once the Registry Editor opens, navigate to the following key-
Right-click in the right-side panel and click on New > Key.
Set the name of this newly created Key to what the entry should be labeled in the right-click context menu. As an example, I have named it FileZilla.
Select the newly created FileZilla key and now, right-click on the right-side panel and click on New > Key, again.
Set the name of this newly created Key as command. Navigate inside that command key.
You will now find a new String value on the right-side panel. We have to modify it.
To do this, you will need to have the full path of the program that you want to execute from the Context Menu.
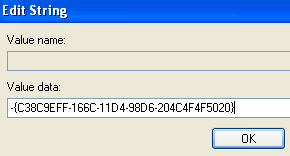
Get it copied to your clipboard and paste this path in double-quotes in the Value Data field and then select OK. In this case, you need to know the file path of filezilla.exe.
Once you are done with that, it will look like this.
Reboot your computer for the changes to take effect.
Now, you will be able to access programs using the Windows 10 Desktop right-click context menu.
Hope you find this useful?
These Context Menu Editors will help you easily Add, Remove, Edit Context Menu items in Windows 10.
Date: March 3, 2019 Tags: Context Menu
Related Posts
Set as default printer Context Menu item is missing in Windows 10
How to remove Edit with Photos and Edit with Paint 3D from Context Menu in Windows 10
Image Preview missing from Context Menu in Windows 10
[email protected]
Ayush has been a Windows enthusiast since the day he got his first PC with Windows 98SE. He is an active Windows Insider since Day 1 and is now a Windows Insider MVP. He has been testing pre-release services on his Windows 10 PC, Lumia, and Android devices.
Primary Sidebar
 report this ad
How to Manually Edit the Right Click Menu in Windows
Third-party applications can make it ridiculously long
The last time I right-clicked on a file, I was annoyed by the fact that it took a full two seconds to load the context menu. Why? Well because I had installed so many different applications on my computer that a couple of them added themselves to my right-click context menu automatically!
Some programs ask you if you want the option added to your context menu while others do not. Now granted, I probably said yes a couple of times, thinking how useful it would be to have that in my right-click menu, but there are still many I never use!
If you’re looking for a way to remove applications from right click menu for files, folders and the desktop, you can do it yourself with a little bit of registry hacking. If you don’t want to bother with the registry, check out my previous post on freeware utilities to edit the right-click context menu.
First, take a look at my ridiculously long right click menu:
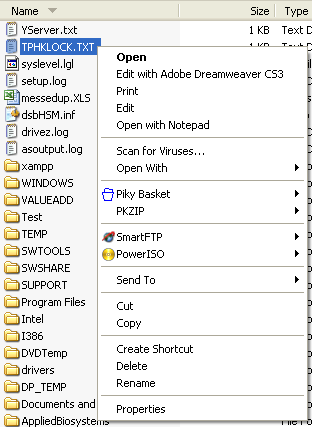
Now that is just way too long! There’s Dreamweaver, Notepad, anti-virus, Pinky basket, PKZIP, SmartFTP, and PowerISO! Whew! So how can we customize the menu to something more manageable?
First, make sure to back up your registry in case something gets messed up. Now open the registry editor by going to Start, then Run and then typing in REGEDIT.
Edit Right Click Menu for Files
There is a right-click menu for files and another for folders. To get to the one for files, head over to this registry key:
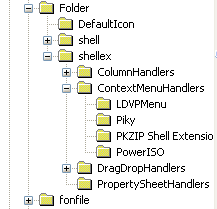
HKEY_CLASSES_ROOT\*\shellex\ContextMenuHandlers\
You should now see a listing like this:
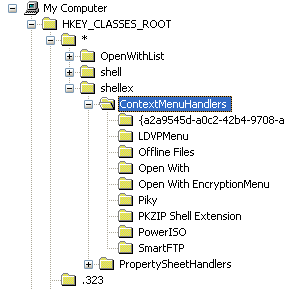
All the folders listed under ContextMenuHandlers are applications that show up when you right click on a file in Windows. You can either delete the folder to remove the option or simply disable the folder, which is better in case you want to bring it back later on.
You can disable an application by clicking on the folder in the left pane and then right-clicking on the key value in the right pane and choosing “Modify“.
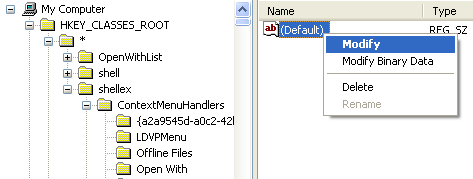
All you need to do is add a minus sign without the parentheses (–) in front of the key value like shown below:
Click OK, then the refresh button at the top and then try right-clicking on the file! The program should now be gone from the context menu. If the minus sign option is not working, you can simply delete the entire key for that particular program by right-clicking and choosing Delete.

You may notice that there are extra items in your right-click context menu that are not showing up under this key. That’s because not all of the menu items are stored in one location. You may also find other menu items for programs stored at these locations:
HKEY_CLASSES_ROOT\AllFileSystemObjects\ShellEx\ContextMenuHandlers

Edit Right Click Menu for Folders
You can also follow the same steps as shown above for folders; it’s just a different registry path. In order to edit the menu options for right clicking on folders, go here:
HKEY_CLASSES_ROOT\Folder\shellex\ContextMenuHandlers\
HKEY_CLASSES_ROOT\Directory\shell
You’ll have to scroll quite a bit, but once you get there, it should look something like this:
Again, you can either delete the folders under ContextMenuHandlers or you can simply disable them by editing the key and putting a – in front of the value. Simple as that and works like a charm!
Edit Right Click Menu for Desktop
Yes, the desktop in Windows has a different location in the registry for its context menu. Luckily, it’s got the same structure as we have shown above, so you won’t have any trouble figuring out how to remove items.
Most programs never add anything to the desktop right-click menu, so it won’t be often that you’ll use this registry hack. The location for the desktop menu items is here:
HKEY_CLASSES_ROOT\Directory\Background\shell
HKEY_CLASSES_ROOT\Directory\Background\shellex\ContextMenuHandlers

If you have always wanted to get rid of that annoying Gadgets menu option from the desktop context menu, now you can!
You can also add any application to the desktop right-click menu pretty easily. Just right-click on the shell key and choose New – Key. Name the key whatever you want as that will appear in the context menu. In my example, I created a key called Paint.
Now right-click on the new key and again choose New – Key. This time name the key command. Now double-click on the Default value in the right-pane and paste in the path to your program. Here is what my registry entries look like:

You can immediately go to the desktop, right-click and you should see a new option for your program!

So those are the three different context menus in Windows and how you can edit them using the registry. If you have any questions or problems, post a comment. Enjoy!
Founder of Online Tech Tips and managing editor. He began blogging in 2007 and quit his job in 2010 to blog full-time. He has over 15 years of industry experience in IT and holds several technical certifications. Read Aseem’s Full Bio
Windows 10 Start Right-Click Context Menu Items Don’t Open
Updated from 8.1 to 10 today. Worked fine in 8.1.
As the title suggests when I right-click my Start bottom left and want to open anything in the Context menu (Power Options, Event Viewer etc.) it doesn’t do anything. Nothing opens, no process starts.
I checked my C:\Users\user\AppData\Local\Microsoft\Windows\WinX folder and the groups are there, what’s more, if I click on any shortcuts directly from that folder, the applications do start. I can access event viewer and so on.
I’m assuming it’s a registry issue, does anyone know something more?
3 Answers 3
I found the solution after hours of searching. Windows 10 has issues with some shell extensions. See here: http://forums.hexus.net/windows/296885-winkey-x-menu-shortcuts-not-working-win-8-1-a.html
Using CCLeaner I was able to go into the Tools > Startup > Context Menu and disable shell extensions. I found out that it was QuickSFV that was causing this issue, so I disabled it and voila the items work again.
If re-copying the WinX folder doesn’t solve the problem, there is probably an obsolete registry entry pointing to a shell extension. You can track it down with this little jewel: http://www.nirsoft.net/utils/shexview.html
Sort by manufacturer and then disable all the non-Microsoft entries. Restart Windows Explorer (ctrl-e in the program) and see if your right-click works on something like Control Panel.
Then just re-enable them one at a time (or in small groups) and ctrl-e to restart Windows Explorer each time. Test each time to be sure your links are still working. Eventually you’ll find the culprit. You can then use the program to locate the CLSID in the registry and delete or disable it. Done and done! Good luck — hope it works for you!


