- Right Click Enhancer для Windows
- Windows: How to add batch-script action to Right Click menu
- 6 Answers 6
- How to add a custom right-click menu to a webpage?
- 20 Answers 20
- Is right click a Javascript event?
- 19 Answers 19
- Fix: Right Click Not Working on Windows 10
- 1. Turn off the Tablet Mode
- Method 1: Turn off Tablet Mode in Action Center
- Method 2: Turn off Tablet mode Through Settings
- Method 3: Use System Registry Editor to Turn Off Tablet Mode (Advanced Users Only)
- 2. Use Shell Extension Manager Application for Windows
- 3. Executing DISM Commands
- 4. Run the SFC Scan
- 5. Remove Registry Items
- 6: Uninstall/Disable Conflicting Applications
- 7: Update Drivers
Right Click Enhancer для Windows
| Оценка: |
4.33 /5 голосов — 6 |
| Лицензия: | Бесплатная |
| Версия: | 4.5.6 | Сообщить о новой версии |
| Обновлено: | 10.01.2020 |
| ОС: | Windows 10, 8.1, 8, 7, XP |
| Интерфейс: | Английский |
| Разработчик: | RBSoft |
| Категории: | Расширения — Быстрый запуск, доступ |
| Загрузок (сегодня/всего): | 0 / 1 559 | Статистика |
| Размер: | 3,93 Мб |
| СКАЧАТЬ | |

Right Click Enhancer — набор полезных утилит для Проводника. Позволяет добавлять в контекстное меню наиболее часто используемые приложения, команды, папки и файлы. Таким образом, вы можете открыть любое приложение прямо во время просмотра файлов. Также есть возможность добавлять подменю и дополнительно организовывать ярлыки.
Приложение включает в себя семь утилит, которые позволяют расширить возможности контекстного меню Проводника Windows. Все утилиты просты в настройках и использовании.
- С помощью Right Click Tweaker можно добавить в контекстное меню новые полезные команды, служащие для перемещения объекта, копирования пути к нему в буфер обмен, проверки на целостность или создания списков файлов в папке.
- File Type Editor служит для изменения ассоциаций типов файлов и приложений. В том числе редактирования и удаления существующих и создания новых с присвоением необходимых значков и аргументов.
- Send To Manager позволяет добавлять или удалалять элементы (программу или папку) системного меню «Отправить».
- Right Click Editor IE позволяет удалять и добавлять новые пункты в контекстное меню браузера Internet Explorer.
- New Menu Editor позволяет отредактировать меню «Создать».
- Smart Renamer служит для группового переименования файлов (по тегам, атрибутам, маске).
- SmartSFV используется для проверки целостности файлов.
Tweaker помогает сэкономить около 100 часов работы путем расширения общих задач, таких как перемещение и копирование файла, в том числе скопировать содержимое файла, не открывая его, переименование файлов и многие другие. Также включает в себя множество функций, которые недоступны для пользователей напрямую — добавляет MSCONFIG (средство настройки системы) и Problem Steps Recorder.
При установке нового приложения некоторые из них добавляют свои опции в контекстное меню. Это обеспечивает быстрый переход к запрашиваемым функциям, но в то же время чем больше опций, тем больше места занимает само контекстное меню на экране, превращаясь в простынь. С помощью редактора вы сможете почистить менюшку, оставив только самые необходимые запросы.
- Добавление полезных твиков.
- Создание новых файлов с предопределенным содержанием.
- Экономия времени.
- Экспорт файлов и ключей реестра, которые можно использовать на другом ПК.
- Можно добавлять параметры командной строки.
- Не влияет на производительность ПК.
Windows: How to add batch-script action to Right Click menu
I have a few programs that creates temp files or backup files or similar files that are not important. For example, GVim for Windows by default creates a backup file in filename.txt
I sometimes need to clean up a directory and remove all these files. I have made a simple .bat file for this. However, it is cumbersome to have to start up CMD, navigate to the folder, run the script. Especially since this is a script that I would like to run often on various folders. And I do not want to copy the script to multiple folders, as this would be a maintenance nightmare.
So, I was thinking, that the best solution would be to add a Right Click menu item that allows me to run the script. So that I can right click on a folder in Explorer and click Cleanup and then have my script run on this folder.
So my question is: How do I add a right click menu action that runs a custom batch script?

6 Answers 6
I have tried on Windows XP SP3 with this .reg key. Don’t have Windows 7 at the moment to test it properly but it should be almost the same.
- Open notepad and paste the code from below.
- Edit as per your need.
- Save as MyScript1.reg
- Double click to import in registry.
- Test by Right click on any directory in Explorer

Actually, the current answer isn’t out of date. I tried the exact same thing on Windows 10 and was able to add Run Batch script to the context menu of all folders in Windows.
This is the content of my batch script (won’t work with UNC paths):
The registry changes I made can be replicated with this REG file:
This only adds a context menu item for all directories/folders in Windows. If you want it showing for each and every file instead, you can use this:
Alternatively, you can add your batch script to the Send To item list by creating a shortcut to your batch script and placing it under %APPDATA%\Microsoft\Windows\SendTo (or enter shell:sendto into the address bar)
If you want your script to show in the context menu that appears when you right click on the empty space within a directory (directory background?) you can use the following REG file:
You don’t need the «Icon»=»%SystemRoot%\\System32\\shell32.dll,71» line. It simply adds an icon to your context-menu that looks like this:
How to add a custom right-click menu to a webpage?
I want to add a custom right-click menu to my web application. Can this be done without using any pre-built libraries? If so, how to display a simple custom right-click menu which does not use a 3rd party JavaScript library?
I’m aiming for something like what Google Docs does. It lets users right-click and show the users their own menu.
NOTE: I want to learn how to make my own versus using something somebody made already since most of the time, those 3rd party libraries are bloated with features whereas I only want features that I need so I want it to be completely hand-made by me.

20 Answers 20
Answering your question — use contextmenu event, like below:
But you should ask yourself, do you really want to overwrite default right-click behavior — it depends on application that you’re developing.

Was very useful for me. For the sake of people like me, expecting the drawing of menu, I put here the code I used to make the right-click menu:

A combination of some nice CSS and some non-standard html tags with no external libraries can give a nice result (JSFiddle)
HTML
Note: the menu tag does not exist, I’m making it up (you can use anything)
CSS
The JavaScript is just for this example, I personally remove it for persistent menus on windows
Also note, you can potentially modify menu > menu

According to the answers here and on other ‘flows, I’ve made a version that looks like the one of Google Chrome, with css3 transition. JS Fiddle
Lets start eazy, since we have the js above on this page, we can worry about the css and layout. The layout that we will be using is an element with a element or a font awesome icon ( ) and a to show the keyboard shortcuts. So this is the structure:
We will put these in a div and show that div on the right-click. Let’s style them like in Google Chrome, shall we?
Now we will add the code from the accepted answer, and get the X and Y value of the cursor. To do this, we will use e.clientX and e.clientY . We are using client, so the menu div has to be fixed.
And that is it! Just add the css transisions to fade in and out, and done!
Is right click a Javascript event?
Is right click a Javascript event? If so, how do I use it?
19 Answers 19
As others have mentioned, the right mouse button can be detected through the usual mouse events (mousedown, mouseup, click). However, if you’re looking for a firing event when the right-click menu is brought up, you’re looking in the wrong place. The right-click/context menu is also accessible via the keyboard (shift+F10 or context menu key on Windows and some Linux). In this situation, the event that you’re looking for is oncontextmenu :
As for the mouse events themselves, browsers set a property to the event object that is accessible from the event handling function:
have a look at the following jQuery code:
The value of which will be:
- 1 for the left button
- 2 for the middle button
- 3 for the right button

You could use the event window.oncontextmenu , for example:


If you want to detect right mouse click, you shouldn’t use MouseEvent.which property as it is non-standard and there’s large incompatibility among browsers. (see MDN) You should instead use MouseEvent.button . It returns a number representing a given button:
- 0 : Main button pressed, usually the left button or the un-initialized state
- 1 : Auxiliary button pressed, usually the wheel button or the middle button (if present)
- 2 : Secondary button pressed, usually the right button
- 3 : Fourth button, typically the Browser Back button
- 4 : Fifth button, typically the Browser Forward button
MouseEvent.button handles more input types than just standard mouse:
Buttons may be configured differently to the standard «left to right» layout. A mouse configured for left-handed use may have the button actions reversed. Some pointing devices only have one button and use keyboard or other input mechanisms to indicate main, secondary, auxilary, etc. Others may have many buttons mapped to different functions and button values.
Fix: Right Click Not Working on Windows 10
In Windows 10, you may encounter an issue whereby the right click does not work (or rather, the context menu doesn’t appear). In some cases right-clicking on the mouse works erratically; sometimes responding and others just remain still.
 Mouse
Mouse
However, if you take a look at the WinX folder all the shortcuts in there will work seamlessly when directly clicked. You can even see the event viewer.
But before moving on with the solutions, make sure the mouse is properly working, to do so, plug the mouse into another system (laptop/ desktop) and check if the right-click is working. For a wireless mouse, replace its batteries and then try the undermentioned solutions. Moreover, disable any network drives/cards during the troubleshooting process. It will be a good idea to unplug all the USB devices except the Mouse. Make sure there is no disk in the CD/DVD ROM. To be sure if the problem is hardware or software related, boot the system in Safe Mode and check if right-click is working. If you are using the PC in a corporate environment, then check with your IT administrator if any group policy is restricting the right-click.
Repair Corrupt System Files
Download and run Restoro to scan and restore corrupt and missing files from here, once done proceed with the solutions below. It is important to ensure that all system files are intact and not corrupt before proceeding with the solutions below.
1. Turn off the Tablet Mode
The failure of the right-click function can be directly attributed to TABLET mode being activated on your computer. You cannot do most of the right-click operations while in this mode. There are many ways to turn off the tablet mode on your Windows 10 PC.
Method 1: Turn off Tablet Mode in Action Center
- For this option, press the combination keys WINDOWS + A, or click on the system icon for Action Center which is usually located in the taskbar notification zone.
- Navigate to the bottom of the Action Center and then click or tap on Tablet Mode. It is a two – way toggle between ON and OFF, so do it according to your preference. Once done, test to see if the right-click now works.
 Turn Off Tablet Mode in Action Center
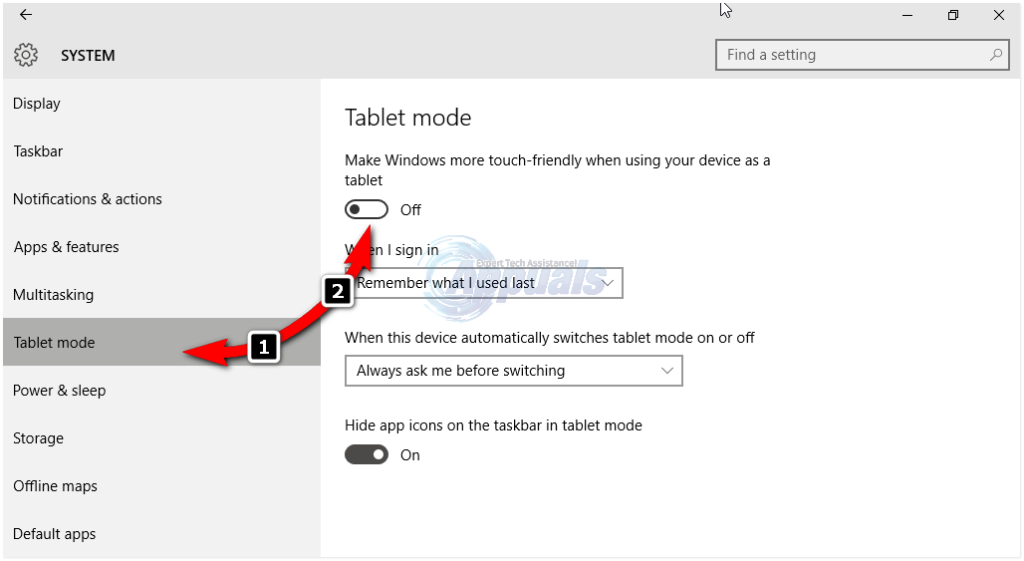
Method 2: Turn off Tablet mode Through Settings
- Go to Settings and click on System.
- On the left-hand side, you will see the line Tablet Mode. Click on it.
- Now on the right side identify the phrase “Make Windows more touch-friendly when using your device as a tablet”. Turn it off.
 Turn Off Tablet Mode in Settings
In case you need to enable Tablet mode, just do the same thing as above but this time turn the button ON.
Take note of the options just under this instruction; they may come in handy for future interactions. There are options for the mode that initiates immediately after you sign in. You can let the system automatically switch to tablet mode on signing in, go to the desktop, or just use the last signing in mode. There are also some more options for how the system notifies you when tablet mode is on automatic mode.
Method 3: Use System Registry Editor to Turn Off Tablet Mode (Advanced Users Only)
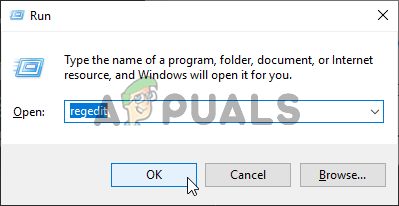
- Go to “Run”. In Run, key in the word Regedit.exe or just Regedit. The registry editor appears.
 Opening the Registry Editor
 - Navigate to the path
- When you click on the folder ImmersiveShell, on the right-hand side locate the DWORD/entry TabletMode. To turn off tablet mode, change its value to 0.
 Opening the Registry Editor
2. Use Shell Extension Manager Application for Windows
The right-click problem is sometimes also caused by third party extensions on context menus. There is a utility that can help you get rid of these extensions effectively without much struggle.
- DownloadShell Extension Manager.
- After completion of the download, launch the application using your keyboard (Shift+F10) and then select “run as administrator”. No installation is required here.
- On the menu that appears select Options. Click Filter by Extension Type and then opt for Context Menu.
- A list will be shown. Take note of the items having a pink background. They are the entries installed by 3 rd party software.
- Press and hold the CTRL key and then click on all the entries having a pink background. On the left corner, click the red button to disable them all.
- Again under Options, Restart Explorer.
- Right-click on your desktop now and see if the problem has been resolved. If so, start enabling the 3 rd party extensions one by one.
- If once again the right click problem occurs, it is most certainly the last 3 rd party extension you enabled. Disable it, or just completely uninstall its parent software or program if necessary.
3. Executing DISM Commands
The Disk health may be damaged due to which the right-click is not working on the computer. Therefore, in this step, we will be checking and repairing the Disk Health. For that:
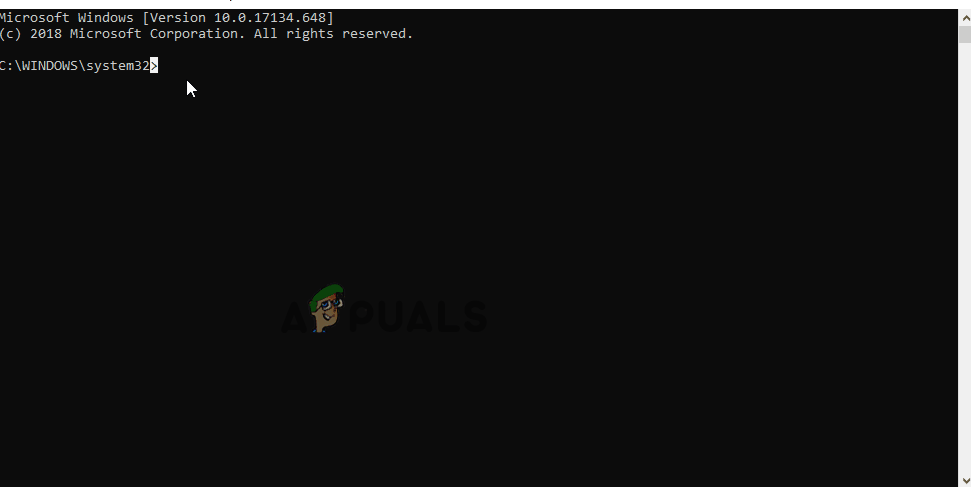
- Press “Windows” + “R” keys simultaneously and type in cmd. Type “cmd” into the Run dialog
- Press the “Shift” + “Ctrl” + “enter” keys simultaneously to open an elevated command prompt.
- Type in the following commands one by one and press “enter” after each
- After the process finishes, check to see if the issue persists.
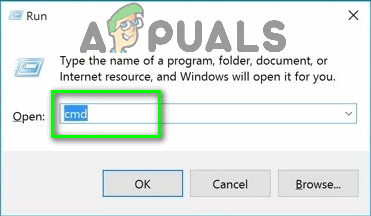 Type “cmd” into the Run dialog
4. Run the SFC Scan
It is possible that a certain driver or “.dll” file is missing or has been corrupted. Therefore, in this step, we will be initiating an SFC scan to check and repair this issue. For that:
- Press “Windows” + “R” keys simultaneously and type in cmd. Type “cmd” into the Run dialog
- Press the “Shift” + “Ctrl” + “enter” keys simultaneously to open an elevated command prompt.
- Type in the following command and press “Enter” to execute it Running SFC scan
- Wait while the system is being scanned and check to see if the issue persists after the scan is completed.
 Running SFC scan
5. Remove Registry Items
Sometimes, the error is fixed simply by deleting certain registry entries. If the registry configurations have been corrupted or are wrongly configured they can prevent certain elements of the operating system from functioning correctly. To fix that:
- Press “Windows” + “R” to open the run prompt. Opening Run Prompt
- Type in “Regedit” and press “Enter”.Running the Registry Editor
- Navigate to the following path Navigate to the indicated path
- Delete all the Folders in EXCEPT the following
- Right-click on any folder except for the ones indicated above and select “Delete” from the list to remove them. Delete Entries like these
 Opening Run Prompt
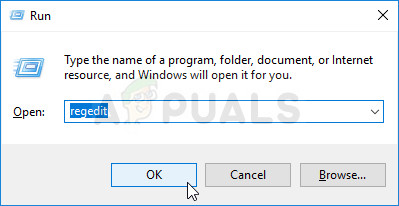 Running the Registry Editor
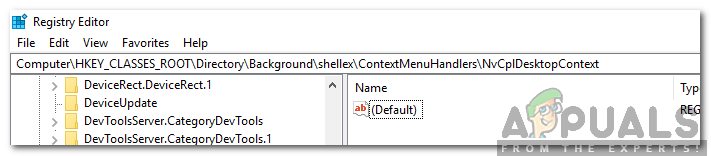 Navigate to the indicated path
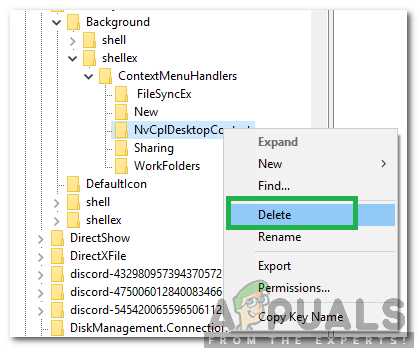 Delete Entries like these
WARNING: During the above steps, you may lose your desktop after disabling stuff and you will be left with nothing to work on for the rest of the processes. If this occurs, just press Ctrl-Alt-Del. In the task manager, select the file tab, run a new task and then key in explorer.exe. Your desktop will come up immediately.
6: Uninstall/Disable Conflicting Applications
There are known applications that cause the mouse error under discussion. These third-party applications usually take control of your HID and then sometimes, they go in an error state which causes the loss of functionality. In that case, uninstalling/disabling these applications may solve the problem. Following is a list of such applications:
- HP Display Control (PdiShellExt.dll )
- Symantec System Recovery
- 7zip
- WinZip
If you have installed any of these applications then either disable them or uninstall/reinstall them. This list might not be complete so keep a lookout for these type of applications. You can also consider starting your computer in safe mode to diagnose the problem.
7: Update Drivers
Drivers are the main components connecting your system hardware and operating system. If any of the drivers are corrupted or outdated, then updating to the latest version may solve the problem. Drivers get corrupt usually because of a bad Windows update and get outdated if they are not updated alongside a Windows update.
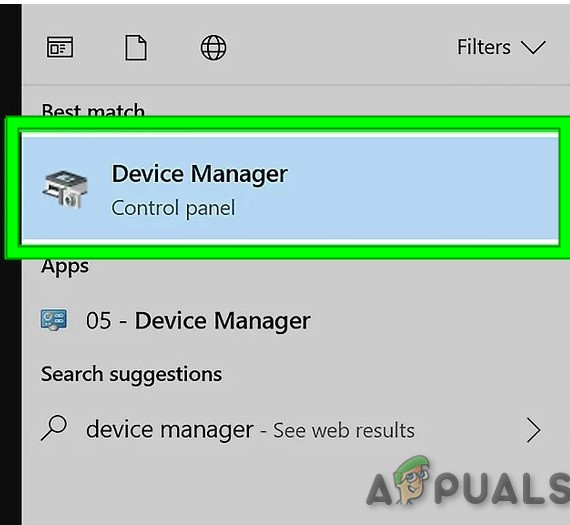
- Press Windows key and type Device Manager. Then in the results, click on Device Manager. Device Manager in Windows Search Box
- Now in the device Manager, expand your Display Adapters and right-click your Graphics Driver and then click on Update Driver. Update Graphics Driver
- Then select “Search Automatically For Updated Driver Software” Searching automatically for newer driver software
- You can also use your graphics card manufacturer website to update the driver. This is a known issue for Laptops with Dual GPU and Optimus technology. If you are using such a laptop, then download the official Intel driver to fix the issue.
- Also, Nvidia applications and drivers are known to create this issue. Uninstall all Nvidia applications/drivers and use Microsoft’s driver for your Graphics card to check if the problem is solved.
- Repeat the same process to update the driver of your mouse located under Mice and Other Pointing Devices.
- A good idea would be to update Windows, so that, all drivers are updated.
 Device Manager in Windows Search Box
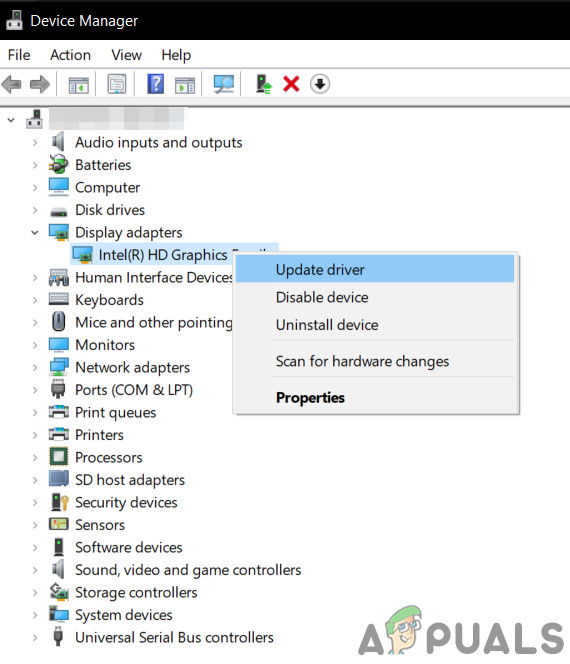 Update Graphics Driver
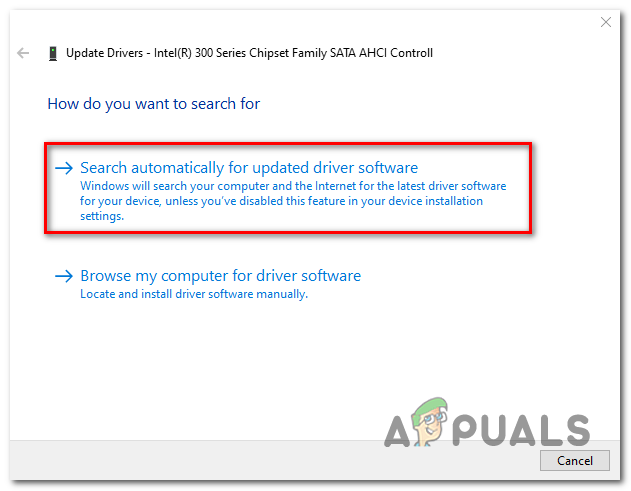 Searching automatically for newer driver software
If nothing has helped you so far, then either perform a system restore or reset Windows. But before doing any, make sure the mouse is not faulty.


