- Take ownership of files or other objects
- Reference
- Possible values
- Best practices
- Location
- Default values
- Policy management
- Group Policy
- Security considerations
- Vulnerability
- Countermeasure
- Potential impact
- Как добавить или удалить запись о вступлении в права собственности в меню правой кнопки мыши — Производительность — 2021
- Table of Contents:
- Добавить запись о собственности в меню правого клика — Метод 1
- Добавление записи о владении в меню правого клика — метод 2
- Удалить запись о владении — метод 1
- Удалить запись о владении — метод 2
- Заключение
- Как стать владельцем файла или папки и получить доступ на просмотр и редактирование ✍️👁️🗨️📁 (Апрель 2021).
- How to Take Ownership of a Folder in Windows 10 Using File Explorer
- How to: Add Take Ownership To the Context Menu on Windows 10
- How to Add the Take Ownership Option in the Context Menu
- Through Registry Files:
- Manually through Registry:
Take ownership of files or other objects
Applies to
Describes the best practices, location, values, policy management, and security considerations for the Take ownership of files or other objects security policy setting.
Reference
This policy setting determines which users can take ownership of any securable object in the device, including Active Directory objects, NTFS files and folders, printers, registry keys, services, processes, and threads.
Every object has an owner, whether the object resides in an NTFS volume or Active Directory database. The owner controls how permissions are set on the object and to whom permissions are granted.
By default, the owner is the person who or the process which created the object. Owners can always change permissions to objects, even when they are denied all access to the object.
Possible values
- User-defined list of accounts
- Not defined
Best practices
- Assigning this user right can be a security risk. Because owners of objects have full control of them, only assign this user right to trusted users.
Location
Computer Configuration\Windows Settings\Security Settings\Local Policies\User Rights Assignment
Default values
By default this setting is Administrators on domain controllers and on stand-alone servers.
The following table lists the actual and effective default policy values. Default values are also listed on the policy’s property page.
| Server type or GPO | Default value |
|---|---|
| Default Domain Policy | Not defined |
| Default Domain Controller Policy | Administrators |
| Stand-Alone Server Default Settings | Administrators |
| Domain Controller Effective Default Settings | Administrators |
| Member Server Effective Default Settings | Administrators |
| Client Computer Effective Default Settings | Administrators |
Policy management
This section describes features, tools, and guidance to help you manage this policy.
A restart of the device is not required for this policy setting to be effective.
Any change to the user rights assignment for an account becomes effective the next time the owner of the account logs on.
Ownership can be taken by:
- An administrator. By default, the Administrators group is given the Take ownership of files or other objects user right.
- Anyone or any group who has the Take ownership user right on the object.
- A user who has the Restore files and directories user right.
Ownership can be transferred in the following ways:
- The current owner can grant the Take ownership user right to another user if that user is a member of a group defined in the current owner’s access token. The user must take ownership to complete the transfer.
- An administrator can take ownership.
- A user who has the Restore files and directories user right can double-click Other users and groups and choose any user or group to assign ownership to.
Group Policy
Settings are applied in the following order through a Group Policy Object (GPO), which will overwrite settings on the local computer at the next Group Policy update:
- Local policy settings
- Site policy settings
- Domain policy settings
- OU policy settings
When a local setting is greyed out, it indicates that a GPO currently controls that setting.
Security considerations
This section describes how an attacker might exploit a feature or its configuration, how to implement the countermeasure, and the possible negative consequences of countermeasure implementation.
Vulnerability
Any users with the Take ownership of files or other objects user right can take control of any object, regardless of the permissions on that object, and then make any changes that they want to make to that object. Such changes could result in exposure of data, corruption of data, or a denial-of-service condition.
Countermeasure
Ensure that only the local Administrators group has the Take ownership of files or other objects user right.
Potential impact
None. Restricting the Take ownership of files or other objects user right to the local Administrators group is the default configuration.
Как добавить или удалить запись о вступлении в права собственности в меню правой кнопки мыши — Производительность — 2021
Table of Contents:
Вам нужен простой способ добавить запись о владении в контекстное меню в Windows 7 или Windows 8? Если вы это сделаете, у нас есть два варианта для вас, оба из которых быстрые и надежные. Они работают как с Windows Explorer, так и с File Explorer .
ПРИМЕЧАНИЕ. Если вы получите доступ к этой опции из контекстного меню, владелец выбранного файла или папки автоматически изменит ваше имя пользователя.
Добавить запись о собственности в меню правого клика — Метод 1
Есть несколько способов добавить опцию « Взять в собственность» в контекстное меню в Windows или Проводнике. Самый быстрый способ — использовать приложение с именем Ownership . Вы можете найти его здесь: Загрузки Datumza. Там вы увидите несколько приложений в списке. Найдите тот, который называется Ownership, и загрузите его на свой компьютер.

Извлеките только что загруженный архив и запустите файл Ownership.exe . Отображается запрос контроля учетных записей пользователей (UAC). Подтвердите, что вы хотите, чтобы приложение запускалось.

Затем нажмите Установить . Это оно!
Добавление записи о владении в меню правого клика — метод 2
Другой способ — отредактировать реестр Windows и добавить несколько пользовательских записей в HKEY_CLASSES_ROOT\*\shell\takeownership .
Поскольку это сложная вещь, которую нужно делать вручную, мы создали файл реестра, который вы можете загрузить и запустить.
Он находится в архиве в конце этой статьи. Скачайте архив и распакуйте его содержимое. Вы увидите файл с именем Add_Take_Ownership.reg . Запустить его!

Вы получите несколько подсказок. Сначала отображается предупреждение безопасности. Нажмите Run .

Затем отображается приглашение контроля учетных записей (UAC). Нажмите Да .

Затем редактор реестра спросит вас, хотите ли вы запустить этот файл. Нажмите Да .

Наконец, вам сообщают, что ключи и значения, содержащиеся в этом файле, были добавлены в реестр Windows. Нажмите ОК .

Разговор о встрече слишком много подсказок. 🙂
В конце этого упражнения щелкните правой кнопкой мыши любую папку, и вы увидите запись о владении .

Удалить запись о владении — метод 1
Если вы использовали приложение Ownership, чтобы добавить Take Ownership в контекстное меню, вы можете удалить эту запись, используя ту же программу.
Запустите файл Ownership.exe , нажмите кнопку « Да» в командной строке UAC и нажмите « Удалить» .

Без дальнейшего подтверждения, запись удаляется.
Удалить запись о владении — метод 2
Вы также можете использовать архив, приложенный в конце этой статьи. Загрузите его и извлеките его содержимое. Вы увидите файл с именем Remove_Take_Ownership.reg .

Запустите его, и вы увидите те же самые подсказки, которые отображались при добавлении этой записи. Подтвердите, что вы хотите запустить этот файл, и дайте ему сделать свое дело. Теперь запись Take Ownership удаляется из контекстного меню в Windows / File Explorer.
Заключение
Два упомянутых решения помогут вам взять на себя ответственность за файлы и папки с минимальными усилиями. Я надеюсь, что вы нашли их полезными. Для более полезных советов и хитростей, прочитайте статьи, рекомендуемые ниже.
Ссылка для скачивания: владение.zip
Как стать владельцем файла или папки и получить доступ на просмотр и редактирование ✍️👁️🗨️📁 (Апрель 2021).
How to Take Ownership of a Folder in Windows 10 Using File Explorer
By Henry T. Casey 08 May 2019
You may find yourself unable to move, edit or copy a file in Windows 10, and often times that’s because of the permissions attached to it. It may be a file or folder that the system doesn’t want altered or one created by a user that’s been deleted. Fortunately, you can reclaim the file.

Here’s how to take ownership and get full access to files and folders in Windows 10.
1. Right-click on a file or folder.
2. Select Properties.
3. Click the Security tab.
4. Click Advanced.
5. Click «Change» next to the owner name.
6. Click Advanced.
7. Click Find Now.
8. Select your username and click OK.
9. Click OK.
10. Click Apply. If you’re modifying a folder, you might want to
11. Click OK.
12. Click Add. Now it’s time to make sure you have all kinds of permissions.
13. Click Select a principal.
14. Click Advanced.
15. Click Find Now.
16. Select your user name and click OK.
17. Click OK.
19. Click OK.
20. Click OK.
21. Click your user name, it’s time to verify your new permissions.
22. Click OK, as you’ve taken ownership and full permissions for the folder!
With this tutorial under your belt, it’s time to learn more about Windows, including how to password protect a folder in Windows 10 and how to create a new folder in Windows 10, how to create a shortcut to a website in Chrom, how to delete old emails in Gmail so you don’t need to pay for OneDrive and how to map a network drive.
How to: Add Take Ownership To the Context Menu on Windows 10
A context menu is the result of an action on the Graphic User Interface. The most popular context menu is the one for right-clicking. Once you right-click on a file, folder, or drive, the resulting menu is that item’s context menu. Now, when using the PC you may want to assume full control of certain amenities such as folders or important files. How about having such a command right in the context menus? You can do this in Windows 10. Basically, you can own a file, an entire folder, or even the drive all in one instance. BUT don’t apply for the take ownership on the c:\ drive, because it has system users and permissions – which if messed up, will require a windows re-installation. Only do this on files, and folders, or external drives if you want.
Simply make the current user the owner of the resource in question and grant them elevated permissions. Of course, before changing ownership you have to be logged in as, or be having Administrator privileges. If not, UAC will prompt you to acquire Administrator privileges before proceeding. Standard users may be prompted to key in the Administrator password as well (the only difference is the ownership will be granted to the specified account with administrative privileges and NOT the standard user account). Otherwise, as an Administrator all you need to do is click “yes” and you’re good to go. However take note that application files such as CMD files, EXE files, etc. will not have “take ownership” in their context menus. Instead, they will continue to have the “run as Administrator” option.
Before proceeding with taking ownership there are a few things you have to take into account. The below procedure works for Windows 10 systems whose language is set to English.
How to Add the Take Ownership Option in the Context Menu
Through Registry Files:
Download this file. This is a compressed file, and you will need to decompress or extract it using WinRar or WinZIP. After you’ve extracted the files, there will be two registry files in the folder. Run the one that says to Install, and if you wish to uninstall it, then run the one with the words uninstall in it.
When you run it, agree to the UAC prompt by clicking Yes, and then choose YES again when the registry editor wants you to confirm the addition. Once done, reboot the PC.
After the reboot, “Take Ownership” option will be added in both folder and file context menus. Once you right-click any folder or file, you immediately become the owner of that computer resource. You will be at liberty to carry out any changes you wish to on the specified file, folder, or drive.
More advanced computer users can manually take ownership of a drive, file, or folder. This is done through coding in the command prompt. The procedure varies slightly for files and folders. The steps are:
Run command prompt as administrator. Hold the Windows Key and Press X. Choose command prompt (admin)
Key in the following command
icacls filename /grant administrators:F
This will take ownership of a file and assign full permission to it. For a folder, the code is
icacls foldername /grant administrators:F /t
Manually through Registry:
We need to make some changes to your computer’s registry. This process can be considered a long and tedious task but, you only have to go through it once and life will be easy. Do note that Registry Editor is a very powerful tool in Windows and you should be very careful when making changes to it. Backup your registry or create a restore point of your Windows if you have important data on the PC.
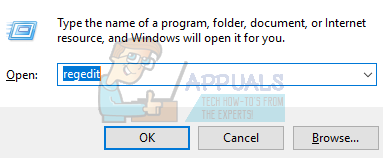
- Press Windows + R to launch your computer’s Run Type “regedit” in the dialogue and hit Enter. This will launch the Registry Editor.
We are going to make changes in two locations in the registry. The first location will add the “Take Ownership” to the context menu for files of any type while the second location will add the option to the context menu of any folder.
- Now navigate to this location when in the Registry Editor using the left side of the screen.
- Now we need to create a new key inside the shell key. Right-click on the shell key and choose the option “New> Key”. We need to name the key “runas”. If you already have this key in your registry, you can skip this step and move on with the next one.
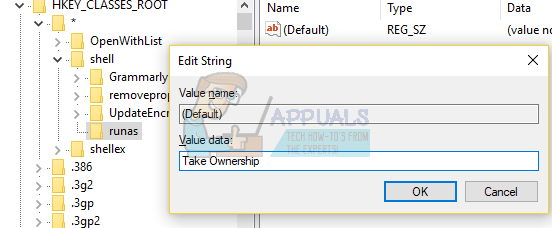
- Now we are going to change the Default value present inside the key runas we just created. Select the runas key and double click the “default” quickly to open its Properties.
- Once in the properties, type “Take Ownership” into the Value Data box present. Click “OK” to save your changes. This value will become the command when you open the context menu. You can also change it to any other name if you want.
- Now we are going to create a new value inside the runas key. Right click on the runas key and choose “New > String Value”. Name the new value as “NoWorkingDirectory”.
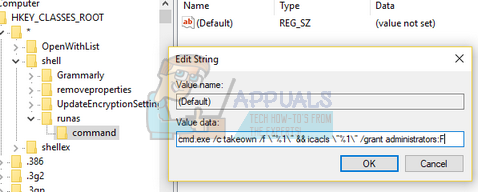
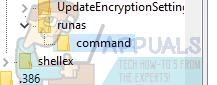
- Now we are going to create a new key inside the runas key. Right click on the runas key and choose “New > Key”. Name the new key as “command”.

- Now with command key selected, double-click on the Default value present on the right pane to open its properties.
- In the Value Data box present in the properties, type the following code (take care of the spaces and the numerical values). Click Ok when you are done.

- Now we need to create a new value inside the command key. Right-click the command key and select “New > String Value”. Name the new value as “IsolatedCommand”.
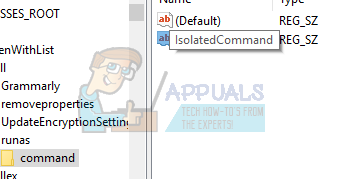
- After naming it, double click it to open its properties.
- In the Value Data box, type the following text and press Ok. This is the same command we added earlier to the default value.
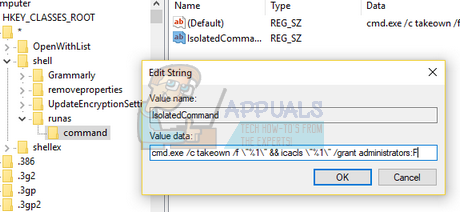
This will add the “Take ownership” command to the context menu for files.

Now we will add the context menu option to folders. We are going to make essentially the same changes we did earlier but to a different directory.
- Navigate to the following path in your Registry Editor.
- Now we need to create a new key inside the shell key. Right-click on the shell key and choose the option “New> Key”. We need to name the key “runas”. If you already have this key in your registry, you can skip this step and move on with the next one.
- Now we are going to change the Default value present inside the key runas we just created. Select the runas key and double click the “default” quickly to open its Properties.
- Once in the properties, type “Take Ownership” into the Value Data box present. Click “OK” to save your changes. This value will become the command when you open the context menu. You can also change it to any other name if you want.
- Now we are going to create a new value inside the runas key. Right click on the runas key and choose “New > String Value”. Name the new value as “NoWorkingDirectory”.
- Now we are going to create a new key inside the runas key. Right-click on the runas key and choose “New > Key”. Name the new key as “command”.
- Now with the command key selected, double-click on the Default value present on the right pane to open its properties.
- In the Value Data box present in the properties, type the following code (take care of the spaces and the numerical values). Click Ok when you are done.
- Now we need to create a new value inside the command key. Right-click the command key and select “New > String Value”. Name the new value as “IsolatedCommand”.
- After naming it, double-click it to open its properties.
- In the Value Data box, type the following text and press Ok. This is the same command we added earlier to the default value.
This will add the “Take ownership” command to the context menu for folders.


