- Using Windowed Mode
- OkeyGeek .
- How to run a game in windowed mode
- Using game settings
- Using “hot keys”
- Using “-window” property for shortcut
- Using third party applications
- Utilities for launching a game in a windowed mode
- Emulators to launch a game in a windowed mode
- Play a Computer Game in Windowed Mode
- Multitask while you play
- Check for the Easy Button
- Make Windows Work for You
- Alternative Ways to Window a Game
- Keyboard Shortcuts
- Modify the .INI File
- Use DxWnd
- If Your Game Is Really Old.
- Virtualization
- Some Considerations
- 6 ways to open the Run command window in Windows
- 1. Open the Run command window with a keyboard shortcut
- 2. Use Search to open the Run command window
- 3. Open the Run command window from the Start Menu
- 4. Use the Command Prompt (CMD) to open the Run window
- 5. Open the Run command window with PowerShell
- 6. Use the WinX power user menu to open the Run window in Windows 10
- What do you want to access using the Run window?
Using Windowed Mode
The legacy Video Renderer Filter always uses windowed mode. The VMR-7 and VMR-9 filters use windowed mode by default, but also support windowless mode.
In windowed mode, the video renderer creates its own window where it paints the video frames. Unless you specify otherwise, this window is a top-level window with its own borders and title bar. Most of the time, however, you will attach the video window to an application window, so that the video is integrated into your application UI. This requires the following steps:
- Query for IVideoWindow.
- Set the parent window.
- Set new window styles.
- Position the video window inside the owner window.
- Notify the video window of WM_MOVE messages.
Query for IVideoWindow
Before starting playback, query the Filter Graph Manager for the IVideoWindow interface:
Set the Parent Window
To set the parent window, call the IVideoWindow::put_Owner method with a handle to your application window. This method takes a variable of type OAHWND, so cast the handle to this type:
Set New Window Styles
Change the style of the video window by calling the IVideoWindow::put_WindowStyle method:
The WS_CHILD flag sets the window to be a child window, and the WS_CLIPSIBLINGS flag prevents the window from drawing inside the client area of another child window.
Position the Video Window
To set the position of the video relative to the application window’s client area, call the IVideoWindow::SetWindowPosition method. This method takes a rectangle that specifies the left edge, top edge, width, and height of the video window. For example, the following code stretches the video window to fit the entire client area of the parent window:
To get the native size of the video, call the IBasicVideo::GetVideoSize method on the Filter Graph Manager. You can use that information to scale the video and keep the correct aspect ratio.
Respond to WM_MOVE Messages
For best performance, you should notify the video renderer whenever the window moves while the graph is paused. Call the IVideoWindow::NotifyOwnerMessage method to forward the WM_MOVE message:
If the renderer is using a hardware overlay, this notification causes the renderer to update the overlay position. (The VMR-9 does not use overlays, so you do not need to call this method if you are using the VMR-9.)
Clean Up
Before the application exits, stop the graph and reset the video window’s owner to NULL. Otherwise, window messages might be sent to the wrong window, which is likely to cause errors. Also, hide video window, or else you might see a video image flicker on the screen momentarily:
If the parent of the video window is a child of your main application window (in other words, if the video window is a child of a child), you should create the video window using CoCreateInstance and add it to the graph, instead of letting the Filter Graph Manager add the video renderer during Intelligent Connect. This ensures that the video window and your child window are repainted at the same time. Otherwise, the child window may paint over the video window.
OkeyGeek .

You are here: Home » Windows » How to run a game in windowed mode
How to run a game in windowed mode
 Computers are often used not only for work, but also for entertainment, including games. A game, just like any other application on a computer, can run in full screen mode or in a windowed mode. Depending on the situation, it may be convenient to use one or another option. There are many ways to start the game in windowed mode, and each of them has its own advantages and disadvantages.
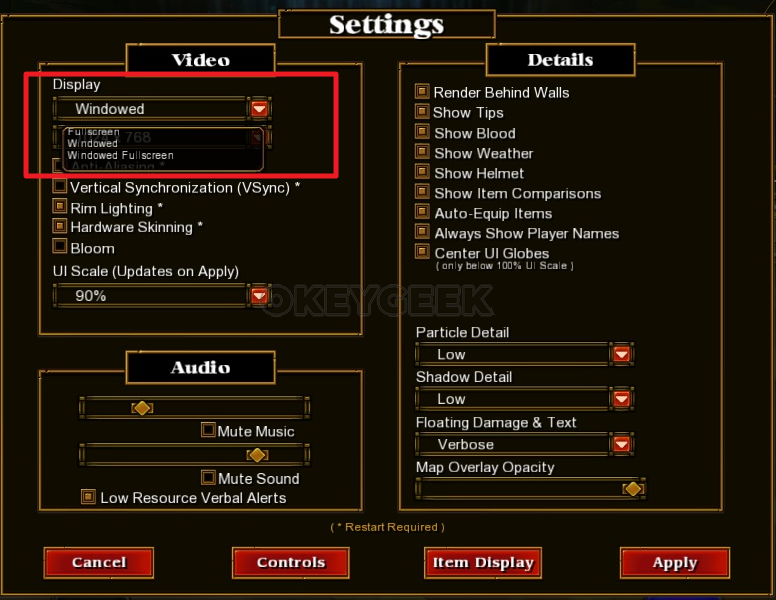
Using game settings
The easiest way to transfer a game from full-screen to windowed mode is to use the game settings. Most often, the switch between the window mode and the regular mode is in the “Display” or “Graphics” options. However, not all games allow you to do this.
Using “hot keys”
Experienced Windows users perfectly know a set of “hot keys” that allows to switch from one version of the system to another and to quickly perform all sorts of actions. There is a way in the system to transfer an application or game to windowed mode. To do this, it is enough to simultaneously press Alt + Enter keys on the keyboard. After that, the full screen mode will change to windowed mode or vice versa.
Using “-window” property for shortcut
If the game does not respond to any of the above methods, or there is no possibility to change its display mode in the settings, you can try adding the windowed mode parameter to the shortcut. To do this, find the game shortcut on the desktop and right-click on it. In the drop-down menu, select “Properties”. There will open a new window and in this window you need to enter the “–window” parameter. This property must be written in the “Target” column, as shown in the example below.
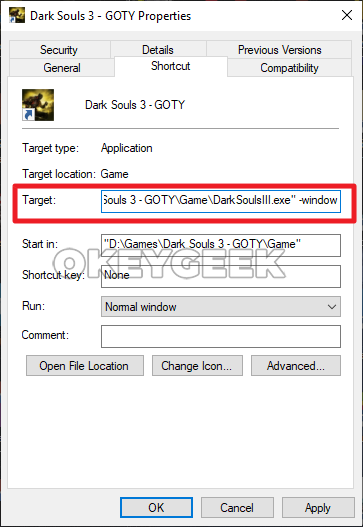
When the required parameter is registered, click “OK” to save the changes. After that, start the game through this shortcut, and it will open in windowed mode.
Using third party applications
There are two types of applications that allow you to run programs in windowed mode – these are specialized utilities and emulator applications. Let’s take a closer look at both of these options.
Utilities for launching a game in a windowed mode
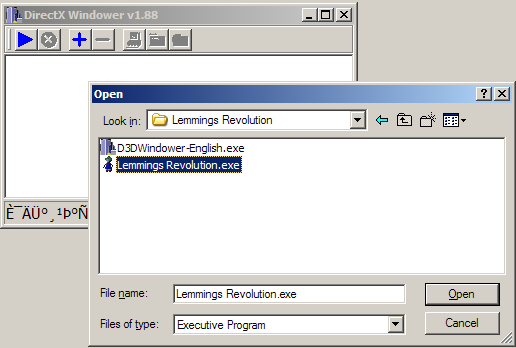
There are many auxiliary applications that allow you to start the game in windowed mode. Let’s take D3DWindower as an example. This utility can be downloaded for free from the official website of its developers. After downloading the program, follow these steps to open the game in windowed mode:
- Install applications in a folder;
- Start the application and click on the plus sign. There will open a window where you need to select the game you want, and then click on the icon with the closed folder;

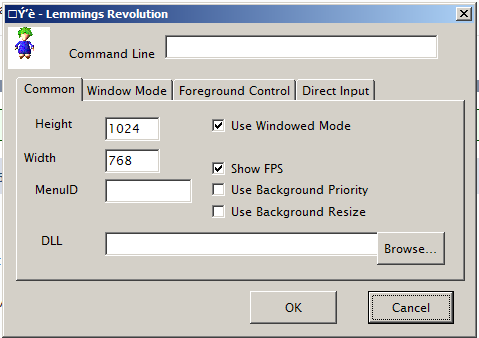
- There will open a settings window where you need to set the following parameters:
- The first two fields indicate the width and height of the window. Make sure that a check mark at the right is activated;
- In the lower right part of the window, click the button and select the file called D3DHook.dll from the folder where the D3DWindower application is installed;
- Save the settings;
- After that you only have to press the “Run program” button, which has a computer icon (this button is the third on the right).
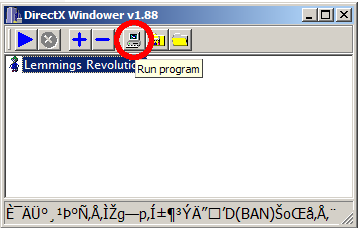
Now there will open a window where the necessary game will start.
Emulators to launch a game in a windowed mode
Emulators are the most difficult way and they should be used as a last resort. \this way implies a complete emulation of the operating system inside the window, followed by launching a game inside it. There are many emulators, both paid and free. Among the most famous options are Windows Virtual PC and Vmware.
Depending on which emulator you will use, the list of actions that you need to perform to start the game varies. In general, the process looks as follows:
- An emulator must be installed on the computer and started;
- Next, in the emulator, you need to specify the path to the files used to install the operating system;
- After that, you need to wait for the OS installation and restart the emulator;
- Next, you need to install your game in the emulator and start it.
 An emulator must be installed on the computer and started;
It is worth noting that for the emulator operation you will need to have about 20 GB of free space on the hard drive (only for installation). In addition, emulators are quite demanding to computer resources.
Play a Computer Game in Windowed Mode
Multitask while you play
:max_bytes(150000):strip_icc()/jonfishersquare-93eb80e77a004035887f56816d3623c5.jpg)
Most computer games take over the whole screen when you play. But, depending on whether or not the developer allows it, you might be able to play in a window instead.
The process to window a game takes just a few seconds, however, some games don’t natively support windowed mode. So, you may have to take some more involved steps to prevent those games from taking up the whole screen.
:max_bytes(150000):strip_icc()/computer-game-windowed-mode-837057-effb14649be74321b35c73e90cb0bdcd.gif)
This guide applies to Windows 10 and later.
Check for the Easy Button
Some games explicitly allow the application to run in a windowed mode. Go into the Settings menu and you’ll see options listed using varying language. If you don’t see the below options there, you might access them from the game’s launcher.
- Windowed Mode: Runs the game in a resizeable window just like any other application.
- Borderless Window Mode: Runs the game as a window, which may be full screen or not, but without the usual chrome (borders, toolbars, etc.) normal apps enjoy.
- Fullscreen (Windowed) Mode: Runs the game full-screen, but full-screen view is just a maximized window, so you can run other apps atop the game.
:max_bytes(150000):strip_icc()/001_computer-game-windowed-mode-837057-5bf4b79ec9e77c0051f52e9b.jpg)
Make Windows Work for You
The Windows operating system supports command-line switches to adjust certain start-up parameters of programs. One way to «force» an application like your favorite game to run in a windowed mode is to create a special shortcut to the program’s main executable, then configure that shortcut with the applicable command-line switch.
Right-click or tap-and-hold the shortcut for the computer game you want to play in windowed mode.
If you don’t see the shortcut on the desktop, you can make one yourself. To make a new shortcut to a game or program in Windows, either drag it to the desktop from the Start menu or right-click (or tap-and-hold if you’re on a touchscreen) the executable file and choose Send to > Desktop.
Select Properties.
:max_bytes(150000):strip_icc()/002_computer-game-windowed-mode-837057-5bf4b7d446e0fb002dcb3e7f.jpg)
In the Shortcut tab, in the Target: field, add -window or -w at the end of the file path. If one doesn’t work, try the other.
:max_bytes(150000):strip_icc()/003_computer-game-windowed-mode-837057-5bf4b7fa46e0fb00513e8a40.jpg)
Select OK.
If you receive an «Access Denied» message, you may need to confirm you’re an administrator on that computer.
If the game doesn’t support Windowed Mode play, adding a command-line switch won’t work. But, it’s worth trying. Many games, officially or unofficially, allow the Windows operating system to control how they render.
Alternative Ways to Window a Game
Here are some additional methods to try if you want to play games in windowed mode:
Keyboard Shortcuts
Some games can be recomposed into a window by pressing the Alt + Enter keys together while in the game, or by pressing Ctrl + F.
Modify the .INI File
Some games store full-screen mode settings in an .INI file. They might use the line «dWindowedMode» to define whether to run the game in windowed mode or not. If there’s a number after that line, make sure it’s 1. Some may use True/False to define that setting.
Use DxWnd
If the game relies on DirectX graphics, programs like DxWnd serve as «wrappers» offering custom configurations to force full-screen DirectX games to run in a window. DxWnd sits between the game and the Windows operating system; it intercepts system calls between the game and the OS and translates them into an output that fits into a resizable window. But again, the game must rely on DirectX graphics for this method to work.
If Your Game Is Really Old.
Some very old games from the MS-DOS era run in DOS emulators like DOSBox. DOSBox and similar programs use configuration files that specify full-screen behavior through customizable toggles.
Virtualization
Another option is to run the game through virtualization software like VirtualBox or VMware, or a Hyper-V virtual machine. Virtualization technology lets an entirely different operating system run as a guest OS within your existing operating system’s session. These virtual machines always run in a window, although you can maximize the window to get a full-screen effect.
Run a game in a virtual machine if it can’t be run in a windowed mode. As far as the game is concerned, it’s functioning like normal. The virtualization software governs its appearance as a window in its host operating system, not the game itself.
Some Considerations
There are a few things to keep in mind when attempting to modify your games:
6 ways to open the Run command window in Windows
The Run command window allows you to launch programs, open files and folders, and access internet resources in Windows. Just type a path or a quick command into the Windows Run box, and then click OK or press Enter to use a Run command. Although the Run shortcut is not as easy to find in recent Windows versions, the tool still exists, and there are plenty of ways to access it. This tutorial illustrates how to open Run in Windows 10 and Windows 7:
1. Open the Run command window with a keyboard shortcut
The fastest way to access the Run command window is to use the keyboard shortcut Windows + R. On top of being very easy to remember, this method is universal for all versions of Windows. Hold down the Windows key and then press R on your keyboard.
The Run window is immediately displayed in the lower-left corner of the screen.
2. Use Search to open the Run command window
As always in Windows, Search is a great idea to find just about anything. If you are using Windows 10, first type the word “run” inside the Search bar.
Then, click or tap on the relevant search result or press Open from the pane on the right.
In Windows 7, click the Start button and type the word “run” in the Start Menu Search box. Then, click the appropriate result to launch the Run command window.
3. Open the Run command window from the Start Menu
The Start Menu is a reliable way to access features on your Windows computer or device, including the Run window. In Windows 10, access the Start Menu by clicking or tapping on the Windows logo in the lower-left corner or by pressing the Windows button on your keyboard. Then, scroll down to the letter W, open the Windows System folder, and press Run.
In Windows 7, open the Start Menu and then access “All Programs -> Accessories -> Run” to launch the window.
Alternatively, you can also customize your Windows 7 Start Menu to permanently display a Run shortcut in the right-hand pane. To learn how to do that, read The complete guide to the Windows 7 Start Menu.
4. Use the Command Prompt (CMD) to open the Run window
Some of my colleagues love the CMD, so we decided to put this in for other fans, even if it’s not as easy to remember as the other ways illustrated in this article. To open the Windows Run, you can also launch the Command Prompt and enter the following:
explorer.exe Shell.
This method works both in Windows 10 and Windows 7.
5. Open the Run command window with PowerShell
Wondering how to open Run from PowerShell in Windows 10 and Windows 7? First, start PowerShell. Then, copy/paste or type in the following command:
(New-Object -ComObject “Shell.Application”).FileRun()
Press Enter on your keyboard, and the Run command window is immediately opened in the bottom-left corner.
6. Use the WinX power user menu to open the Run window in Windows 10
Windows 10 has a hidden power user menu that includes a shortcut for the Run command window. There are many ways to access this menu, the easiest being to use the Windows + X keyboard shortcut. Then, click or tap on Run or press R on your keyboard to open the Run box in Windows 10.
If the WinX power user menu interests you, you can learn more by reading: What is the WinX menu and how to open it.
What do you want to access using the Run window?
The Run command window was first introduced by Microsoft in Windows 95 and has been with us ever since. Some of us access it pretty often, but plenty of people don’t realize its potential and usefulness yet. We’re happy this feature caught your eye, but we are curious what brought you here. Are you looking for new ways to open the Windows Run command window or are you trying something new on your computer? Let us know in the comments.


