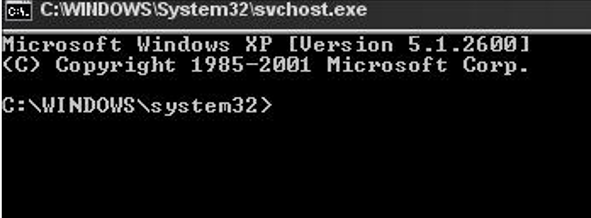
- How to Run CMD/Program under SYSTEM (LocalSystem) in Windows?
- How to Run CMD under Local System Account in Windows (Versions Prior to Vista)?
- How to Run CMD/Process as SYSTEM on Windows 10 Using PSExec?
- How to create a Run As account and associate with a Run As profile
- Create a Run As account
- Modify Run As account properties
- Associate a Run As account to a Run As profile
- Configure distribution of a Run As account
- Next steps
- Using the LocalSystem Account as a Service Logon Account
How to Run CMD/Program under SYSTEM (LocalSystem) in Windows?
To perform some actions in Windows, it’s not enough to have administrator privileges. For example, you cannot replace or delete system files and some registry keys, stop system services or perform some other potentially unsafe actions that could affect the stability of your operating system. In these cases, a system administrator can take ownership of files or other objects, or perform actions on behalf of the system account. In this article you we’ll look on how to run an app or the command prompt as the privileged SYSTEM ( LocalSystem ) account on Windows 10.

How to Run CMD under Local System Account in Windows (Versions Prior to Vista)?
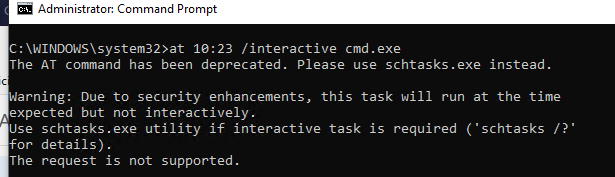
In Windows XP and Windows Server 2003 *that are no longer supported) there was an interesting trick that allowed you to run a program or the interactive command prompt (cmd.exe) with the system privileges using the Task Scheduler. It was enough to open the command prompt under the admin account and runthe following command:
at 10:23 /interactive cmd.exe
where, 10:23 is the current time + one minute (in the 24-hour format)
When the specified time comes, a command prompt will appear running under the local system account. If you have run this command in a terminal (RDP) session on Windows Server 2003/XP, note that the command prompt with the System privileges is displayed in the console session only (you can connect to the computer console via mstsc /console or mstsc /admin ).
Windows 10 doesn’t support running the interactive command prompt using the at command. It is recommended to use schtasks.exe instead.
How to Run CMD/Process as SYSTEM on Windows 10 Using PSExec?
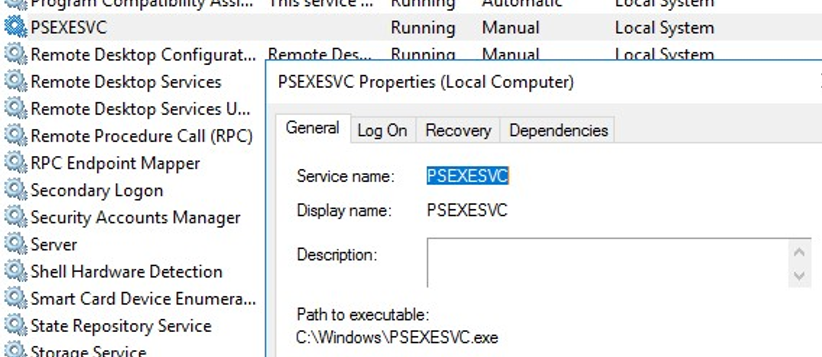
In Windows 7 or higher, the interactive command prompt cannot be run under the System account using Task Scheduler. To run commands as NT Authority\ System, you can use the PSExec.exe utility by Sysinternals.
PSExec doesn’t need to be installed. Open the elevated command prompt (“Run as administrator”), go to the folder where PSexec.exe is located and run the following command:
psexec -i -s cmd.exe
-i – allows to start the process/app in the interactive mode (a user can interact with the app on the desktop; if you don’t use this parameter, the process starts in a console session),
–s – means that the process (in this case, the command prompt) must be run as System account.

After running the command, a new command prompt window will appear run under the NT Authority\System account. Make sure it is true, by running this command:

In the command prompt window that appears, you can run any commands as SYSTEM. Now you can change, rename or delete system files/registry keys that are owned by TrustedInstaller or SYSTEM. All programs or processes you start in this window will run with elevated LocalSystem privileges. For example, you can stop a system service or close a file opened by the system process.
psexec -s \\mun-b21pc12 cmd.exe
If the “ Couldn’t install PSEXESVC service ” error appears, make sure that:
- The command prompt is run as administrator;
- Another PSEXESVC service instance is not running

There is also a number of third-party tools to run apps as System account (AdvancedRun , RunAsSystem, PowerRun), but I cannot see any point in using them. First of all, they are third-party and you cannot be sure there is no malicious code in them. Secondly, the official PsExec utility by Microsoft does a great job.
How to create a Run As account and associate with a Run As profile
This version of Operations Manager has reached the end of support, we recommend you to upgrade to Operations Manager 2019.
This procedure describes how you create a Run As Account by using a set of Windows credentials as an example. Then it shows you how to edit the properties of the Run As Account to modify the security level and distribution of the credentials. You use this same procedure for all other account types. Once you are completed creating the Run As account, you will associate it with a Run As Profile.
The credentials that you provide in a Run As Account are used to run tasks, rules, monitors and discoveries as defined by the management pack that they are in. The management pack guide has the settings that you need for configuring the Run As Account and the Run As Profile. When you create a Run As Account you are warned that you must associate the Run As Account with a Run As profile, and you are not presented with the option to configure Run As Account credential distribution. Both of these activities can be accomplished in the Run As Profile wizard. Alternately, you can configure Run As Account credential distribution by editing the properties of the Run As Account as shown below.
Both distribution and targeting of Run As accounts must be correctly configured for the Run As profile to work properly.
Create a Run As account
Log on to the Operations console with an account that is a member of the Operations Manager Administrators role.
In the Operations console, click Administration.
In the Administration workspace, right-click Accounts, and then click Create Run As Account.
In the Create Run As Account Wizard, on the Introduction page click Next.
On the General Properties page, do the following:
a. Select Windows in the Run As Account type: list.
b. Type a display name in the Display Name text box.
c. Optionally, type a description in the Description box.
d. Click Next.
On the Credentials page, type a user name, and its password, and then select the domain for the account that you want to make a member of this Run As account.
Click Next.
On the Distribution Security page, select the Less secure or More secure option as appropriate. For more information, see Distribution and Targeting for Run As Accounts and Profiles.
Click Create.
On the Run As Account Creation Progress page, click Close.
Modify Run As account properties
In the Operations console, click Administration.
In the Administration workspace, click Accounts.
In the results pane, double-click the Run As account that you want to edit to open its properties.
On the Run As Account Properties page, you can edit values on the General Properties, Credentials, or the Distribution tabs. In this case, select the Distribution tab.
On the Distribution tab, in the Selected computers: area, click Add to open the Computer Search tool.
On the Computer Search page, click the Option: list and select one of the following options:
a. Search by computer name (Default), then type in the computer name in the Filter by: (Optional) box.
b. Show suggested computers, if you have already associated the Run As Account object with a Run As profile, a list of discovered computers that host the monitored service are presented here.
c. Show management servers, in some cases, for example cross platform monitoring, all monitoring is performed by a management server and therefore the credentials have be distributed to the management servers that is performing the monitoring.
Optionally, type in a value in the Filter by: (Optional) box to narrow the search result set and click Search. A list of computers that match the search criteria is displayed in the Available items box.
Select the computers that you want to distribute the credentials to, and click Add. The computers appear in the Selected Items box.
Click OK. This returns you to the Distribution tab and the computers are displayed.
Click OK.
Associate a Run As account to a Run As profile
This procedure can be used for creating and configuring a new Run As profile, or you can use the configuring section to modify or configure Run As profiles that are pre-existing in your management group. This procedure assumes that you have not previously created a Run As account.
Log on to the Operations console with an account that is a member of the Operations Manager Administrators role.
In the Operations console, click Administration.
In the Administration workspace, click Profiles.
In the results pane, double-click the Run As profile that you want to configure. The Run As Profile Wizard opens.
In the left pane, click Run As Accounts.
On the Run As Accounts page, click Add.
In the Add a Run As Account window, in the Run As account field, select an existing Run As account from the dropdown menu. You can also create an account by clicking New and following Create a Run As Account steps above.
Select All targeted objects or A selected class, group, or object. If you select A selected class, group, or object, click Select, and then locate and select the class, group, or object that you want the Run As account to be used for. For more information, see Distribution and Targeting for Run As Accounts and Profiles.
Click OK to close the Add a Run As Account window.
On the Run As Accounts page, click Save.
On the Run As Profile Wizard Completion page, if every account you associated is configured for Less Secure distribution, click Close. If you associated a Run As account that is configured for More Secure distribution, you will see the Run As account listed as a link. Click the link to configure credential distribution, using the following procedure.
Configure distribution of a Run As account
Open the properties for the Run As account using one of the following methods:
- On the Run As Profile Wizard Completion page, click the account link.
- In the Operations console, in the Administration workspace, under Run As Configuration, click Accounts, and then in the results pane, double-click the account you want to configure.
On the Distribution tab, click Add for the Selected computers box and do the following:
a. Select Search by computer name (Default) or Show suggested computers, or Show management servers.
b. Optionally type in a value in the Filter by: (Optional) box.
c. Click Search. The result set is returned in the Available items box.
d. Select the computers you want from the result set, and click Add. This adds the selected computers to the Selected objects box.
e. Click OK.
Click OK.
Next steps
Review Distribution and Targeting for Run As Accounts and Profiles to understand how to target Run As account distribution to agent-managed computers securely.
If you need to create new credentials for the management server action account, see How to Create a New Action Account in Operations Manager.
To learn about how you can use the The Health Service lockdown tool to limit the identities used to run a rule, task, or monitor on agent-managed systems, see Control Access by Using the Health Service Lockdown Tool in Operations Manager.
Using the LocalSystem Account as a Service Logon Account
One advantage of running under the LocalSystem account is that the service has complete unrestricted access to local resources. This is also the disadvantage of LocalSystem because a LocalSystem service can do things that would bring down the entire system. In particular, a service running as LocalSystem on a domain controller (DC) has unrestricted access to Active Directory Domain Services. This means that bugs in the service, or security attacks on the service, can damage the system or, if the service is on a DC, damage the entire enterprise network.
For these reasons, domain administrators at sensitive installations will be cautious about allowing services to run as LocalSystem. In fact, they may have policies against it, especially on DCs. If your service must run as LocalSystem, the documentation for your service should justify to domain administrators the reasons for granting the service the right to run at elevated privileges. Services should never run as LocalSystem on a domain controller. For more information and a code example that shows how a service or service installer can determine if it is running on a domain controller, see Testing Whether Running on a Domain Controller.
When a service runs under the LocalSystem account on a computer that is a domain member, the service has whatever network access is granted to the computer account, or to any groups of which the computer account is a member. Be aware that in WindowsВ 2000, a domain computer account is a service principal, similar to a user account. This means that a computer account can be in a security group, and an ACE in a security descriptor can grant access to a computer account. Be aware that adding computer accounts to groups is not recommended for two reasons:
- Computer accounts are subject to deletion and re-creation if the computer leaves and then rejoins the domain.
- If you add a computer account to a group, all services running as LocalSystem on that computer are permitted the access rights of the group. This is because all LocalSystem services share the computer account of their host server. For this reason, it is particularly important that computer accounts not be made members of any domain administrator groups.
Computer accounts typically have few privileges and do not belong to groups. The default ACL protection in Active Directory Domain Services permits minimal access for computer accounts. Consequently, services running as LocalSystem, on computers other than DCs, have only minimal access to Active Directory Domain Services.
If your service runs under LocalSystem, you must test your service on a member server to ensure that your service has sufficient rights to read/write to Active Directory Domain Controllers. A domain controller should not be the only Windows computer on which you test your service. Be aware that a service running under LocalSystem on a Windows domain controller has complete access to Active Directory Domain Services and that a member server runs in the context of the computer account which has substantially fewer rights.


