- 6 Ways To Boot Windows 10 Into Safe Mode
- #1. Access safe mode from Windows 10 Settings
- #2. Use a Command prompt command
- #3. Access safe mode from the sign-in screen
- #4. Enable Safe mode in System Configuration
- #5. Force Windows to enter WinRE
- #6. Use a Windows 10 bootable USB or disk
- Bonus method
- Wrapping up
- How to directly reboot in Safe Mode in Windows 10
- Reboot in Safe Mode
- Shortcut to reboot in Safe Mode
- BootSafe
- How to start or boot Windows 10 in Safe Mode
- Boot Windows 10 in Safe Mode
- Steps to Boot Windows 10 in Safe Mode [with Pictures]
- Three other ways to access Safe Mode in Windows 10
- Why can’t you access the Safe Mode using F8?
- How can you get F8 work again?
- How to boot into Safe Mode in Windows 10?
- Way 1: Enter Safe Mode when you can’t boot normally
- Way 2: Enter Safe Mode from Normal Mode
- Way 3: Start Safe Mode from the login screen
- Tired of having to start in Safe Mode?
6 Ways To Boot Windows 10 Into Safe Mode
![]()
Whether you have messed up Windows configuration or a virus prevents you from using the system, Windows safe mode is your best bet to solve all such problems.
In safe mode, Windows starts with minimum required drivers and services, and no third-party programs are loaded. This ensures no problematic program loads so that you may solve the problem without any interference.
However, accessing safe mode is a real problem when an error arises. Although it’s easier to access safe mode right from the Windows 10 settings, what if you can’t access the settings?
Or worse, you can’t even start Windows?
There are many ways to boot into safe mode in Windows 10, and each method is useful depending on the problem you are dealing with. In this article, I will show you 6 ways to access Windows 10 safe mode, so you may always have access to safe mode no matter the odds.
#1. Access safe mode from Windows 10 Settings
This is the most common method to access safe mode when you can operate the system and access the settings. Here’s how to do it:
Go to Windows Settings from the Start menu and click on Update & Security .

Now click on the Recovery option in the left panel and then click on Restart now button under the Advanced startup section.

Windows will restart and open up the Windows Recovery Environment (WinRE). Here go to Troubleshoot > Advanced options > Startup Settings > Restart.

Your PC will restart and open up a page with a bunch of commands to choose from. Here press the 4 key or f4 key to launch Safe mode.
#2. Use a Command prompt command
If you can only access the Command prompt, you can run a command that will restart the PC into Windows Recovery Environment, where you can access the safe mode.
To access the Command prompt in Windows 10, press Windows+R keys to open the Run dialog and type cmd here to open the Command prompt.

Here enter the command shutdown.exe /r /o and press the Enter key.

After a short delay, Windows will restart into Windows Recovery Environment, where you can follow the instruction in the above method to access safe mode.
#3. Access safe mode from the sign-in screen
You can also boot into safe mode from the sign-in screen if you cannot sign-in for some reason. All you have to do is click on the Power button at the bottom-right corner and then hold the shift key while clicking on the Restart button.
This will restart the PC, and you will enter the Windows Recovery Environment. You can follow the instructions in the first method to access safe mode from here.
Note: You can also use this method while inside Windows; hold the Shift key while restarting your PC from the Start menu.
#4. Enable Safe mode in System Configuration
This is a rather permanent option for accessing the safe mode, but it can help restart the PC often and make sure you always enter the safe mode. From System configuration, you can force the PC to always launch in safe mode whenever you restart. And when you are done fixing the problem, you can disable this option to get back to normal Windows. Here’s how to do it:
Press Windows+R keys to open the Run dialog and type msconfig here to launch the System Configuration window.

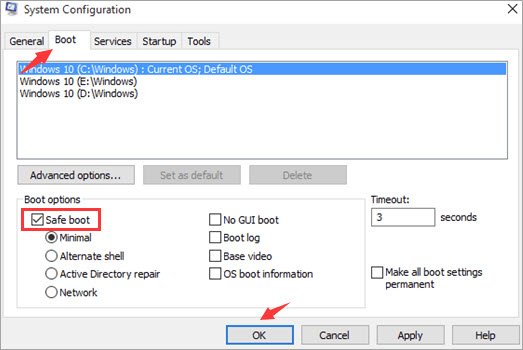
Here move to the Boot tab, check the checkbox next to Safe boot, and then click on OK.

You will be prompted to restart the PC, accept the prompt, and your PC will boot into safe mode on every restart now.
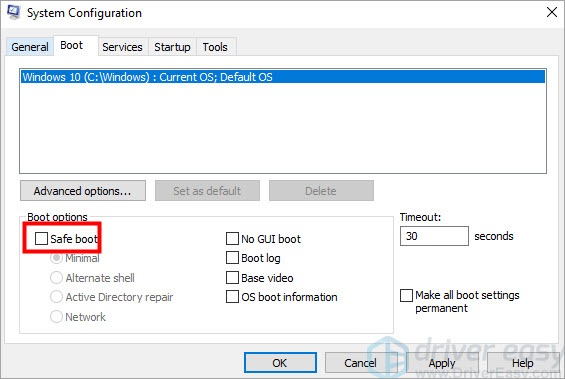
To undo the changes, follow the same steps as above while in safe mode and uncheck the checkbox next to Safe boot.
#5. Force Windows to enter WinRE
You can also force Windows to enter the Windows Recovery Environment from where you can access safe mode. This method should only be used in critical circumstances when Windows is unable to boot at all. Otherwise, this method can damage your Windows.
If Windows crashes three consecutive times, then it will automatically boot into WinRE. So if you are having trouble starting Windows, you can also fake crash the Windows to open up WinRE to solve it.
Just start the PC, and when Windows starts loading, hold the power button for up to 10 seconds to force it to shutdown. Repeat this process up to two times more, and the next time Windows will automatically boot into Windows Recovery Environment. From there, you can follow the guidelines in the first method to access safe mode.
#6. Use a Windows 10 bootable USB or disk
If you have your Windows 10 CD with you or a bootable Windows 10 flash drive, you can use it to boot into safe mode. You will only need to use this method when Windows is corrupted to the point it is unable to load at all, even the force shutdown method isn’t working.
If you don’t already have a bootable drive with you, you can easily create one for free using Windows 10 media creation tool. All you need is another PC and a USB drive with at least 8GB of free space. You can follow the instruction on the aforementioned Microsoft support page to download and create Windows 10 bootable USB.
Once you have the bootable drive, please insert it into the PC and start the PC. First, you will have to select the keyboard layout and preferred language. Once done, you can click on the Repair your computer button at the bottom-left corner of the window to open the Windows Recovery Environment.

The changes you make here in Windows Recovery Environment will apply to your original Windows. So all you need to do is access the safe mode from here (see method #1), and your corrupted Windows will launch in safe mode.
Bonus method
This method will probably not work on the latest PCs that run UEFI and have SSDs for storage. However, if you have an old PC with legacy BIOS with HDD storage, it should work for you; and it’s arguably the easiest method to access safe mode.
On Windows 7, you could access safe mode by repeatedly hitting the F8 or Shift+F8 keys before the Windows started. However, this method doesn’t work on Windows 8.1 and Windows 10 because the hardware they come with is new, and their boot time is swift. So there isn’t enough time for Windows to register the keystrokes and launch the safe mode.
Although if you have an old PC running on legacy BIOS and HDD, it will be slow enough even on Windows 10 to register the keystrokes and launch safe mode. If your PC qualifies, all you have to do is press the F8 key repeatedly when your PC starts booting to boot into safe mode. If that doesn’t work, try holding the Shift key and repeatedly pressing the F8 key.
This method is much faster to access safe mode as you don’t have to access Windows and don’t need to go through any menus.
Wrapping up
I am sure these methods to access safe mode in Windows 10 are enough no matter which problem you are stuck in. Whether you have access to Windows or not, one of these methods will work. Although if you are looking for the quickest way to open safe mode, I believe the 3rd method is the fastest. You don’t even have to sign-in to open safe mode, and it works even when you are signed-in.
If you still need help with the PC boot then check out Tenorshare Windows Boot Genius software.
Next, find out how to disable NetBIOS over TCP/IP in Windows.
How to directly reboot in Safe Mode in Windows 10
The Safe mode in Windows, start the computer with a limited set of drivers and system files. Startup programs, add-ons, etc. first, do not run in Safe Mode, and only the basic drivers needed to start Windows 10/8/7 are started. This mode is quite useful for troubleshooting Windows problems.
If you want to restart and boot directly into Safe Mode, you have to watch the computer reboot, watch the various BIOS messages, select which operating system you want to boot with, and then press F8 at the exact moment to enable the Advanced Boot menu. In Windows 10/8, of course, things are a bit different. You have to first enable F8 key if you want to use it to boot in Safe Mode.
Reboot in Safe Mode
But you wish you can directly reboot into Safe Mode. To do this, open Run box, type msconfig and hit Enter to open the System Configuration utility.
Select the Boot tab, and under Boot Options, check Safe Mode. The Minimal option will get selected automatically. If you need other Safe Mode options like Networking, etc.on, you can select those.
Click on Apply > OK. You will now see a prompt. Click on the Restart button, and the computer will initiate the process to reboot your computer directly in safe mode. So before you click the Restart button, make sure that you have saved all your work.
Do note that, if you reboot again from Safe Mode, you will again reboot back into Safe Mode. So once you have completed your work in Safe Mode, again run msconfig and uncheck the Safe Boot option, Click Apply, and then restart your computer. This will bring you back to your desktop, after the restart.
Shortcut to reboot in Safe Mode
If you need to reboot in Safe Mode frequently, you can create its shortcut. Right-click on your desktop, select New > Shortcut. In the Location field, copy-paste the following path:
Click next and name the shortcut as, say, Restart Options.
BootSafe
Alternatively, you can download and use a simple .exe utility called BootSafe.
However, when you want to leave Safe Mode and return to Normal mode, you need to use this program again to get a reboot into Normal mode.
How to start or boot Windows 10 in Safe Mode
Windows 10 Safe Mode loads the operating system with a minimal set of system files and device drivers – just enough to boot the Windows OS. In Safe Mode, the startup programs, add-ons, etc.settings, do not run. We usually boot into Safe Mode, when we need to troubleshoot issues. This post will show you how to enable and start or boot Windows 10 in Safe Mode. There may be other ways, but we will cover only 2 of the most convenient ways.
Boot Windows 10 in Safe Mode
There are three easy ways you can boot Windows 10 in Safe Mode:
- Press Shift and then click on Restart
- Open Recovery section in Update & Settings and click on Restart now.
- Use MSConfig or System Configuration Utility and select the Safe boot and Minimal options setting and restart.
Let us take a look at them in detail.
1] Using Advanced Startup Options
The easiest way to boot Windows 10 into Safe Mode, would be to press Shift and then click on Restart. This will reboot your Windows 10 computer into Advanced Startup Options.
Alternatively, open the Settings app > Update & Security > Recovery. Under Advanced startup, click on Restart now.
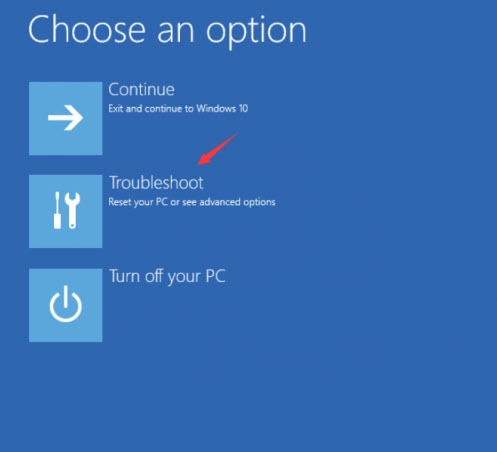
When you follow any of the two methods mentioned, your Windows 10 computer will restart, and you will see the following screen.
Click on Troubleshoot to proceed.
Now follow the steps laid down in Advanced Startup options in Windows 10. It will take you through the entire process starting with – Troubleshoot > Advanced Options > Startup Settings > Restart > Press No 4 key.
If you have followed the procedure correctly, you will finally reach Startup Settings screen, from where you will be able to enable Safe Mode.
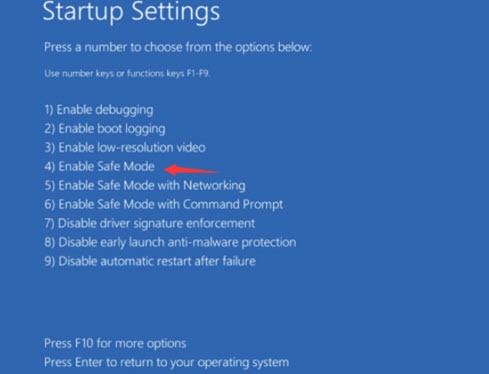
Press the ‘4’ key, and your computer will restart and enter Safe Mode. To reboot in Safe Mode with Networking, press ‘5’ key. To reboot in Safe Mode with Command Prompt, press the ‘6’ key.
You will see a black desktop with a Safe Mode watermark in the bottom left and right sides.
Read: How to Enable F8 Key to Boot into Safe Mode on Windows 10
2] Using System Configuration Utility
The other simple way, of course, is by using the built-in System Configuration Utility. From the Win+X Menu, open Run box, type msconfig and hit Enter.
Under the Boot tab, check the Safe boot and Minimal options. Click Apply/OK and exit. On a restart, your computer will enter Safe Mode directly.
You can now work in the Safe Mode.
Before you exit, remember to open msconfig and uncheck the Safe Boot check box, click Apply/OK and then on Restart, so that on reboot, your computer will not again boot in safe mode – but instead will boot to your desktop.
Steps to Boot Windows 10 in Safe Mode [with Pictures]
Last Updated: 1 year ago
In Windows 10, if you want to start Safe Mode with the F8 key, you have to set it up first. Read on to find out why and how, and to learn other ways to access Safe Mode in Windows 10.
Three other ways to access Safe Mode in Windows 10
- Enter Safe Mode when Windows can’t boot normally
- Enter Safe Mode from Normal Mode
- Start Safe Mode from the login screen
TIP: If you’re tired of Windows problems that force you to start in Safe Mode, scroll down to this suggestion.
Why can’t you access the Safe Mode using F8?
On previous versions of Windows such as Windows 7, at the beginning of the boot, you’re able to press the F8 key to access the Advanced Boot Options menu, where you can enable Safe Mode. But on Windows 10, the F8 key doesn’t work any more. No matter how many times you’ve tried. You must be wondering why this happens. Is it removed from Windows 10?
Actually, F8 key is still available to access the Advanced Boot Options menu on Windows 10. But starting from Windows 8 (F8 doesn’t work on Windows 8, either.), in order to have faster boot time, Microsoft has disabled this feature by default. That is to say Windows 10 boots too fast to have any time to let anything interrupt. If you want to use the F8 key to access the Safe Mode, you need to enable the feature manually.
How can you get F8 work again?
F8 boot menu feature is disabled on Windows 10 by default. The good news is you can get it work again with the Boot Configuration Data (BCD) Edit command. BCD Edit is a tool written to control how the operating system is started. You can use it to enable F8 boot menu easily. Just follow these steps:
1) On your keyboard, press Windows logo key and R key at the same time to invoke the run command.
2) Type cmd then press Ctrl+Shift+Enter to open an administrator command prompt. (Don’t just press Enter or click OK as that won’t open the command prompt in an administrator mode.)

3) Copy the following command and paste it in the Command Prompt. Then on your keyboard, press the Enter key.
bcdedit /set

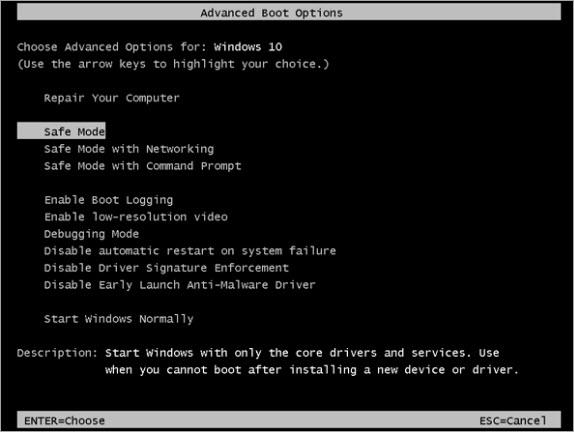
4) Reboot your PC. Before the Windows logo appears, press F8 to access the Boot Options menu (see below screenshot). Then select Safe Mode.
Note: You can get F8 work again only when you’re able to access Windows. If you can’t start Windows normally, you need to use other effective way.
How to boot into Safe Mode in Windows 10?
Except F8, there are other numerous ways to boot into Safe Mode in Windows 10. In this post, you’ll learn the easiest ways. If you run into a serious problem (for example, blue screen) and can’t start Windows normally, please use Way 1 to enter Safe Mode. If you’re in Windows Normal Mode, please use Way 2. If you boots to the login screen (you may call it sign-in screen), please use Way 3.
Way 1: Enter Safe Mode when you can’t boot normally
Safe Mode loads with a minimum set of drivers, software and service. Usually, when Windows doesn’t start normally, Safe Mode starts with no problem. It’s useful for you to troubleshoot the problem there.
This way works effectively when you can’t boot Windows 10 normally.
- Ensure your PC is off
Ensure your PC is off. If your PC is on, turn it off.
Enter Preparing Automatic Repair screen
Press the power button to turn on your PC, then hold the power button down until PC shuts down automatically (about 5 seconds) . Repeat this more than 2 times until you see the Preparing Automatic Repair (see below screenshot).
Note: This step is aim to bring up Preparing Automatic Repair screen. When Windows doesn’t boot properly, this screen pops up and Windows attempts to fix the problem by itself. If you’ve seen this screen at the first time when you power up the computer, skip this step.

Diagnose your PC
Wait for Windows to diagnose your PC. 
Advanced Options button
Click Advanced options, then the system will bring up the Windows RE (Recovery environment.) screen. 
On the Windows RE (Recovery environment) screen, click Troubleshoot. 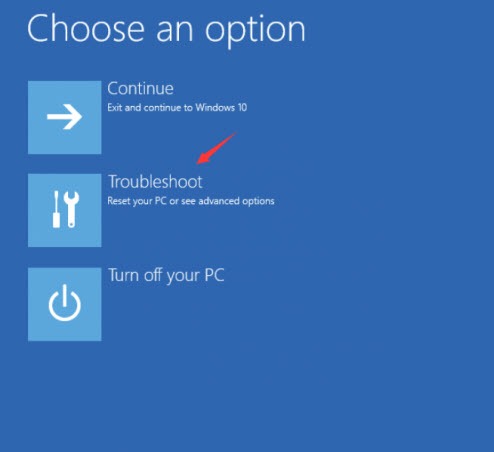
On the Troubleshoot screen, click Advanced options. 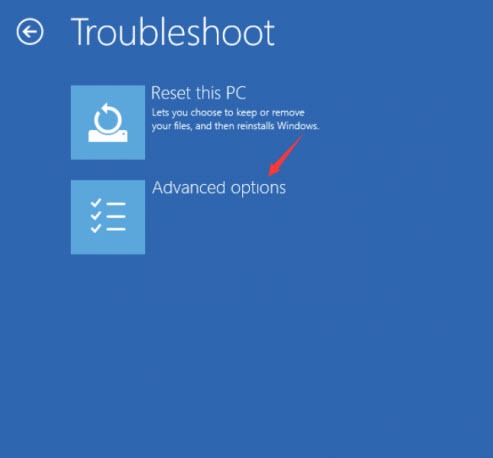
Advanced options screen
Click Startup Settings to continue. 
Click Restart. The computer restarts and another screen opens showing a list of different startup options. 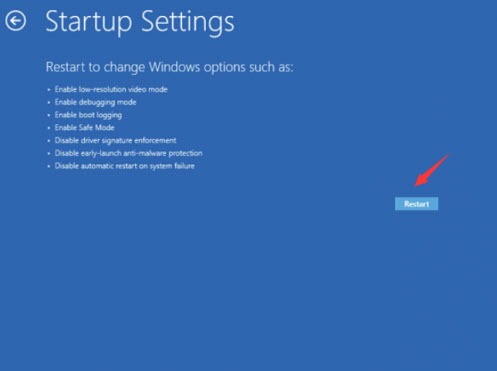
Enable Safe Mode
On your keyboard, press the 4 number key to enter Safe Mode without network. (If you need to do some online research after boot into the safe mode, press the 5 number key to enter Safe Mode with network access.) 
Way 2: Enter Safe Mode from Normal Mode
If you’ve started Windows normally, you can boot into the safe mode using the System Configuration tool. The System Configuration tool allows you to configure how your PC starts, the boot procedure, the startup items, etc.
Follow below instructions to open the System Configuration tool and set Windows starts in Safe Mode. Just 4 steps:
1) On your keyboard, press the Win+R (Windows logo key and R key) at the same time to invoke the Run box.
2) Type msconfig and click OK. Then the System Configurations will open.

3) When System Configuration opens, click the Boot tab. Under Boot options, check Safe boot then click OK.
4) When you’re prompted to restart your computer to apply these changes, click Restart then you will boot into the Safe Mode.

IMPORTANT: If you want to start Windows 10 in Normal Mode, ensure Safe boot is unchecked.
Way 3: Start Safe Mode from the login screen
If you can boot to the login screen, you can enter Safe Mode from the login screen. The steps are similar with the steps of Way 1.
1) On your keyboard, hold down the Shift key.
2) While holding down the Shift key, on the login screen (you may call it sign in screen), at the bottom right of the corner, click the power button then select Restart. Then Windows will bring up the Windows RE (Recovery environment) screen.

3) On the Windows RE (Recovery environment) screen, click Troubleshoot.
4) On the Troubleshoot screen, click Advanced options.

5) Click Startup Settings.

6) Click Restart. The computer restarts and another screen opens showing a lot of different startup options.

7) On your keyboard, press the 4 number key to enter Safe Mode without network. (If you need to do some online research after booting into the safe mode, press the 5 number key to enter Safe Mode with network access.)
Hope the instructions in this post help you boot into Safe Mode. If you have any ideas or questions, please leave a comment below. Thanks for your reading.
Tired of having to start in Safe Mode?

Windows is a very old technology. Sure, Windows 10 is relatively new, but it’s still just the latest iteration of a decades-old operating system, designed for a bygone era (pre-internet).
Now that we have the internet, fast connection speeds, free cloud storage, and endless web apps (like Gmail, Google Docs, Slack, Facebook, Dropbox and Spotify), the entire Windows way of doing things – with locally installed programs and local file storage – is totally outdated.
Why is that a problem? Because when you’re constantly installing uncontrolled third-party programs, you’re constantly opening the door to viruses and other malware. (And Windows’ insecure permission system compounds this problem.)
Plus the way Windows manages installed software and hardware has always been a problem. If your computer shuts down unexpectedly, or a program installs, uninstalls or updates incorrectly, you can get ‘registry’ corruptions. That’s why Windows PCs always slow down and become unstable over time.
Also because everything’s installed and saved locally, it doesn’t take long before you run out of disk space, and your disk gets fragmented, which makes everything even slower and more unstable.
For most people, the simplest way to solve Windows problems is to ditch Windows altogether, and switch to a faster, more reliable, more secure, easier to use and cheaper operating system…
ChromeOS feels much like Windows, but instead of installing heaps of programs to email, chat, browse the internet, write documents, do school presentations, create spreadsheets, and whatever else you normally do on a computer, you use web apps. You don’t need to install anything at all.
That means you don’t have virus and malware problems, and your computer doesn’t slow down over time, or become unstable.


