- Advanced startup options (including safe mode)
- Repair Your Computer
- Safe Mode
- Загрузка компьютера в безопасном режиме в Windows 10
- 4 способа загрузить Windows 10 в Безопасном режиме
- Безопасный режим Windows 10
- Способ 1: С помощью инструмента Конфигурация системы (msconfig.exe)
- Способ 2: Перезагрузить компьютер с нажатием клавиши Shift (Shift + Перезагрузка)
- 9 ways to boot Windows 8 or Windows 8.1 into Safe Mode
- 1. Use Shift + Restart on the Windows 8 sign in screen
- 2. Interrupt the normal boot process of Windows 8 or 8.1, three times in a row
- 3. Use a Windows 8 installation media and the Command Prompt
- 4. Boot from a Windows 8.1 flash USB system recovery drive
- 5. Use a System Recovery CD/DVD to boot into Safe Mode (this method works only in Windows 8, not in Windows 8.1)
- 6. Use the System Configuration tool (msconfig.exe) to enable Safe Mode
- 7. Use “Shift + Restart” on the Windows 8.1 Start screen
- 8. Use the PC Settings to access the Recovery options and start Safe Mode
- 9. Use F8 or Shift + F8 (does not work when using UEFI BIOS and SSD drives)
- Which method do you prefer for booting Windows 8 or 8.1 into Safe Mode?
Advanced startup options (including safe mode)
The Advanced Boot Options screen lets you start Windows in advanced troubleshooting modes. You can access the menu by turning on your computer and pressing the F8 key before Windows starts.
Some options, such as safe mode, start Windows in a limited state, where only the bare essentials are started. If a problem doesn’t reappear when you start in safe mode, you can eliminate the default settings and basic device drivers and services as possible causes. Other options start Windows with advanced features intended for use by system administrators and IT professionals. For more information, go to the Microsoft website for IT professionals.
Repair Your Computer
Shows a list of system recovery tools you can use to repair startup problems, run diagnostics, or restore your system. This option is available only if the tools are installed on your computer’s hard disk. If you have a Windows installation disc, the system recovery tools are located on that disc.
Safe Mode
Starts Windows with a minimal set of drivers and services.
To start in safe mode:
Remove all floppy disks, CDs, and DVDs from your computer, and then restart your computer. Click the Start button , click the arrow next to the Shut Down button (or the arrow next to the Lock button), and then click Restart.
Do one of the following:
If your computer has a single operating system installed, press and hold the F8 key as your computer restarts. You need to press F8 before the Windows logo appears. If the Windows logo appears, you’ll need to try again by waiting until the Windows logon prompt appears, and then shutting down and restarting your computer.
If your computer has more than one operating system, use the arrow keys to highlight the operating system you want to start in safe mode, and then press F8.
On the Advanced Boot Options screen, use the arrow keys to highlight the safe mode option you want, and then press Enter.
Log on to your computer with a user account that has administrator rights.
Safe Mode with Networking. Starts Windows in safe mode and includes the network drivers and services needed to access the Internet or other computers on your network.
Safe Mode with Command Prompt. Starts Windows in safe mode with a command prompt window instead of the usual Windows interface. This option is intended for IT professionals and administrators.
Enable Boot Logging. Creates a file, ntbtlog.txt, that lists all the drivers that are installed during startup and that might be useful for advanced troubleshooting.
Enable low-resolution video (640×480). Starts Windows using your current video driver and using low resolution and refresh rate settings. You can use this mode to reset your display settings. For more information, see Change your screen resolution.
Last Known Good Configuration (advanced). Starts Windows with the last registry and driver configuration that worked successfully.
Directory Services Restore Mode. Starts Windows domain controller running Active Directory so that the directory service can be restored. This option is intended for IT professionals and administrators.
Debugging Mode. Starts Windows in an advanced troubleshooting mode intended for IT professionals and system administrators.
Disable automatic restart on system failure. Prevents Windows from automatically restarting if an error causes Windows to fail. Choose this option only if Windows is stuck in a loop where Windows fails, attempts to restart, and fails again repeatedly.
Disable Driver Signature Enforcement. Allows drivers containing improper signatures to be installed.
Start Windows Normally. Starts Windows in its normal mode.
Загрузка компьютера в безопасном режиме в Windows 10
В безопасном режиме запуск Windows выполняется с использованием ограниченного набора файлов и драйверов. Если проблема не возникает в безопасном режиме, это означает, что эти параметры по умолчанию и основные драйверы устройств не приводят к возникновению проблемы. Наблюдение за Windows в безопасном режиме позволяет сузить источник проблемы и устранить неполадки на компьютере.
Существует две версии безопасного режима: Безопасный режим и Безопасный режим с загрузкой сетевых драйверов. В безопасном режиме с поддержкой сети добавляются сетевые драйверы и службы, необходимые для доступа к Интернету и другим компьютерам в сети.
Изучите следующие разделы, чтобы узнать, как запустить компьютер в безопасном режиме в разделе «Параметры», на экране входа в систему, на черном или пустом экране.
Нажмите клавишу с логотипом Windows + I на клавиатуре, чтобы открыть раздел «Параметры». Если это не поможет, нажмите Start кнопку «Пуск» и выберите » Параметры «.
В разделе Особые варианты загрузки выберите элемент Перезагрузить сейчас.
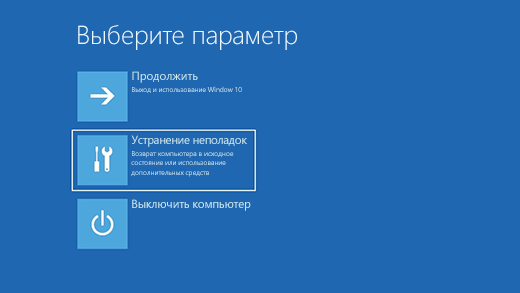
После перезагрузки компьютера на экране Выберите параметр выберите элементы Диагностика > Дополнительные параметры > Параметры загрузки > Перезапуск. Возможно, вам будет предложено ввести ключ восстановления BitLocker.


После перезагрузки компьютера вы увидите список параметров. Нажмите клавиши 4 или F4, чтобы запустить компьютер в безопасном режиме. Если вам будет нужен Интернет, выберите клавиши 5 или F5, чтобы войти в безопасный режим с загрузкой сетевых драйверов.
Если вам не удается открыть «Параметры» для перехода в безопасный режим, перезагрузите устройство на экране входа в Windows.
На экране входа в Windows удерживайте клавишу SHIFT и выберите в это время Выключение > Перезапуск .
После перезагрузки компьютера на экране Выберите параметр выберите элементы Диагностика > Дополнительные параметры > Параметры загрузки > Перезапуск. Возможно, вам будет предложено ввести ключ восстановления BitLocker.
После перезагрузки компьютера вы увидите список параметров. Нажмите клавиши 4 или F4, чтобы запустить компьютер в безопасном режиме. Или, если вам нужно использовать Интернет, выберите 5 или F5 для безопасного режима с помощью сети.
Примечание: Если вы зашифровали свое устройство, для запуска в безопасном режиме вам потребуется ключ BitLocker.
Перед входом в безопасный режим необходимо войти в среду восстановления Windows (winRE). Для этого вы будете периодически включать свое устройство, а затем:
Нажмите кнопку питания на устройстве и удерживайте ее нажатой в течение 10 секунд, чтобы выключить устройство.
Снова нажмите кнопку питания, чтобы включить устройство.
После появления первого признака запуска Windows (например, на некоторых устройствах отображается логотип производителя при перезапуске) удерживайте нажатой кнопку питания в течение 10 секунд, чтобы отключить устройство.
Снова нажмите кнопку питания, чтобы включить устройство.
После перезагрузки Windows удерживайте кнопку питания на устройстве нажатой в течение 10 секунд, чтобы выключить устройство.
Снова нажмите кнопку питания, чтобы включить устройство.
Разрешите полностью перезапустить устройство. Будет активирована среда восстановления Windows.
В среде winRE выполните следующие действия, чтобы перейти в безопасный режим.
На экране Выбор действия выберите Диагностика > Дополнительные параметры > Параметры загрузки > Перезагрузить.
После перезагрузки устройства вы увидите список параметров. Выберите параметр 5 в списке или нажмите клавишу F5, чтобы запустить безопасный режим с подключением к сети.
Если вам нужны дополнительные сведения о черном или пустом экране, изучите раздел Устранение ошибок типа «черный» или «пустой» экран.
Примечания: Если вам необходимо выйти из безопасного режима, просто перезагрузите устройство или выполните следующие действия.
Нажмите клавишу с логотипом Windows+ R.
Введите msconfig в поле Открыть, а затем нажмите кнопку ОК.
Откройте вкладку Загрузка.
В разделе Параметры загрузки снимите флажок Безопасный режим.
4 способа загрузить Windows 10 в Безопасном режиме
Читайте, как загрузить Безопасный режим Windows . Рассмотрим стандартные способы, с использованием диска восстановления или используя определённое сочетание клавиш. Если операционная система не загружается или работает неправильно по одной из множества возможных причин, то иногда единственным способом вернуть её работоспособность и получить доступ к своим данным есть загрузка компьютера в Безопасном режиме и исправление ошибок с его помощью.
Безопасный режим Windows 10
Если вам уже довелось какое-то время пользоваться Windows 10, то вы, наверное, обратили внимание, что старые способы загрузки компьютера в Безопасном режиме больше не работают. Т.е. нажимая клавиши F8 или Shift+F8 во время загрузки системы вы уже не сможете загрузить операционную систему в безопасном режиме. Но это не значит, что в Windows 10 больше нет Безопасного режима . Просто чтобы загрузить его, необходимо пройти другие процедуры. Давайте рассмотрим их детальнее.
Когда вы входите в безопасный режим Windows 10, операционная система загружает минимальный интерфейс и только самые необходимые сервисы и драйвера, которые необходимы для функционирования системы.
Способ 1: С помощью инструмента Конфигурация системы (msconfig.exe)
Самый простой способ загрузиться в Безопасном Режиме Windows 10, это с помощью инструмента Конфигурация системы . Многие пользователи знают его по исполняемому имени: msconfig.exe .
Чтобы запустить данный инструмент, необходимо открыть окно «Выполнить» (сочетание клавиш Windows + R) и ввести в нём msconfig .
Также, Конфигурацию системы можно запустить с помощью окна поиска возле кнопки меню Пуск . Достаточно ввести в нём «Конфигурация системы» .
В открывшемся окне инструмента Конфигурация системы перейдите на вкладку Загрузки , и в разделе Параметры загрузки выберите Безопасный режим .
После этого система предложит перезагрузить компьютер для вступления в силу изменений. Можно продолжить работу на компьютере без перезагрузки или перезагрузить его, после чего он автоматически загрузится в Безопасном режиме .
Способ 2: Перезагрузить компьютер с нажатием клавиши Shift (Shift + Перезагрузка)
Ещё один способ с помощью которого можно запустить Безопасный режим Windows 10, это перезагрузить компьютер удерживая нажатой клавишу Shift. Для этого, откройте меню Пуск , нажмите кнопку Выключение и удерживая нажатой клавишу Shift, выберите Перезагрузка .
Также данную комбинацию можно использовать из экрана блокировки.
9 ways to boot Windows 8 or Windows 8.1 into Safe Mode
Are you struggling to boot Windows 8 or Windows 8.1 into Safe Mode? Have you tried pressing both F8 and Shift + F8 and they do not work? That is because the boot procedure in Windows 8 is different compared to older versions of Windows such as Windows 7. The boot is so fast that it literally cannot be interrupted by any of your keypresses. Here are nine different ways in which you can boot into Safe Mode, that do not involve any special hacks or manual configuration:
NOTE: If you want to find out all the methods which you can use to boot Windows 8 or Windows 8.1 into Safe Mode, read this entire tutorial. However, we first show you how to boot into Safe Mode when you cannot log into Windows 8.1, and after that, how to boot into Safe Mode when you can still log into Windows 10. If you cannot log into Windows 8.1, read methods 1 to 5. If you can log into Windows 8.1, read methods 6 to 8. The ninth method works only on computers with old hardware.
1. Use Shift + Restart on the Windows 8 sign in screen
This method works in Windows 8.1 even if you cannot log into a user account. On the sign in screen (or in the Settings charm, if you can log in), press and hold the SHIFT key. While keeping it pressed, click or tap the Power button and then Restart.
Windows asks you to select an option. Choose Troubleshoot.
On the Troubleshoot screen, choose Advanced options.
On the Advanced options screen, click or tap Startup Settings.
Windows informs you that it is about to restart so that it can change several boot options. Among other things, it also enables Safe Mode. Click or tap Restart.
After your PC or device reboots, it displays nine different startup settings, including:
- Safe Mode – press the 4 or the F4 key on your keyboard
- Safe Mode with Networking – press the 5 or the F5 key on your keyboard
- Safe Mode with Command Prompt – press the 6 or the F6 key on your keyboard
Windows 8.1 now boots according to the Safe Mode environment that you selected.
2. Interrupt the normal boot process of Windows 8 or 8.1, three times in a row
Another method to boot into Safe Mode is somewhat automatic. When Windows 8 fails to boot three times in a row, it automatically starts its Automatic Repair procedure. If you want to force Windows 8.1 to do so, you can interrupt its normal boot 3 times over. That means that you must stop your PC or device while booting. You can do that by pressing the physical Reset or Power button on your PC or device. If you choose to press the Power button, note that you might have to press it for at least 4 seconds to stop your PC/device. The fourth time your PC or device tries to boot, it should automatically enter into its Automatic Repair mode, and the first thing you see on your screen is a message that says “Preparing Automatic Repair.”
After a while, Windows 8 displays the Automatic Repair screen. On it, click or tap Advanced options.
On the next screen, click or tap Troubleshoot.
The following steps you need to take are the same as in the first method from this guide. Go to “Advanced options -> Startup Settings -> Restart.” Once you get to the Startup Settings screen, press the 4 or the F4 key on your keyboard boot into Safe Mode, press 5 or F5 to enter “Safe Mode with Networking,” or press 6 or F6 to enable “Safe Mode with Command Prompt.”
3. Use a Windows 8 installation media and the Command Prompt
If you can create a Windows 8 or 8.1 bootable media such as a DVD or USB memory stick, or if you already have one around, you can use it to boot your PC or device into Safe Mode. Insert it into your PC or device and boot from it. When the Windows 8 installation wizard starts, select the language and keyboard layout you prefer, and press Next.
On the next screen, click or tap the “Repair your computer” link from bottom-left corner.
On the “Choose an option” screen, click or tap Troubleshoot.
On the Troubleshoot screen, press the Advanced options button.
Click or tap Command Prompt.
The previous action opens Command Prompt as administrator. Inside it, type the following command: bcdedit /set
Close the Command Prompt, and Windows 8 should take you back to the “Choose an option” screen. There, click or tap Continue.
The PC or device reboots and automatically goes into Safe Mode.
IMPORTANT: This method almost always works, but it makes Windows 8.1 go into Safe Mode every time it starts. To disable it and make Windows 8.1 to boot normally again, open Command Prompt and run this command: bcdedit /deletevalue
4. Boot from a Windows 8.1 flash USB system recovery drive
In Windows 8 and Windows 8.1, you can use the Recovery Media Creator to create a system recovery drive on a USB flash drive. You can find detailed instructions in this tutorial: How to create a Recovery Drive on a USB memory stick in Windows 8 & 8.1.
Boot from the USB memory stick. On the first screen, select the keyboard layout you prefer using and, on the “Choose an option” screen, click or tap Troubleshoot. The next steps are the same as the steps we have shown you in the first method from this guide. In short, you have to follow this path: “Advanced options -> Startup Settings -> Restart.” Then press 4 or F4 key on your keyboard to boot to Safe Mode, 5 or F5 to go into “Safe Mode with Networking,” or 6 or F6 to enter “Safe Mode with Command Prompt.”
5. Use a System Recovery CD/DVD to boot into Safe Mode (this method works only in Windows 8, not in Windows 8.1)
In Windows 8, but not in Windows 8.1, you can create a system recovery CD or DVD. Here is the tutorial that shows how it is done: What is a system repair disc and how to create one in Windows.
Once you have that disc created, boot from it. When asked to press any key to load its content, do so. Then, choose your keyboard layout.
Once you have done that, the “Choose an option” screen is shown. From here on, the steps are identical to those we have shown in method 1. Go to “Advanced options -> Startup Settings -> Restart”. Then, press 4 or F4 on your keyboard to boot into Safe Mode, 5 or F5 to get into “Safe Mode with Networking,” or 6 or F6 to enter “Safe Mode with Command Prompt.”
6. Use the System Configuration tool (msconfig.exe) to enable Safe Mode
Maybe one of the easiest methods for booting into Safe Mode is to use the System Configuration tool, also known as msconfig.exe.
On the Start Screen, type msconfig and click or tap on the result bearing the same name. Also, if you want to see other ways to open the System Configuration tool, you can read this article: 8 ways to start System Configuration in Windows (all versions).
In System Configuration, go to the Boot tab and, in the Boot options area, check the box that says “Safe boot.” Then, click or tap OK.
Windows 8 now tells you that you need to reboot your PC. Click or tap on Restart to reboot right now, or click/tap on “Exit without restart” if you want to restart later.
The next time Windows 8.1 boots, it automatically enters Safe Mode.
7. Use “Shift + Restart” on the Windows 8.1 Start screen
Windows 8 or 8.1 also let you enable Safe Mode with just a few click or taps on its Start screen. Head to the Start screen and press and hold the SHIFT key on your keyboard. Then, while still holding SHIFT, click/tap the Power button and then the Restart option.
Windows 8 then takes you to the “Choose an option” screen. On it, click or tap Troubleshoot.
From here on, follow the same steps as the ones from the first method in this guide. That means that you must go to “Advanced options -> Startup Settings -> Restart.” Then, press 4 or F4 on your keyboard to go into Safe Mode, 5 or F5 to go into “Safe Mode with Networking,” or 6 or F6 to enter “Safe Mode with Command Prompt.”
8. Use the PC Settings to access the Recovery options and start Safe Mode
If your Windows 8 or 8.1 PC or device still works and you can log in to it, you can also use the PC Settings to go into Safe Mode. Open the PC Settings and go to “Update and recovery.”
On the left sidebar, click or tap on Recovery and, on the right side of the screen, press the “Restart now” button from the “Advanced startup” section.
Windows 8.1 then shows you the “Choose an option” screen. On it, click or tap Troubleshoot.
Then, must follow the same steps as the ones from the first method in this guide. Go to “Advanced options -> Startup Settings -> Restart”. Then, press 4 or F4 on your keyboard to boot into Safe Mode, 5 or F5 to get into “Safe Mode with Networking,” or 6 or F6 to enter “Safe Mode with Command Prompt.”
9. Use F8 or Shift + F8 (does not work when using UEFI BIOS and SSD drives)
If your PC or device is rather old (has a classic BIOS and does not use an SSD drive), you might also have some luck trying to boot into Safe Mode using the old ways of pressing the F8 or Shift + F8 keys on your keyboard during the boot of your PC.
However, they often do not work because Microsoft changed the way that Windows 8 and 8.1 boot. They tried to make the whole boot process faster than before (in Windows 7 and prior), but that also stopped Windows 8 and 8.1 from being able to record any key presses during startup. You can read more about it in this Microsoft blog post: Designing for PCs that boot faster than ever before.
Which method do you prefer for booting Windows 8 or 8.1 into Safe Mode?
We hope you found this guide useful. If you know other ways in which you can make Windows 8 or Windows 8.1 boot into Safe Mode, do not hesitate to share them in the comments section below. Many readers are going to find them useful.


