- How to Fix the Windows Sandbox No Internet Connection Issue
- Dilum Senevirathne
- Re-Enable Sandbox
- Activate Additional Features
- Bridge Network Connections
- Windows Sandbox has no Internet connection
- Windows Sandbox does not have Internet connection
- 1] Disable VPN Connections
- 2] Bridge the required connection
- 3] Run Network Troubleshooter
- 4] Reenable Windows Sandbox feature
- Enable or Disable Networking in Windows Sandbox in Windows 10
- To Enable or Disable Networking in Windows Sandbox in Windows 10,
- Enable or Disable Networking in Windows Sandbox in Registry
- Ready-to-use Registry Files
- More on Windows Sandbox
- More on Group Policy
- About Sergey Tkachenko
- Как исправить Windows Песочница Нет проблем с подключением к Интернету
- Повторно включить песочницу
- Активировать дополнительные функции
- Мост Сетевые подключения
- Отключить виртуальную частную сеть
- Отключить антивирусный брандмауэр
- Добавить исключение брандмауэра
- Подключен и готов к работе
How to Fix the Windows Sandbox No Internet Connection Issue
Dilum Senevirathne
19 Aug 2019
The Windows Sandbox lets you do just about anything. You can try out sketchy-looking programs and websites or mess around the operating system settings without worrying about breaking things up. But provided that you managed to activate Windows Sandbox, you might run into an issue where you might not have access to the internet within the virtual setting.

Usually, that issue occurs due to a variety of factors ranging from technical glitches, virtual private networks, to antivirus firewalls. So without further ado, let’s check out how you can go about regaining access to the internet within the Windows Sandbox.
Also on Guiding Tech

Top 3 Windows 10 Night Light Alternatives
Re-Enable Sandbox
Windows Sandbox is a fresh addition to Windows 10, so it is extremely susceptible to bugs and glitches. Disabling and re-enabling the feature will likely help it connect to the internet successfully.
Start by opening the Windows Features dialog box. For that, you must type windows features into the Start menu, and then click Open.
Uncheck the box next to Windows Sandbox on the Windows Features dialog box that shows up, and then click OK. Windows Features will remove Windows Sandbox.

Afterward, restart your computer, revisit the Windows Features dialog box, and then re-enable Windows Sandbox.
Once again, restart your computer, and then try out Windows Sandbox. If it doesn’t connect to the internet, let’s check out what you can do next.
Activate Additional Features
Another viable fix that you can try out to ensure that Windows Sandbox can run properly. That involves activating the various features which facilitate running virtualized environments on your PC. It includes Microsoft’s own Hyper-V dedicated virtual platform.
Open the Windows Features dialog box, check the boxes next to the following features as listed below, and then click OK:
- Containers
- Hyper-V
- Virtual Machine Platform
- Windows Hypervisor Platform
Once your computer finishes activating these features, restart your computer, and then try out Windows Sandbox. Does it connect to the internet now? Continue if it doesn’t.
Bridge Network Connections
Bridging both networks used by Windows Sandbox and the host operating system is the next step that you should take to resolve the issue. That enables better communication between the networks. It is something that you definitely should do.
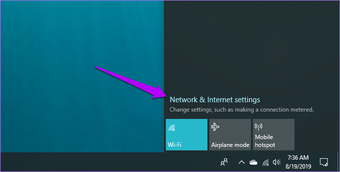
Step 1: Click the Wi-Fi or Ethernet icon on the Windows 10 taskbar of the host, and then click Network & Internet Settings.

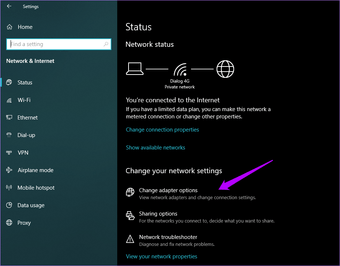
Step 2: On the Status Settings dialog box that shows up, click Change Adapter Options.

Step 3: Hold down the Ctrl key, and then select both the host network connection (Wi-Fi or Ethernet, whichever is active) and the vEthernet Hyper-V Virtual Ethernet Adapter network.
Next, right-click either one of the selected connections, and then click Bridge Connections.

Finally, launch Windows Sandbox and check to see if it connects to the internet successfully. Still no luck? Let’s try the next one.
Windows Sandbox has no Internet connection
Some users have been reporting that the Windows Sandbox environment is not connecting to the Internet. Due to this issue, using applications that requires an Internet connection becomes a painful experience and fully defeats the use-case scenario of the Windows Sandbox feature. There can be a number of causes for this issue, but the most prominent one is where the computer is connected to a VPN network.
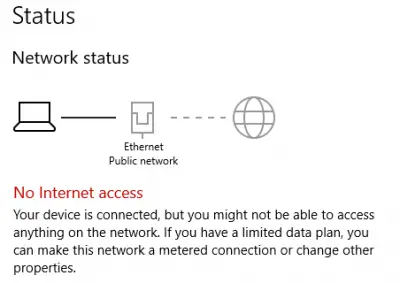
Windows Sandbox does not have Internet connection
Windows Sandbox is a new feature which is meant to carry out operations in a sandboxed or isolated environment. If you face an issue where Windows Sandbox is working on your PC, but the Internet inside the Sandbox is not working, then perhaps one of our suggestions will help you tun on the Internet inside Sandbox.
- Disable VPN Connections.
- Bridge the required connections.
- Run Network Troubleshooter.
- Re-enable Windows Sandbox feature.
1] Disable VPN Connections
Open Windows 10 Settings app. Navigate to the following path: Network & Internet > VPN.
Select the VPN network that your computer is connected to and select Disconnect.
After that, open the Windows Sandbox environment and you should be able to access the Internet in the isolated environment.
If you are using any third party VPN software, exit that applcation.
2] Bridge the required connection
You can try to bridge the connections between the WiFi Adapter/Ethernet adapter and the vEthernet Hyper – V Virtual Adapter and see if that helps.
3] Run Network Troubleshooter
You can try to run various troubleshooters related to the Network. This could also fix your issue.
4] Reenable Windows Sandbox feature
Look up for Turn Windows features on and off in the Windows Search box and select the appropriate option.
From the populated list, uncheck the option for Windows Sandbox. Select OK.
Let the processing be done and reboot your computer.
Enable or Disable Networking in Windows Sandbox in Windows 10
How to Enable or Disable Networking in Windows Sandbox in Windows 10
Windows Sandbox is an isolated, temporary, desktop environment where you can run untrusted software without the fear of lasting impact to your PC. Starting in Windows 10 build 20161, it is possible to enable or disable Networking in Windows Sandbox.
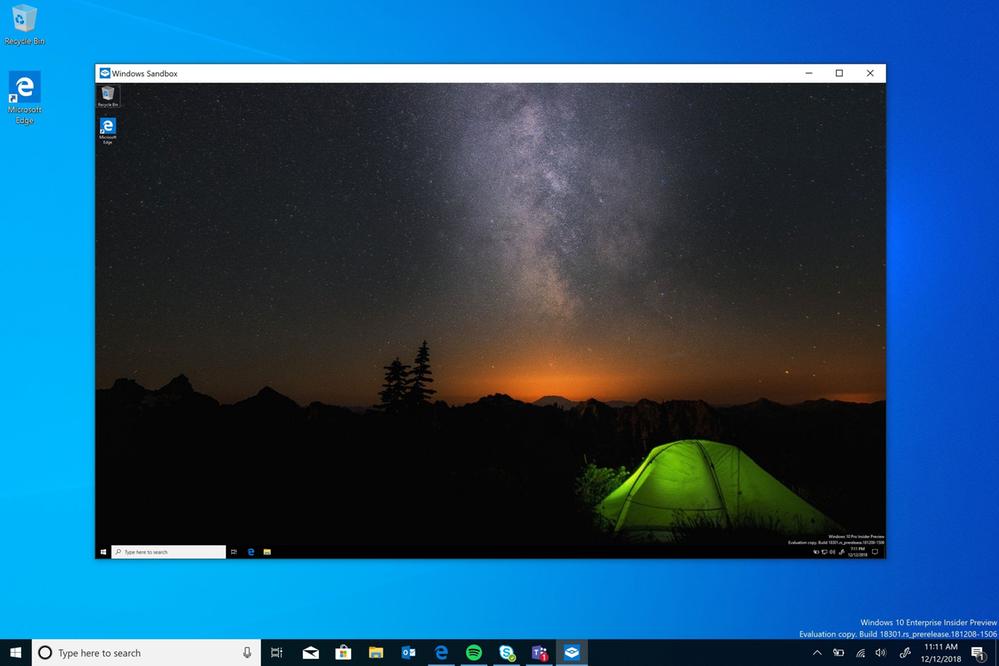
Any software installed in Windows Sandbox stays only in the sandbox and cannot affect your host. Once Windows Sandbox is closed, all the software with all its files and state are permanently deleted.
Windows Sandbox has the following properties:
- Part of Windows – everything required for this feature ships with Windows 10 Pro and Enterprise. No need to download a VHD!
- Pristine – every time Windows Sandbox runs, it’s as clean as a brand-new installation of Windows
- Disposable – nothing persists on the device; everything is discarded after you close the application
- Secure – uses hardware-based virtualization for kernel isolation, which relies on the Microsoft’s hypervisor to run a separate kernel which isolates Windows Sandbox from the host
- Efficient – uses integrated kernel scheduler, smart memory management, and virtual GPU
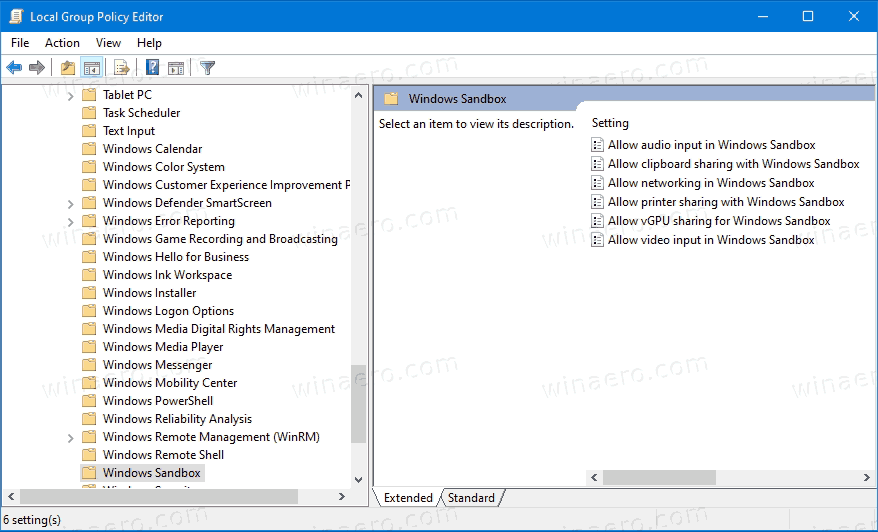
Starting in Windows 10 build 20161, there are a number of Group Policy options that you can use to fine-tune the Windows Sandbox feature. Windows 10 offers you at least two methods to configure them. You can use a Local Group Policy Editor option, or a Group Policy Registry tweak. The first method can be used in editions of Windows 10 that come with the Local Group Policy Editor app. If you are running Windows 10 Pro, Enterprise, or Education editions, then the Local Group Policy Editor app is available in the OS out of the box. Alternatively, a Registry tweak can be used for the same.
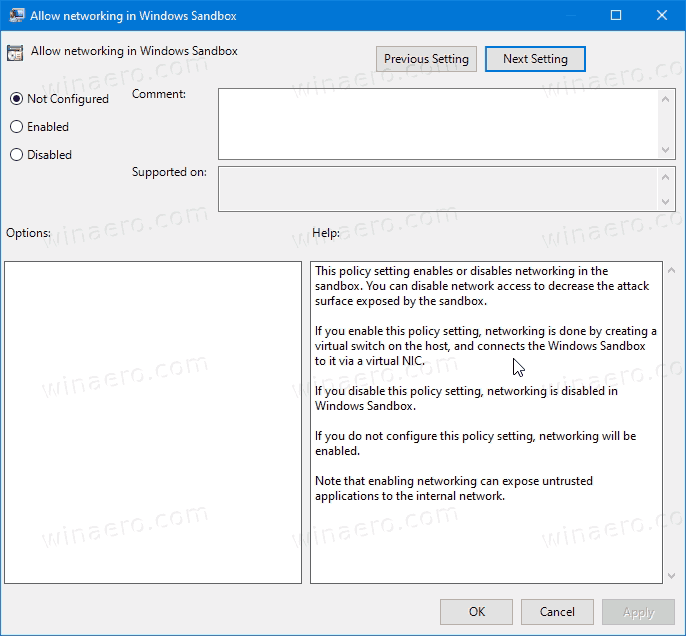
If you enable or do not configure this policy setting, apps inside the Sandbox will be able to utilize a virtual switch on the host Windows 10 OS. Sandbox will connect to it via a virtual network adapter. If you disable this policy setting, networking is disabled in Windows Sandbox. Having the Networking feature enabled may be unwanted if you are running untrusted apps in Windows Sandbox.
To Enable or Disable Networking in Windows Sandbox in Windows 10,
- Open the Local Group Policy editor app,.
- Navigate to Computer Configuration\Administrative Templates\Windows Components\Windows Sandbox on the left.

- On the right, find the policy setting Allow networking in Windows Sandbox.
- To enable Networking in Windows Sandbox, set the policy to either Enabled or Not Configured (default).
- To disable Networking in Windows Sandbox, set the policy to Disabled.
- Click on Apply and OK.
Enable or Disable Networking in Windows Sandbox in Registry
- Open Registry Editor.
- Go to the following Registry key: HKEY_LOCAL_MACHINE\SOFTWARE\Policies\Microsoft\Windows\Sandbox .
See how to jump to the desired Registry key with one click. - If you do not have such a key, then just create it.
- Here, create a new 32-bit DWORD value AllowNetworking . Note: Even if you are running 64-bit Windows, you still need to use a 32-bit DWORD as the value type.
- Set it to 0 to disable the Networking feature for Windows Sandbox.
- Delete the value to enable the Networking feature.
- To make the changes done by the Registry tweak take effect, you may need to restart Windows 10.
Ready-to-use Registry Files
To save your time, you can download the following Registry Files, including the undo tweak
More on Windows Sandbox
More on Group Policy
Winaero greatly relies on your support. You can help the site keep bringing you interesting and useful content and software by using these options:
Share this post
About Sergey Tkachenko
Sergey Tkachenko is a software developer from Russia who started Winaero back in 2011. On this blog, Sergey is writing about everything connected to Microsoft, Windows and popular software. Follow him on Telegram, Twitter, and YouTube.
Как исправить Windows Песочница Нет проблем с подключением к Интернету
Windows Песочница позволяет вам делать что угодно. Вы можете попробовать схематично выглядящие программы и веб-сайты или покопаться в настройках операционной системы, не беспокоясь о том, чтобы что-то сломать. Но при условии, что вам удалось активировать Windows Песочница, вы можете столкнуться с проблемой, когда у вас может не быть доступа к Интернету в виртуальной среде.

Обычно эта проблема возникает из-за множества факторов, начиная от технических сбоев, виртуальных частных сетей и заканчивая антивирусными брандмауэрами. Так что без дальнейших церемоний, давайте посмотрим, как вы можете восстановить доступ к Интернету в Windows Sandbox.
Note: Убедитесь, что у вас есть последние обновления для Windows 10 перед установкой – тип ‘windows Обновление »в меню« Пуск », нажмите« Открыть », а затем нажмите« Проверить наличие обновлений ».
Повторно включить песочницу
Windows Песочница является свежим дополнением к Windows 10, поэтому он чрезвычайно подвержен ошибкам и сбоям. Отключение и повторное включение этой функции, вероятно, поможет ей успешно подключиться к Интернету.
Начните с открытия Windows Диалоговое окно возможностей. Для этого вы должны набрать windows функции в меню Пуск, а затем нажмите кнопку Открыть.
Снимите флажок рядом с Windows Песочница на Windows Откроется диалоговое окно «Функции», а затем нажмите кнопку «ОК». Windows Особенности будут удалены Windows Sandbox.

После перезагрузите компьютер, снова посетите Windows Диалоговое окно функций, а затем снова включите Windows Sandbox.
Еще раз перезагрузите компьютер, а затем попробуйте Windows Sandbox. Если он не подключается к Интернету, давайте посмотрим, что вы можете сделать дальше.
Активировать дополнительные функции
Еще одно надежное исправление, которое вы можете попробовать Windows Песочница может работать правильно. Это включает в себя активацию различных функций, которые облегчают запуск виртуализированных сред на вашем ПК. Это включает в себя собственные Microsoft Hyper-V выделенная виртуальная платформа,
Открой Windows В диалоговом окне «Функции» установите флажки рядом со следующими функциями, перечисленными ниже, и нажмите кнопку «ОК»:
- КонтейнерыHyper-VV Виртуальная машинная платформаWindows Hypervisor Platform
Как только ваш компьютер завершит активацию этих функций, перезагрузите компьютер, а затем попробуйте Windows Sandbox. Это подключается к Интернету сейчас? Продолжайте, если это не так.
Мост Сетевые подключения
Соединение обеих сетей, используемых Windows Песочница и операционная система хоста – это следующий шаг, который вы должны предпринять для решения проблемы. Это обеспечивает лучшую связь между сетями. Это то, что вы обязательно должны сделать.
Шаг 1: Нажмите значок Wi-Fi или Ethernet на Windows 10 панели задач хоста, а затем нажмите Настройки сети и Интернета.
SТеп 2: В открывшемся диалоговом окне «Параметры состояния» нажмите «Изменить параметры адаптера».
SТеп 3: Удерживая нажатой клавишу Ctrl, выберите сетевое подключение хоста (Wi-Fi или Ethernet, в зависимости от того, что активно) и сеть виртуального адаптера Ethernet vEthernet Hyper-V.
Затем щелкните правой кнопкой мыши одно из выбранных подключений и выберите Мостовые подключения.

Наконец, запустите Windows Песочницу и проверьте, если она успешно подключается к Интернету. Все еще не повезло? Давайте попробуем следующий.
Отключить виртуальную частную сеть
Ваш компьютер подключен к VPN? Протоколы шифрования, используемые этими сетями, печально известны предотвращением Windows Песочница от установления подключения к интернету. Если это так, вы должны отключить его.
Шаг 1: Откройте Центр уведомлений хоста, а затем нажмите на плитку VPN.

SТеп 2: В открывшемся окне «Параметры VPN» нажмите «Отключить» рядом с любым активным подключением VPN. Если у вашего VPN есть специальный апплет, вы также можете использовать его для его отключения.

запуск Windows Sandbox. Вероятно, следует установить подключение к Интернету. Как только он это сделает, вы можете снова включить VPN-соединение на хосте – Windows Песочница все равно будет иметь доступ к интернету.
Отключить антивирусный брандмауэр
Еще одна главная причина, почему Windows Песочница может не подключиться к Интернету из-за сторонних антивирусных брандмауэров. Если у вас есть компьютер, попробуйте отключить его.

Например, если вы используете Norton Security, щелкните правой кнопкой мыши значок Norton Security на панели задач и выберите «Отключить Smart Firewall». После запуска Windows Песочница – она, скорее всего, должна подключаться к интернету.
Предупреждение: Отключение брандмауэра может сделать ваш компьютер подверженным угрозам безопасности. Следовательно, включите его как можно скорее или добавьте Windows Песочница как исключение.
Добавить исключение брандмауэра
Работало ли отключение брандмауэра? Чтобы не повторять то же самое каждый раз, когда вы хотите использовать Windows Песочница (и чтобы не оставлять ваш компьютер незащищенным) рассмотрите возможность добавления Windows Песочница как исключение из брандмауэра антивирусного приложения.
Используя Norton Security в качестве примера, перейдите на панель «Параметры» антивирусного приложения, нажмите «Брандмауэр», а затем добавьте следующий путь в разделе «Управление программой»:

Если это не работает, вы также можете попробовать добавить MAC-адрес сетевого подключения, используемого Windows Песочница как исключение. Используйте следующие шаги, чтобы сделать это.
Шаг 1: запуск Windows Песочница, щелкните значок в форме шара на панели задач, а затем нажмите Настройки сети и Интернета.

SТеп 2: В открывшемся окне нажмите «Просмотр свойств вашей сети».

SТеп 3: Note вниз MAC-адрес сетевого подключения, указанный рядом с Физический адрес (MAC). Выход из Windows Песочница потом.

SТеп 4: Снова взяв Norton Security в качестве примера, перейдите на экран управления брандмауэром, нажмите «Общие параметры», а затем нажмите «Настроить» (+) рядом с «Доверие устройства».

Sтеп 5: Нажмите кнопку Добавить, а затем добавьте MAC-адрес Windows Песочница и установите уровень доверия на полное доверие.

Помните, что помимо нахождения MAC-адреса Windows Сетевое подключение песочницы, процесс добавления его в брандмауэр будет отличаться для каждого антивирусного приложения. Проверьте документацию вашего антивирусного приложения для конкретных инструкций.
Подключен и готов к работе
Надеюсь, исправления, приведенные выше, сработали, и теперь вы подключены к Интернету. Microsoft, скорее всего, исправит различные ошибки, связанные с Windows Песочница, поэтому не забудьте сохранить Windows 10 в курсе. Теперь пришло время возиться с Windows Песочница, так что не стесняйтесь делать в ней все, что хотите.
Следующий: Windows 10 имеет аккуратную скрытую функцию под названием «Погружение в поиск». Узнайте, о чем это все.


