Save or convert to PDF or XPS in Project desktop
You can use the Office programs to save or convert your files to PDFs so that you can share them or print them using commercial printers. And you won’t need any other software or add-ins.
Use PDF format when you want a file that:
Looks the same on most computers.
Has a smaller file size.
Complies with an industry format.
Examples include resumes, legal documents, newsletters, files that are intended to be read (not edited) and printed, and files that are intended for professional printing.
Important: Many programs, including Microsoft Word, have the ability to open and edit PDF files. Simply sharing something as a PDF is not sufficient to guarantee the recipient can’t edit the file.
To export or save as PDF, in your Office file, on the File menu, click Export or Save As. To see step-by-step instructions, select an Office program from the drop-down list.
- Which Office program are you using?
- Access
- Excel
- OneNote
- PowerPoint
- Project
- Publisher
- Visio
- Word
Open the table or report you want to publish as a PDF.
On the External Data tab, in the Export group, click PDF or XPS

In the File Name field, type or select a name for the document.
In the Save as type list, click PDF (*.pdf).
If the document requires high print quality, click Standard (publishing online and printing).
If file size is more important than print quality, click Minimum size (publishing online).
Click Options to set the page to be printed, to choose whether markup should be printed, and to select output options. Click OK.
This information also applies to Microsoft Excel Starter 2010.
Note: You can’t save Power View sheets as PDF files.
Click the File tab.
Click Save As.
To see the Save As dialog box in Excel 2013 or Excel 2016, you have to choose a location and folder.
In the File Name box, enter a name for the file, if you haven’t already.
In the Save as type list, click PDF (*.pdf).
If you want the file to open in the selected format after saving, select the Open file after publishing check box.
If the document requires high print quality, click Standard (publishing online and printing).
If file size is more important than print quality, click Minimum size (publishing online).
Click Options to set the page to be printed, to choose whether markup should be printed, and to select output options. For more information on the Options dialog box in Excel, see More about PDF options. Click OK when finished.
OneNote 2013 and OneNote 2016
Click the File tab.
Under Export Current, click what part of the notebook you want to save as PDF.
Under Select Format, click PDF (*.pdf), and then click Export.
In the Save As dialog box, in the File Name field, enter a name for the notebook.
Click the File tab.
Click Save As, and then click the option that represents the portion of the notebook that you want to save as PDF.
Under Save Section As, click PDF (*.pdf), and then click Save As.
In the File Name field, enter a name for the notebook.
Click the File tab.
Click Save As.
To see the Save As dialog box in PowerPoint 2013 and PowerPoint 2016, you have to choose a location and folder.
In the File Name box, enter a name for the file, if you haven’t already.
In the Save as type list, click PDF (*.pdf).
If you want the file to open in the selected format after saving, select the Open file after publishing check box.
If the document requires high print quality, click Standard (publishing online and printing).
If the file size is more important than print quality, click Minimum size (publishing online).
Click Options to set the page to be printed, to choose whether markup should be printed, and to select output options. Click OK when finished.
On the File tab, choose Save As.
To see the Save As dialog box in Project 2013 or Project 2016, you have to choose a location and folder.
In the File Name box, enter a name for the file, if you haven’t already.
In the Save as type list, select PDF Files (*.pdf) or XPS Files (*.xps), and then choose Save.
In the Document Export Options dialog box, select a Publish Range, whether to Include Non-printing Information, and ISO 19500-1 compliance (PDF only).
Project doesn’t support every PDF or XPS formatting feature, but you can still use some print options to change the look of the final doc.
Choose File > Print, and then change any of these options:
In the Page Setup dialog box, you can change options on these tabs:
Click the File tab.
Click Save As.
To see the Save As dialog box in Publisher 2013 or Publisher 2016, you have to choose a location and folder.
In the File Name box, enter a name for the file, if you haven’t already.
In the Save as type list, click PDF (*.pdf).
If you want to change how the document is optimized, click Change. (Click Options in Publisher 2013 or Publisher 2016.)
Make any changes you want to the picture resolution and non-printing information.
Click Print Options to make changes to the printing options for the document.
Click OK when finished.
If you want the file to open in the selected format after saving, select the Open file after publishing check box.
Click the File tab.
Click Save As.
To see the Save As dialog box in Visio 2013 or Visio 2016, you have to choose a location and folder.
In the File Name box, enter a name for the file, if you haven’t already.
In the Save as type list, click PDF (*.pdf).
If you want the file to open in the selected format after saving, select the Automatically view file after saving check box.
If the document requires high print quality, click Standard (publishing online and printing).
If file size is more important than print quality, click Minimum size (publishing online).
Click Options to set the page to be printed, to choose whether markup should be printed, and to select output options. Click OK.
Word 2013 and newer
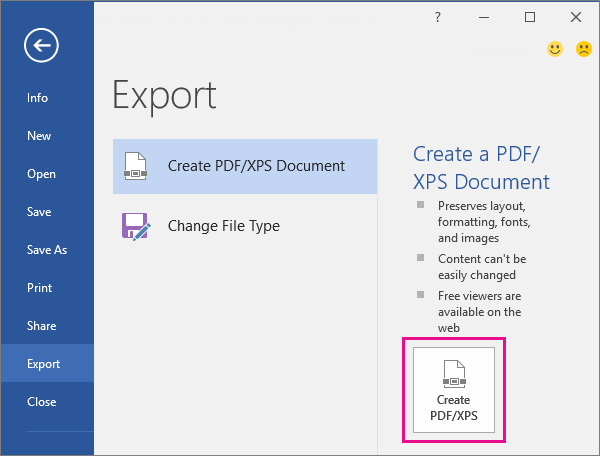
Choose File > Export > Create PDF/XPS.
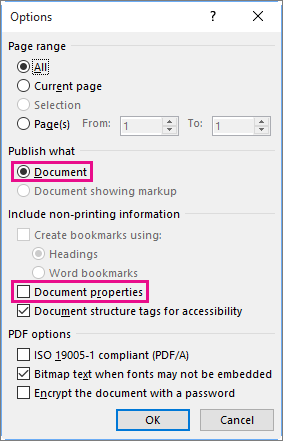
If the properties of your Word document contains information that you do not want included in the PDF, in the Publish as PDF or XPS window, choose Options. Then select Document and clear Document properties. Set any other options you want and choose OK.
For more information about document properties, see View or change the properties for an Office 2016 file.
In Publish as PDF or XPS, navigate to where you want to save the file. Also, modify the file name if you want a different name.
More about PDF options
To make a PDF file from only some of the pages in your document, choose an option under Page range.
To include tracked changes in the PDF, under Publish what, select Document showing markup. Otherwise, make sure Document is selected.
To create a set of bookmarks in the PDF file, select Create bookmarks using. Then, choose Headings or, if you added bookmarks to your document, Word Bookmarks.
If you want to include document properties in the PDF, make sure Document properties is selected.
To make the document easier for screen-reading software to read, select Document structure tags for accessibility.
ISO 19005-1 compliant (PDF/A) This option outputs the PDF document as version 1.7 PDF, which is an archiving standard. PDF/A helps to insure that a document will look the same when it’s opened later on a different computer.
Bitmap text when fonts may not be embedded If fonts can’t be embedded into the document, the PDF uses bitmap images of the text so that the PDF looks the same as the original document. If this option isn’t selected and the file uses a font that can’t be embedded, then the PDF reader might substitute another font.
Encrypt the document with a password To restrict access so only people with the password can open the PDF, select this option. When you click OK, Word opens the Encrypt PDF Document box, where you can type and re-enter a password.
Open and copy content from a PDF with Word
You can copy any content you want from a PDF by opening it in Word.
Go to File > Open and browse to the PDF file. Word opens the PDF content in a new file. You can copy any content you want from it, including images and diagrams.
This information also applies to Microsoft Word Starter 2010.
Click the File tab.
Click Save As.
To see the Save As dialog box in Word 2013 and Word 2016, you have to choose a location and folder.
In the File Name box, enter a name for the file, if you haven’t already.
In the Save as type list, click PDF (*.pdf).
If you want the file to open in the selected format after saving, select the Open file after publishing check box.
If the document requires high print quality, click Standard (publishing online and printing).
If the file size is more important than print quality, click Minimum size (publishing online).
Click Options to set the page to be printed, to choose whether markup should be printed, and to select output options. Click OK when finished.
To save your file as a PDF in Office for Mac follow these easy steps:
Click File Format towards the bottom of the window

Select PDF from the list of available file formats
Give your file a name, if it doesn’t already have one, then click Export
You can use Word, PowerPoint, and OneNote for the Web to convert your doc into a PDF.
Select File > Print > Print (in PowerPoint you will select one of three formats).
In the dropdown menu under Printer, select Save as PDF and then select Save.
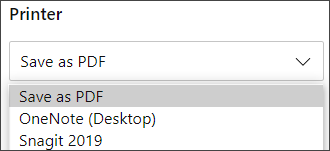
Then in the Explorer menu that opens you can name the PDF and choose where to save it and then select Save.
This will generate a basic PDF that preserves the layout and format of your original document.
If you need more control over the options for your PDF, such as adding bookmarks, use the desktop app to convert your doc to a PDF. Click Open in Desktop App in the toolbar of PowerPoint and OneNote to start using the desktop app, and in Word select the Editing dropdown first and then select Open in Desktop App.

If you don’t own the desktop app, you can try or buy the latest version of Office now.
Got a suggestion for this feature?
Vote for an idea, or share a new one in our suggestion box at word.uservoice.com.
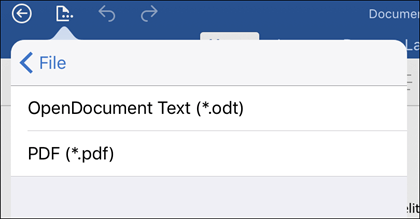
To export your Word document or Excel workbook to PDF format on iOS tap the File button at the top left, choose Export and then PDF.
 Export to export your document to PDF»>
Portable Document Format (PDF) preserves document formatting and enables file sharing. When the PDF format file is viewed online or printed, it retains the format that you intended. The PDF format is also useful for documents that will be reproduced using commercial printing methods. PDF is accepted as a valid format by many agencies and organizations, and viewers are available on a wider variety of platforms than XPS.
XML Paper Specification (XPS) is an electronic file format that preserves document formatting and enables file sharing. The XPS format ensures that when the file is viewed online or printed, it retains exactly the format that you intended, and that data in the file cannot be easily changed.
Important: Most modern web browsers can open and display a PDF file. If you have an older operating system, however, you may need a PDF reader installed on your device such as the Acrobat Reader, available from Adobe Systems.
Save PowerPoint presentations as PDF files
In this course:
When you save presentation as a PDF file it freezes the formatting and layout. People can view the slides even if they don’t have PowerPoint, but they can’t make changes to it.
Select File > Export.
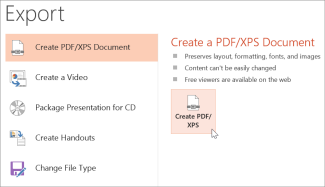
Click Create PDF/XPS Document, then click Create PDF/XPS.
In the Publish as PDF or XPS dialog box, choose a location to save the file to. If you want it to have a different name, enter it in the File name box.
Optionally, if you want to change what the final PDF file is like, do any of the following:
At Optimize for, select Standard for higher quality (for example, if you want to print it). Select Minimum size to make the file smaller (for example, if you want to send it as an e-mail attachment).
Click Options to set how the presentation will appear as a PDF. Here are some of the available options:
To save the current slide only as a PDF, under Range, select Current slide.
To save specific slides as PDF, in Slides(s), enter the slide number range in From and To boxes.
If you don’t want to save slides, but instead only save comments, handouts, or Outline view, under Publish what, select an appropriate option. You can also specify the number of slides to appear in Slides per page dropdown box, and modify the order ( Horizontal or Vertical).
You can choose to include frame slides, hidden slides, comments, ink, non-printing information such as Document properties or Document structure tags, in your PDF by selecting the appropriate options.
There are two ways to make your PowerPoint for macOS presentation a PDF.
You can save your presentation as a PDF in File > Save As.
You can export your presentation as a PDF file by going to File > Export.
Both methods do the same thing, so you can choose whichever you’re more familiar with when you want to create a PDF version of your presentation.
Method 1: Save your presentation as a PDF
Select File > Save As.
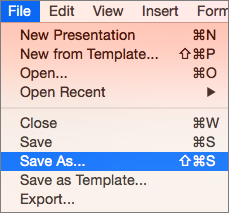 Save As Menu in PowerPoint 2016 for Mac.»/>
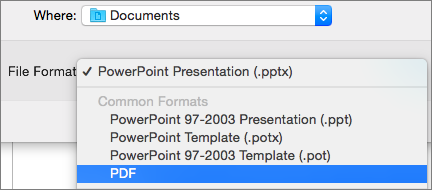
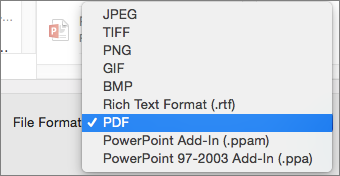
Choose the location where you’d like to save your PDF, and then in the File Format menu, choose PDF.
Method 2: Export your presentation as a PDF
Select File > Export.
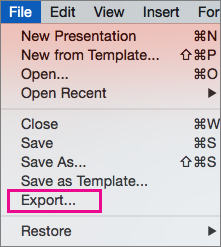
In the File Format menu, choose PDF.
Note: If you’d like to have more options to customize PDF conversions of presentations in PowerPoint for macOS, please add your suggestions to the PowerPoint Suggestion Box.
Set the print quality of the PDF
Features such as saving notes, saving slides as handouts, including hidden slides in the PDF, or setting the PDF to a smaller file size aren’t available. However, you can set the print quality of a PDF to a higher or lower standard.
Tip: PowerPoint for macOS doesn’t preserve hyperlinks in PDFs but if you save your presentation to OneDrive you can open it in PowerPoint for the web and download as PDF from there. PDF files generated from PowerPoint for the web preserve hyperlinks, are accessible, and also tend to have a smaller file size.
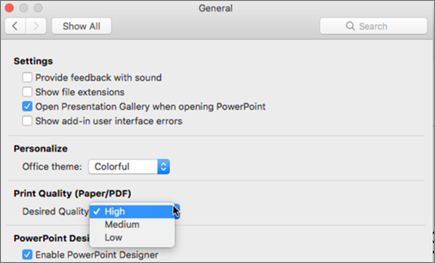
You can set the print quality of the PDF to High, Medium, or Low—depending on your need. By default, the print quality is set to High—which is the optimal choice for printing a PDF. Follow these instructions to set the print quality of the PDF:
Click the PowerPoint menu > Preferences.
In the PowerPoint Preferences dialog box, click General.
Under Print Quality (Paper/PDF), set the Desired Quality to an option of your choice.
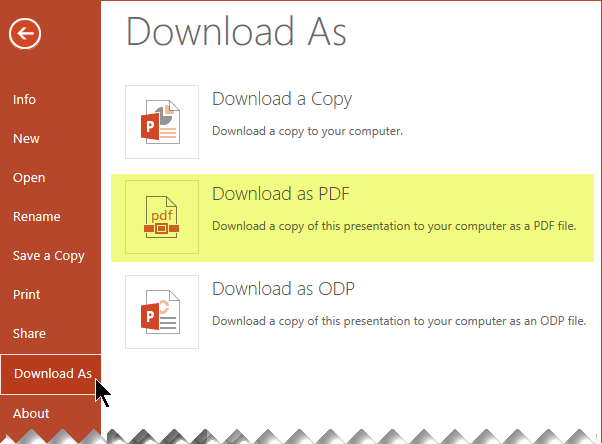
Click the File tab, click Download As, and then click Download as PDF. (The file is converted to PDF, and then a dialog box tells you that it is ready to download.
 Download As > Download as PDF»/>
Click Download. A message bar appears to show you that the downloaded PDF file is ready to save to your computer. (The exact message varies depending on the web browser you’re using.)
Click Save As, and then a dialog box appears that allows you to specify where to save the file on your computer.


