- Battery saving tips
- Other things you can do
- Start your PC in safe mode in Windows 10
- Your settings are not saved when you try to personalize the Windows Update Web site or the Microsoft Update Web site
- Symptoms
- Resolution
- More Information
- Save and load settings in a UWP app
- What do you need to know
- Save app settings
- Load app settings
- Useful APIs and docs
Battery saving tips
Here are some things you can do to extend your PC’s battery life.
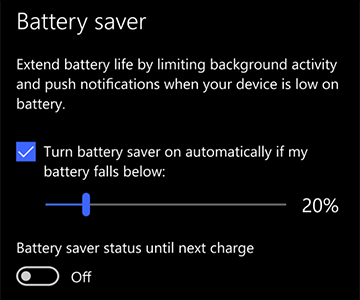
When battery saver is on, your PC temporarily turns off some things that use a lot of power, like automatic email and calendar syncing, live tile updates, and apps you’re not actively using. Using battery saver is the easiest way to extend battery life.
Select the Start button, and then select Settings > System > Battery . If you want battery saver to turn on whenever the battery falls below a certain level, select Turn battery saver on automatically if my battery falls below: and set it where you’d like. To turn on battery saver now and leave it on until the next time you plug in your PC, turn on Battery saver status until next charge.
Turn on battery saver in Settings
Adjust some of your PC’s display settings to help extend battery life. For example:
Set a shorter duration for an active display.
Select the Start button, and then select Settings > System > Power & sleep . Under On battery power, turn off after, pick a shorter duration.
Open Power & sleep settings
Reduce your display’s brightness.
Select the Start button, and then select Settings > System > Display . Turn off Change brightness automatically when lighting changes (if it appears), and then use the Change brightness slider to set the brightness level you want.
Open Display settings
Use a dark background.
Select the Start button, select Settings > Personalization > Background, and then choose a dark picture or dark solid color.
Open Background settings
Use a dark theme.
Select the Start button, select Settings > Personalization > Themes > Theme settings, and then choose a dark theme.
Open Themes settings
Adjust some of your PC’s power settings to help extend battery life. For example:
Let Windows change some power settings for you automatically.
Select the Start button, and then select Settings > Update & security > Troubleshoot > Power and then select Run the troubleshooter.
Set a shorter duration for when your PC sleeps.
Select the Start button, and then select Settings > System > Power & sleep . Under On battery power, PC goes to sleep after, choose a shorter duration.
Open Power & sleep settings
Disconnect from a Wi-Fi network when your PC sleeps.
Select the Start button, and then select Settings > System > Power & sleep > When my PC is asleep and on battery power, disconnect from the network. Change the setting to Always or Managed by Windows instead of Never.
This option isn’t available on all PCs and depends on your PC hardware and manufacturer.
Put a lid on it.
Most laptops can go to sleep automatically by closing the lid. To set this, select the Start button, and then select Settings > System > Power & sleep > Additional power settings > Choose what closing the lid does.
Choose a lower power mode.
Select the Battery icon on the right side of the taskbar. To reduce power use, move the slider toward Best battery life.
This option isn’t available on all PCs and depends on your PC hardware and manufacturer.
Just press a power button.
Most PCs let you turn off your display, shut down, sleep, or hibernate with a press of the Power button.
To choose what the power buttons do, select the Start button, and then select Settings > System > Power & sleep > Additional power settings,and then Choose what the power buttons do.
Increase battery life by changing how frequently your PC syncs. For example:
Sync email less often.
Select the Start button, and then select Settings > Accounts > Email & accounts .
Open Email & account settings
Select the account that you want to change, and then select Manage > Change mailbox sync settings. Under Download new email, choose a longer interval.
Sync only the email, calendars, and contacts you want.
You don’t have to sync email, calendars, or contacts unless you want to.
Select the Start button, and then select Settings > Accounts > Email & accounts .
Select the account that you want to change and the Manage button, and then select Change mailbox sync settings. Under Sync options, select Email, Calendar, or Contacts to turn them off.
Other things you can do
Keep your PC plugged in until it’s fully charged.
To check your PC’s battery level, move the mouse pointer over the Battery icon on the taskbar, or go to Settings > System > Battery .
Restart your PC.
This can sometimes fix problems that can shorten battery life. Select the Start button, and then select Power > Restart.
Turn on airplane mode if you don’t need Internet, Bluetooth, or other wireless communications.
Select the Start button, then select Settings > Network & Internet > Airplane mode , and turn on airplane mode.
Open Airplane mode settings
Use Microsoft Edge for browsing.
Tests show that when browsing with Microsoft Edge, your battery lasts 36-53% longer per charge than when browsing with Chrome, Firefox, or Opera on Windows 10.
Start your PC in safe mode in Windows 10
Safe mode starts Windows in a basic state, using a limited set of files and drivers. If a problem doesn’t happen in safe mode, this means that default settings and basic device drivers aren’t causing the issue. Observing Windows in safe mode enables you to narrow down the source of a problem, and can help you troubleshoot problems on your PC.
There are two versions of safe mode: Safe Mode and Safe Mode with Networking. Safe Mode with Networking adds the network drivers and services you’ll need to access the Internet and other computers on your network.
Select from the following sections to find out how to start your PC in safe mode from Settings, from the sign-in screen, or from a black or blank screen.
Press Windows logo key + I on your keyboard to open Settings. If that doesn’t work, select the Start button, then select Settings .
Under Advanced startup, select Restart now.
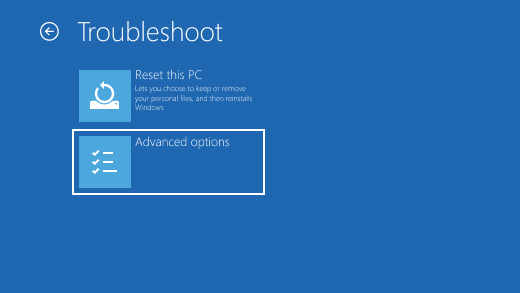
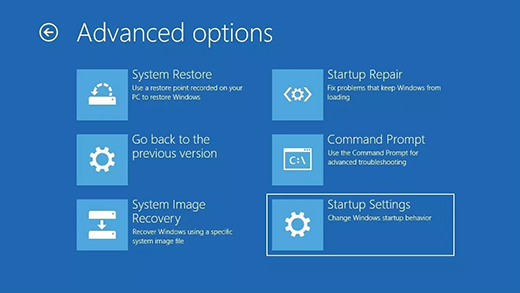
After your PC restarts to the Choose an option screen, select Troubleshoot > Advanced options > Startup Settings > Restart. You may be asked to enter your BitLocker recovery key.


After your PC restarts, you’ll see a list of options. Select 4 or press F4 to start your PC in Safe Mode. Or if you’ll need to use the Internet, select 5 or press F5 for Safe Mode with Networking.
When you can’t open Settings to get into safe mode, restart your device from the Windows sign-in screen.
On the Windows sign-in screen, press and hold the Shift key while you select the Power > Restart .
After your PC restarts to the Choose an option screen, select Troubleshoot > Advanced options > Startup Settings > Restart. You may be asked to enter your BitLocker recovery key.
After your PC restarts, you’ll see a list of options. Select 4 or F4 to start your PC in safe mode. Or if you’ll need to use the Internet, select 5 or F5 for Safe Mode with Networking.
Note: If you’ve encrypted your device, you’ll need your BitLocker key to start in safe mode.
Before you enter safe mode, you need to enter the Windows Recovery Environment (winRE). To do this, you will repeatedly turn your device off, then on:
Hold down the power button for 10 seconds to turn off your device.
Press the power button again to turn on your device.
On the first sign that Windows has started (for example, some devices show the manufacturer’s logo when restarting) hold down the power button for 10 seconds to turn off your device.
Press the power button again to turn on your device.
When Windows restarts, hold down the power button for 10 seconds to turn off your device.
Press the power button again to turn on your device.
Allow your device to fully restart. You will enter winRE.
Now that you are in winRE, you will follow these steps to take you to safe mode:
On the Choose an option screen, select Troubleshoot > Advanced options > Startup Settings > Restart.
After your device restarts, you’ll see a list of options. Select option 5 from the list or press F5 for Safe Mode with Networking.
If you need more info on a black or blank screen error, see Troubleshoot black or blank screen errors.
Notes: If you need to exit safe mode, simply restart your device, or:
Press the Windows logo key + R.
Type msconfig in the Open box and then select OK.
Select the Boot tab.
Under Boot options, clear the Safe boot checkbox.
Your settings are not saved when you try to personalize the Windows Update Web site or the Microsoft Update Web site
Symptoms
When you try to personalize the Windows Update Web site or the Microsoft Update Web site, your settings are not saved.
Resolution
To resolve this problem, enable the Userdata persistence security setting. To do this, follow these steps:
Start Microsoft Internet Explorer.
In the Tools menu, click Internet Options, and then click the Security tab.
Under Select a Web content zone, click Internet, and then click Custom Level.
In Settings, click Enable in the Miscellaneous section under Userdata persistence, and then click OK.
When you are prompted to confirm that you want to change the security settings for this zone, click Yes.
Click OK to close the Internet Options dialog box, and then close all Internet Explorer windows.
If the problem persists, delete the WindowsUpdate[x].xml files in your UserData folder. To do this, follow these steps:
Close all Internet Explorer windows.
Click Start, click Run type explorer in the Open box, and then click OK.
Locate the UserData folder. This folder is in one of the following locations:
Microsoft Windows 98 and Microsoft Windows Millennium Edition
C:\Windows\Application Data\Microsoft\Internet Explorer\UserData
Microsoft Windows 2000, Microsoft Windows XP, or Microsoft Windows Server 2003
C:\Documents and Settings\ Username\UserData
Typically, the UserData folder contains four subfolders. Open each folder, and then delete any files that take the following form:
WindowsUpdate[ n].xmlTo delete a file, right-click the file, and then click Delete.
Note You may see multiple versions of these files in the folders. Some of the folders may be empty. Delete all these files that you find.
More Information
For more information about how to use Windows Update, click the following article number to view the article in the Microsoft Knowledge Base:
323166 How to download updates that include drivers and hotfixes from the Windows Update Catalog
Save and load settings in a UWP app
This topic covers what you need to know to get started loading, and saving, settings in a Universal Windows Platform (UWP) app. The main APIs are introduced, and links are provided to help you learn more.
Use settings to remember the user-customizable aspects of your app. For example, a news reader could use app settings to save which news sources to display and what font to use for reading articles.
We’ll look at code to save and load app settings, including local and roaming settings.
What do you need to know
Use app settings to store configuration data such as user preferences and app state. Settings that are specific to the device are stored locally. Settings that apply on whichever device your app is installed on are stored in the roaming data store. Settings are roamed between devices on which the user is signed in with the same Microsoft Account and have the same version of the app installed.
The following data types can be used with settings: integers, doubles, floats, chars, strings, Points, DateTimes, and more. You can also store instances of the ApplicationDataCompositeValue class which is useful when there are multiple settings that should be treated as a unit. For example, a font name and point size for displaying text in the reading pane of your app should be saved/restored as a single unit. This prevents one setting from getting out of sync with the other due to delays in roaming one setting before the other.
Here are the main APIs you need to know about to save or load app settings:
- Windows.Storage.ApplicationData.Current.LocalSettings gets the application settings container from the local app data store. Store settings here that are not appropriate to roam between devices because they represent state specific to this device, or are too big.
- Windows.Storage.ApplicationData.Current.RoamingSettings gets the application settings container from the roaming app data store. This data roams between devices.
- Windows.Storage.ApplicationDataContainer is a container that represents app settings as key/value pairs. Use this class to create and retrieve setting values.
- Windows.Storage.ApplicationDataCompositeValue represents multiple app settings that should be serialized as a unit. This is useful when one setting shouldn’t be updated independently of another.
Save app settings
For this introduction, we will focus on two simple scenarios: saving and loading an app setting locally, and roaming a composite font/font size setting between devices.
Save a setting to the local device, by first getting an ApplicationDataContainer for the local settings data store with Windows.Storage.ApplicationData.Current.LocalSettings . Key/value dictionary pairs that you assign to this instance are saved in the local device setting data store.
Save a roaming setting using a similar pattern. First get an ApplicationDataContainer for the roaming settings data store with Windows.Storage.ApplicationData.Current.RoamingSettings . Then assign key/value pairs to this instance. Those key/value pairs will automatically roam between devices.
In the code snippet above, a ApplicationDataCompositeValue stores multiple key/value pairs. Composite values are useful when you have multiple settings that shouldn’t get out of sync with each other. When you save a ApplicationDataCompositeValue, the values are saved and loaded as a unit, or atomically. This way settings that are related won’t get out of sync because they are roamed as a unit instead of individually.
Load app settings
Load a setting from the local device, by first getting an ApplicationDataContainer instance for the local settings data store with Windows.Storage.ApplicationData.Current.LocalSettings . Then use it to retrieve key/value pairs.
Load a roaming setting by following a similar pattern. First get an ApplicationDataContainer instance from the roaming settings data store with Windows.Storage.ApplicationData.Current.RoamingSettings . Access key/value pairs from that instance. If the data hasn’t roamed yet to the device that you are accessing the settings from, you’ll get a null ApplicationDataContainer. That’s why there is a if (composite != null) check in the example code above.
Useful APIs and docs
Here is a quick summary of APIs, and other useful documentation, to help get you started saving and loading app settings.


