- How to Clean Up and Make Space on Your Windows 10 “C” Drive
- Delete Temporary Files Manually
- Use Storage Sense
- Scan for Large Files on Your Hard Drive
- Uninstall Windows Shovelware and Space-Hungry Apps
- Use Disk Clean-Up Utility
- Disable Hibernation
- Delete Browser Cache and Cookies
- Remove Old Windows Update Files, Previous Installations
- Windows Install Clean Up Utility — обзор утилиты
- Solved|“Cleaning up. Do Not Turn off Your Computer.”
- The case: “Cleaning up. Do not turn off your computer.”
- 3 effective solutions to “Cleaning up. Do not turn off your computer.”
- Method 1: Wait until the cleaning process is finished
- Method 2: Run Windows Update from Safe Mode
- Method 3: Run Startup Repair to fix boot issues
- Precaution: backup Windows before running Windows Update
- Summary
How to Clean Up and Make Space on Your Windows 10 “C” Drive

The all-important “C” drive is, for most people, the core of the PC, where their operating system is installed and all the crucial system files are kept. Inevitably, this is also the drive that gets filled up most easily due to endless Windows updates, downloaded files that you forget about, and the fact that by default, everything saves to the “C” drive.
Here we show you how to clean up your drive, recover some space, and subsequently get it running nicely and quickly again.
Delete Temporary Files Manually
Below, we show you some tricks that clean out your various temporary files automatically, but those methods (like Storage Sense and Disk Clean-up) won’t do a complete job of clearing out temporary files, and there’s a good chance that the biggest, most hard-drive-hogging temporary files will remain in your Temp folder for a bit longer. (The automatic methods will wait for files to reach a certain age – one week, usually – before deleting them.)
Note: make sure you’re not running anything when deleting temporary files manually. If you delete temporary files related to an app you’re currently running, it may crash, and you may lose whatever you were working on at that moment.
To find your main temporary files folder, the default directory is “C:\Users\Rob\AppData\Local\Temp” (or you can hit Win + R , then enter %temp% ).

To see how much space the Temp folder is taking up, select everything in it using Ctrl + A , then right-click any file and click Properties. If you’re happy to go ahead with the delete, make sure everything is selected using Ctrl + A , right-click, then click Delete.
Use Storage Sense
Windows 10 has a handy feature called Storage Sense, which monitors the storage space on your PC, then jumps in and cleans things up if you’re running low. It does basic things like clean your Recycle Bin, remove old files in your Downloads folder, and delete temporary files on your PC.

To turn this feature on, go to “Settings -> System,” then click “Storage” in the pane on the left.

Click “Configure Storage Sense or run it now,” then in the new window click the slider under Storage Sense so that it’s “On.” You can then use the drop-down menu below to choose whether you want it to run when you’re low on space, daily, weekly or monthly.
In Storage Sense, you’ll also see that you can get it to automatically delete files in your Recycle Bin that have been there for a certain amount of time, and even files in your Downloads folder (which, from my experience, is definitely a place where unused files tend to outstay their welcome).
Scan for Large Files on Your Hard Drive
Using Windows Explorer, you can scan your entire hard drive for files based on their size. The amount of times I’ve found hefty redundant files sitting around for years is unbelievable.
To do this search, open a Windows Explorer window, select your “C” drive, then click the “Search (C:)” search box at the top-right of the window.

Type “size:” and you’ll get a bunch of autofill options showing varying sizes of files to filter for. You can use one of these presets, or if you want to get more specific about the size of file you’re looking for, you can type “size:>1gb” to look for files over 1GB in size and so on.
You can delete files directly from the results or right-click, then select “Sort by -> Size” to order them by size and quickly see which ones need deleting. Just by testing this, I’ve discovered an old Android 7.1 VM that I really don’t need any more. Just don’t delete anything that looks important. (For example, stuff from the “C:Windows folder” or game files that tend to be quite large.)
Uninstall Windows Shovelware and Space-Hungry Apps
In the “Apps & Features” window (you’ll find it by right-clicking the Start button), you can sort the list by “Size” to see which applications are the most HDD-hungry. You may be surprised by the results and may wish to remove apps as appropriate. Think about whether you really need all those space-hungry apps and delete as appropriate.

Another thing that may surprise you is that you’re the proud owner of games like Bubble Witch 3 Saga and Minecraft, which you never wanted in the first place! Simply uninstalling them from the “Apps & Features” list won’t suffice, however, and you will need to remove them using the Powershell. To do this, read our guide on how to uninstall pre-installed Windows apps.
Use Disk Clean-Up Utility
You’re probably aware of Windows’s built-in Disk Clean-Up utility but have not been using it. This is the first place to look to free up some space. To start using it, launch Windows Explorer, right-click on the C drive and select “Properties” from the list.
Once the Properties window is open, click “Disk Cleanup” to open the utility. Here, in the “files to delete” box, select all the checkboxes like System memory error dump files, Recycle Bin, set up log files, etc.

Once you have selected all the checkboxes you want, click on “OK” to free up the disk space occupied by the above files. How much space you free up depends on how badly you’ve neglected your “C” drive. As you can see below, I haven’t taken good care of the C drive at all. Shame on me.

Disable Hibernation
Hibernation is a handy feature you can use to easily turn off your computer while saving the current state so you can resume your work when you power it on. That said, it can take up a huge amount of disk space, as it reserves the amount of space on your hard drive equal to how much content is saved in your RAM. (So potentially, the more RAM you have, the more disk space it uses.)
To disable hibernation, open your Windows Control Panel by pressing Win + X and selecting “Control Panel” from the list. Once the control panel is opened, select “Power Options.”
2. Click on the “choose what the power buttons do” link in the pane on the left. This action will take you to the system settings window.

3. Click “Change settings that are currently unavailable.” This action will enable all the disabled options.

4. Scroll down and un-check the “Hibernate” checkbox to disable hibernation in Windows 10.

Delete Browser Cache and Cookies
Temporary Internet files like the browser cache and cookies take up a little bit of your C drive space, so clearing those temporary files will grant you some free space.

In Chrome, go to “Settings -> Advanced -> Privacy and security,” then “Clear browsing data.”
In Firefox, go to “Options -> Privacy & Security,” then under “History,” select “clear your recent history.”
In Microsoft Edge, go to “Settings -> Clear browsing data -> Choose what to clear,” and make sure to select the “Cached data” and “Cookies” options.
Remove Old Windows Update Files, Previous Installations
Windows has a tendency to hold onto old (and mostly redundant) system files. For the most part you can delete these files, particularly if you installed your current version of Windows over a previous version. To do this:
1. Open Windows Explorer, right-click the C drive and select “Properties.”
2. Click “Disk CleanUp,” then in the new window click “Clean up system files” to open the advanced disk cleanup window.

4. Select the “Windows upgrade log files” checkbox and, if you have anything there, the “Previous Windows installation(s)” checkbox. Unbeknownst to me, my secondhand laptop still has the “Windows.old” folder from the previous user, using up a whopping 31.5GB of hard drive real estate.

There are other checkboxes here, but for the most part they don’t use up a ton of space and can be left alone. When you’re ready, click “OK” to clean up your hard drive.
It’s good to go through this routine every now and then, but it’s advisable to make sure it doesn’t fill up in the first place. If you want to keep streamlining your Windows setup, see how to install Chromium on Windows 10. We also have a guide on how you can view network adapter details in Windows 10.
Related:
Content Manager at Make Tech Easier. Enjoys Android, Windows, and tinkering with retro console emulation to breaking point.
Windows Install Clean Up Utility — обзор утилиты
Во время работы на компьютере установка новой программы внезапно прерывается. В результате на компьютере остается частично установленная программа. Попытки установить программу вновь оказываются безуспешными. Могут также возникать проблемы с удалением старой программы, потому что файлы установки повреждены.
Не волнуйтесь. Средство Windows Installer CleanUp может помочь. Эта программа может применяться для удаления данных об установках, которые были сделаны при помощи установщика Windows. Обратите внимание, что средство Windows Installer CleanUp не удаляет с компьютера саму программу. Однако оно удалит файлы установки, чтобы можно было снова начать установку, обновление или удаление.
Вкратце Windows Installer Clean Up Utility программа Microsoft предназначенная для удаления параметров управления настройкой установщика Windows в случае возникновения проблем.
- Пример случаев,в которых данное средство необходимо
При установки программы возникла неполадка и процесс установки был отменён. Последующие попытки повторно запустить установку программы ни к чему не приводят (многие программы выдают ошибку такого рода: Не удалось запустить установку продукта,т.к. он уже установлен на вашей системе).
Удаление программы чрез Программы и компоненты/Установка и удаление программ не запускается или запускается с ошибкой.
- Актуальность
Компания Microsoft с 2010 года прекратила поддержку продукта Windows Install Clean Up Utility в связи с появлением нового средства FixIt.
Но программа осталась всё также эффективной в плане устранения неполадок при установки/удаления ПО,а в некоторых случаях оказывается эффективней,чем её замена средство Microsoft FixIt.
Windows Install Clean Up Utility прекрасно работает на системах Windows XP и старше вплоть до Windows 10).
- Инструкция по пользованию
1. Запустить Windows Install Clean Up через меню Пуск. В Windows XP запустить двойным щелчком левой кнопкой мыши по ярлыку. В Windows Vista/7/8/8.1/10 запустить от имени администратора.
2. Найти интересующую вас программу в перечне списка Installed Products,выделить и нажать на кнопку Remove.
3. Дождаться окончания завершения процесса удаления параметров управления настройкой установщика Windows.
- Откуда скачать утилиту ?
Поскольку Microsoft больше не поддерживает данную утилиту на сайтах Центра загрузок Mocrosoft вы её не найдёте.
Вот ссылка на скачивание последней версии Windows Install Clean Up Utility
Добавлено через 2 часа 28 минут
Обзор компонента MSIZAP,входящего в утилиту Windows Install Clean Up.
- Описание
Аннотация на сайте Microsoft.
MSIZAP — Стирает данные об установки того или иного ПО,которая проходила с помощью установщика Windows.
Этот компонент стоит использовать,если вы испытываете проблемы с удалением данных об установки ПО через Windows Install Clean Up Utility. Данный компонент запускается через командную строку.
- Инструкция по пользованию
1. Запустите командную строку (в Windows XP просто зайдите в Меню Пуск -> Служебные -> двойным щелчком мыши по ярлыку командной строки,в Windows 7 и старше командную строку нужно запускать от имени администратора).
2. В командной строке введите
Copyright (C) Microsoft Corporation. All rights reserved.
MSIZAP — Zaps (almost) all traces of Windows Installer data from your machine.
Usage: msizap T[WA!]
msizap *[WA!] ALLPRODUCTS
msizap PWSA?!
* = remove all Windows Installer folders and regkeys;
adjust shared DLL counts; stop Windows Installer service
T = remove all info for given product code
P = remove In-Progress key
S = remove Rollback Information
A = for any specified removal, just change ACLs to Admin Full Control
W = for all users (by default, only for the current user)
M = remove a managed patch registration info
G = remove orphaned cached Windows Installer data files (for all users)
? = verbose help
! = force ‘yes’ response to any prompt
CAUTION: Products installed by the Windows Installer may fail to
function after using msizap
NOTE: MsiZap requires admin privileges to run correctly. The W option requires that the profiles for all of the users be loaded
Solved|“Cleaning up. Do Not Turn off Your Computer.”
Find Windows stuck on “Cleaning up. Do not turn off your computer” after Windows update? Learn how to solve the issue easily from this page.

By Lily  / Last Updated April 9, 2021
Quick Navigation:
The case: “Cleaning up. Do not turn off your computer.”
In Windows 7 Service Pack 1 (SP1) and Windows Server 2008 R2 SP1, a new plugin was added to the Disk Cleanup wizard. After you install Windows 7 or Server 2008 R2 SP1, you can use the Windows Update Cleanup option to delete Windows updates that you no longer need.
However, users find Windows stuck on “Cleaning up. Do not turn off your computer” during Configuring Windows Updates or after SP1 is installed. One user posted his experience in the forum:
“I turned off my computer when it seemed like it was frozen during the Configuring Windows Updates (it was at 100% for a while) and then tried to restart on Safe Mode. My computer then displayed a вЂFailure to Configure Windows Updates. Reverting Changes’ screen.
After that, my computer restarted itself and is now displaying a вЂCleaning up. Do not turn off your computer’ screen for the last 3 hours. Is it supposed to take this long? What should I do?”
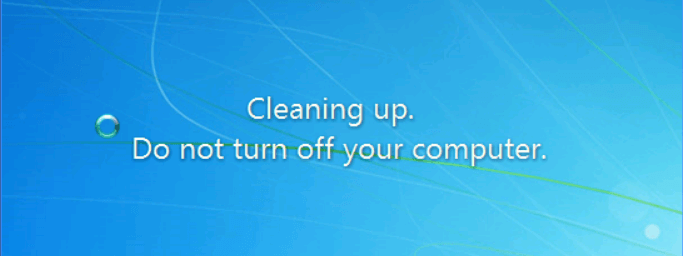
How to fix “Cleaning up. Do not turn off your computer” on Server 2008 (R2) or Windows 7? Please read on.
3 effective solutions to “Cleaning up. Do not turn off your computer.”
When you encounter “Cleaning up. Do not turn off your computer” on Windows 7 or Server 2008 (R2), you can try following methods to solve the issue:
Method 1: Wait until the cleaning process is finished
When the screen displays the message of doing cleanup, it means the Disk Cleanup utility is trying to remove unnecessary files for you, including temporary files, offline files, old Windows files, Windows upgrade logs, etc. The whole process will take a long time like several hours. You may leave it alone overnight to finish the cleaning process.
After the cleanup is complete, you may get several gigabytes of free space on your hard drive and your computer will be speeded up. So it’s worth waiting!
Method 2: Run Windows Update from Safe Mode
Safe Mode only allows essential system programs and services to start up at boot, thus bypassing the Disk Cleanup utility. Follow instructions below to run Windows Update from Safe Mode in Windows 7 or Server 2008 (R2):
1. Restart your computer and press F8 while your computer is booting to display the Advanced Boot Options menu.
2. Use the arrow keys to highlight Safe Mode and press Enter.
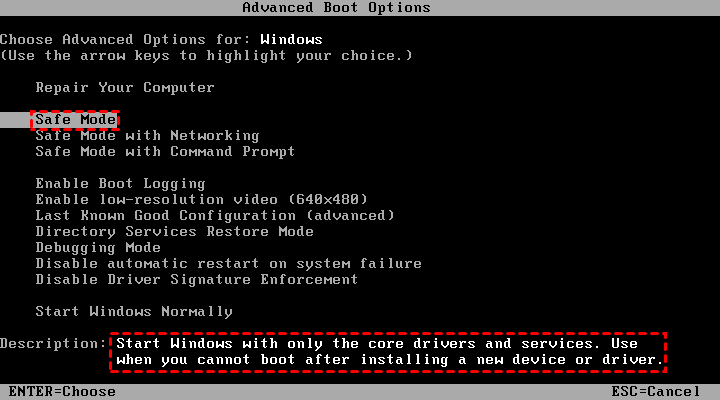
3. Run Windows Update again. After the updates are installed successfully, you can repeat steps 1-2 and select Start Windows Normally to return to your normal Windows configuration.
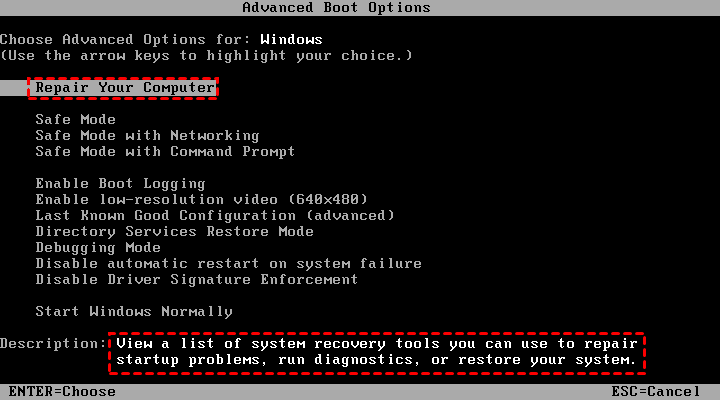
Method 3: Run Startup Repair to fix boot issues
▶ If you encounter “Cleaning up. Do not turn off your computer” on a Windows 7 computer, you can run Startup Repair in following steps:
1. Restart your computer and press F8 while your computer is booting to display the Advanced Boot Options menu.
2.В Repair Your ComputerВ is already highlighted. Press Enter to continue.
3. In the next screen, select a keyboard input method and clickВ Next. Then, log on as a local user.
4. In the System Recovery Options window, select Startup Repair.
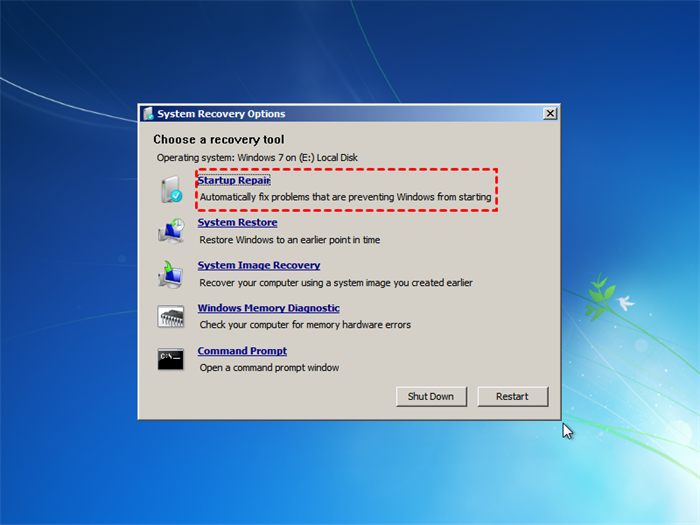
5. Wait for the repair process to be done. Click Finish once you see the “Restart your computer to complete the repairs” window to restart your PC.
в–¶ If you meet the problem on a Server 2008 (R2) computer, you can follow the steps thereinafter to perform Startup Repair:
1. Insert Windows Server 2008 (R2) installation media and restart your computer.
2. Press any key when the message indicating “Press any key to boot from CD or DVD …” appears.
3. Select a language, time, currency, and a keyboard or another input method, and then click Next.
4. Click Repair your computer.
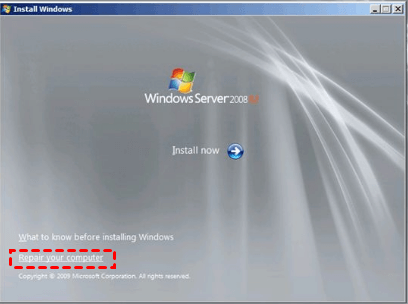
5. Click the operating system that you want to repair, and then click Next.
6. In the System Recovery Options window, select Command Prompt.
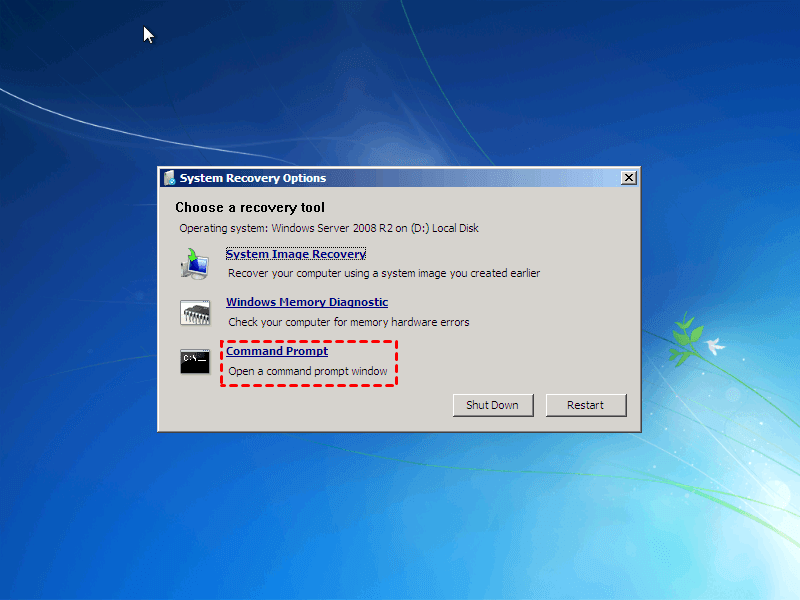
7. In Command Prompt, input startrep.exe and press Enter. This will take a while but will address any registry related issues.
Note: Not all boot errors can be fixed by Startup Repair. Sometimes you even need to do system restore from boot to get rid of the “Cleaning up. Do not turn off your computer” error.
Precaution: backup Windows before running Windows Update
Although Windows Update helps to keep your device secure and up to date, it may cause problems sometimes. The problems range from serious ones like error messages preventing Windows from starting to less serious ones like video or audio problems.
Therefore, it’s important to backup Windows before running Windows Update. With a backup at hand, you can restore your computer to previous working condition easily. Here I’d like to recommend the best free backup software—AOMEI Backupper Standard to you.
It enables you to make different types of backup including System/Disk/Partition/File Backup. You are also allowed to schedule backups to run automatically. All Windows PC operating systems like Windows 10/8.1/8/7/Vista/XP are supported. Just download this freeware and follow the intuitive wizard to perform system backup. All you need to do are a few clicks!

Note: You can also create bootable media to boot your computer with AOMEI Backupper in case of boot failure.
Summary
There are three methods offered in this article to help you solve the “Cleaning up. Do not turn off your computer” error. It is suggested that you backup Windows before running Windows Update just in case errors occur. To backup OS in Windows Servers, please turn to AOMEI Backupper Server which also enables you to  clone C drive in Server 2019. Try AOMEI Backupper now to discover more!


