- Как использовать Windows 10 Display Scaling
- Сделайте отображаемый текст, значки и элементы навигации более понятными
- Почему вы хотите использовать масштабирование дисплея
- Как включить масштабирование экрана в Windows 10
- Как настроить масштабирование для нескольких дисплеев или для пользовательских размеров
- Устранение неполадок масштабирования экрана в Windows 10
- How to set custom display scaling settings on Windows 10
- How to change display scaling settings using recommended values
- How to change display scaling settings using custom values
- How to make text bigger without changing scaling settings
- More Windows 10 resources
- Mauro recommends all these affordable accessories
- Logitech MX Master Wireless Mouse ($72 at Amazon)
- Ktrio Extended Gaming Mouse Pad ($12 at Amazon)
- Supernight LED light strip ($20 at Amazon)
- The Dell XPS 15 is our choice for best 15-inch laptop
- Halo: MCC’s live service elements make it better, not worse
- Microsoft’s Surface Duo is not ‘failing up’
- These are the best PC sticks when you’re on the move
- Automatic scaling in Windows Forms
- Need for automatic scaling
- Original support for automatic scaling
- Current support for automatic scaling
- Automatic scaling in action
Как использовать Windows 10 Display Scaling
Сделайте отображаемый текст, значки и элементы навигации более понятными
Более крупный текст часто облегчает чтение слов на экране. Но большие символы не обязательно делают компьютер более простым в использовании, если все значки и элементы навигации остаются относительно маленькими. Масштабирование дисплея делает все на экране немного больше, что облегчает использование приложений для людей с плохим зрением.
Почему вы хотите использовать масштабирование дисплея
Система масштабирования экрана Windows 10 регулирует размер текста, значков и элементов навигации, чтобы людям было удобнее видеть и использовать компьютер.
Вы можете настроить масштаб отображения для вашего устройства с Windows 10, а также для любых внешних дисплеев. Например, корректировка масштабирования дисплея может преобразовать дисплей из текста с небольшим текстом, который трудно прочитать, в экран, который легче увидеть. Кроме того, масштабирование может также облегчить открытие, запуск и использование приложений на проецируемом дисплее.
Система масштабирования экрана Windows 10 выбирает размер на основе нескольких факторов, таких как собственное разрешение экрана, размеры экрана и предполагаемое расстояние от экрана. Например, расстояние от экрана предполагает, что дисплей ноутбука будет ближе к глазам зрителя, чем внешний монитор, и проецируемый дисплей будет просматриваться на еще большем расстоянии.
Разрешение экрана является отдельной настройкой от масштабирования. См. Как настроить разрешение экрана в Windows для этих шагов.
Как включить масштабирование экрана в Windows 10
Чтобы настроить масштабирование экрана Windows 10, необходимо выбрать процент масштабирования. Вот как.
Откройте Windows меню «Пуск» .
Выберите Настройки .
Выберите Система .
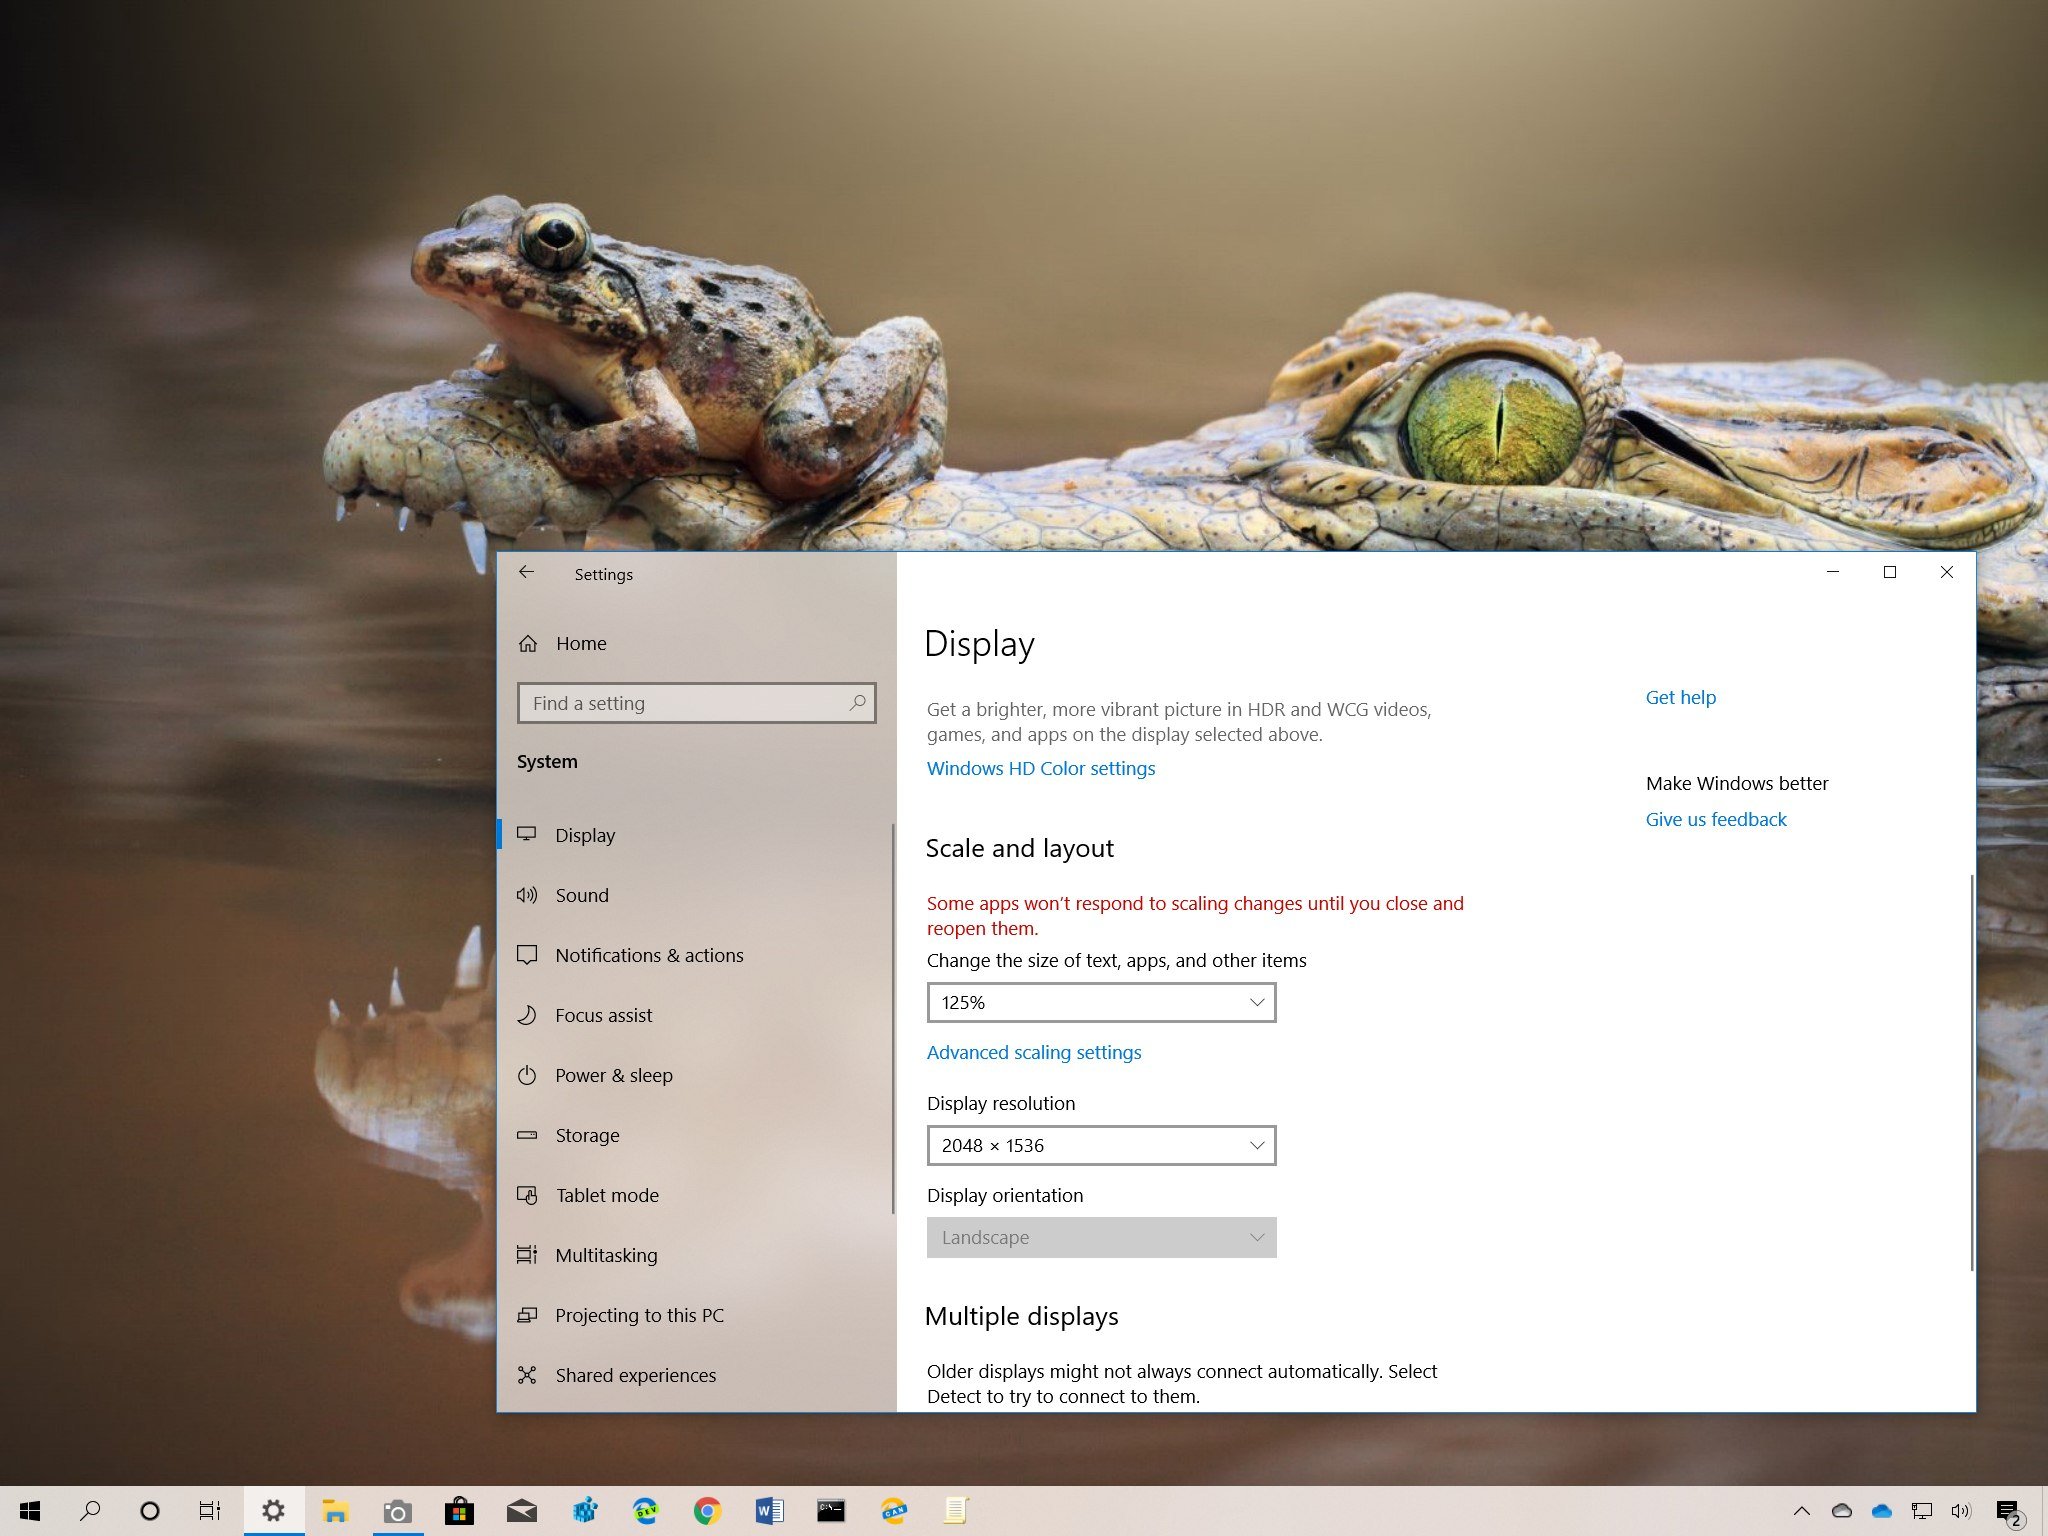
Выберите Показать .
Ищите Масштаб и макет . Раскрывающееся меню масштабирования и макета предложит рекомендуемые параметры масштабирования, например 125% или 150%. Отображаемые элементы будут увеличиваться при увеличении масштаба.
Выберите опцию, например 125% или 150%, тогда ваш дисплей изменится.
Это оно! Теперь ваш дисплей должен быть масштабирован до выбранного вами размера.
Как настроить масштабирование для нескольких дисплеев или для пользовательских размеров
Вы можете настроить масштаб отображения для вашего основного дисплея и подключенных дисплеев. Поместите курсор и щелкните (или коснитесь) на прямоугольнике для дисплея, который вы хотите масштабировать, например, дисплей 1 или дисплей 2 и т. Д. Затем отрегулируйте масштабирование для выбранного дисплея. Это позволяет настроить масштабирование для каждого дисплея отдельно.
Выберите Расширенные настройки масштабирования , чтобы настроить масштаб от стандартного 100% до целых 500%. На этом экране настроек вы можете вручную ввести пользовательский размер масштабирования. Однако разные настройки масштабирования будут работать лучше на разных дисплеях. В некоторых случаях вы можете увидеть размытые символы, обрезанные слова или слишком большой или маленький текст для определенного места. В частности, старые программы могут не полностью поддерживать современные функции масштабирования экрана в Windows 10.
Расширенные настройки масштабирования также предоставляют вам доступ к дополнительному параметру, который будет «Позволить Windows пытаться исправить приложения, чтобы они не были размытыми». Однако эта настройка применяется только к главному экрану, а не к любому внешнему дисплеи.
Устранение неполадок масштабирования экрана в Windows 10
Не все приложения хорошо масштабируются, особенно на дисплеях с высоким разрешением, также известных как дисплеи с высоким разрешением (точек на дюйм). Выполните следующие действия, чтобы переопределить параметры масштабирования экрана Windows для определенного приложения. Не вносите эти корректировки или изменения без крайней необходимости. (См. Разрешение 4K Ultra HD (обзор, подробности и последствия для получения дополнительной помощи по настройке дисплея с высоким разрешением.)
Выберите Windows Пуск. и найдите свое приложение в списке установленных приложений. Нажмите правой кнопкой мыши (или коснитесь двумя пальцами) приложения, выберите Еще , затем выберите Открыть местоположение файла . Найдите приложение в списке файлов, затем щелкните его правой кнопкой мыши (или коснитесь двумя пальцами), выберите Свойства и перейдите на вкладку Совместимость . Найдите кнопку с надписью «Изменить настройки высокого DPI». Здесь вы можете изменить настройки масштабирования по мере необходимости.
Найдите свое приложение в списке установленных приложений, затем щелкните правой кнопкой мыши (или коснитесь двумя пальцами) в приложении.
Выберите Больше .
Выберите Открыть местоположение файла .
Найдите приложение в списке файлов, затем щелкните правой кнопкой мыши (или коснитесь двумя пальцами) в приложении.
Выберите Свойства .
Затем выберите вкладку Совместимость .
Найдите кнопку с надписью «Изменить настройки высокого DPI».
Измените параметры масштабирования по желанию или необходимости.
Ваши индивидуальные настройки масштабирования дисплея теперь будут применяться к этому приложению.
Если вы установили нестандартное графическое оборудование и программное обеспечение, возможно, вы не сможете настроить масштаб отображения в системных настройках Windows. Например, стороннее программное обеспечение, управляющее видеокартой, может иметь приоритет над настройками системного дисплея Windows. Вы можете часто получать доступ и настраивать стороннее графическое программное обеспечение из системного трея Windows (как правило, находится в правом нижнем углу экрана).
Более ранние версии Windows не всегда корректируют масштабирование так же плавно, как Windows 10. В некоторых версиях Windows требуется выполнить выход после настройки параметров масштабирования, а затем выполнить вход. Кроме того, при использовании старых программ вы можете обнаружьте, что некоторые приложения не поддерживают настройки масштабирования экрана Windows. В любом случае, возможно, пришло время обновить систему до Windows 10 или обратиться за помощью к разработчику приложения.
How to set custom display scaling settings on Windows 10
On its own, Windows 10 does a pretty good job detecting and adjusting the display scaling settings based on various factors (such as screen size and resolution) to ensure that elements (text, icons, navigations, and other items) on the screens are big enough to make apps easier to use.
However, it’s not a flawless system, and as a result, Windows 10 also allows you to adjust the scaling settings manually on a per-monitor basis, which can come in handy in many scenarios. For example, if you’re pairing your device with a different size external monitor, specifying a custom scaling value can help to match the size of text and elements across all monitors. If you don’t have perfect vision, scaling can increase the size of elements to make everything easier to see and use without forcing your eyes. Or adjusting the scaling settings may also improve the viewing of a presentation when projecting to a larger screen.
In this Windows 10 guide, we’ll walk you through the steps to change the scaling settings for a standalone monitor or laptop display.
How to change display scaling settings using recommended values
To change a display scaling size using the recommended settings, use these steps:
- Open Settings.
- Click on System.
- Click on Display.
Under the «Scale and layout» section, use the drop-down menu and select the scale settings that suit your needs. Options available include 100, 125, 150, and 175 percent.

Once you complete the steps, you don’t need to sign out and sign back in, but it’s recommended to restart your computer to make sure that the new settings apply correctly across the desktop and apps.
How to change display scaling settings using custom values
If the recommended scaling settings are not suited for your display, you can specify a custom scaling size.
To set a custom size for scaling a display on Windows 10, use these steps:
- Open Settings.
- Click on System.
- Click on Display.
Under the «Scale and layout» section, click the Advanced scaling settings option.
Under the Custom scaling section, specify a custom scaling size between 100 to 500 percent.
Quick tip: If you need to make the size of text, apps, and other items just a little bigger, you can try using 110 as the new scaling value.
After you complete the steps, text, apps, and other items should scale to the size that you specified.
If icon and other items are not scaling correctly on the desktop, use the same instructions outlined above to slightly increase or decrease the scaling size number until you find a right balance.
At any time, you can remove the custom size using the steps, but on step No. 4, click the Turn off custom scaling and sign out option.
How to make text bigger without changing scaling settings
If you’re looking to make only the text more readable, you don’t need to change the scaling settings. Instead, you should change the font size globally.
To make text bigger on Windows 10, use these steps:
- Open Settings.
- Click on Ease of Access.
- Click on Display.
Under the «Make text bigger» section, use the slider to select the new font size that makes text easy to read.
Once you complete the steps, the screen will flash a «Please wait» screen to apply the new text size.
More Windows 10 resources
For more helpful articles, coverage, and answers to common questions about Windows 10, visit the following resources:
Mauro recommends all these affordable accessories
Hi, I’m Mauro Huculak, Windows Central’s help and how-to guru. I wrote the post you’re reading now, and I know the Windows OS inside and out. But I’m also a bit of a hardware geek. These are some of the affordable gadgets on my desk today.
![]()
Logitech MX Master Wireless Mouse ($72 at Amazon)
I know mice, and this is the one I use every day. The MX Master is a wireless high-precision mouse that’s very comfortable to use and has many great features, including the ability to connect with multiple devices, an infinite scroll wheel, back and forward buttons, all of which you can customize.
![]()
Ktrio Extended Gaming Mouse Pad ($12 at Amazon)
If you spend a lot of time typing, your palms and mouse will leave tracks on your desk. My solution was to start using gaming mouse pads, which are big enough for you to use the keyboard and the mouse comfortably. This is the one I use and recommend.
![]()
Supernight LED light strip ($20 at Amazon)
You could just use a regular light bulb in your office, but if you want to add some ambient lighting with different colors, an RGB LED strip is the way to go. This one is Mauro-approved.
We may earn a commission for purchases using our links. Learn more.
![]()
The Dell XPS 15 is our choice for best 15-inch laptop
For a lot of people, a 15-inch laptop is a perfect size that offers enough screen for multitasking, and in a lot of cases, some extra performance from powerful hardware. We’ve rounded up the best of the best at this size.
![]()
Halo: MCC’s live service elements make it better, not worse
Halo: The Master Chief Collection is more popular than ever, but some fans don’t agree with the live service approach 343 Industries has taken with it. Here’s why those elements are, at the end of the day, great for the game and for Halo overall.
![]()
Microsoft’s Surface Duo is not ‘failing up’
Microsoft announced this week that it was expanding Surface Duo availability to nine new commercial markets. While Surface Duo is undoubtedly a work in progress, this is not a sign of a disaster. It’s also doesn’t mean that Surface Duo is selling a ton either. Instead, the reason for the expansion is a lot more straightforward.
![]()
These are the best PC sticks when you’re on the move
Instant computer — just add a screen. That’s the general idea behind the ultra-portable PC, but it can be hard to know which one you want. Relax, we have you covered!
Automatic scaling in Windows Forms
Automatic scaling enables a form and its controls, designed on one machine with a certain display resolution or system font, to be displayed appropriately on another machine with a different display resolution or system font. It assures that the form and its controls will intelligently resize to be consistent with native windows and other applications on both the users’ and other developers’ machines. The support of the .NET Framework for automatic scaling and visual styles enables .NET Framework applications to maintain a consistent look and feel when compared to native Windows applications on each user’s machine.
For the most part, automatic scaling works as expected in .NET Framework version 2.0 and later. However, font scheme changes can be problematic. For an example of how to resolve this, see How to: Respond to Font Scheme Changes in a Windows Forms Application.
Need for automatic scaling
Without automatic scaling, an application designed for one display resolution or font will either appear too small or too large when that resolution or font is changed. For example, if the application is designed using Tahoma 9 point as a baseline, without adjustment it will appear too small if run on a machine where the system font is Tahoma 12 point. Text elements, such as titles, menus, text box contents, and so on will render smaller than other applications. Furthermore, the size of user interface (UI) elements that contain text, such as the title bar, menus, and many controls are dependent on the font used. In this example, these elements will also appear relatively smaller.
An analogous situation occurs when an application is designed for a certain display resolution. The most common display resolution is 96 dots per inch (DPI), which equals 100% display scaling, but higher resolution displays supporting 125%, 150%, 200% (which respectively equal 120, 144 and 192 DPI) and above are becoming more common. Without adjustment, an application, especially a graphics-based one, designed for one resolution will appear either too large or too small when run at another resolution.
Automatic scaling seeks to ameliorate these problems by automatically resizing the form and its child controls according to the relative font size or display resolution. The Windows operating system supports automatic scaling of dialog boxes using a relative unit of measurement called dialog units. A dialog unit is based on the system font and its relationship to pixels can be determined though the Win32 SDK function GetDialogBaseUnits . When a user changes the theme used by Windows, all dialog boxes are automatically adjusted accordingly. In addition, the .NET Framework supports automatic scaling either according to the default system font or the display resolution. Optionally, automatic scaling can be disabled in an application.
Original support for automatic scaling
Versions 1.0 and 1.1 of the .NET Framework supported automatic scaling in a straightforward manner that was dependent on the Windows default font used for the UI, represented by the Win32 SDK value DEFAULT_GUI_FONT. This font is typically only changed when the display resolution changes. The following mechanism was used to implement automatic scaling:
At design time, the AutoScaleBaseSize property (which is now deprecated) was set to the height and width of the default system font on the developer’s machine.
At runtime, the default system font of the user’s machine was used to initialize the Font property of the Form class.
Before displaying the form, the ApplyAutoScaling method was called to scale the form. This method calculated the relative scale sizes from AutoScaleBaseSize and Font then called the Scale method to actually scale the form and its children.
The value of AutoScaleBaseSize was updated so that subsequent calls to ApplyAutoScaling did not progressively resize the form.
While this mechanism was sufficient for most purposes, it suffered from the following limitations:
Since the AutoScaleBaseSize property represents the baseline font size as integer values, rounding errors occur that become evident when a form is cycled through multiple resolutions.
Automatic scaling was implemented in only the Form class, not in the ContainerControl class. As a result, user controls would scale correctly only when the user control was designed at the same resolution as the form, and it was placed in the form at design time.
Forms and their child controls could only be concurrently designed by multiple developers if their machine resolutions were the same. Likewise it also made inheritance of a form dependent on the resolution associated with the parent form.
It is not compatible with the newer layout managers introduced with the .NET Framework version 2.0, such as FlowLayoutPanel and TableLayoutPanel.
It did not support scaling based directly on the display resolution that is required for compatibility to the .NET Compact Framework.
Although this mechanism is preserved in the .NET Framework version 2.0 to maintain backward compatibility, it has been superseded by the more robust scaling mechanism described next. As a consequence, the AutoScale, ApplyAutoScaling, AutoScaleBaseSize, and certain Scale overloads are marked as obsolete.
You can safely delete references to these members when you upgrade your legacy code to the .NET Framework version 2.0.
Current support for automatic scaling
The .NET Framework version 2.0 surmounts previous limitations by introducing the following changes to the automatic scaling of Windows Forms:
Base support for scaling has been moved to the ContainerControl class so that forms, native composite controls and user controls all receive uniform scaling support. The new members AutoScaleFactor, AutoScaleDimensions, AutoScaleMode and PerformAutoScale have been added.
The Control class also has several new members that allow it to participate in scaling and to support mixed scaling on the same form. Specifically the Scale, ScaleChildren, and GetScaledBounds members support scaling.
Support for scaling based upon the screen resolution has been added to complement system font support, as defined by the AutoScaleMode enumeration. This mode is compatible with automatic scaling supported by the .NET Compact Framework enabling easier application migration.
Compatibility with layout managers such as FlowLayoutPanel and TableLayoutPanel has been added to the implementation of automatic scaling.
Scaling factors are now represented as floating point values, typically using the SizeF structure, so that rounding errors have been practically eliminated.
Arbitrary mixtures of DPI and font scaling modes are not supported. Although you may scale a user control using one mode (for example, DPI) and place it on a form using another mode (Font) with no issues, but mixing a base form in one mode and a derived form in another can lead to unexpected results.
Automatic scaling in action
Windows Forms now uses the following logic to automatically scale forms and their contents:
At design time, each ContainerControl records the scaling mode and it current resolution in the AutoScaleMode and AutoScaleDimensions, respectively.
At run time, the actual resolution is stored in the CurrentAutoScaleDimensions property. The AutoScaleFactor property dynamically calculates the ratio between the run-time and design-time scaling resolution.
When the form loads, if the values of CurrentAutoScaleDimensions and AutoScaleDimensions are different, then the PerformAutoScale method is called to scale the control and its children. This method suspends layout and calls the Scale method to perform the actual scaling. Afterwards, the value of AutoScaleDimensions is updated to avoid progressive scaling.
PerformAutoScale is also automatically invoked in the following situations:
In response to the OnFontChanged event if the scaling mode is Font.
When the layout of the container control resumes and a change is detected in the AutoScaleDimensions or AutoScaleMode properties.
As implied above, when a parent ContainerControl is being scaled. Each container control is responsible for scaling its children using its own scaling factors and not the one from its parent container.
Child controls can modify their scaling behavior through several means:
The ScaleChildren property can be overridden to determine if their child controls should be scaled or not.
The GetScaledBounds method can be overridden to adjust the bounds that the control is scaled to, but not the scaling logic.
The ScaleControl method can be overridden to change the scaling logic for the current control.


