- How to open Scan app in Windows 10 computer and Scan a document
- How to open Scan App in Windows 10
- How to scan a document in Windows 10
- How to Scan Documents or Photos in Windows 10
- Windows 10 – Scan Documents, Business Cards or Photos using a Scanner
- Scan Documents, Business Cards or Photos or Whiteboards using a Mobile Phone
- 17 Comments
- How to scan a document in Windows 10 using the Windows Scan app
- How to find the Windows Scan app
- How to download the Windows Scan app
- How to scan a document in Windows 10 using the Windows Scan app
- How to scan documents on Windows 10
- How to scan documents using Windows Scan app
- Install Windows Scan app
- Scan documents
- Printer and scanner
- HP OfficeJet Pro 8025
- How to scan documents using Windows Fax and Scan app
- More Windows 10 resources
- The Dell XPS 15 is our choice for best 15-inch laptop
- Halo: MCC’s live service elements make it better, not worse
- Microsoft’s Surface Duo is not ‘failing up’
- These are the best PC sticks when you’re on the move
How to open Scan app in Windows 10 computer and Scan a document
Microsoft Store offers a Scan app which you can use to scan documents and pictures in Windows 10 quickly. The app is useful when you are scanning one single photo or multiple pages. In this post, we will share how to open the Scan App in Windows 10 computer and use it to scan a document properly.
How to open Scan App in Windows 10
Before we start with the Scan App, the OEM of the Scanner may have its own scanner software, which can help you with scanning a document. I would suggest you have a look at it as well as it can offer some extra features compared to the Windows Scan App.
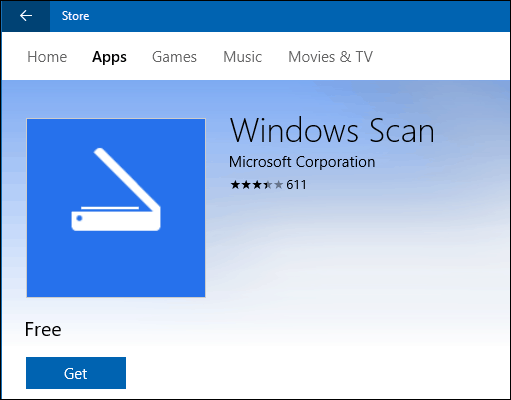
- Open Microsoft Store
- Type Windows Scan in the search box.
- Once it appears, click on the Get button to install it on the computer or open this link.
- Post-installation, Windows Scan will be available in the Start menu as the “SCAN” app.
- Click on it, to open the Scan App in Windows 10 computer.
If you just connected the Scanner, make sure to install the driver. Windows 10 would usually find it and list it under Settings > Devices > Printers and Scanners. Make sure its status is online; else, you will not be able to use it.
Before launching the scanner app, make sure the scanner is physically plugged into a power source and connected to the computer over the USB plug. Launch the scanner app, and it will automatically detect the scanner and list it. If you have multiple scanners, you can always choose between them.
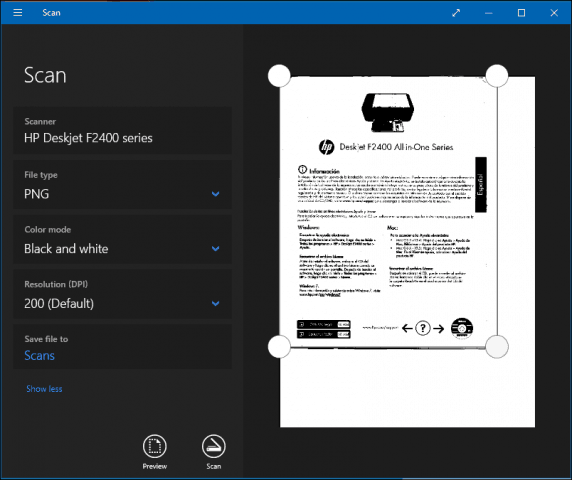
When the app launches, it only shows Scanner Name and File type in which the scan would be saved. Right under the file type option, click on Show more link top reveal the complete set of options which includes:
- File Type: Choose between TIFF, JPEG, PDF, XPS, BMP, and OpenXPS
- Color Mode: Here, you can choose between Color, Black & White, and Greyscale.
- Resolution: The higher the value, the better would be the quality of the print, saved document, and, of course, the size. Depending on where and how you plan to use it, choose wisely.
- Save File to: Make sure to choose this option, and I would say, save it to the cloud. Not only you can instantly share with someone; you will not lose it. When you switch computers, you can get still across them if it is on Dropbox or OneDrive
How to scan a document in Windows 10
Now that you know all the features of the scan app, let’s learn how to scan a document or image using this app.
- Place a document on the scanner bed, and put down the lid.
- Switch to Scan app, and configure the options
- Click on the Preview button. Make sure to it every time to see how the output of the scan will look like.
- Once the preview shows up, you can use the selection or circle markers to decide the area to scan. If the preview is not as you expected then
- change the color mode and DPI
- make sure the scanner lid was put down
- accurately mark the area to scan using circle markers
- if you plan to edit the image later, save it as an IMAGE format.
- Click on the Scan button to perform a final scan. You should see Scanning instead of Previewing this time. Once complete, a message would show up on top of the app.
That’s it. It is how you scan a document or image in Windows 10. While the Scan app is basic, it offers enough features which allow you to scan almost anything.
However, software from OEM would do a much better job as it can offer extra features, option to save at multiple places, and so on. As an example, I can save multiple scans into a single PDF file, which is excellent when you are scanning a document with numerous pages. So make sure to install the scanner app from the OEM and try out that too.
Date: December 18, 2019 Tags: Windows Apps
How to Scan Documents or Photos in Windows 10


There are multiple ways to scan a document or photo in Windows 10. You might be wondering, who needs to scan stuff in this digital decade? Unfortunately, there are many many circumstances which paper is still the preferred or default format. Banking and Government documents for taxes, for example, still show up at the house in paper form — ick.. normally arrive at my house
In this article, I will review a few ways you can scan a document using a physical scanner or the free Office Lens app for Windows 10. After all, who wants to be buried under a mountain of unsearchable paper documents?
Windows 10 – Scan Documents, Business Cards or Photos using a Scanner
Even in 2017, it’s hard to beat the quality of a dedicated document or flatbed scanner. On Amazon, Prices range from $50 to $400 depending on the features, speed etc… If you want advice, stick with the big brands like Canon, Epson or Brother. Look for the highest number of reviews combined with a high Amazon rating (4+ star) and you should be just fine. So, once you get set up with your printer and get it configured with Windows 10, it’s time to start scanning!
Windows 10 includes a built-in scan utility, which you can access from the printer context menu.
Click Start, type: devices and printer then hit Enter. Right-click your scanner or printer, then click Start Scan.

Users have several options on the screen which let you preview the document, choose a color format (color or black and white), adjust brightness, set the appropriate resolution and even choose the format you want to save it in: JPEG, PDF or PNG. If you are satisfied with the results after reviewing the document, proceed to click Scan.
Make your selections, Click Preview to ensure everything looks good then Click Scan.
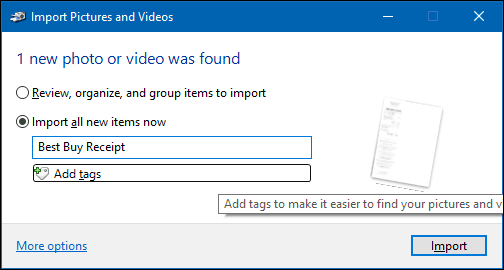
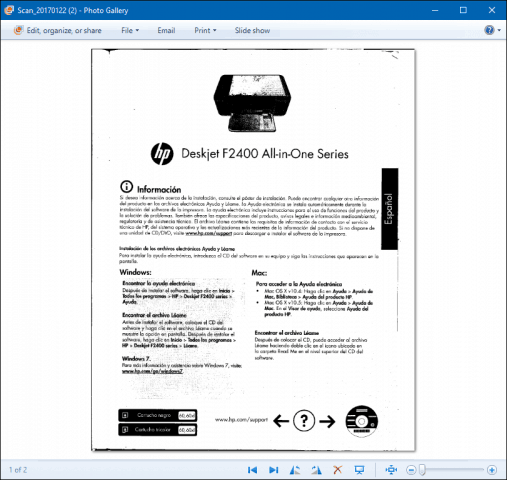
After giving your scanned document a Name, add a few tags to make it easier to search for later. Click Import.
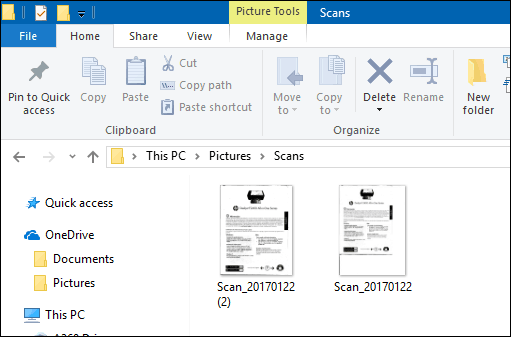
Your scanned document can normally be found in Pictures within the scanned files folder.
With each revision of Windows 10, Microsoft is slowly deprecating parts of the classic desktop and the built-in scan utility might become the next victim. Microsoft released a modern universal app you can download from the Windows Store called Windows Scan.
Depending on when you’re reading this article, the Windows Scan app might be the best place to start for scanning paper documents or photos. If you updated to Windows 10 from 8, you might even have it installed. That said, I had to blow away the app from my Windows 10 box and reinstall it from the Windows Store. Something must have been corrupted during the Windows 8 to 10 upgrade.
The interface is quite similar to the old scanning utility. You can preview your document, crop it before scanning the final document, adjust resolution, select appropriate file formats and choose your save location.
When ready, click Scan then review the scanned document.
Scan Documents, Business Cards or Photos or Whiteboards using a Mobile Phone
Although once very popular, many people just don’t buy scanners anymore. No worries, Microsoft also makes an excellent mobile app called Office Lens. We’ve written about the iPhone/iPad version in detail however it also works well on Android.
Download Links:
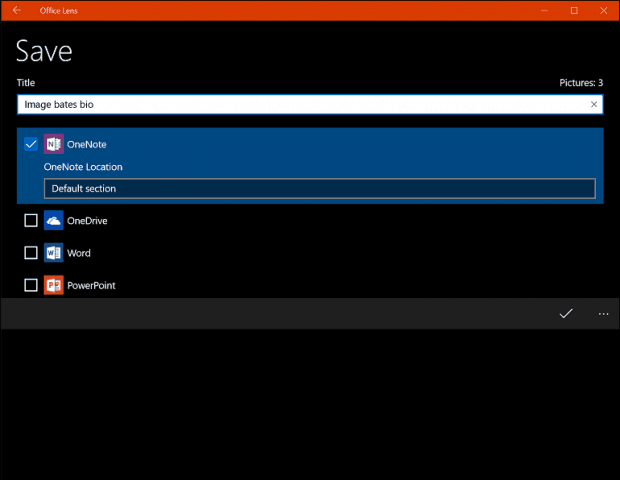
Office Lens scans photos, whiteboards, business cards, and documents quickly and easily. It’s fully integrated with other Microsoft apps like OneDrive, Word and OneNote.
It’s simple to use, just launch Office Lens, tap the scanner tab, then choose the type of content to scan. Office Lens will optimize its settings and create a frame around the document when it is recognized.

Tap the camera button to capture the file, preview the document then make further adjustments such as cropping or saving it in the desired format.

After scanning your document, there are other tasks you might want to perform such as adding a label, crop, delete it or save it for use in OneNote, OneDrive, Word or PowerPoint.
So, that’s a look at scanning documents and photos in Windows 10, both old and new. I must admit, using a dedicated flatbed scanner still remains the best choice for scanning documents; if you want the best quality. That said, it’s hard to beat the convenience and speed of a mobile combined with Onedrive. Sure, the quality might not be as good but, in most cases, it’s probably good enough.
17 Comments
I’ve never used the process you have described to scan documents, but will have give it a try. I have two flatbed scanners and use the HP scan software. However, when away from my office I use an iPhone app called “DocSanner”. It uses the iPhone camera. Once the image of the document, or sunset, etc. is captured you can crop, change dark/light settings, or rotate. Once complete you have the options to email as PDF or JPEG. You can upload to Dropbox, Evernote, eFax or HP eprint. You can even add a signature. The app also has an OCR option. Not bad for a free app!!
SCANNABLE is another great app. I use it a lot for scanning all my documents. You can create multi-page PDF documents with it and then either save the scan to your iPhone or email it. Works great. Might want to give that a look also.
How to scan a document in Windows 10 using the Windows Scan app

- You can quickly and easily scan a document in Windows 10 using the Windows Scan app.
- Windows Scan allows you to scan both documents and images, immediately saving them to your computer in an image format.
- Visit Business Insider’s homepage for more stories.
Scanning software can be confusing and time-consuming to set up and operate.
Fortunately, Windows 10 has an app called Windows Scan that simplifies the process for everyone, saving you time and frustration.
How to find the Windows Scan app
Before you start scanning documents, you’ll need to make sure that you have Windows Scan installed on your computer.
1. To check if you have Windows Scan installed, click on the Start menu, and then click «All apps» (represented by an icon that looks like a bulleted list).
2. Scroll through the list until you find the Scan app, and click on it.
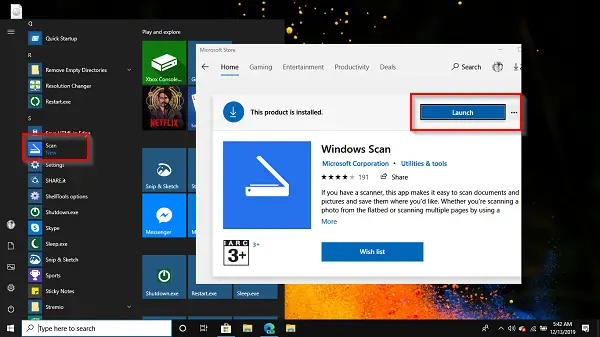
How to download the Windows Scan app
If you can’t find the Scan app on your computer, you will need to download it from the Microsoft Store.
1. From the Start menu, click on «Microsoft Store.»
2. From there, click on the bar that says «Search» and type in «Scan.»
3. «Windows Scan» should be the first result that pops up in the dropdown menu — click on it.
4. On the next page, click on the button labeled «Get» and Windows Scan will begin downloading automatically.
5. Once it has downloaded completely, click «Launch» to open the app.
How to scan a document in Windows 10 using the Windows Scan app
Once you have confirmed that Windows Scan is installed and open on your computer, you can begin scanning documents.
1. Check to make sure that your scanner is connected.
- If it is plugged in, turned on, and has been set up correctly, the scanner’s name should appear on the left side of the Scan app’s screen, as the first item in the list.
- If there is an error message or nothing appears in that first item box, you will need to connect your scanner to your computer using either a USB connection cable or Wi-Fi connection, and double check that it is plugged in and turned on.
2. Once your scanner has been connected properly, select the file type you want from the Scan app’s menu.
3. If you click «Show More» in the Scan app’s menu, you can adjust additional settings for your scan, including color, resolution, and the folder in which you want to save your scan. If you skip this step, your scan will use the default settings.
4. Position the document you want to scan inside your scanner. This can be done either face-down on the scanner glass or face-up in the scanner document feeder, depending on the type of scanner you have.
5. When you’re ready to begin scanning, click the «Scan» button on the Windows Scan app.
6. When your scan has finished, you can view it by clicking «View» on the Scan app. The scan will be saved in your computer’s «Pictures» folder unless you selected another location in the Scan app’s settings.
Please note that some older scanners are not compatible with Windows Scan, and thus cannot be used in conjunction with the Scan app.
How to scan documents on Windows 10
 Source: Windows Central
Although we’re now living in a digital world, from time to time, you may still need to scan important documents, such as handwritten letters, contracts, forms, and more, for many reasons. For instance, when you need to sign and send an agreement digitally via email, you want to convert important papers into digital files for inventory or preservation purposes, etc.
If you have a multi-function printer or standalone scanner, you can probably walk up to the device and directly scan the document (or picture) onto a USB flash drive. However, Windows 10 has two apps you can use to save you the trip to scan any documents and pictures directly onto your device without having to use the manufacturer software, whether you have a flatbed or feeder scanner.
In this Windows 10 guide, we’ll walk you through two methods to scan documents and photos on your device.
How to scan documents using Windows Scan app
Windows 10 has a modern app to scan documents using a scanner, but you must first download and install it from the Microsoft Store.
Install Windows Scan app
To install the Windows Scan app, use these steps:
Click the Get button.
 Source: Windows Central
Click the Install button.
 Source: Windows Central
Once you complete the steps, the app will install, and you can proceed to convert documents from physical to digital.
Scan documents
To scan physical documents to PDF, JPEG, or another file format, use these steps:
- Open Start.
- Search for Windows Scan and click the top result to open the app.
Use the «Scanner» drop-down menu to select the scanning device.
Quick tip: Before proceeding with the scan, make sure the scanner is powered on and connected to the computer via USB or network, depending on how you configured the device.
Use the «Source» drop-down menu to select the location of the document you are trying to scan:
- Flatbed: This option will apply for most users who have a standalone scanner or multi-function printer with scanning functionality.
- Feeder: This option is for scanners that support scanning by feeding the document using the roller paper feeder. If you select this option, you’ll also be able to select two additional settings, including the ability to scan both sides and select the paper size.
- Auto-configured: This option doesn’t include additional settings, and it’ll scan the document as-is and save the output into a file.
For this guide’s purpose, we’ll be selecting the «Flatbed» option since it will apply to most users.
 Source: Windows Central
Use the «File type» drop-down to select the file format to save the document scan. Options available include:
Quick tip: Usually, you may want to select the PDF option for paper documents and JPEG when scanning images. For this guide, we’ll be selecting the «PDF» option.
Use the «Color mode» drop-down menu to select whether you want the scan. Options available include:
Source: Windows Central
Click the Preview button.
Source: Windows Central
Click the Scan button.
Source: Windows Central
Once you complete the steps, the scanner will scan the document, and the app will save a digital copy in the Scans folder inside the Pictures profile folder unless you selected a different location.
If you scanned an image, the view option would open the file with the Photos app, and if you scanned a document as PDF, then the file will open with the default PDF viewer.
In the case that you’re in the market for a new all-in-one printer with scanning capability, then look no further than the HP OfficeJet Pro 8025 since it’s a reliable wireless printer that offers decent speed and good quality printing. Of course, it also includes a flatbed scanner with feeder functionality to scan both sides of the page. This is our best overall, but we have other picks you may want to consider.
Printer and scanner
HP OfficeJet Pro 8025
It prints and scans
The OfficeJet Pro 8025 is a great solution for your home office or small business. It’s full of smarts so that you can use it with the cloud.
How to scan documents using Windows Fax and Scan app
Alternatively, you can also use the legacy Windows Fax and Scan app. The app has been available for many years, and it includes all the essential features to scan documents and images. (If you have a modem and landline, you can also use it to send and receive faxes.)
To scan a document with the Windows Fax and scan app, use these steps:
- Open Start.
- Search for Windows Fax and Scan and click the top result to open the app.
- Click the Scan option from the bottom of the page (if applicable).
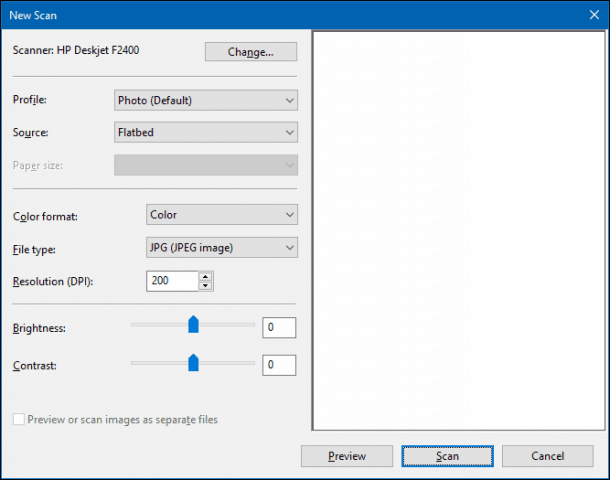
Click the New Scan button from the top-left corner.
Source: Windows Central
Use the Profile drop-down menu to select the profile that applies to your scan. Options available include:
For this guide, we’ll be selecting the «Documents» option.
Use the «Source» drop-down menu to select the location of the document you are trying to scan:
- Flatbed: This option will apply for most users who have a dedicated scanner or a multi-function printer with scanning functionality.
- Feeder: This option is for scanners that support scanning by feeding the document using the roller paper feeder. If you select this option, you’ll also be able to select two additional options, including the ability to scan both sides and select the paper size.
For this guide, we’ll be selecting the «Flatbed» option.
Source: Windows Central
Use the «Color format» drop-down menu to select whether you want the scan. Options available include:
Use the «File types» drop-down menu to select the format to save the scan. Options available include:
Use the «Resolution (DPI)» drop-down menu to specify the scan’s resolution.
Quick note: When specifying the resolution, the higher the number means higher resolution, but using 300 is good enough for most scans.
Click the Preview button.
Source: Windows Central
Select the image from the Windows Fax and Scan inbox to view a preview of the scan.
Source: Windows Central
After you complete the steps, you can find the output file in the «Scanned Documents» inside the Documents folder.
We’re focusing this guide on scanning documents, but the instructions will also work to convert printed pictures into digital copies.
More Windows 10 resources
For more helpful articles, coverage, and answers to common questions about Windows 10, visit the following resources:
We may earn a commission for purchases using our links. Learn more.
![]()
The Dell XPS 15 is our choice for best 15-inch laptop
For a lot of people, a 15-inch laptop is a perfect size that offers enough screen for multitasking, and in a lot of cases, some extra performance from powerful hardware. We’ve rounded up the best of the best at this size.
![]()
Halo: MCC’s live service elements make it better, not worse
Halo: The Master Chief Collection is more popular than ever, but some fans don’t agree with the live service approach 343 Industries has taken with it. Here’s why those elements are, at the end of the day, great for the game and for Halo overall.
![]()
Microsoft’s Surface Duo is not ‘failing up’
Microsoft announced this week that it was expanding Surface Duo availability to nine new commercial markets. While Surface Duo is undoubtedly a work in progress, this is not a sign of a disaster. It’s also doesn’t mean that Surface Duo is selling a ton either. Instead, the reason for the expansion is a lot more straightforward.
![]()
These are the best PC sticks when you’re on the move
Instant computer — just add a screen. That’s the general idea behind the ultra-portable PC, but it can be hard to know which one you want. Relax, we have you covered!


