- 4 Ways To Find Large Files In Windows 10
- Find Large Files In Windows 10 Using File Explorer
- Search For Large Files In Windows 10 With Command Prompt
- Use Largest Files Finder To Find Large Files On Windows 10
- Find Largest Files On Windows 10 With TreeSize Free
- System file check (SFC) Scan and Repair System Files & DISM to fix things SFC cannot
- Windows command for file size only
- 12 Answers 12
4 Ways To Find Large Files In Windows 10
Free up space quickly by deleting them
If you quickly want to free-up memory space on your Windows machine, the best way to do that is to find large files on your Windows 10 PC and get rid of them if they’re no longer useful. The question though is how do you go about searching for large files on your computer?
Windows provides you with multiple ways to find all the large files that are stored in your drives. Either you can use the built-in tools on your machine to look for these files or you can grab a third-party app that will do the task for you. Either way, you’ll find the files that occupy a significant portion of your memory space.

Once such files are found, it’s then up to you what you want to do with them. If deleting them permanently isn’t something you’d like to do straightaway, you can move them over to a cloud storage or to an external hard drive.
Also, be sure to check out our YouTube video from our sister site Online Tech Tips where we go through some of the options mentioned below in this article.
Find Large Files In Windows 10 Using File Explorer
File Explorer comes with a lot of hidden features to let you organize, sort, and find files on your computer. One of its abilities is to help you find files that are of specific size on your computer. Using this feature, you can locate those memory-hogging files and get them removed from your PC.
Before you do that, though, you’ll need to first enable the hidden files option. This is to ensure that Explorer looks for large hidden files as well in addition to searching for the normal files.
However, be cautious while dealing with the hidden files. Most of the time, these are system and app related files which, if you delete, will cause your apps to malfunction and even lead your entire system to crash. Before you delete anything, just make sure you know what it is and you’ll be fine.
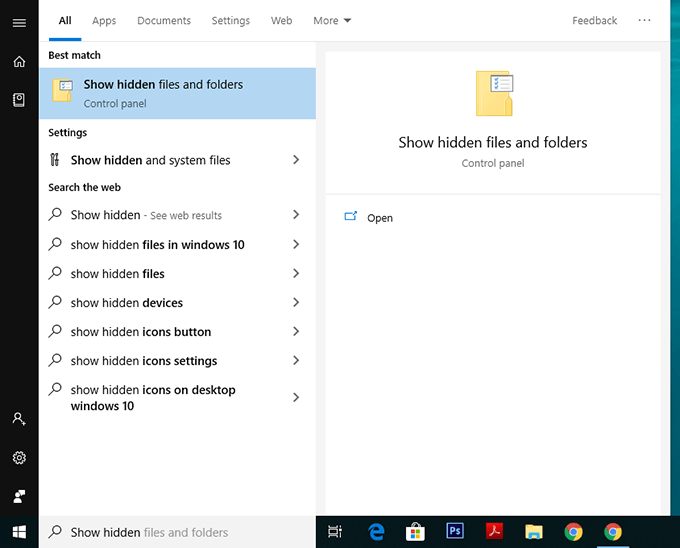
Open the Start Menu and search for Show hidden and click on Show hidden files and folders.
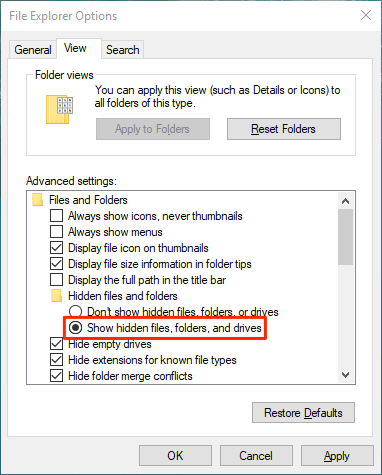
When the dialog box opens, click on the View tab at the top. You’ll see various File Explorer options that you can modify.
Find the option that says Show hidden files, folders, and drives and put a checkmark in it. Then click on the OK button to save your changes.
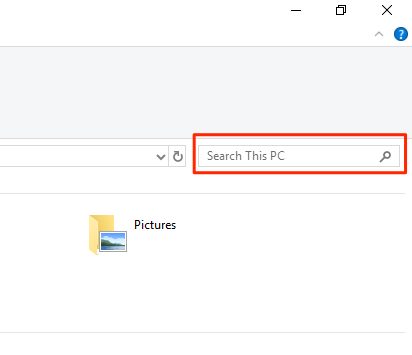
Double-click on This PC on your desktop to launch File Explorer. When the utility launches, click on the search box given at the top-right corner.
A new menu item will be added to the top of your screen. Click on the newly added item that says Search to view further options.
Select the Size option and then select an appropriate option from the list. It’ll let you find large files available on your PC.
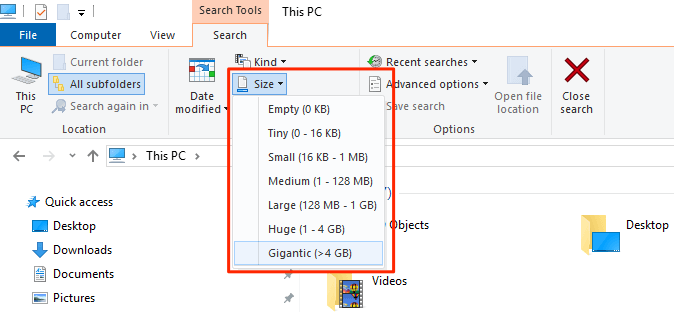
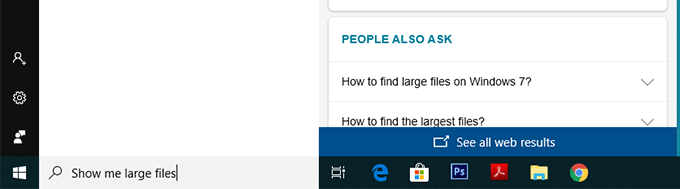
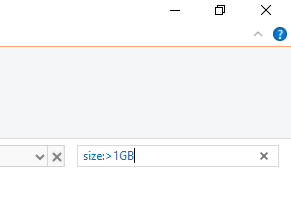
If what you consider as a large file isn’t available in the default menu, type in size:>1GB (replace 1GB with your size) in the search box and hit Enter. It’ll only look for the files that are larger than your specified size.
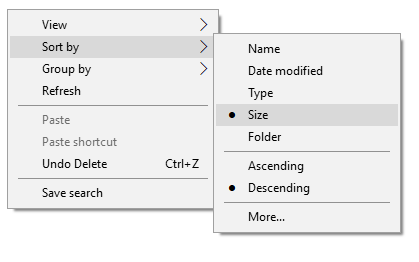
When the search results appear, right-click anywhere blank and select Sort by followed by Size and Descending. This’ll ensure the largest file is shown at the top of the results.
Search For Large Files In Windows 10 With Command Prompt
If you’re more of a geeky person, you can use the Command Prompt utility to retrieve a list of all the files larger than a specified size value. The files list can be exported to a text file for you to then actually find those files on your machine.
Press Windows + R, type in cmd, and hit Enter to launch the utility.
When it launches, type in the following command and hit Enter. It’ll find all the files that are larger than 1GB in size. You can modify the value in the command so it finds files that you think are large.
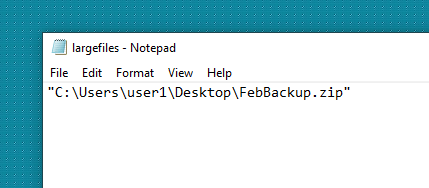
forfiles /S /M * /C “cmd /c if @fsize GEQ 1073741824 echo @path > largefiles.txt

Open the newly created largefiles.txt file and it’ll have a list of all the large files sitting on your computer.
Use Largest Files Finder To Find Large Files On Windows 10
File Explorer and Command Prompt aren’t the only tools to find large files on your Windows 10 computer. There are a few third-party apps as well that can help you find such files.
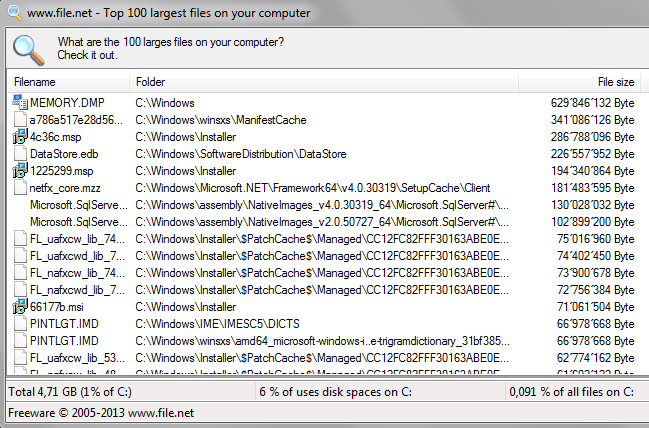
Largest Files Finder is one of those apps that helps you find the top 100 largest files on your computer. It claims to be only taking a minute to scan drives sized upto 200GB. Also, it doesn’t require any installation and works straight out of the box.
- Download and launch the app on your computer.
- Soon as it launches, it automatically starts searching for large files on your computer. When it’s done, you can review the results for yourself.
If you want to delete any files from the search results, you can do so with ease from within the app. Simply right-click on any of the files and select Delete.
Find Largest Files On Windows 10 With TreeSize Free
TreeSize Free has been around for quite a long time and it helps you find space hogging files on your Windows computers. It requires a small installation but then it works like a charm.
- Download, install, and launch the app on your computer. Make sure to run it with admin rights so it can search the folders that it can’t otherwise.
- You’ll see a tree of your folders along with the space they occupy on your screen. You can double-click on any folder to view its subfolders and their sizes.
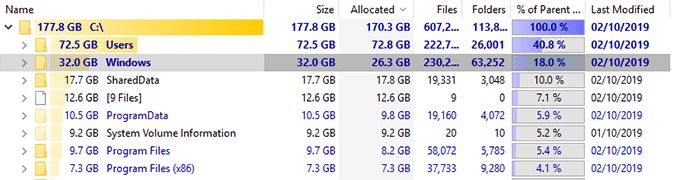
You can then sort the directories by the Size column so that the largest files are always shown at the top.
It has a few customizable options as well should you want to use them. Feel free to play around with any options you think will make it easier to find large files on your computer.
Mahesh has been obsessed with technology since he got his first gadget a decade or so ago. Over the last few years, he’s written a number of tech articles on various online publications including but not limited to MakeTechEasier and Android AppStorm. Read Mahesh’s Full Bio
System file check (SFC) Scan and Repair System Files & DISM to fix things SFC cannot
Technical Level : Basic
System file check is a utility built into the Operating System that will check for system file corruption The sfc /scannow command (System File Check) scans the integrity of all protected operating system files and replaces incorrect, corrupted, changed, or damaged versions with the correct versions where possible. When it cannot repair the damage DISM should be run to fix as many errors as possible.
System file check works on Vista and UP
Dism works on win 7 and UP
If you are running an insider build (ie 14915) and SFC fails
20% it is a known problem with this build
If you are running sfc &/or DISM to fix an underlying problem please tell us what that problem is.
If you have modified your system files ( including Windows DLL files) running sfc /scannow will revert the system files back to the default state.
It is always a good idea to back up your data beforehand!
To run a system file check (SFC)
Go to start >Type CMD
Right click and run as Administrator
If you want to verify and repair the OS type sfc /scannow (note the space between sfc and «/»)
If you just want to check (verify only) the OS type sfc /verifyonly (no changes will be made using verify only)
You may have to run this up to 3 times to fix all the problems
When you have finished it will say one of three things
Windows did not find any integrity violations (a good thing)
Windows Resource Protection found corrupt files and repaired them (a good thing)
Windows Resource Protection found corrupt files but was unable to fix some (or all) of them (not a good thing) If you get this message run DISM as described below
If SFC was not able to repair some or all of the files there are a few options including a repair install from the OS dvd, and DISM (win 8 & UP)
If SFC did not find any violations it is still a good idea to run DISM Restorehealth
DISM
If you are on win 8 (and up) you should also run DISM whether SFC found errors or not!!
You can run Check, then Scan, but you should always run RESTORE HEALTH
To check the health (You would use /CheckHealth to only check whether the image has been flagged as corrupted)
run Dism /Online /Cleanup-Image /CheckHealth
To scan the health use /ScanHealth to scan the image for component store corruption. This option does not fix any corruption.
run Dism /Online /Cleanup-Image /ScanHealth
To RESTORE health (recommended)
Use DISM / Online / Cleanup — Image / RestoreHealth to scan the image for component store corruption, perform repair operations automatically, and records that corruption to the log file. This generally takes 15-30 minutes depending on the corruption and size of the partition
You can run scanhealth & restore health at the same time like this
DISM.exe /Online /Cleanup-image /Scanhealth && DISM.exe /Online /Cleanup-image /Restorehealth
After running DISM it is a good idea to re-run SFC /scannow to make sure all the issues were fixed.
If you get the error message «cannot find source files»you need to have an ISO file mounted and need to specify where it is located with the below command
The ISO must be exactly the same version as the running OS. An ISO of 10586.0 will not repair a running system of 10586.35 because it has additional updates and files.
DISM /Online /Cleanup-Image /RestoreHealth /source:WIM:X:\Sources\Install.wim:1 /LimitAccess Where «X» is the drive letter where the ISO is located. Simply change the «X» to the correct drive letter
If you do not have an ISO you can make one. The instructions are here
If this wiki has proved helpful please click me too at the bottom of the wiki.
Other Wiki’s you may be interested in
Windows command for file size only
Is there a Windows command that will output the size in bytes of a specified file like this?
I know that the dir command outputs this information, but it outputs other information also.
I could easily write such a program, but I would prefer to use a native Windows command if possible, or only what is available in a fresh install of Windows XP.

12 Answers 12
If you are inside a batch script, you can use argument variable tricks to get the filesize:
This gives results like the ones you suggest in your question.
at the command prompt for all of the crazy variable manipulation options. Also see this article for more information.
Edit: This only works in Windows 2000 and later

znI . – Patrick Cuff Jan 27 ’09 at 16:41
z variables refer specifically to a file passed as an argument, so will be looking up their values from the filesystem, rather than a dynamic stream of bytes. – Mike Houston Aug 5 ’16 at 17:39
zn1 wasn’t working in a console ( 1 != I xD) – kayleeFrye_onDeck Oct 15 ’19 at 21:16
If you don’t want to do this in a batch script, you can do this from the command line like this:
Ugly, but it works. You can also pass in a file mask to get a listing for more than one file:
Will display the size, file name of each .DOC file.
Use a function to get rid off some limitation in the
z operator. It is especially useful with a for loop:
z1/1024 – David Doumèche Mar 18 ’14 at 2:59
The forfiles command runs command c for each file m in directory p .
The variable @fsize is replaced with the size of each file.
If the file C:\Temp\file1.txt is 27 bytes, forfiles runs this command:
Which prints 27 to the screen.
As a side-effect, it clears your screen as if you had run the cls command.
Since you’re using Windows XP, Windows PowerShell is an option.
or as a function
Create a file named filesize.cmd (and put into folder C:\Windows\System32):
In a batch file, the below works for local files, but fails for files on network hard drives
However, it’s inferior code, because it doesn’t work for files saved on a network drive (for example, \\Nas\test.jpg and \\192.168.2.40\test.jpg ). The below code works for files in any location, and I wrote it myself.
I’m sure there are more efficient ways of doing this using VBScript, or PowerShell or whatever, but I didn’t want to do any of that; good ol’ batch for me!
zI – trindflo Mar 18 ’20 at 19:23
The following command finds folders that are greater than 100 MB in size on the D: drive:
The /s option causes subdirectories to be searched, the /m option displays disk usage in megabytes, the /q:100 option causes folders that are greater than 100 MB to be marked, and the /d option displays only folders that exceed the threshold specified by /q.
Use the diskuse command to find files over a certain size. The following command displays files over 100 MB in size on the D: drive:
The /x:104857600 option causes files over 104,857,600 bytes to be displayed and is valid only if you include the /v option (verbose). The /s option means subdirectories from the specified path (in this case, the D: drive) are searched.


