- Создание и управление заданиями планировщика из PowerShell
- Управление заданиями Task Scheduler с помощью PowerShell
- Как создать задание планировщика с помощью PowerShell?
- Получение информации и запуск заданий планировщика из PowerShell
- Экспорт и импорт заданий планировщика в XML файл
- Creating a Scheduled Task in Windows 10
- Option 1 – From GUI
- Option 2 – From Command Line
- Parameter List:
- You Might Also Like
Создание и управление заданиями планировщика из PowerShell
Большинство пользователей и администраторов привыкли использовать графический интерфейс консоли Taskschd.msc для создания заданий планировщика Windows (Task Scheduler), запускаемых по расписанию. Однако в различных скриптах и автоматизируемых задачах для создания заданий планировщика гораздо удобнее использовать возможности PowerShell. В этой статье мы покажем, как создавать и управлять заданиями планировщика Windows из PowerShell.
Управление заданиями Task Scheduler с помощью PowerShell
В Windows 10/Windows Server 2016 для управления задачами в планировщике используется PowerShell модуль ScheduledTasks. Список командлетов в модуле можно вывести так:
Get-Command -Module ScheduledTasks
- Disable-ScheduledTask
- Enable-ScheduledTask
- Export-ScheduledTask
- Get-ClusteredScheduledTask
- Get-ScheduledTask
- Get-ScheduledTaskInfo
- New-ScheduledTask
- New-ScheduledTaskAction
- New-ScheduledTaskPrincipal
- New-ScheduledTaskSettingsSet
- New-ScheduledTaskTrigger
- Register-ClusteredScheduledTask
- Register-ScheduledTask
- Set-ClusteredScheduledTask
- Set-ScheduledTask
- Start-ScheduledTask
- Stop-ScheduledTask
- Unregister-ClusteredScheduledTask
- Unregister-ScheduledTask

Как создать задание планировщика с помощью PowerShell?
В современных версиях PowerShell (начиная с PowerShell 3.0 в Windows Server 2012/Windows 8) для создания заданию планировщика нужно использовать командлеты New-ScheduledTaskTrigger и Register-ScheduledTask.
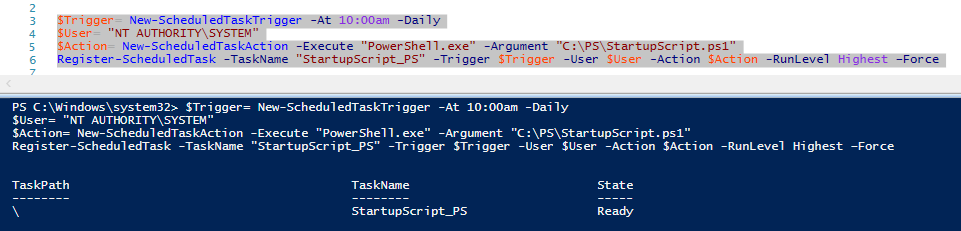
Предположим, наша задача создать задание планировщика, которое должно запускаться при загрузке компьютера (или в определенное время) и выполнять какой-то PowerShell скрипт. Создадим задание планировщика с именем StartupScript_PS. Данное задание должно каждый день в 10:00 запускать PowerShell скрипт, хранящийся в файле C:\PS\StartupScript.ps1 из-под учетной записи системы (SYSTEM). Задание будет выполняться с повышенными привилегиями (галка “Run with highest privileges”).
$Trigger= New-ScheduledTaskTrigger -At 10:00am -Daily
$User= «NT AUTHORITY\SYSTEM»
$Action= New-ScheduledTaskAction -Execute «PowerShell.exe» -Argument «C:\PS\StartupScript.ps1»
Register-ScheduledTask -TaskName «StartupScript_PS» -Trigger $Trigger -User $User -Action $Action -RunLevel Highest –Force
Если задание успешно создано, появится надпись Ready.
Теперь ваш PowerShell скрипт будет запускаться по указанному расписанию. Если на вашем компьютере настроена PowerShell Execution Policy, блокирующая запуск скриптов PS1, вы можете запустить скрипт их планировщика с параметром –Bypass.
Используйте такую строку при создании нового задания:
$Action= New-ScheduledTaskAction -Execute «PowerShell.exe» -Argument “-NoProfile -NoLogo -NonInteractive -ExecutionPolicy Bypass -File C:\PS\StartupScript.ps1″
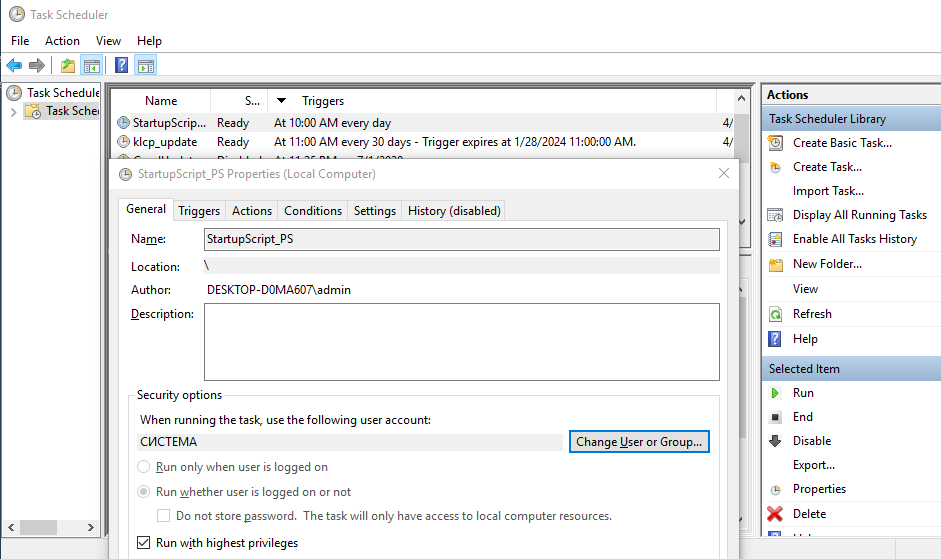
Откройте консоль Taskschd.msc и проверьте, что проверьте, что в Task Scheduler Library появилось новое задание планировщика.
$TaskName = «NewPsTask»
$TaskDescription = «Запуск скрипта PowerShell из планировщика»
$TaskCommand = «c:\windows\system32\WindowsPowerShell\v1.0\powershell.exe»
$TaskScript = «C:\PS\StartupScript.ps1»
$TaskArg = «-WindowStyle Hidden -NonInteractive -Executionpolicy unrestricted -file $TaskScript»
$TaskStartTime = [datetime]::Now.AddMinutes(1)
$service = new-object -ComObject(«Schedule.Service»)
$service.Connect()
$rootFolder = $service.GetFolder(«\»)
$TaskDefinition = $service.NewTask(0)
$TaskDefinition.RegistrationInfo.Description = «$TaskDescription»
$TaskDefinition.Settings.Enabled = $true
$TaskDefinition.Settings.AllowDemandStart = $true
$triggers = $TaskDefinition.Triggers
#http://msdn.microsoft.com/en-us/library/windows/desktop/aa383915(v=vs.85).aspx
$trigger = $triggers.Create(8)
Получение информации и запуск заданий планировщика из PowerShell
Вы можете вывести список всех активных заданий планировщика в Windows с помощью команды:
Get-ScheduledTask -TaskPath | ? state -ne Disabled
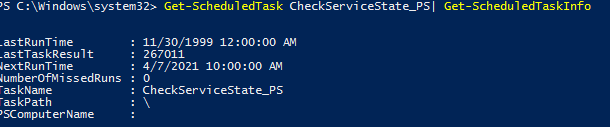
Чтобы получить информацию о конкретном задании:
Get-ScheduledTask CheckServiceState_PS| Get-ScheduledTaskInfo
Вы можете отключить это задание:
Get-ScheduledTask CheckServiceState_PS | Disable-ScheduledTask
Чтобы включить задание:
Get-ScheduledTask CheckServiceState_PS | Enable-ScheduledTask
Чтобы запустить задание немедленно (не дожидаясь расписания), выполните:

Чтобы полностью удалить задание из Task Scheduler:
Unregister-ScheduledTask -TaskName CheckServiceState_PS
Если нужно изменить имя пользователя, из-под которого запускается задание и, например, режим совместимости, используйте командлет Set-ScheduledTask:
$task_user = New-ScheduledTaskPrincipal -UserId ‘winitpro\kbuldogov’ -RunLevel Highest
$task_settings = New-ScheduledTaskSettingsSet -Compatibility ‘Win7’
Set-ScheduledTask -TaskName CheckServiceState_PS -Principal $task_user -Settings $task_settings

Экспорт и импорт заданий планировщика в XML файл
С помощью PowerShell можно экспортировать любое задания планировщика в текстовый XML файл для распространения на другие компьютеры. Вы можете экспортировать задание из графического интерфейса Task Scheduler или из консоли PowerShell.
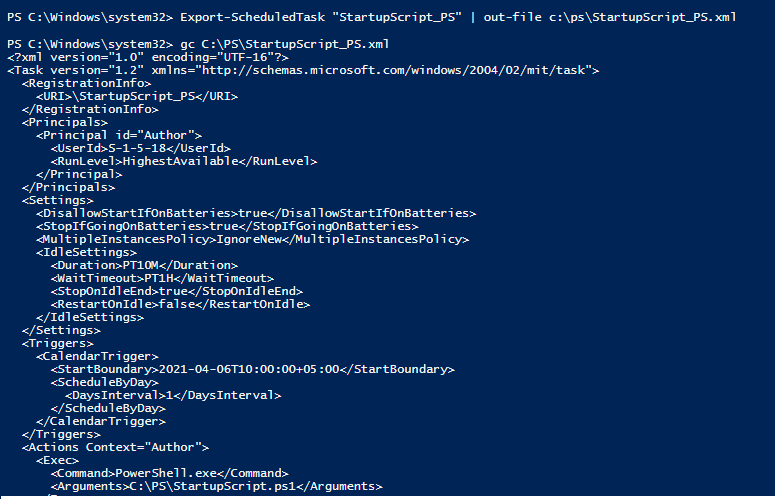
Следующая команда экспортирует задание StartupScript_PS в файл StartupScript_PS.xml:
Export-ScheduledTask «StartupScript_PS» | out-file c:\temp\StartupScript_PS.xml
schtasks /query /tn «NewPsTask» /xml >> «c:\ps\NewPsTask.xml»
После того, как настройки задания планировщика экспортированы в XML файл, его можно импортировать на любой другой компьютер с помощи графической консоли, SchTasks.exe или PowerShell.
Воспользуйте командлетом PowerShell Register-ScheduledTask чтобы параметры задания из файла и зарегистрировать его:
Register-ScheduledTask -Xml (Get-Content “\\Server1\public\NewPsTask.xml” | out-string) -TaskName «NewPsTask»
schtasks /create /tn «NewPsTask» /xml «\\Server1\public\NewPsTask.xml » /ru corp\aaivanov /rp Pa$$w0rd
schtasks /Run /TN «NewPsTask»
Обратите внимание, что в этом примере указаны данные учетной записи, из-под которой будет запускаться задание. Если имя и пароль учетной записи не указаны, то т.к. они не хранятся в задании, они будут запрошены при импорте.
Creating a Scheduled Task in Windows 10
If you frequently use certain programs in Microsoft Windows 10 and get tired of opening them after a shutdown or a reboot, you can create scheduled task that runs at boot up.
Option 1 – From GUI
- Using the “Windows Key“ + “R” to open run and type “taskschd.msc“. This will open Task Scheduler.
- Under the actions panel, you can choose to create a back task or create a task. Click “Create Task“.
- The “Create Task” screen will appear. Select the “General” tab
- In the “Name” field, give the task a name. Example: “Outlook Task“.
- In the “Description” field, here you can describe what the task is for and what it will do.
- The last section is the “Security options“, here you can set who can run this task and if the task has admin right.
- Select the “Triggers” tab.
- Select “New…“.
- The “New Trigger” window will appear, here you have the option to set when the task will start.
- Select when you would like the task to start in the “Begin the task” drop-down menu.
- Modify the “Settings” area as desired.
- In the “Advanced settings” field you can choose to delay task, repeat task, stop task, activate and expire.
- “Enabled” is checked by default.
- Select “OK“.
- Select the “Actions” tab, then select “New“.
- The “New Action” window will open.
- In the “Action” drop down, “Start a program” is set by default. Change it if desired.
- Select “Browse…” next to the “Program/script” field
- Browse to the program you are wanting to schedule a task for.
- Select “OK“.
- Go to the “Conditions” tab.
- You can change these if you’d like, but I recommend leaving these settings default.
- Select the “Settings” tab. You can change these if you’d like, but I recommend leaving these alone.
- Select “OK“.
You have successfully setup a scheduled task!
Option 2 – From Command Line
You can add scheduled tasks from the command line if you want to include it in a script using the “schtasks” command along with parameters to tell it when to schedule the task.
For example, if I wanted to run “notepad.exe” every Wednesday at 1:00pm, I could use the following command:
schtasks /create /tn OpenNotepad /tr notepad.exe /sc weekly /d wed /st 13:00:00
SCHTASKS /Create [/S system [/U username [/P [password]]]] [/RU username [/RP password]] /SC schedule [/MO modifier] [/D day] [/M months] [/I idletime] /TN taskname /TR taskrun [/ST starttime] [/RI interval] [ [/K] [/XML xmlfile] [/V1]] [/SD startdate] [/ED enddate] [/IT | /NP] [/Z] [/F] [/HRESULT] [/?]
Parameter List:
- /S system Specifies the remote system to connect to. If omitted the system parameter defaults to the local system.
- /U username Specifies the user context under which SchTasks.exe should execute.
- /P [password] Specifies the password for the given user context. Prompts for input if omitted.
- /RU username Specifies the “run as” user account (user context) under which the task runs. For the system account, valid values are “”, “NT AUTHORITY\SYSTEM” or “SYSTEM”. For v2 tasks, “NT AUTHORITY\LOCALSERVICE” and “NT AUTHORITY\NETWORKSERVICE” are also available as well as the well known SIDs for all three.
- /RP [password] Specifies the password for the “run as” user. To prompt for the password, the value must be either “*” or none. This password is ignored for the system account. Must be combined with either /RU or /XML switch.
- /SC schedule Specifies the schedule frequency. Valid schedule types: MINUTE, HOURLY, DAILY, WEEKLY, MONTHLY, ONCE, ONSTART, ONLOGON, ONIDLE, ONEVENT.
- /MO modifier Refines the schedule type to allow finer control over schedule recurrence. Valid values are listed in the “Modifiers” section below.
- /D days Specifies the day of the week to run the task. Valid values: MON, TUE, WED, THU, FRI, SAT, SUN and for MONTHLY schedules 1 – 31 (days of the month). Wildcard “*” specifies all days.
- /M months Specifies month(s) of the year. Defaults to the first day of the month. Valid values: JAN, FEB, MAR, APR, MAY, JUN, JUL, AUG, SEP, OCT, NOV, DEC. Wildcard “*” specifies all months.
- /I idletime Specifies the amount of idle time to wait before running a scheduled ONIDLE task. Valid range: 1 – 999 minutes.
- /TN taskname Specifies the string in the form of path\name which uniquely identifies this scheduled task.
- /TR taskrun Specifies the path and file name of the program to be run at the scheduled time.
Example: C:\windows\system32\calc.exe - /ST starttime Specifies the start time to run the task. The time format is HH:mm (24 hour time) for example, 14:30 for 2:30 PM. Defaults to current time if /ST is not specified. This option is required with /SC ONCE.
- /RI interval Specifies the repetition interval in minutes. This is not applicable for schedule types: MINUTE, HOURLY, ONSTART, ONLOGON, ONIDLE, ONEVENT. Valid range: 1 – 599940 minutes.If either /ET or /DU is specified, then it defaults to 10 minutes.
- /ET endtime Specifies the end time to run the task. The time format is HH:mm (24 hour time) for example, 14:50 for 2:50 PM. This is not applicable for schedule types: ONSTART, ONLOGON, ONIDLE, ONEVENT.
- /DU duration Specifies the duration to run the task. The time format is HH:mm. This is not applicable with /ET and for schedule types: ONSTART, ONLOGON, ONIDLE, ONEVENT. For /V1 tasks, if /RI is specified, duration defaults to 1 hour.
- /K Terminates the task at the endtime or duration time. This is not applicable for schedule types: ONSTART,
ONLOGON, ONIDLE, ONEVENT. Either /ET or /DU must be specified. - /SD startdate Specifies the first date on which the task runs. The format is mm/dd/yyyy. Defaults to the current
date. This is not applicable for schedule types: ONCE, ONSTART, ONLOGON, ONIDLE, ONEVENT. - /ED enddate Specifies the last date when the task should run. The format is mm/dd/yyyy. This is not applicable for schedule types: ONCE, ONSTART, ONLOGON, ONIDLE, ONEVENT.
- /EC ChannelName Specifies the event channel for OnEvent triggers.
- /IT Enables the task to run interactively only if the /RU user is currently logged on at the time the job runs.
This task runs only if the user is logged in. - /NP No password is stored. The task runs non-interactively as the given user. Only local resources are available.
- /Z Marks the task for deletion after its final run.
- /XML xmlfile Creates a task from the task XML specified in a file. Can be combined with /RU and /RP switches, or with /RP alone, when task XML already contains the principal.
- /V1 Creates a task visible to pre-Vista platforms. Not compatible with /XML.
- /F Forcefully creates the task and suppresses warnings if the specified task already exists.
- /RL level Sets the Run Level for the job. Valid values are LIMITED and HIGHEST. The default is LIMITED.
- /DELAY delaytime Specifies the wait time to delay the running of the task after the trigger is fired. The time format is mmmm:ss. This option is only valid for schedule types ONSTART, ONLOGON, ONEVENT.
- /HRESULT For better diagnosability, the process exit code will be in the HRESULT format.
- /? Displays this help message.
Modifiers: Valid values for the /MO switch per schedule type:
MINUTE: 1 – 1439 minutes.
HOURLY: 1 – 23 hours.
DAILY: 1 – 365 days.
WEEKLY: weeks 1 – 52.
ONCE: No modifiers.
ONSTART: No modifiers.
ONLOGON: No modifiers.
ONIDLE: No modifiers.
MONTHLY: 1 – 12, or
FIRST, SECOND, THIRD, FOURTH, LAST, LASTDAY.
You Might Also Like
Filed Under: Windows Tagged With: Windows 10


