- Can’t change Screen Resolution in Windows 10
- Cannot change Screen Resolution in Windows 10
- My screen resolution in Windows 10 won’t fit my monitor properly.
- Replies (19)
- How to change your screen resolution in Windows 10
- How to change screen resolution in Windows 10: The short route
- How to change screen resolution in Windows 10: The long route
- How to change screen resolution in Windows 10 for multiple displays
- How to change refresh rates in Windows 10
- How to create a custom resolution (Nvidia)
Can’t change Screen Resolution in Windows 10
Many a time, mostly after an Update to Windows or installation of a new graphics card, you may not be able to adjust the Screen Resolution on your PC running on Windows 10. Sometimes you would not be able to find an option to change the screen resolution because the drop-down freezes, or it always reverts to the old resolution. Even worse, the monitor doesn’t display the native resolution. In this post, I am talking about how to fix the problem, if you can’t change the screen resolution in Windows 10.
Just before you start, let’s try some basic tips. Open Settings where you get to change the screen resolution. Go to Settings > System > Display. You should see a dropbox under the label Resolution. See if you can change it to a resolution which either you want to is better than this. Sometimes, because of some issue, the display drivers automatically change the screen resolution. If this doesn’t solve your problem, let’s try other methods.
Cannot change Screen Resolution in Windows 10
The primary reason for this issue is driver misconfiguration. Sometimes Drivers aren’t compatible, and they choose a lower resolution to stay safe. So let’s first update the Graphics driver or maybe rollback to the previous version.
Note: Try this fix if only your apps are blurry.
1] Update or Roll Back Graphics Driver:
- Open Device Manager ( WIN + X + M)
- Expand Display Adapters, and select the GPU listed there.
- Note down the OEM, and Model no, and download the latest driver from their website.
- Run the driver program which you just downloaded, and install it.
- If it’s an INF file or some other format, you can right-click on the CPU, and update the driver.
- It will ask you to locate the INF file, and then install it.
In case your driver is already updated to the latest version, you can try rolling back to the old driver. It is only possible if you have a backup for your driver before the update or you can find one on the OEM website.
2] Turn on GPU Scaling
If you own an AMD graphics card or NVIDIA, you may want to check GPU scaling option. It allows scaling the image, so it fits the screen both vertically and horizontally, i.e., no black borders.
AMD:
- Open your AMD Radeon settings
- Click on ‘Display’
- Find GPU Scaling there and enable it
NVIDIA:
Open NVIDIA Control Panel. Here you have two options:
a) Change Resolution or Create New Resolution: Here you can create a custom resolution for your display, but keep the refresh rate same.
You can test before finalizing. This is useful when you know a particular resolution was there, but the monitor resolution not listed now.
b) Adjust Desktop Size: You can choose between Full Screen, Aspect Ratio, or no scaling. Scaling can be on GPU level or just monitor. Here is a bit of warning though. While it might not show any visible signs during regular work including video playback, you might see noticeable lag when playing a video game.
If your problem is only limited to a particular app, you may want to give it access to GPU. Go to Settings > System > Display > Graphics Settings.
These are the only possible solutions we have noticed when Windows 10 won’t let you change the resolution of your display. Sometimes, the resolution is stuck at a lower resolution, and there is no way to fix it. If these don’t solve the problem for you, I would suggest one last thing before reinstalling Windows. Create a new account, and see if it works for you. Sometimes, accounts get corrupted, and profiles cant be fixed.
Let us know if any of these tips helped you.
Date: July 12, 2018 Tags: Screen Resolution
My screen resolution in Windows 10 won’t fit my monitor properly.
Replies (19)
* Please try a lower page number.
* Please enter only numbers.
* Please try a lower page number.
* Please enter only numbers.
![]()
Thank you for your interest in Windows 10.
I suggest you to try to install all the pending Windows Updates if any are available.
If you are unable to do this in Normal mode, I suggest you to boot the computer in safe mode and then try to update the chipset and display drivers. In Safe Mode computer starts with minimal set of drivers and files.
Refer the article to boot to Safe Mode:
Hope this information is helpful. Please do let us know if you need further assistance, we’ll be glad to assist you.
6 people found this reply helpful
Was this reply helpful?
Sorry this didn’t help.
Great! Thanks for your feedback.
How satisfied are you with this reply?
Thanks for your feedback, it helps us improve the site.
How satisfied are you with this reply?
Thanks for your feedback.
I found a way to fix this if your computer has the AMD Catalyst Control Center.
1. Open the Device Manager (right click on Start-Icon in left corner)
2. Then click Display Adapters and click your display card.
3. Click on «Search for a driver on the computer» (second entry)
4. Click «Select driver from list»
5. Pick the newest one you have
6. Restart your computer and it should work. mine did
Here is the link to where I found the help though how I state it may be simpler and more concise.
It is NavyLCDR’s Post. the second from the bottom if it doesn’t bring you there automatically.
When the AMD Catalyst Control Center works go under My Digital Flat Panels and from there to Scaling Options. scale it as needed
Hopefully this helps!
24 people found this reply helpful
Was this reply helpful?
Sorry this didn’t help.
Great! Thanks for your feedback.
How satisfied are you with this reply?
Thanks for your feedback, it helps us improve the site.
How satisfied are you with this reply?
Thanks for your feedback.
I was having a similar problem when I looked up this page.
I fixed it after trying the AMD catalyst i opened up my Intel HD graphics control center.
it has a scaling option at the bottom of the Display settings that allows you to manually scale your screen into picture.
1. To open, right click in screen and open Graphic Properties.
2. Wait for the loading screen
3. click on the Display icon with the TV
4. Using the bars to the Right of and under the small picture of the boy, scale slowly until happy
Hope this helped anyone else struggling.
144 people found this reply helpful
Was this reply helpful?
Sorry this didn’t help.
Great! Thanks for your feedback.
How satisfied are you with this reply?
Thanks for your feedback, it helps us improve the site.
How satisfied are you with this reply?
Thanks for your feedback.
The method using the AMD Catalyst Control Center worked for me. A 5% under scan setting worked best.
Thank you for pointing me in this direction. I was almost ready to undo the Windows 10 upgrade.
7 people found this reply helpful
Was this reply helpful?
Sorry this didn’t help.
Great! Thanks for your feedback.
How satisfied are you with this reply?
Thanks for your feedback, it helps us improve the site.
How satisfied are you with this reply?
Thanks for your feedback.
31 people found this reply helpful
Was this reply helpful?
Sorry this didn’t help.
Great! Thanks for your feedback.
How satisfied are you with this reply?
Thanks for your feedback, it helps us improve the site.
How satisfied are you with this reply?
Thanks for your feedback.
32 people found this reply helpful
Was this reply helpful?
Sorry this didn’t help.
Great! Thanks for your feedback.
How satisfied are you with this reply?
Thanks for your feedback, it helps us improve the site.
How satisfied are you with this reply?
Thanks for your feedback.
The MS basic display driver is only a placeholder and doesn’t offer much screen resolution , sleep or hibernate. Almost any modern display hardware or PC will have a newer driver that either comes in shortly via Windows Update or needs to be imported from the PC or Adapter’s Support Downloads webpage.
More here compiled for the very best install of all which is always a Clean Install Windows 10.
Over 100,000 helped in forums for 11 years. I don’t quit for those who are polite and cooperative.
Windows MVP 2010-21
2 people found this reply helpful
Was this reply helpful?
Sorry this didn’t help.
Great! Thanks for your feedback.
How satisfied are you with this reply?
Thanks for your feedback, it helps us improve the site.
How satisfied are you with this reply?
Thanks for your feedback.
I found a way to fix this if your computer has the AMD Catalyst Control Center.
1. Open the Device Manager (right click on Start-Icon in left corner)
2. Then click Display Adapters and click your display card.
3. Click on «Search for a driver on the computer» (second entry)
4. Click «Select driver from list»
5. Pick the newest one you have
6. Restart your computer and it should work. mine did
Here is the link to where I found the help though how I state it may be simpler and more concise.
It is NavyLCDR’s Post. the second from the bottom if it doesn’t bring you there automatically.
When the AMD Catalyst Control Center works go under My Digital Flat Panels and from there to Scaling Options. scale it as needed
Hopefully this helps!
The most recent UPDATE from Windows 10 on my computer took place on 11/23/17. When I looked at the driver described in these notes I noted that «a new driver» had been installed on my computer dated 11/23/17 (the day of the Windows 10 update) (when I looked as instructed). I clicked «update». Then Windows 10 said I was using the most recent driver. So I simply selected «Return to previous driver» and PRESTO my screen filled completely and everything looked fine. The Windows 10 update screwed up my computer and the new driver was a disaster. I hope whoever is working on Windows updates learns about how bad this «new driver» was. I’ll bet this same thing took place on thousands of other computer monitors.
8 people found this reply helpful
Was this reply helpful?
Sorry this didn’t help.
Great! Thanks for your feedback.
How satisfied are you with this reply?
Thanks for your feedback, it helps us improve the site.
How satisfied are you with this reply?
Thanks for your feedback.
Yes, we have been swamped with cases from people who had their displays messed up by recent Updates. Your suggestion to roll back the driver is a known fix, as well as updating the driver. from the PC or Display adapter’s Support Downloads webpage.
Besides choosing Roll Back on Display device Driver tab in Device Manager, if that doesn’t work or is greyed out you can also choose Update driver, then Browse PC, then Let Me Pick to have a list of all previously installed drivers to try them, working backwards.
Over 100,000 helped in forums for 11 years. I don’t quit for those who are polite and cooperative.
Windows MVP 2010-21
1 person found this reply helpful
Was this reply helpful?
Sorry this didn’t help.
Great! Thanks for your feedback.
How satisfied are you with this reply?
Thanks for your feedback, it helps us improve the site.
How satisfied are you with this reply?
Thanks for your feedback.
Just to add to my prior comments. My screen looked great for several years, and when I updated to Windows 10 some years ago it still looked great. Then suddenly after the most recent Windows 10 automatic update the computer footprint was not filling the entire screen — with an even border on all sides with nothing and spatial distortion on what was seen. I didn’t touch anything. Tried rebooting. Nada. Then I looked up this issue and saw the above method of «updating». But my problem was Windows had screwed it up by updating. So I first tried to «Update» the driver and got the message that I was using the latest driver. THEN I figured out the automatic Windows update must have screwed me up, so I clicked on «Revert to prior driver».
Presto — back to normal. I hope this helps anyone else with the same problem. Mike
8 people found this reply helpful
Was this reply helpful?
Sorry this didn’t help.
Great! Thanks for your feedback.
How satisfied are you with this reply?
Thanks for your feedback, it helps us improve the site.
How to change your screen resolution in Windows 10
You finally swapped out that crusty old monitor for a flat, widescreen display with a higher resolution. You fire up Windows 10 and everything on the new screen is big and ugly. That’s likely because your PC is still set at the lower resolution used by your previous display. In this article we’ll show you how to change your screen resolution in Windows 10.
Our guide covers setups with one or more displays. It also shows you how to pick specific resolutions with specific refresh rates and create a custom resolution on Nvidia-based systems. This guide is based on Windows 10 version 1809 (October 2018 Update).
How to change screen resolution in Windows 10: The short route
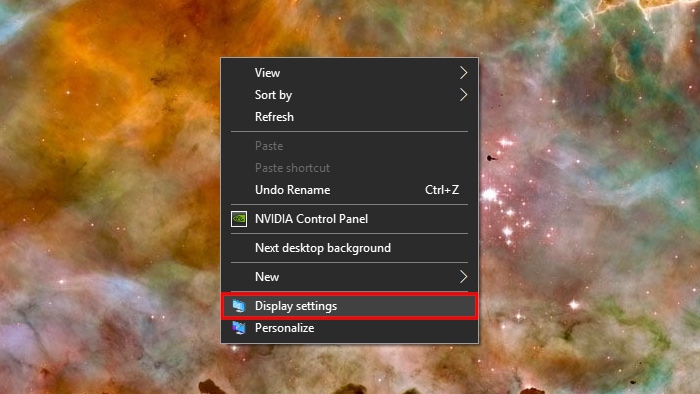
1. Right-click on your desktop.
2. Select Display settings on the menu.

3. Scroll down to Resolution.
4. Select the resolution you want in the expanded menu.

5. Select Keep changes if the resolution works as expected or Revert if the setting causes issues.
If the new resolution distorts the screen to the point where you can’t make any changes, Windows 10 will automatically revert to your original resolution after 15 seconds.
For the best experience, choose the resolution listed as Recommended.
How to change screen resolution in Windows 10: The long route

1. Click the Start button and select the “gear” icon on the Start Menu. This opens the Settings app.

2. Select System.
3. The Display category opens by default. Scroll down to Resolution.
4. Select the resolution you want in the expanded menu.
5. Select Keep changes if the resolution works as expected or Revert if the setting causes issues.
If the new resolution distorts the screen to the point where you can’t make any changes, Windows 10 will automatically revert to your original resolution after 15 seconds.
For the best experience, choose the resolution listed as Recommended.
How to change screen resolution in Windows 10 for multiple displays

If you have two or more displays, you can change their individual resolutions.
1. Take the Short or Long Route listed above to access the Windows 10 Settings app Display section.
2. As shown above, you should see two or more rectangles with numbers. In our example, we have two monitors connected to a laptop. The “1” represents the primary laptop display. If you’re simply duplicating the Windows 10 desktop to external monitors, the resolution you set on Display 1 will be the same across all connected displays if they support that resolution.
If your desktop is in Extended mode, perform the following:
1. Click the rectangle associated with the screen you want to modify.
2. Scroll down to Resolution and select the resolution you want in the expanded menu.
3. Select Keep changes if the resolution works as expected or Revert if the setting causes issues.
If the new resolution distorts the screen to the point where you can’t make any changes, Windows 10 will automatically revert to your original resolution after 15 seconds.
For the best experience, choose the resolution listed as Recommended.
How to change refresh rates in Windows 10
If you only want to change the resolution without dealing with refresh rates, then your journey ends here. This section deals with selecting a specific resolution and a specific refresh rate, like 1,920 x 1,080 at 75Hz. It’s a good place for gamers to experiment with resolutions and refresh rates to get the best experience from their connected display(s).

1. Right-click on the desktop and select Display settings or take the Settings > Display route through the Settings app.
2. Scroll all the way down to the Advanced display settings link.

3. Under Choose display, select the display you want to modify in the drop-down menu.
4. Click the Display adapter properties for Display # (whatever you chose in Step 3) link.
5. In the pop-up window, click the List All Modes button.
6. Select a resolution and refresh rate in a second pop-up window.
7. Click OK.
8. Click Apply.
9. The resolution will change. In another pop-up window, select Keep changes if the switch worked as expected, or click Revert if the switch didn’t work properly. Windows 10 will automatically revert to your original setting at 15 seconds if you can’t see anything on your screen.
How to create a custom resolution (Nvidia)
Display manufacturers program a list into their displays containing stable resolution and refresh rate combinations that work correctly on their product. Windows 10 uses this list to present your resolution options in the Settings app. But there’s a chance your display can “unofficially” go higher than Windows 10’s recommended setting.
For instance, your PC’s graphics card may support a 3,840 x 2,160 resolution at 120Hz, but Windows 10 has you capped at 2,560 x 1,440 at 60Hz. This limit is based on the display manufacturer’s “safe” list but doesn’t mean you can’t go higher with a little experimentation. The drawback to pushing a higher resolution and refresh rate combo is that you could damage the display, so experiment at your own risk.
As noted, this guide is based on PCs that include a discrete graphics chip provided by Nvidia (GeForce).
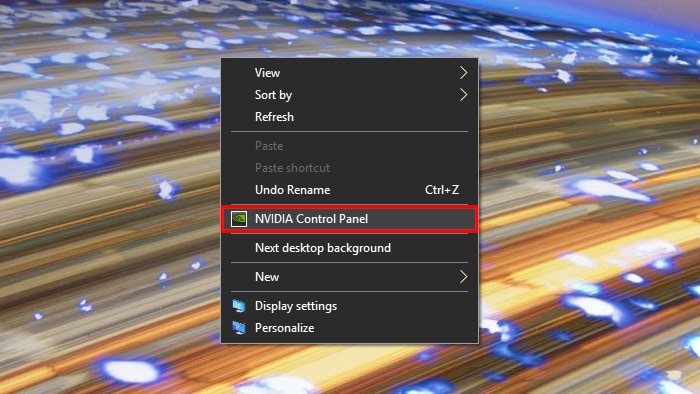
1. Right-click on the desktop and select the Nvidia Control Panel option on the resulting menu.

2. On the left menu in the Nvidia Control Panel, select Change resolution. Note that you can take this route versus using the instructions provided in the Short. Long, and Hardcore routes provided above.
3. Select the display you want to customize.
4. Click the Customize button.

5. In the pop-up window, check the Enable resolutions not exposed by the display option and then click OK .
6. If you still don’t see the resolution you want, click the Customize button again .
7. Click the Create Custom Resolution button.

8. In the next window you’ll see options to set the horizontal pixels, vertical lines, refresh rate, color depth, and more. Again, this customization tool isn’t meant for the Average Joe and could damage your display. Here are a few notes:
Horizontal pixels: The number of pixels in a single line from left to right. We list sample numbers in bold:
- 1920 x 1080 (Full HD or 1080p)
- 2560 x 1440 (Quad HD or 1440p)
- 3840 x 2160 (Ultra HD or 2160p)
Vertical lines: The number of vertical scan lines crammed into the screen from left to right. We list sample numbers in bold:
- 1920 x 1080 (Full HD or 1080p)
- 2560 x 1440 (Quad HD or 1440p)
- 3840 x 2160 (Ultra HD or 2160p)
Refresh rate: How many times the display renders an image each second. If you have a graphics card that outputs 60 frames per second, you want the display set at 60Hz.
Scan type Progressive: Renders the entire picture at once. This reduces flickering.
Scan type Interlaced: Half the image appears followed by the second half 1/60th of a second later. This causes noticeable flickering.
Timing: By default, this is set to Automatic. You shouldn’t need to change these settings if your display is connected via DisplayPort or HDMI. This section addresses DVI ports and analog CRT-based monitors.
9. Click the Test button to see if your custom resolution works. The screen(s) will go black for a moment.
With the right number combination, you should see a pop-up box revealing a successful test. If you want to keep the new resolution, click the Yes button. If not, click the No button. If the test distorts your screen to the point you can’t see anything, Windows 10 will revert to your original working resolution in 15 seconds.

10. You should now see the new resolution in the Customize window. You can edit this setting by clicking the marker icon next to its name, delete it by clicking the red “X,” or activate it by checking the box. Click OK to close the Customize window.

11. The custom resolution is now available through the Nvidia Control Panel and the Windows 10 Settings app. To set your display to the new resolution in the Nvidia Control Panel, click the setting and then the Apply button.
That concludes our guide on how to change your screen resolution in Windows 10. Here are a few more guides to help you navigate Windows 10:


