- Основы языка JScript — написание WSH скриптов
- Что такое Windows Script Host?
- Возможности Windows Script Host
- Примеры написания WSH скриптов
- Выводим сообщение на JScript
- Работа с Excel на JScript
- Работа с текстовым файлом и Excel на JScript
- Get started using Python on Windows for scripting and automation
- Set up your development environment
- Install Python
- Install Visual Studio Code
- Install the Microsoft Python extension
- Open the integrated PowerShell terminal in VS Code
- Install Git (optional)
- Example script to display the structure of your file system directory
- Example script to modify all files in a directory
Основы языка JScript — написание WSH скриптов
Сегодня поговорим об очень полезном компоненте операционной системы Windows — это Windows Script Host, если быть конкретней, то о языке Jscript, на котором можно писать эти самые WSH скрипты.
Начнем мы с небольшой теории, так как мы еще не затрагивали Windows Script Host.
Что такое Windows Script Host?
Windows Script Host – сервер выполнения сценариев (скриптов) на таких языках как VBScript и JScript. WSH разработан компанией Microsoft и он является компонентом операционной системы Windows начиная с Windows 98.
Первоначально для администрирования использовались только bat-файлы, но их возможности ограничены (хотя также очень полезны!), поэтому компания Microsoft предложила такой вариант WSH. Возможности WSH-скриптов уже гораздо больше, ведь данные скрипты уже создаются на полноценных языках, таких как VBScript и JScript.
Именно о JScript мы сегодня и поговорим.
Но о VBScript мы тоже скажем пару слов.
VBScript – это скриптовой язык программирования, созданный компанией Microsoft для разработки скриптов в операционной системе Windows. Другими словами, это один из языков, которые может интерпретировать Windows Script Host. И из названия ясно, что VBScript основан на языке Visual Basic, поэтому тем, кто знаком с Visual Basic будет просто писать WSH-скрипты на этом языке программирования.
JScript – скриптовой язык программирования, с помощью которого можно создавать (писать) скрипты, которые будут интерпретироваться компонентом Windows Script Host.
С первого взгляда JScript во многом похож на JavaScript (ECMAScript), это и естественно, так как синтаксис, некоторый объекты, методы, свойства аналогичны JavaScript. Но это все же не JavaScript, а именно JScript. JavaScript (ECMAScript) ориентирован на объекты браузера, а JScript уже на компоненты операционной системы Windows. Но как мы сказали, они похожи, поэтому те, кто владеют языком программирования JavaScript с легкостью перейдут на JScript.
Возможности Windows Script Host
А теперь давайте поговорим о том, зачем нам нужно писать эти самые WSH-скрипты, т.е. об их возможностях и преимуществах:
- Возможность взаимодействия с файловой системой (файлы, каталоги), системным реестром, ресурсами локальной сети;
- Взаимодействие с такими продуктами как Microsoft Word, Excel и другими программами. Т.е. например, мы можем создавать excel файлы или конвертировать другие форматы в excel файлы;
- Взаимодействие с ActiveX-технологиями, например: ActiveX Data Object (ADO) — доступ к базам данных разных форматов, Active Directory Service Interface (ADSI) — работа со службами каталогов Active Directory;
- Наличие полноценного языка программирования, с помощью которого можно реализовывать сложные алгоритмы, которые например нельзя реализовать с помощью bat файлов.
Скрипты на JScript имеют расширение .js такое же, как и на JavaScript за исключением того, что эти скрипты обрабатывает не браузер, а Windows Script Host.
На JScript возможно даже реализация графического интерфейса через объект браузера (internet explorer), согласитесь это уже полноценная программа.
Примеры написания WSH скриптов
Перейдем к практике, так как у нас сегодня статья по основам, мы рассмотрим простые примеры написание скриптов на JScript.
Примечание! Для того чтобы попробовать примеры ниже скопируйте код любого примера в текстовый файл и сохраните с расширением .js, например, test.js.
Выводим сообщение на JScript
В WSH имеется специальный объект, на основе которого мы уже можем в дальнейшем создавать другие объекты, настраивать взаимодействие с программами, файлами и другими компонентами операционной системы.
Этим объектом является WScript. Пример его использования на Jscript:
Тем самым мы создали объект, с помощью которого мы можем получить доступ к компонентам Windows.
Например, вывести сообщение:
Работа с Excel на JScript
Теперь давайте создадим другой объект, например, Excel файл:
Как Вы понимаете, мы имеем доступ ко всем свойствам в Excel, другими словами, мы можем изменить внешний вид, задать формат ячеек и многое другое. Для примера давайте поэкспериментируем с некоторыми свойствами:
Работа с текстовым файлом и Excel на JScript
Я думаю с Excel все понятно, теперь давайте прочитаем какие-нибудь данные из текстового файла и запишем их в нашу Excel таблицу, для закрепления наших знаний.
Для того чтобы настроить взаимодействие с файловой системой, необходимо создать объект FileSystemObject, который работает с файлами и каталогами. Вот пример небольшого скрипта, который считывает данные из текстового файла построчно и записывает их в Excel документ, причем мы все строки пронумеруем и зададим ширину столба для данных в Excel:
Пример текстового файла:
Как всегда весь код я прокомментировал, поэтому неясностей возникнуть не должно.
Я думаю для начала этого вполне достаточно, в дальнейшем мы будем разбирать задачи посложней, ведь при помощи Jscript в WSH можно очень много чего сделать, гораздо больше, чем с помощью простых bat файлов. До встречи!
Get started using Python on Windows for scripting and automation
The following is a step-by-step guide for setting up your developer environment and getting you started using Python for scripting and automating file system operations on Windows.
This article will cover setting up your environment to use some of the helpful libraries in Python that can automate tasks across platforms, like searching your file system, accessing the internet, parsing file types, etc., from a Windows-centered approach. For Windows-specific operations, check out ctypes, a C-compatible foreign function library for Python, winreg, functions exposing the Windows registry API to Python, and Python/WinRT, enabling access Windows Runtime APIs from Python.
Set up your development environment
When using Python to write scripts that perform file system operations, we recommend you install Python from the Microsoft Store. Installing via the Microsoft Store uses the basic Python3 interpreter, but handles set up of your PATH settings for the current user (avoiding the need for admin access), in addition to providing automatic updates.
If you are using Python for web development on Windows, we recommend a different setup using the Windows Subsystem for Linux. Find a walkthrough in our guide: Get started using Python for web development on Windows. If you’re brand new to Python, try our guide: Get started using Python on Windows for beginners. For some advanced scenarios (like needing to access/modify Python’s installed files, make copies of binaries, or use Python DLLs directly), you may want to consider downloading a specific Python release directly from python.org or consider installing an alternative, such as Anaconda, Jython, PyPy, WinPython, IronPython, etc. We only recommend this if you are a more advanced Python programmer with a specific reason for choosing an alternative implementation.
Install Python
To install Python using the Microsoft Store:
Go to your Start menu (lower left Windows icon), type «Microsoft Store», select the link to open the store.
Once the store is open, select Search from the upper-right menu and enter «Python». Open «Python 3.7» from the results under Apps. Select Get.
Once Python has completed the downloading and installation process, open Windows PowerShell using the Start menu (lower left Windows icon). Once PowerShell is open, enter Python —version to confirm that Python3 has been installed on your machine.
The Microsoft Store installation of Python includes pip, the standard package manager. Pip allows you to install and manage additional packages that are not part of the Python standard library. To confirm that you also have pip available to install and manage packages, enter pip —version .
Install Visual Studio Code
By using VS Code as your text editor / integrated development environment (IDE), you can take advantage of IntelliSense (a code completion aid), Linting (helps avoid making errors in your code), Debug support (helps you find errors in your code after you run it), Code snippets (templates for small reusable code blocks), and Unit testing (testing your code’s interface with different types of input).
Download VS Code for Windows and follow the installation instructions: https://code.visualstudio.com.
Install the Microsoft Python extension
You will need to install the Microsoft Python extension in order to take advantage of the VS Code support features. Learn more.
Open the VS Code Extensions window by entering Ctrl+Shift+X (or use the menu to navigate to View > Extensions).
In the top Search Extensions in Marketplace box, enter: Python.
Find the Python (ms-python.python) by Microsoft extension and select the green Install button.
Open the integrated PowerShell terminal in VS Code
VS Code contains a built-in terminal that enables you to open a Python command line with PowerShell, establishing a seamless workflow between your code editor and command line.
Open the terminal in VS Code, select View > Terminal, or alternatively use the shortcut Ctrl+` (using the backtick character).
The default terminal should be PowerShell, but if you need to change it, use Ctrl+Shift+P to enter the command pallette. Enter Terminal: Select Default Shell and a list of terminal options will display containing PowerShell, Command Prompt, WSL, etc. Select the one you’d like to use and enter Ctrl+Shift+` (using the backtick) to create a new terminal.
Inside your VS Code terminal, open Python by entering: python
Try the Python interpreter out by entering: print(«Hello World») . Python will return your statement «Hello World».
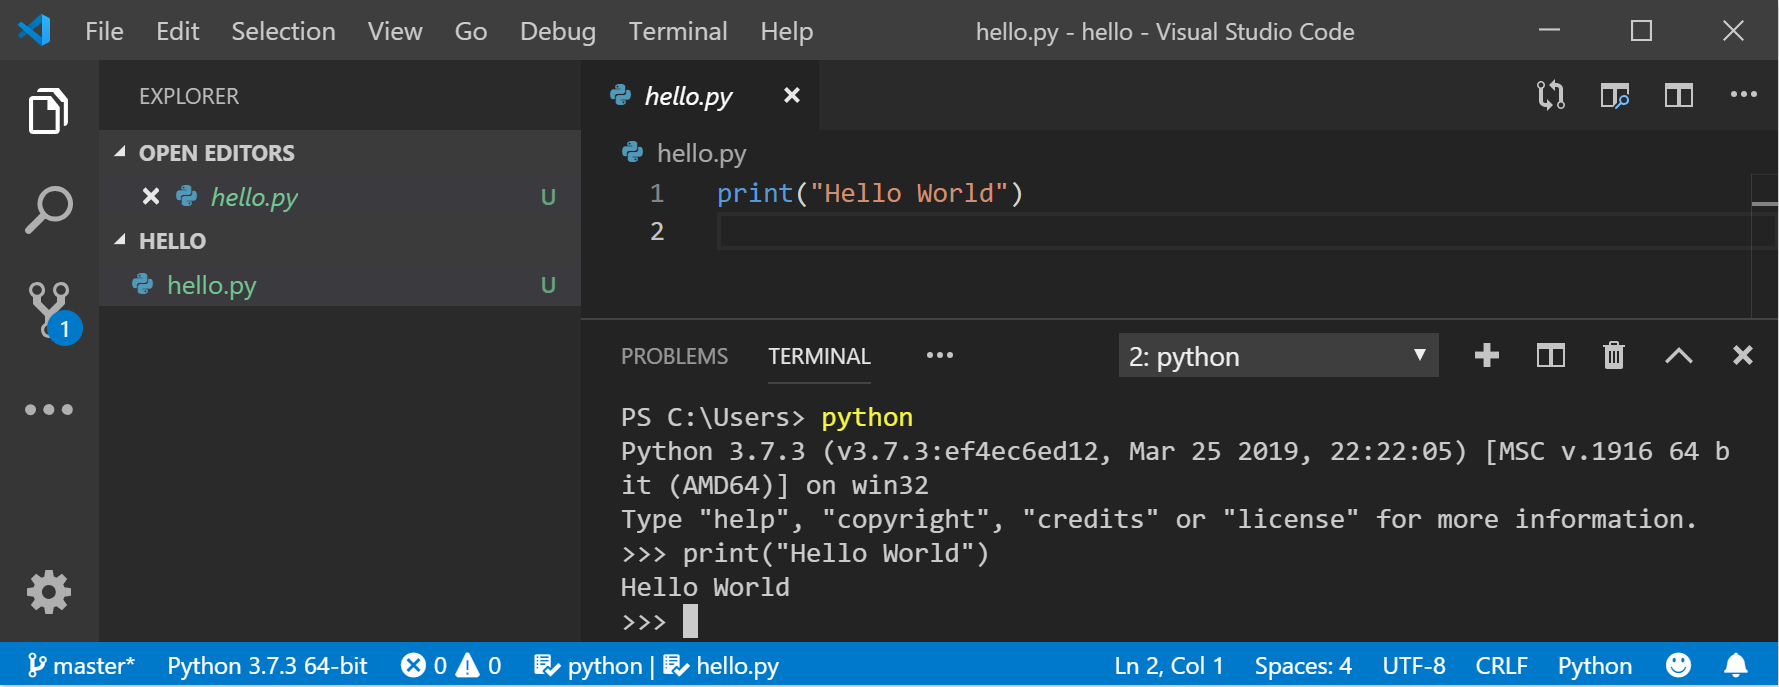
To exit Python, you can enter exit() , quit() , or select Ctrl-Z.
Install Git (optional)
If you plan to collaborate with others on your Python code, or host your project on an open-source site (like GitHub), VS Code supports version control with Git. The Source Control tab in VS Code tracks all of your changes and has common Git commands (add, commit, push, pull) built right into the UI. You first need to install Git to power the Source Control panel.
Download and install Git for Windows from the git-scm website.
An Install Wizard is included that will ask you a series of questions about settings for your Git installation. We recommend using all of the default settings, unless you have a specific reason for changing something.
If you’ve never worked with Git before, GitHub Guides can help you get started.
Example script to display the structure of your file system directory
Common system administration tasks can take a huge amount of time, but with a Python script, you can automate these tasks so that they take no time at all. For example, Python can read the contents of your computer’s file system and perform operations like printing an outline of your files and directories, moving folders from one directory to another, or renaming hundreds of files. Normally, tasks like these could take up a ton of time if you were to perform them manually. Use a Python script instead!
Let’s begin with a simple script that walks a directory tree and displays the directory structure.
Open PowerShell using the Start menu (lower left Windows icon).
Create a directory for your project: mkdir python-scripts , then open that directory: cd python-scripts .
Create a few directories to use with our example script:
Create a few files within those directories to use with our script:
Create a new python file in your python-scripts directory:
Open your project in VS Code by entering: code .
Open the VS Code File Explorer window by entering Ctrl+Shift+E (or use the menu to navigate to View > Explorer) and select the list-directory-contents.py file that you just created. The Microsoft Python extension will automatically load a Python interpreter. You can see which interpreter was loaded on the bottom of your VS Code window.
Python is an interpreted language, meaning that it acts as a virtual machine, emulating a physical computer. There are different types of Python interpreters that you can use: Python 2, Python 3, Anaconda, PyPy, etc. In order to run Python code and get Python IntelliSense, you must tell VS Code which interpreter to use. We recommend sticking with the interpreter that VS Code chooses by default (Python 3 in our case) unless you have a specific reason for choosing something different. To change the Python interpreter, select the interpreter currently displayed in blue bar on the bottom of your VS Code window or open the Command Palette (Ctrl+Shift+P) and enter the command Python: Select Interpreter. This will display a list of the Python interpreters that you currently have installed. Learn more about configuring Python environments.
Paste the following code into your list-directory-contents.py file and then select save:
Open the VS Code integrated terminal (Ctrl+`, using the backtick character) and enter the src directory where you just saved your Python script:
Run the script in PowerShell with:
You should see output that looks like this:
Use Python to print that file system directory output to it’s own text file by entering this command directly in your PowerShell terminal: python3 list-directory-contents.py > food-directory.txt
Congratulations! You’ve just written an automated systems administration script that reads the directory and files you created and uses Python to display, and then print, the directory structure to it’s own text file.
If you’re unable to install Python 3 from the Microsoft Store, see this issue for an example of how to handle the pathing for this sample script.
Example script to modify all files in a directory
This example uses the files and directories you just created, renaming each of the files by adding the file’s last modified date to the beginning of the filename.
Inside the src folder in your python-scripts directory, create a new Python file for your script:
Open the update-filenames.py file, paste the following code into the file, and save it:
os.getmtime returns a timestamp in ticks, which is not easily readable. It must be converted to a standard datetime string first.
Test your update-filenames.py script by running it: python3 update-filenames.py and then running your list-directory-contents.py script again: python3 list-directory-contents.py
You should see output that looks like this:
Use Python to print the new file system directory names with the last-modified timestamp prepended to it’s own text file by entering this command directly in your PowerShell terminal: python3 list-directory-contents.py > food-directory-last-modified.txt
Hope you learned a few fun things about using Python scripts for automating basic systems administration tasks. There is, of course, a ton more to know, but we hope this got you started on the right foot. We’ve shared a few additional resources to continue learning below.


