- Объединение разделов на SD-карте памяти (Windows)
- Работа с программой DiskPart
- [2021 New Fix] Use SD Card as Internal Storage in Windows 10 | See Full Guide
- How to Use SD Card as Internal Storage in Windows 10?
- Easiest Method — Use SD Card as Internal Storage in Windows 10 by Free Partition Manager Software
- 1. Format Your SD Card to NTFS
- 2. Create a Folder in Your C: Drive
- 3. Mount the SD Card in Windows 10
- Manual Method — Mount SD Card in Windows 10
- Step 1.В Format the SD Card to NTFS
- Step 2.В Create a Mount Point
- Step 3.В Mount the SD Card
- Step 4. Add SD Sard into the Libraries
- Conclusion
- Mount SD Card as Internal Storage Windows 10В FAQs
- How to Remove Partitions from SD Card on Windows and Mac
- Deleting partitions from an SD card is a common process people do to manage disk capacity. This page entails a complete guide on the easiest ways of deleting partition from the SD card.
- Part 1: About deleting SD card partition
- Remove Partitions vs. Format SD Card vs. Clear SD card.
- Learn Tips Before Deleting Partition
- Part 2: Methods of deleting Partition from SD card
- Method 1: Remove SD Card Partitions on Windows
- Method 2: Remove SD Card Partitions on Mac
- Method 1: Remove Partitions From SD Card on Linux
- Method 4: Get Tricks After Deleting a Partition on SD Card
- Conclusion
Объединение разделов на SD-карте памяти (Windows)
Настоящая инструкция посвящена восстановлению состояния карты памяти, а точнее созданию одного раздела вместо нескольких, созданных, например, способом, описанным в статье Создание/объединение разделов на SD-карте памяти средствами Android или Создание разделов на SD-карте памяти (Windows) или еще каким-нибудь другим способом.
ОС Windows уже содержит встроенный инструмент управления разделами на устройствах памяти – DiskPart, так что, к счастью, ничего доустанавливать не придётся. Программа не имеет графического интерфейса, все команды необходимо выполнять с командной строки с правами администратора.
Работа с программой DiskPart
В первую очередь подключите карту памяти к компьютеру через картридер. Если нужно, воспользуйтесь адаптером, поставляемым в комплекте с картой памяти.

Нажмите «Пуск» и найдите среди программ «Командная строка» нажмите правой клавишей и выберите опцию «Запустить от имени администратора».

В появившемся окне введите команду diskpart, в окне появится приглашение DISKPART> ввода команд консольной утилиты DiskPart.

Введите команду list disk и нажмите Enter, чтобы увидеть список всех накопителей (внутренних и внешних), подключенных к компьютеру.

Догадаться, где находится жесткий диск, а где карта памяти, можно, если посмотреть на размер памяти запоминающих устройств.
Как видно из примера, жесткий диск обозначен как «Диск 0», а карта памяти как «Диск 1».
Введите команду select disk X (где X – номер карты памяти в списке) и нажмите клавишу Enter, чтобы дать программе возможность дальше работать с картой памяти (у меня карта памяти обозначена как «Диск 1», поэтому я ввожу команду select disk 1).

Выполните команду clean, чтобы удалить все разделы на карте памяти. Внимание! Все данные будут удалены с карты памяти!

Для создания нового раздела выполните команду create partition primary. Данная команда создаст один раздел на всю карту памяти.

Выполните команду select partition 1 для выбора только что созданного раздела.

Выполните команду active для того, чтобы система пометила раздел как активный.

Выполните полное форматирование карты памяти с помощью команды format fs=FAT32 (или NTFS, для того чтобы получить возможность записывать файлы размером больше 4 Гб, но в таком случае SD-карта может не читаться другими устройствами). Операция может занять значительное время в зависимости от размера SD-карты. Если нет времени ждать, выполните команду с параметром QUICK (то есть format fs=FAT32 QUICK), чтобы выполнить быстрое форматирование.

Чтобы присвоить карте памяти букву, выполните команду assign. Сразу после выполнения этой команды появится окно автозапуска, как при подключении съемного устройства к компьютеру.

Завершите работу программы DiskPart выполнением команды exit.

Выполните команду exit снова, чтобы закрыть окно командной строки.
Как видно в программе MiniTool Partition Wizard, после выполнения вышеперечисленных операций карта памяти снова содержит только один раздел.
[2021 New Fix] Use SD Card as Internal Storage in Windows 10 | See Full Guide
How to Use SD Card as Internal Storage in Windows 10?
«Hi there, have you ever met this issue that a new SD card may not be able to work for saving data in Windows 10/8/7?В How can I mount the SD card to use it as a local drive or internal storage for saving files in Windows 10?«
Unmounted SD card, USB or other devices may not be able to work normally as a local storage device on PC or laptop. So how to quickly mount the SD card as permanent storage on Windows PC? Relax! Just follow the offered methods here to use SD card as internal storage in Windows 10 and make your SD card work for saving files now.
We highly recommend the first method, for it’s free in use and rich in features. The manual one is also good but requires more steps. Let’s drive to the full guide in the next part.
Easiest Method — Use SD Card as Internal Storage in Windows 10 by Free Partition Manager Software
A quick and automatic way to mount SD card to work as permanent storage or local drive in Windows PC is to apply professional partition manager software to securely format and mount SD card as internal storage.В
You can free download and install EaseUS free partition manager software and apply it to format your SD card to NTFS in Windows 10 with simple steps.В After this, you can create a folder in your C drive and mount the SD Card to the folder that you created in C: to use your SD card as permanent storage and save files on it as a local drive by then.В
Download this Free software:
1. Format Your SD Card to NTFS
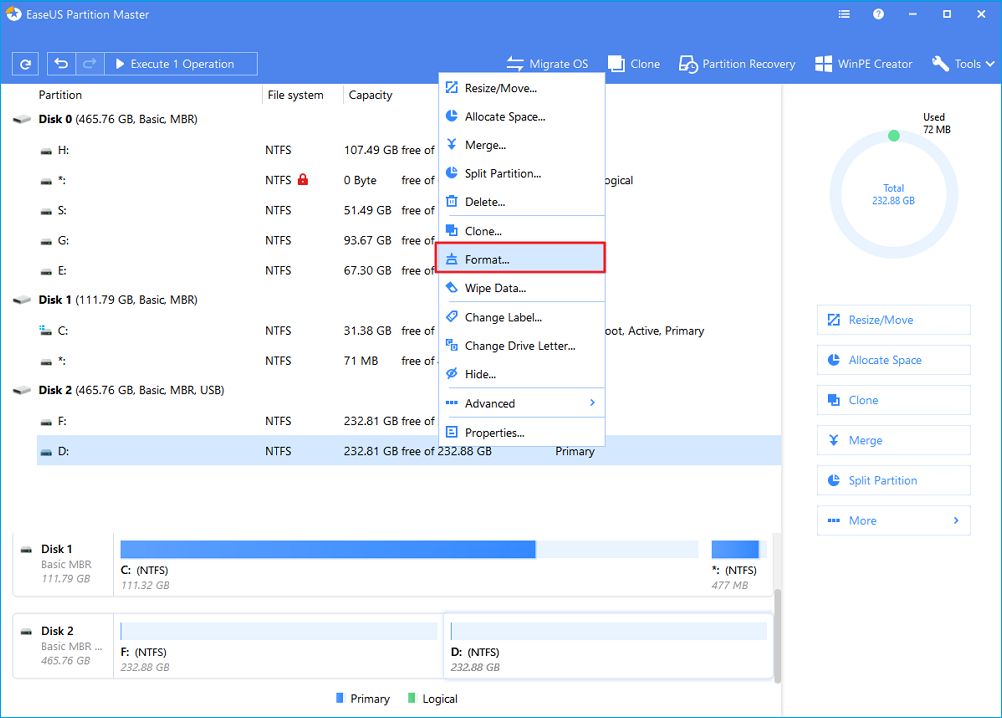
Step 1. Find your SD card and right-click the partition you want to format and choose «Format».
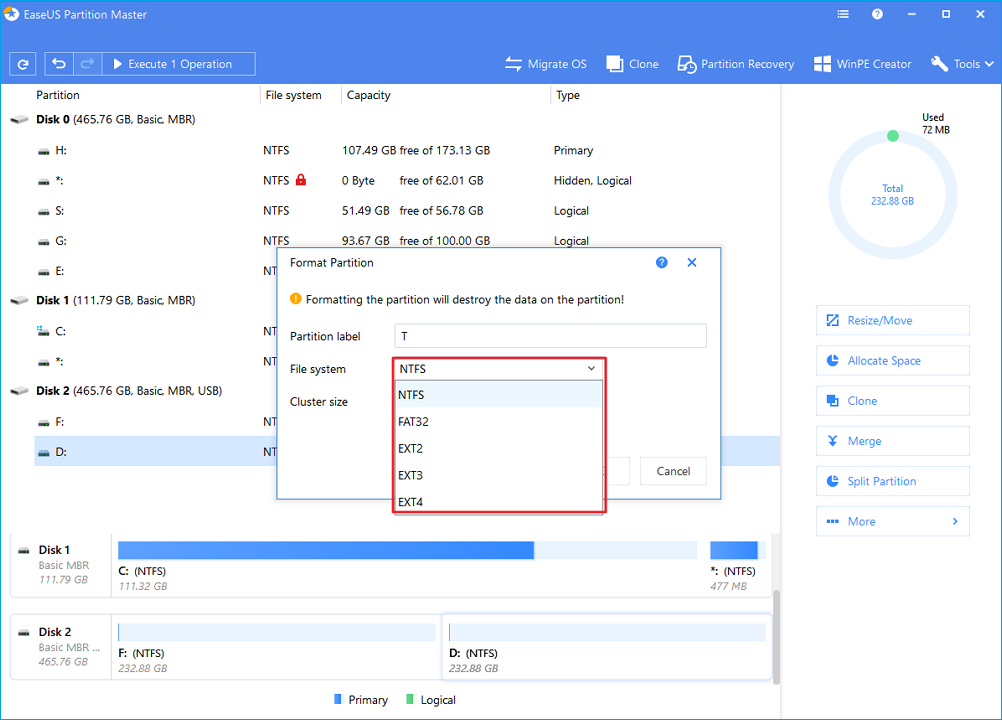
Step 2. Set a new partition label, file system (NTFS/FAT32/EXT2/EXT3), and cluster size to the selected partition, then click «OK».
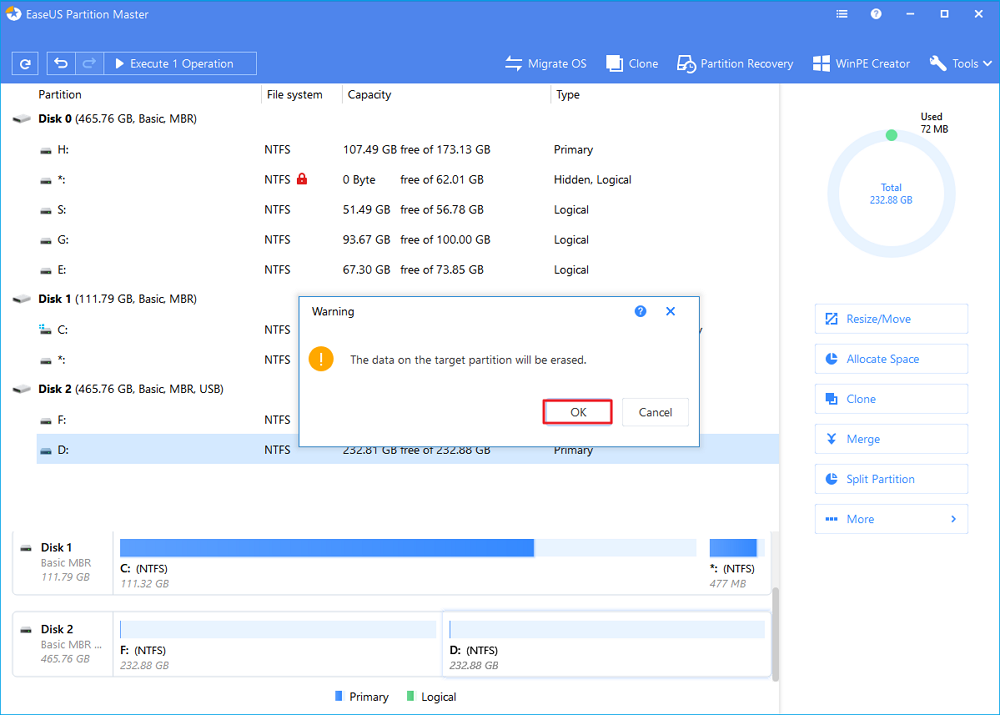
Step 3. Click «OK» on the pop-up window to continue.
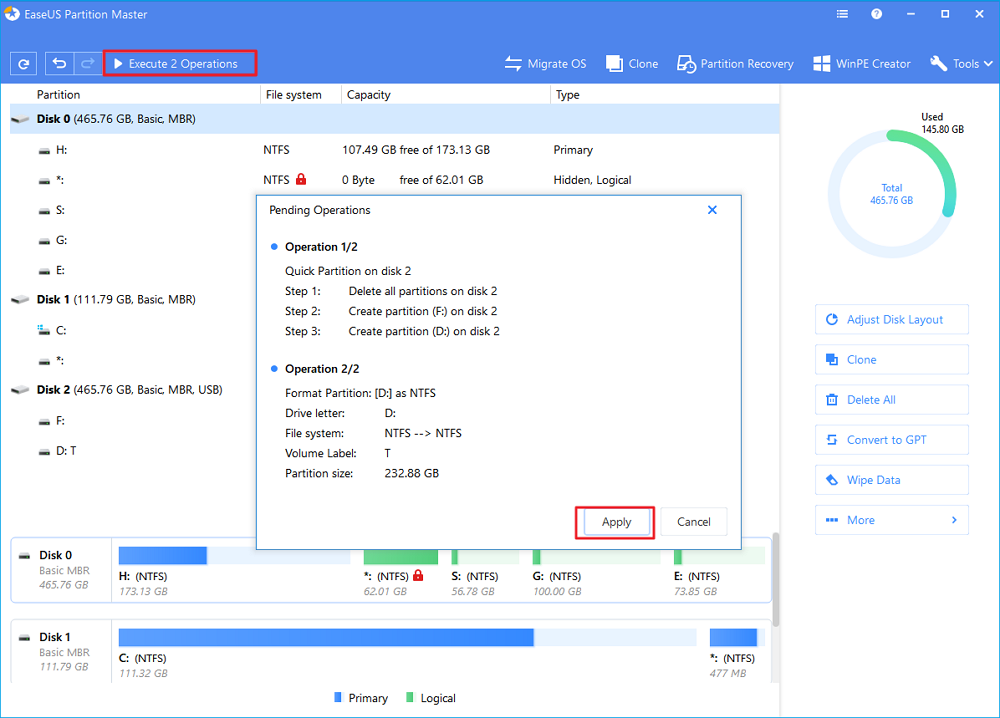
Step 4. Click the «Execute Operation» button on the toolbar, then click «Apply» to start formatting your SD card.
2. Create a Folder in Your C: Drive
Step 1. Launch File Explorer and choose C: drive.В
Step 2. Right-click the mouse and create a new folder. Name it as «SD card».

3. Mount the SD Card in Windows 10
Step 1. Press Windows + R and click disk management.
Step 2. Right-click the SD card and choose Change Drive Letter and Paths.
Step 3. Click Add >В Click Mount in the following empty NTFS folder and select BrowseВ > find SD card folder you created and click OK.
![]()
In addition to mounting SD or other USB cards, EaseUS Partition Master provides other one-stop partition and disk management solutions for your Windows computer, for instances:
- Resize/move partitions (the Pro version allows toВ move space from D drive to C drive), create, format, delete, and merge partitions
- Copy and clone an entire disk to another even the target partition is smaller than the source
- ConvertВ a logical partition to primary or primary partition to logical, FAT to NTFS partition, MBR disk to GPT, or GPT disk to MBR
- Completely wipe out all the data on the hard disk toВ prevent information from being leaked or recovered
Manual Method — Mount SD Card in Windows 10
The other way that you can try is to manually mount SD card in Windows 10 with the below steps.
Step 1.В Format the SD Card to NTFS
- Update and install the latest Windows drivers
- Connect unmounted SD card to Windows 10 PC with a card reader
- OpenВ «This PC»В > Right-click on SD card >В «Format»
- Format to NTFS and click OK to confirm
Step 2.В Create a Mount Point
- Open This PC and go to C: drive > Create a new folder and name it as SD card
Step 3.В Mount the SD Card
- Search diskmgmt in the Search bar and open «Disk Management»
- Right-click mounted SD card and selectВ «Change Drive Letters and Path. «
- ClickВ «Add», select «Mount in Following Empty NTFS» folder and click «Browse»
- Go to C:\SD card and click «OK»
Step 4. Add SD Sard into the Libraries
- Open «Libraries» > Click on «Documents»
- ClickВ «Manage»В on the top of the window > Click «Add»В when you see a window called «Documents Library Locations»
- Go to C:\SD card and click «Document» folder >В «Include folder»
- Set the SD card as the default location to save data by right-clicking on the folder you’ve added and selectВ «Set a default save location»
- Repeat the process for other libraries.
After this, you can use the mounted SD card as a permanent storage device in Windows 10 and save files on it now.
Conclusion
This page covers the two most common ways to help youВ mount SD card as internal storage in Windows 10. You can use these two approaches to out any removable storage devices on Windows PC or laptops.
As you see, EaseUS partition master free version enables you to mount SD card in Windows 10 with a few clicks without any effort or complicated operations. What’s more, it offers you a lot of free options on disk/partition management to resize, clone, convert, delete partitions, and organize hard drive to enhance system performance. If you are looking for a professional partition manager tool, don’t miss it,В
Mount SD Card as Internal Storage Windows 10В FAQs
If you also have the following questions related to using an SD card for PC storage, get help here.
1.В How do I use my micro SD card as internal storage Windows 10?
To use Micro SD card as internal storage in Windows 10, you need to first format the SD card to NTFS, create an SD card, then, mount the SD card in Disk Management
2. Can I use SD card as internal memory on laptop?
Yes, large Windows laptops provide a slot for a Micro SD card. You can insert the SD card into your laptop and leave it there all the time. Or you can take a specific way to use SD card as internal memory on laptop.
3. Should I use my SD card as portable storage or internal storage?
If you frequently change cards, choose portable storage, use SD cards to transfer content between devices, and don’t download many large applications. If your device storage space is always fullВ and you want to use SD card to extend the storage space of your PC or laptop, you canВ select internal storage.
4. How do I mount my SD card as a disk drive?В В
To mount SD card as internal storage on Windows 10, you have to methods to complete. One is to use EaseUS partition management software to easily mount SD card in Windows 10 with a few clicks, and the other is to manually format and mount SD card by Disk Management.В
How to Remove Partitions from SD Card on Windows and Mac
Deleting partitions from an SD card is a common process people do to manage disk capacity. This page entails a complete guide on the easiest ways of deleting partition from the SD card.

Eleanor Reed
Jan 04, 2021 • Filed to: SD Card Solutions • Proven solutions
People partition their SD card to help reduce the burden of internal storage on the device. But, it sometimes becomes necessary that you delete the Partition from the SD card to free up space for other programs or prepare the computer to broaden another partition.
In some cases, deleting partition from the SD card may result in data loss. The only means to resolve the issue is by employing a professional partition recovery software to enable you to recover your lost data conveniently, within a few minutes.
Part 1: About deleting SD card partition
You delete the Partition from the SD card to free up space for other programs or ready a computer to expand another partition.
Deleting the SD card partition involves merging the partition into the original drive to add space back to the drive, which was partitioned initially
By the way, to clear future confusion on the differences between deleting SD card partition, formatting SD card, and clearing SD card, read the brief explanation below.
Remove Partitions vs. Format SD Card vs. Clear SD card.
I feel the difference between these terms is clear, but some don’t seem to understand their meaning.
Partitioning an SD card involves the logical division of an SD card mass storage into distinct divisions. Thus, removing partition is the opposite of partitioning the SD card.
Nevertheless, Deleting partition from an SD card, in simple words, involves merging a partitioned SD card.
Having understood that partitioning an SD card combines a subdivided SD card back to a whole, the process of formatting an SD card pertains to flashing all data on the SD card, leaving it empty.
However, clearing the SD card data involves selecting or removing files that are identified as unnecessary by the card user.
Learn Tips Before Deleting Partition
Deleting partition from windows or Mac can be very tricky and may result in SD card data loss. Thus it’s essential you backup your relevant data before deleting the partition from the SD card.
For you to efficiently execute the SD card partition delete operation, I’ve outlined some helpful methods you can utilize to make sure nothing goes wrong during the delete process.
Part 2: Methods of deleting Partition from SD card
Generally speaking, there are two solutions to delete SD card partition using Windows, which is either by disk management or DISKPART. Thus, utilize the solutions below to remove partitions from your SD card on Windows.
Method 1: Remove SD Card Partitions on Windows
Solution 1: Remove Partitions by Disk Management
If you try to delete the partition from your SD card with Windows, using disk management is one way to do so. However, Windows disk management is a utility that allows users to access and manage all disk drive installed in the computer and the partition attributed to the drive. Use the steps outlined below to delete the partition from an SD card.
Step 1: Navigate to the left bottom of your PC screen, click the start menu, and launch the settings page.
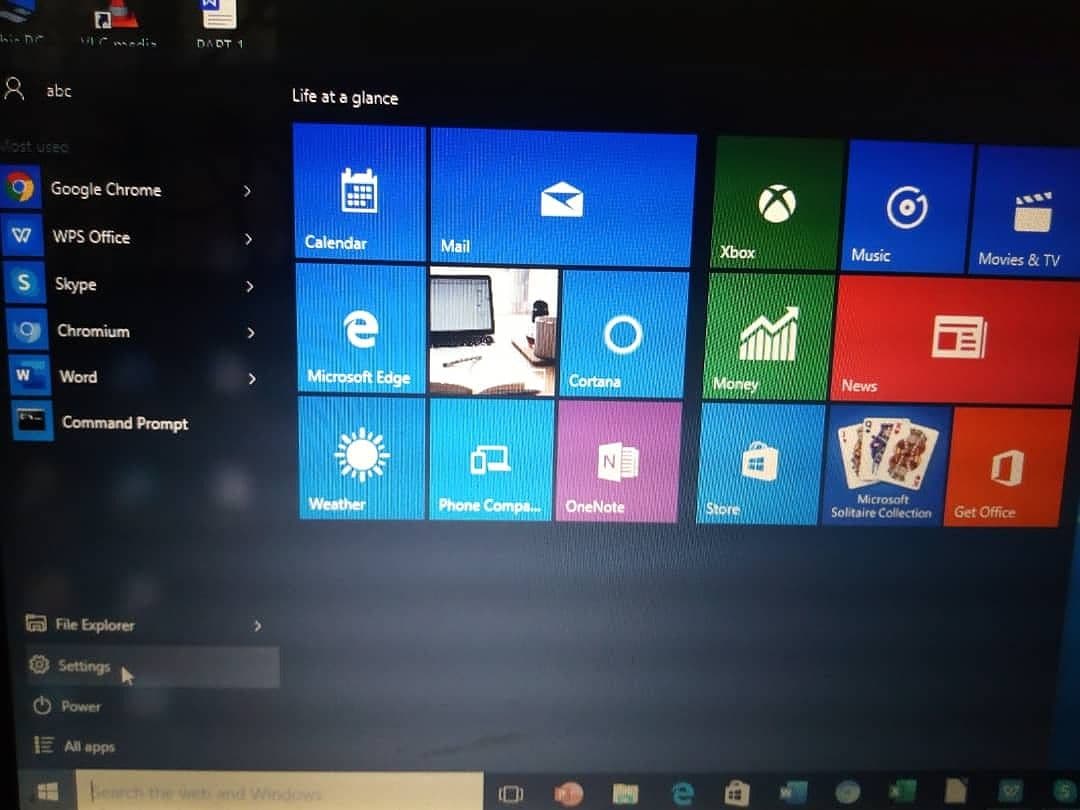
Step 2: At the top right-hand side of the setting page, type ‘Disk Management’ in the search box and click ‘create and format hard disk partitions.p
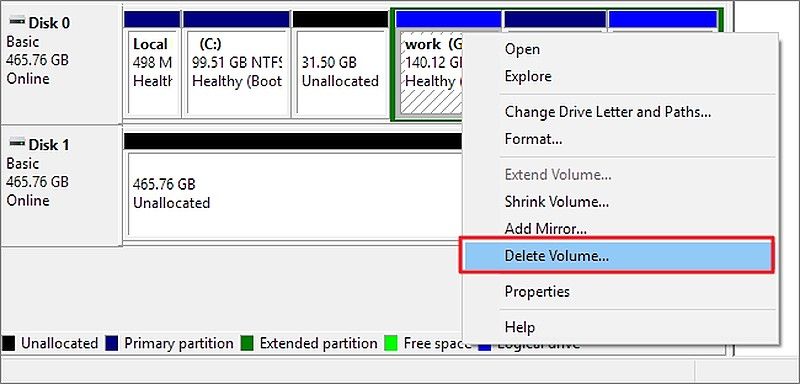
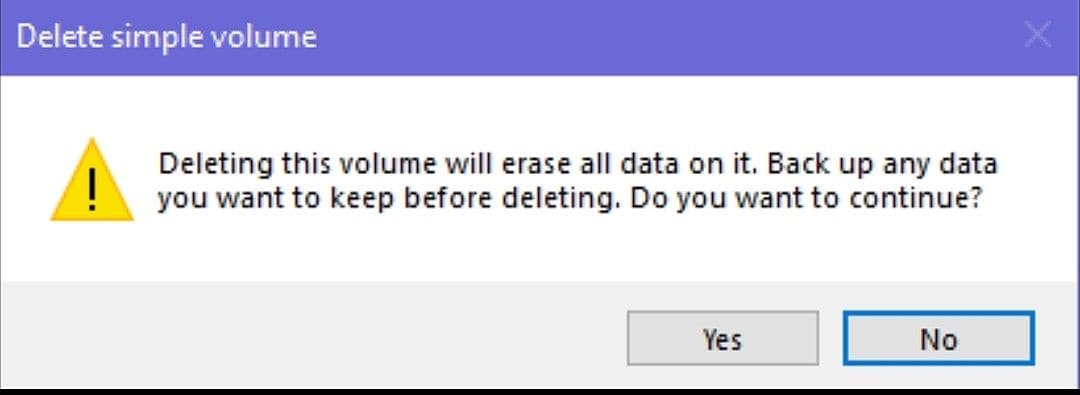
Step 3: A pop-up window will show up on the screen, then you right-click on the drive or partition and click on Delete Volume. After that, select ‘Yes’ to enable the system to complete the delete process.
Solution 2: Delete Partitions Using DISKPART
The DiskPart is a command-line utility used in the Windows operating system to manage disk partitions from both internal and external devices. Anyway, to remove partition with this program, you’ll need to follow the steps mentioned below.
Step 1: Click on Windows+R to start up the Run box, and type cmd and click OK.
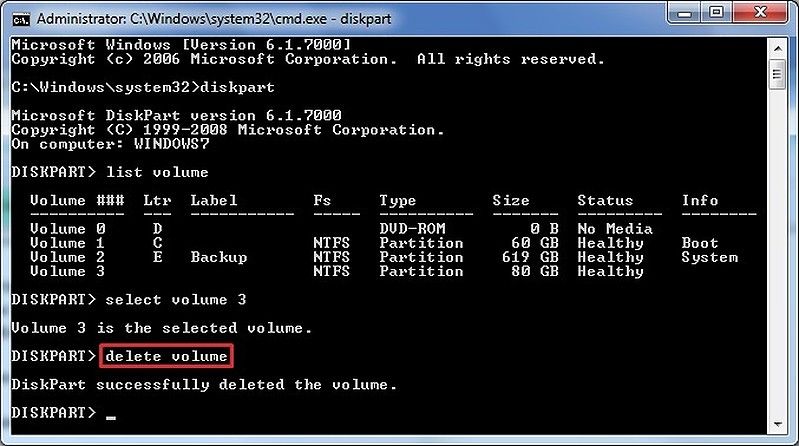
Step 2: A command prompt window will come up on your PC screen. Type ‘diskpart’ and click on enter.
Step 3: Type ‘list volume’ as the next window shows up on the PC screen. After that, type ‘Select volume 3’.
Step 4: Type ‘delete volume’ to remove partitions from the SD card. Repeat the steps to remove other partitions from the SD card.
Note: Always click ‘Enter’ after typing each command. But, deleting partition from the SD card may result in data loss. Therefore, before removing partitions from your SD card, it’s advisable to backup relevant data in advance.
Method 2: Remove SD Card Partitions on Mac
The easiest way to remove SD card partitions on Mac is by using ‘Disk Utility’ installed on the Mac system. Therefore, launch the Disk Utility by simultaneously clicking «Cmd+space» and search for it in the Spotlight.
The steps below show more explanation on the SD card partition delete process using Mac.
Step 1: Launch disk utility via ‘Spotlight.’ On the sidebar, you’ll see all available hard drives and their partitions, while the central panel displays the information about the drive you’ve chosen.
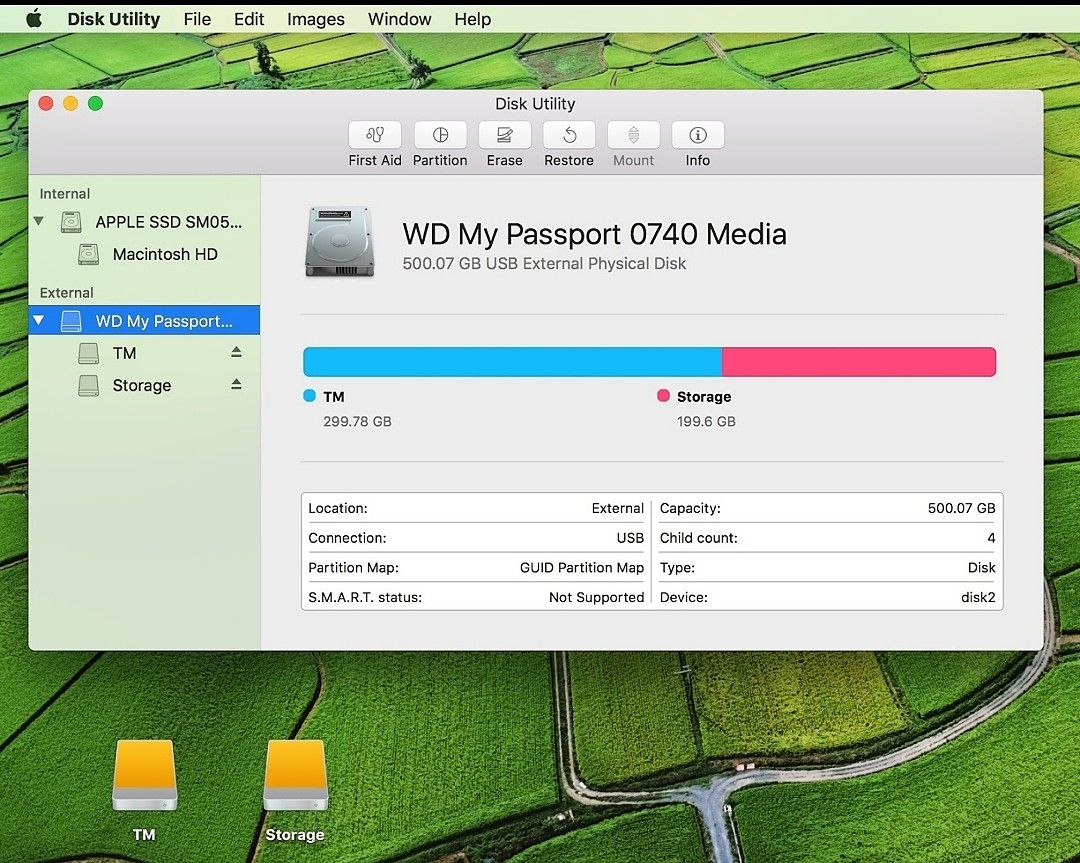
Step 2: Using the sidebar, locate your SD card containing the partition you want to remove. After that, your SD card info will be highlighted in the central panel.
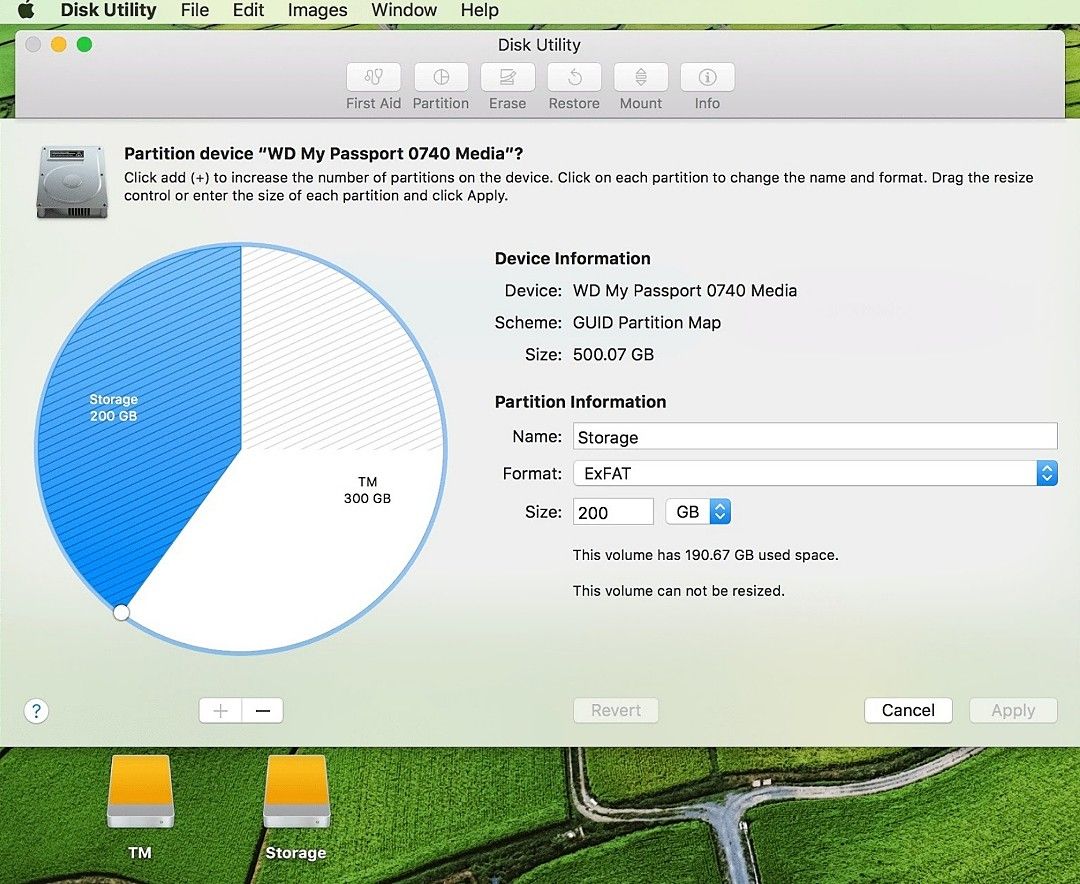
Step 3: Navigate to the top bar of the disk utility window and ‘Partition,’ another window will come up showing the partition map in the pie chart.
Step 4: Click on the pie chart displayed on the screen, and a window will pop-up, then click ‘Partition.’
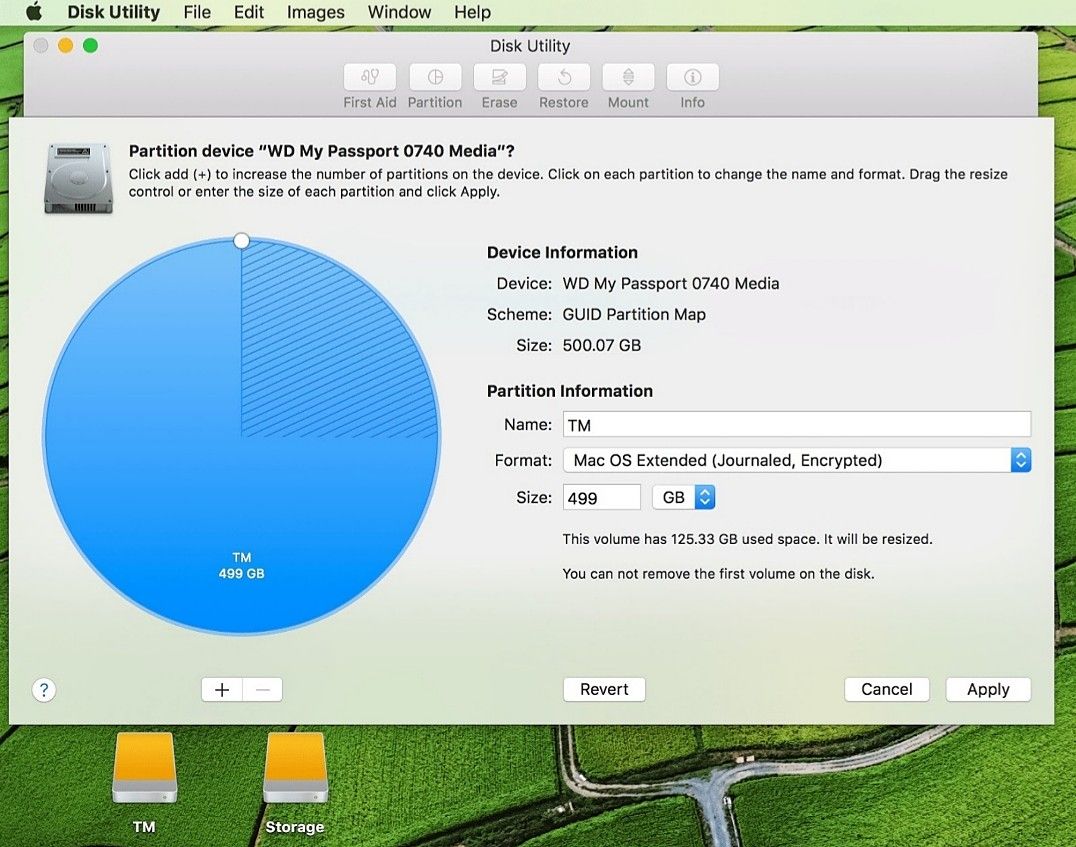
Step 5: After deleting partitions from SD card, click on ‘Apply’ to complete the whole process
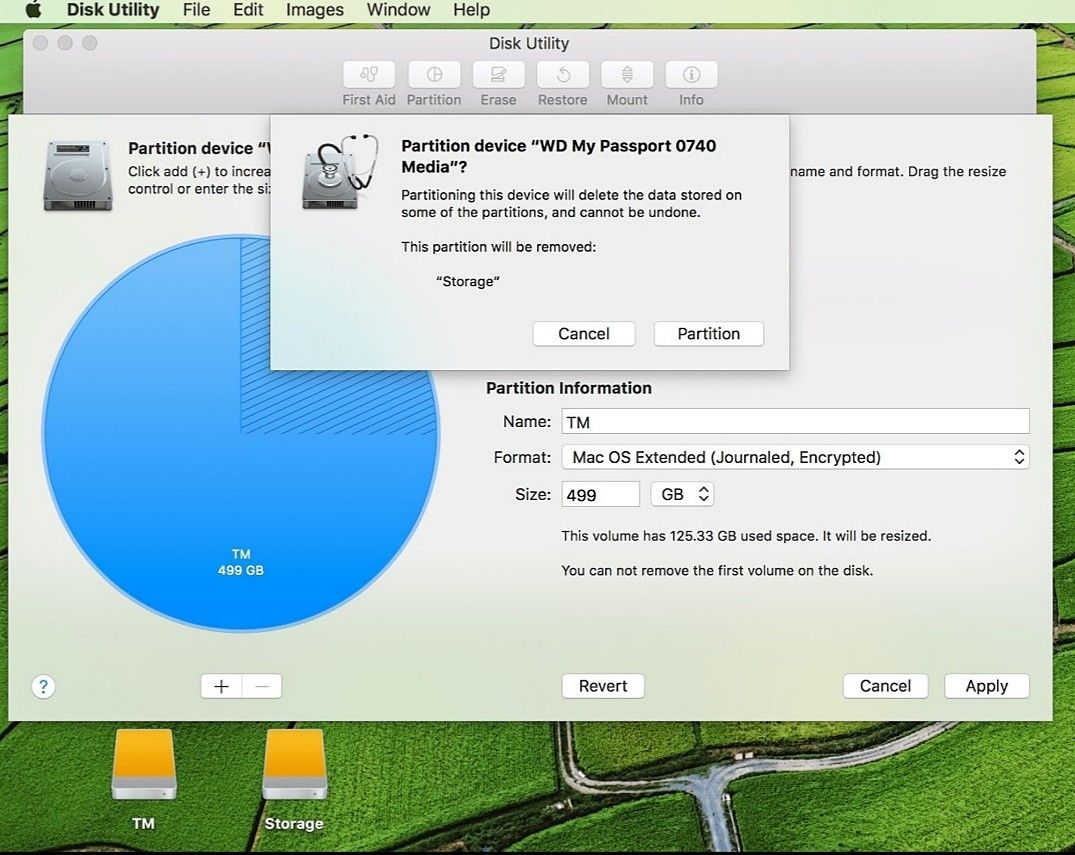
Note: On completion of the operation, a confirmation window will appear on the screen, summarizing all you’ve done so far. It’s advisable to read the confirmation dialogue carefully before proceeding and be sure all changes you made implied on the SD card.
Method 1: Remove Partitions From SD Card on Linux
To delete the Partition from SD card on Linux, you’d have to utilize the fdisk command prompt to execute the partition removal process. You may ask, what is »FDISK»?
FDISK (fixed or format disk) is used basically for manipulating partitions on Unix and Linux systems.
Use the steps below to delete the Partition from SD card using your Linux system.
Step 1: Firstly, use the mount command to locate the mount point of the partition and type ‘P’ to show the current partitions on the system and SD card.
Step 2: In the next prompt that shows up, Type ‘D.’ Doing this will prompt you to enter the partition number
Step 3: Provide the disk number you’re willing to delete, then the partition will be deleted. After removing the SD card partition, click on p to check your partition table.
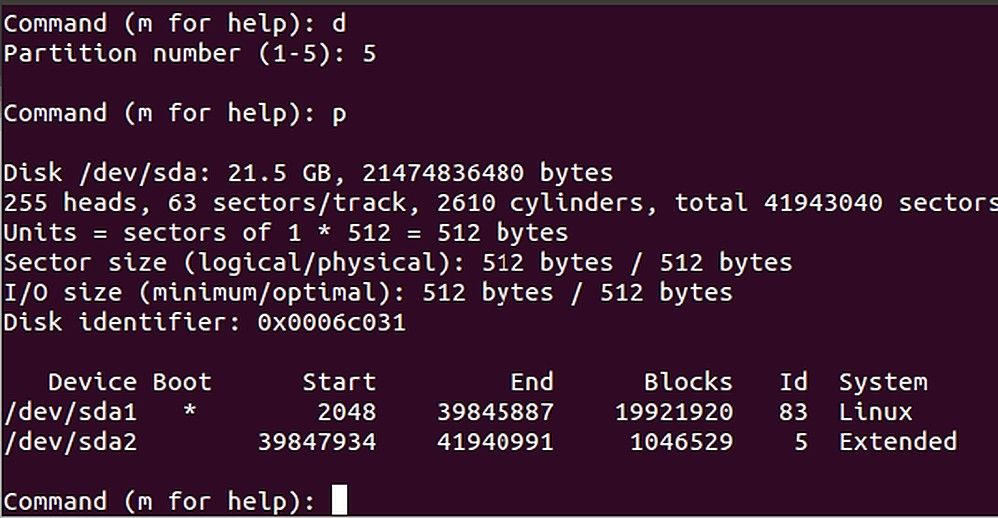
Note: procedure to delete an extended and primary partition is the same. However, after completing the partition delete process, the SD card may appear empty but, fdisk will finalize changes when you click ‘W.’
Method 4: Get Tricks After Deleting a Partition on SD Card
Trick 1: Fix »Can’t Partition SD Card»
Nowadays, many people find it hard to partition their SD card, but have you ever asked yourself what may be the cause of this annoying issue or how can the problem be resolved within a few minutes? Let’s take you through some causes of the problem and how you can easily rectify it within a short time.
Causes of SD Card Cannot partition
There are several causes of the SD card can’t partition problem, check out some reasons below.
Write protection: This may occur whenever you insert the SD card with an adapter or card reader into your computer, you can see and read all files on the SD card but can’t perform any operation on it.
Any video, audio, or photo files on a write-protected SD card would remain unavailable. Even when you try to format or partition SD card, you’ll still get a windows prompt message saying, the disk is write-protected.
Locked error: Whenever there’s an SD card locked error on your computer, camera, or Android device, you can’t get the access to add new files to the SD card, modify or delete data stored on the card. As a result, the SD card won’t partition because it’ll be blocked from receiving and editing files.
SD card corruption: If you’re experiencing an SD card corruption problem, you’ll not be able to partition SD card. This is always a result of inappropriate SD card handling and many other devastating circumstances.
Solutions to SD Card Cannot Partition error
It’s believed that all SD card users would surely encounter errors while using their cards. This is always as a result of mishandling the SD memory card. In order to fix this error effectively, I’ve summed up two easy solutions you can use to resolve and eradicate this SD card cannot format error from your PC.
Solution 1: Eject and re-insert the SD card
This solution force Windows to re-organize the disk arrangement. It’s easy to execute but usually takes some time.
Step 1: If you encounter this kind of error, remove the SD card from your PC and exit the installation wizard to go back to the main page where you started the process.
Step 2: Now, on the main setup page, click on ‘install now’ without inserting your SD card.
Step 3: An error message will come up saying Windows is unable to locate the setup files. You’ll be asked to load a CD/DVD driver for windows set up to continue, click on ‘OK’ to return to the main setup page.
Step 4: Re-insert your SD card to the PC and select ‘Install Now’ to partition the SD card.
Solution 2: Create Boot Partition Manually
While the first solution helps to organize Windows disk configurations, Creating a boot partition manually helps to delete all data on the SD card, leaving it empty. Thus If you still see the error message, you can utilize this solution.
Step 1: Click on Shift+F10 at the point where you see the error message, and It’ll start up a command-line console. Then type disk part and click on enter.
Step 2: Type List Disk and click on enter to continue. After that, type Select disk 0 and click on enter, again.
Step 3: Type Clean and click on enter to clean the disk. Then, type creates partition primary size = 5000 and click on the enter button. (5000 indicates 5000MB).
Step 4: carry out a quick format for the partition and format it into NTFS by typing ‘format fs= NTFS quick’ and click enter, afterward, type assign and click on the enter button to assign a drive letter to the newly established partition.
Step 5: Activate the partition by typing active. Don’t forget to click enter and on the next procedure type list volume and press the enter button. This will list the drive letter of that SD card, then type exit, and click enter.
Step 6: Copy the installation file to the partition you’ve just created. Type e and click enter, then type copy e: c:/e /h /k, press enter, and relax while the copy process will complete.
Step 7: Remove the SD card and restart your PC. You’ll now be able to partition your SD card conveniently.
Trick 2: Recover SD Card Lost Data
In a case where you delete partition without the advance backup of SD card data, you may encounter data loss. This is because deleting partition from the SD card completely erase your SD card data. As a result, you’ll need the intervention of a professional and efficient data recovery software to retrieve your SD card data.
However, one leading data recovery software that’ll enable you to execute this operation easily and conveniently is the Recoverit data recovery software.
With Recoverit lost partition recovery mode, you can recover SD card deleted partition within a few minutes.
Let’s take a look at how to recover deleted partition data with the use of Recoverit.
Step 1: Select storage of your lost file

Download Recoverit data recovery software on your PC/Mac and insert your memory card using a card reader or adapter. Open Recoverit data recovery software tool, select the inserted SD card and click on Start to begin your recovery operation.
Step 2: Scan your inserted SD memory card

Recoverit data recovery will do a scan to search out your lost videos, audios, or photo files and preview them.
Step 3: Preview and recover your deleted SD card data

Finally, your lost photos, audios, or video files will be displayed on the computer screen after the quick scan process. At the bottom of your screen, click Recover to access your SD card lost data.
Conclusion
Digital storage media have been a blessing in the way individuals store their files. You may be familiar with the term вЂpartition SD card’, but it sometimes becomes a necessity to delete these partitions from the SD card.
The procedures outlined on this page are known to be the simplest and quickest means of deleting partition from an SD card. However, as a result of SD card data loss that may occur during the process of deleting the partition from an SD card, Recoverit is the perfect data recovery software you can reach out to reclaim your files.


