- Как использовать пакет SDK для Windows 10 в классическом приложении Windows How to: Use the Windows 10 SDK in a Windows Desktop application
- Использование правильного Windows SDK для проекта Use the right Windows SDK for your project
- Изменение целевой платформы для пакета SDK для Windows 10 To target the Windows 10 SDK
- Изменение целевой платформы для пакета SDK для Windows 8.1 To target the Windows 8.1 SDK
- How To Set Android SDK Path In Windows And Mac
- 1. Configure Android SDK Variable In Windows.
- 1.1 Get Android SDK Install Directory Path.
- 1.2 Set %ANDROID_HOME% and %Path% System Environment Variable.
- 2. Configure Android SDK Variable In macOS.
- How to: Use the Windows 10 SDK in a Windows Desktop application
- Use the right Windows SDK for your project
- To target the Windows 10 SDK
- To target the Windows 8.1 SDK
Как использовать пакет SDK для Windows 10 в классическом приложении Windows How to: Use the Windows 10 SDK in a Windows Desktop application
При создании проекта классического рабочего стола Windows в Visual Studio он по умолчанию обращается к пакету SDK для Windows 10. When you create a new classic Windows desktop project in Visual Studio, it targets the Windows 10 SDK by default. Visual Studio устанавливает версию этого пакета SDK при установке рабочей нагрузки C++ рабочего стола. Visual Studio installs a version of this SDK when you install the C++ Desktop workload. Пакет SDK для Windows 10 поддерживает написание кода для Windows 7 SP1 и более поздних версий. The Windows 10 SDK supports writing code for Windows 7 SP1 and later. Дополнительные сведения о нацеливании на конкретные версии Windows см. в разделе Использование заголовков Windows и обновление winver и _WIN32_WINNT. For more information about targeting specific versions of Windows, see Using the Windows Headers and Update WINVER and _WIN32_WINNT.
При обновлении существующего проекта можно выбрать один из вариантов: можно использовать целевой Windows SDK, указанный в проекте. When you upgrade an existing project, you have a choice: You can keep using the target Windows SDK specified in your project. Вы также можете перенацелить проект для использования пакета SDK для Windows 10. Or, you can retarget your project to use the Windows 10 SDK. С помощью пакета SDK для Windows 10 вы получаете преимущества поддержки новейших операционных систем и языковых стандартов. With the Windows 10 SDK, you get the advantages of support for the latest operating systems and language standards.
Использование правильного Windows SDK для проекта Use the right Windows SDK for your project
Начиная с Visual Studio 2015 библиотека среды выполнения C (CRT) была разделена на две части: одна часть, ucrtbase, содержит стандартные функции CRT C и Microsoft, которые можно использовать в универсальных приложениях Windows. Starting with Visual Studio 2015, the C Runtime (CRT) library was separated into two parts: One part, ucrtbase, contains the Standard C and Microsoft-specific CRT functions that you can use in Universal Windows Apps. Эта библиотека теперь называется универсальной библиотекой CRT или UCRT и перешла в пакет SDK для Windows 10. This library is now known as the Universal CRT, or UCRT, and has moved into the Windows 10 SDK. UCRT содержит множество новых функций, таких как функции C99, которые необходимы для поддержки новейших C++ языковых стандартов. The UCRT contains many new functions, such as C99 functions, needed to support the latest C++ language standards. Другая часть исходной CRT — vcruntime. The other part of the original CRT is vcruntime. Он содержит поддержку, запуск и код завершения среды выполнения C, а также все остальное, которые не были отправлены в UCRT. It contains the C runtime support, startup, and termination code, and everything else that didn’t go into the UCRT. Библиотека vcruntime устанавливается вместе с C++ компилятором и набором инструментов в Visual Studio. The vcruntime library gets installed along with the C++ compiler and toolset in Visual Studio. Дополнительные сведения см. в разделе функции библиотеки CRT. For more information, see CRT library features.
UCRT теперь является системным компонентом, установленным на каждой версии Windows 10. The UCRT is now a system component that’s installed on every version of Windows 10. Он также доступен как устанавливаемый компонент для всех более ранних поддерживаемых версий Windows. It’s also available as an installable component for all earlier supported versions of Windows. Вы можете использовать пакет SDK для Windows 10, чтобы выбрать все поддерживаемые версии Windows. You can use the Windows 10 SDK to target all the supported versions of Windows. Полный список поддерживаемых операционных систем см. в разделе Windows 10 SDK. For a complete list of supported operating systems, see Windows 10 SDK.
Чтобы перенацелить проекты на использование пакета SDK для Windows 10 при обновлении версии проекта до Visual Studio 2015, выполните следующие действия. To retarget your projects to use the Windows 10 SDK when you upgrade from a project version before Visual Studio 2015, follow these steps:
Изменение целевой платформы для пакета SDK для Windows 10 To target the Windows 10 SDK
Убедитесь, что установлен пакет SDK для Windows 10. Make sure the Windows 10 SDK is installed. Пакет SDK для Windows 10 устанавливается как часть разработки классических приложений с C++ рабочей нагрузкой. The Windows 10 SDK is installed as part of the Desktop development with C++ workload. Автономная версия доступна в загружаемых файлах и средствах для Windows 10. A standalone version is available at Downloads and tools for Windows 10.
Откройте контекстное меню для узла проекта и выберите пункт перенацелить проекты. Open the shortcut menu for the project node, and choose Retarget projects. (В более ранних версиях Visual Studio выберите Изменить целевую версию пакета SDK.) Откроется диалоговое окно Проверка действий решения . (In earlier versions of Visual Studio, choose Retarget SDK Version.) The Review Solution Actions dialog appears.

В раскрывающемся списке Версия целевой платформы выберите версию пакета SDK для Windows 10, которую вы хотите использовать. In the Target Platform Version dropdown list, choose the version of the Windows 10 SDK you want to target. В целом, мы рекомендуем выбрать последнюю установленную версию. Generally speaking, we recommend you choose the latest installed version. Нажмите кнопку ОК , чтобы применить изменение. Choose the OK button to apply the change.
8,1 в этом контексте относится к пакету SDK для Windows 8.1. The 8.1 in this context refers to the Windows 8.1 SDK.
Если этот шаг выполнен успешно, в окне вывода появится следующее сообщение. If this step is successful, the following text appears in the Output window:
Retargeting End: 1 completed, 0 failed, 0 skipped
Откройте диалоговое окно Свойства проекта. Open the project properties dialog. В разделе Свойства конфигурации > Общие Обратите внимание на значения версии целевой платформы Windows. In the Configuration Properties > General section, notice the values of Windows Target Platform Version. Изменение значения на данном этапе действует аналогично данной процедуре. Changing the value here has the same effect as following this procedure. Дополнительные сведения см. в разделе Страница свойств «Общие» (проект). For more information, see General Property Page (Project).

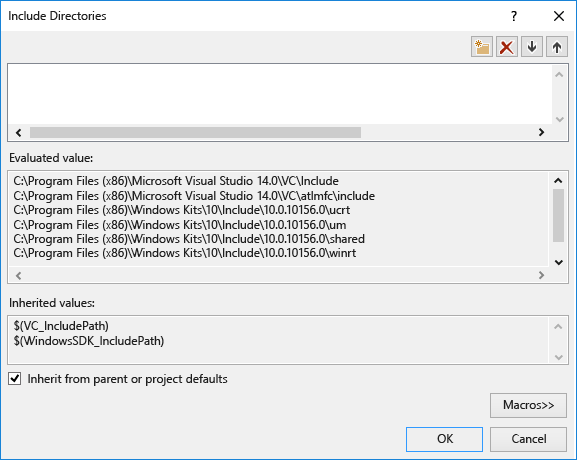
Это действие приводит к изменению значений макросов проекта, содержащих пути к файлам заголовка и файлам библиотеки. This action changes the values of project macros that include paths to header files and library files. Чтобы увидеть изменения, откройте раздел » визуальные C++ каталоги » диалогового окна » Свойства проекта «. To see what changed, open the Visual C++ Directories section of the Project Properties dialog. Выберите одно из свойств, например каталоги включения. Select one of the properties, such as Include Directories. Затем откройте раскрывающийся список значение свойства и выберите . Then, open the property value’s dropdown list, and choose . Откроется диалоговое окно Каталоги включения . The Include Directories dialog appears.
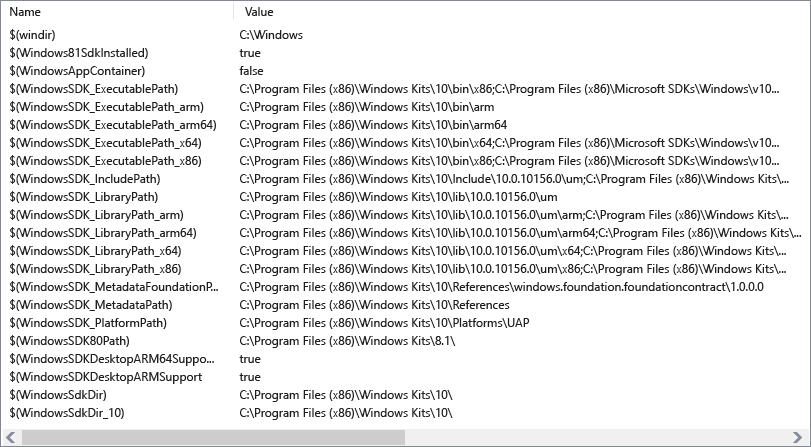
Нажмите кнопку макросы > > и прокрутите список макросов до Windows SDK макросов, чтобы просмотреть все новые значения. Choose the Macros >> button, and scroll down the list of macros to the Windows SDK macros to see all the new values.
При необходимости повторите процедуру перенаправления для других проектов решений и перестройте решение. Repeat the retargeting procedure for other solution projects, as needed, and rebuild the solution.
Изменение целевой платформы для пакета SDK для Windows 8.1 To target the Windows 8.1 SDK
Откройте контекстное меню узла проекта в обозреватель решений и выберите пункт перенацелить проекты. Open the shortcut menu for the project node in Solution Explorer, and choose Retarget projects. (В более ранних версиях Visual Studio выберите Изменить целевую версию пакета SDK.) (In earlier versions of Visual Studio, choose Retarget SDK Version.)
В раскрывающемся списке Версия целевой платформы выберите 8,1. In the Target Platform Version dropdown list, choose 8.1.
How To Set Android SDK Path In Windows And Mac
After you installed android studio, you still need to configure some android SDK environment variables then you can use it easily. This article will tell you how to correctly configure Android SDK environment variables such as ANDROID_HOME, PATH on Windows and macOS.
1. Configure Android SDK Variable In Windows.
1.1 Get Android SDK Install Directory Path.
Before you can configure it, you should first get the android SDK install directory follow below steps.
- Open android studio, click File —> Settings menu item in the top men bar.
- Expand Appearance & Behavior —>System Settings —>Android SDK menu item on the left side of the popup window. Then you can find the Android SDK Location directory path on the right side ( in this example, the Android SDK location path is C:\Users\Jerry\AppData\Local\Android\Sdk ), remember it.
1.2 Set %ANDROID_HOME% and %Path% System Environment Variable.
- Right-click the computer icon in Windows file explorer left side, click Properties menu item in the popup menu list. This will open the windows system configuration window.
- Click the Advanced system settings link on left panel, it will popup the System Properties window, click the Environment Variables button to open Environment Variables window.
- Click the New… button to add a new system variable, input ANDROID_HOME as the variable name, and input the Android SDK location directory path ( such as C:\Users\Administrator\AppData\Local\Android\Sdk ) as the variable value.
- Select variable Path and click Edit button and add ;%ANDROID_HOME%\tools;%ANDROID_HOME%\tools\bin;%ANDROID_HOME%\platform-tools at the end of its value. Please note the ; must be English character otherwise it will not take effect .
- Click OK to close the system environment variables settings window, open a dos window, type command adb in it. If you see output like below that means the android SDK path variable has been configured successfully.
2. Configure Android SDK Variable In macOS.
- Open Android Studio on macOS, then click Android Studio —> Preferences menu item at the left top toolbar.
- Input search keyword sdk in the search box of the popup Preferences dialog window left side.
- It will focus on the Android SDK menu item on the left side, and you can get the Android SDK Location directory path value on the right side Android SDK Location text box.
- Generally, the Android SDK is installed in the /Users/user-name/Library/Android/sdk folder on macOS.
- If you can not find the above folder in macOS finder or terminal, this is because the Library folder is a hidden folder by default, you should make the hidden folder visible by executing the command $ defaults write com. apple . finder AppleShowAllFiles TRUE in a macOS terminal window ( please read article How To Show Hidden Files In Mac OS Finder And Select Hidden Files In Html Upload File Form ).
- You can also see the hidden Library folder by opening a macOS Finder window, then click Go —> Go to Folder… menu item, and input
/Library in the popup dialog input text box, then click Go button.
How to: Use the Windows 10 SDK in a Windows Desktop application
When you create a new classic Windows desktop project in Visual Studio, it targets the Windows 10 SDK by default. Visual Studio installs a version of this SDK when you install the C++ Desktop workload. The Windows 10 SDK supports writing code for Windows 7 SP1 and later. For more information about targeting specific versions of Windows, see Using the Windows Headers and Update WINVER and _WIN32_WINNT.
When you upgrade an existing project, you have a choice: You can keep using the target Windows SDK specified in your project. Or, you can retarget your project to use the Windows 10 SDK. With the Windows 10 SDK, you get the advantages of support for the latest operating systems and language standards.
Use the right Windows SDK for your project
Starting with Visual Studio 2015, the C Runtime (CRT) library was separated into two parts: One part, ucrtbase, contains the Standard C and Microsoft-specific CRT functions that you can use in Universal Windows Apps. This library is now known as the Universal CRT, or UCRT, and has moved into the Windows 10 SDK. The UCRT contains many new functions, such as C99 functions, needed to support the latest C++ language standards. The other part of the original CRT is vcruntime. It contains the C runtime support, startup, and termination code, and everything else that didn’t go into the UCRT. The vcruntime library gets installed along with the C++ compiler and toolset in Visual Studio. For more information, see CRT library features.
The UCRT is now a system component that’s installed on every version of Windows 10. It’s also available as an installable component for all earlier supported versions of Windows. You can use the Windows 10 SDK to target all the supported versions of Windows. For a complete list of supported operating systems, see Windows 10 SDK.
To retarget your projects to use the Windows 10 SDK when you upgrade from a project version before Visual Studio 2015, follow these steps:
To target the Windows 10 SDK
Make sure the Windows 10 SDK is installed. The Windows 10 SDK is installed as part of the Desktop development with C++ workload. A standalone version is available at Downloads and tools for Windows 10.
Open the shortcut menu for the project node, and choose Retarget projects. (In earlier versions of Visual Studio, choose Retarget SDK Version.) The Review Solution Actions dialog appears.

In the Target Platform Version dropdown list, choose the version of the Windows 10 SDK you want to target. Generally speaking, we recommend you choose the latest installed version. Choose the OK button to apply the change.
The 8.1 in this context refers to the Windows 8.1 SDK.
If this step is successful, the following text appears in the Output window:
Retargeting End: 1 completed, 0 failed, 0 skipped
Open the project properties dialog. In the Configuration Properties > General section, notice the values of Windows Target Platform Version. Changing the value here has the same effect as following this procedure. For more information, see General Property Page (Project).

This action changes the values of project macros that include paths to header files and library files. To see what changed, open the Visual C++ Directories section of the Project Properties dialog. Select one of the properties, such as Include Directories. Then, open the property value’s dropdown list, and choose . The Include Directories dialog appears.

Choose the Macros >> button, and scroll down the list of macros to the Windows SDK macros to see all the new values.

Repeat the retargeting procedure for other solution projects, as needed, and rebuild the solution.
To target the Windows 8.1 SDK
Open the shortcut menu for the project node in Solution Explorer, and choose Retarget projects. (In earlier versions of Visual Studio, choose Retarget SDK Version.)
In the Target Platform Version dropdown list, choose 8.1.


