- Как ускорить поиск в Windows 10: бесплатная утилита заменяет медленную системную функцию
- Содержание
- Что такое Everything
- Чем Everything лучше поиска Windows
- Служба поиска, индексатор службы Microsoft Windows Search и его влияние на нагрузку процессора
- Индексатор службы Microsoft Windows Search грузит процессор?
- Как можно уменьшить нагрузку службы Microsoft Windows Search на процессор?
- Определяем папки, которые служба поиска должна индексировать
- Устанавливаем классический режим поиска
- Активируем привязку производительности индексатора к параметрам питания устройства
- Отключаем службу Windows Search
- How To Fix Windows Search?
- How To Fix Windows Search In Windows 10 If It Is Not Working
- Restart File Explorer
- Restart Cortana
- Check Windows Search Service
- Run Windows Troubleshooter
- Re-register Cortana Using PowerShell
- Restore Indexing Service
- Restore Your System Using Restore Points
- Video Showing How To Fix Windows Search:
Как ускорить поиск в Windows 10: бесплатная утилита заменяет медленную системную функцию

Поиск Windows 10 — это, наверное, одно из крупнейших изменений в новой версии ОС, которое значительно улучшило функционал системы. Однако, судя по всему, при разработке Поиска, Microsoft не ориентировалась на пользователей с жёсткими дисками, и скорость работы поиска оставляет желать лучшего даже после многочисленных обновлений. На этот случай есть отличная утилита Everything, о которой я расскажу сегодня.
Содержание
Что такое Everything
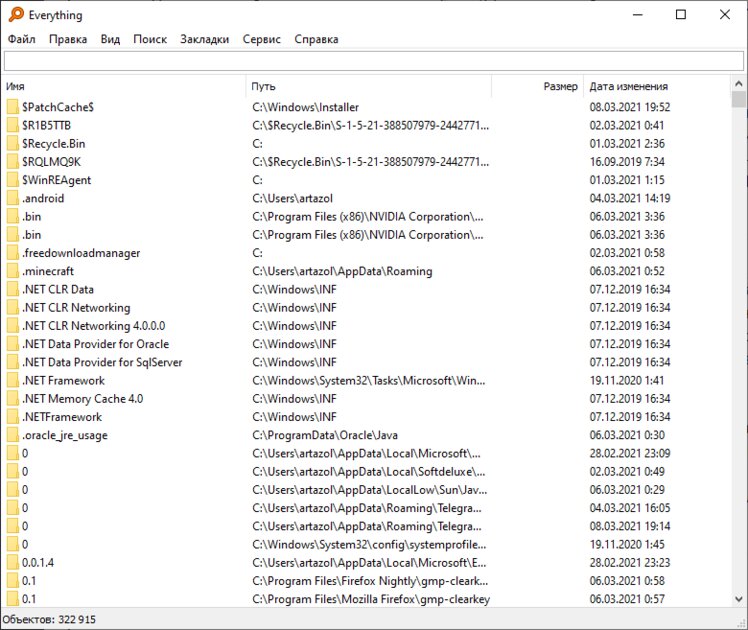
Everything — это приложение для поиска файлов, написанное независимым разработчиком. Его главной особенностью является молниеносная скорость даже на старых накопителях и поддержка всех версий Windows от XP. Утилита бесплатна, часто обновляется, а также очень легковесна — её смело можно добавлять в автозагрузку системы. Everything занимает 14 МБ ОЗУ если файлов на диске около 120 тысяч, если миллион — 75 МБ.
Чем Everything лучше поиска Windows

Как это обычно происходит с Microsoft, независимые разработчики зачастую превосходят творения высококлассных специалистов, создавая продукты для Windows лучше, чем сама компания. Everything не стала исключением и во многом превосходит встроенный поиск Windows 10. Более того, недавно утилита получила интеграцию с панелью задач, заменяя тем самым стандартное поле ввода для поисковых запросов.
Одним из преимуществ утилиты является просто космическая скорость индексации и нахождения файлов вместе с папками даже на HDD, чем продукт Microsoft похвастаться не может. Также, утилита позволяет предварительно просматривать результаты поиска, будь это текстовый файл или фото. Кроме этого, приложение имеет поддержку REGEX, а также позволяет создавать свои фильтры для поиска, которые значительно ускоряют работу.
Служба поиска, индексатор службы Microsoft Windows Search и его влияние на нагрузку процессора
Служба Windows Search отвечает за поиск файлов и папок на устройстве. Она способна искать данные не только по наименованию файлов, но и по содержанию этих файлов (метаданным, свойствам и т.д.). Например, поиск по содержанию файлов по умолчанию активирован для текстовых и офисных документов (txt, doc, docx, xls, xlsx, pdf).
На компьютере может быть очень много файлов и папок. Чтобы поиск по устройству не занимал много времени, служба Windows Search использует индексацию файлов. Процесс индексирования представляет собой чтение диска с данными и запись информации о просканированных файлах в базу данных. Индексирование осуществляется в фоновом режиме. Когда вы сохраните новый документ в индексированном расположении, служба Windows Search проиндексирует его и сохранит собранную информацию о нём в своей базе.
Индексатор службы Microsoft Windows Search грузит процессор?
Обычно индексатор службы Microsoft Windows Search не грузит процессор. В нашем случае, когда все файлы проиндексированы, нагрузка на центральный процессор составляет 0%, а объём используемой оперативной памяти составляет порядка 80МБ.
 На скриншоте видно, что Индексатор службы Microsoft Windows Search в Windows 10 не нагружает процессор, так как все файлы проиндексированы.
 На скриншоте видно, что Индексатор службы Microsoft Windows Search в Windows 10 не нагружает процессор, так как все файлы проиндексированы.
Поэтому, если на вашем устройстве индексатор службы Microsoft Windows Search грузит процессор, это означает, что в настоящее время идёт индексирование файлов. Если вы активно пользуетесь устройством, нажимаете на клавиши клавиатуры, водите мышкой, служба Windows Search замедляет скорость сканирования. В нашем случае при сниженной скорости индексирования нагрузка на процессор составляет 0,6-1,2%.
- На скриншоте видно увеличение нагрузки на процессор, так как идёт индексирование новых файлов (при сниженной скорости сканирования)
 На скриншоте видно увеличение нагрузки на процессор, так как идёт индексирование новых файлов (при сниженной скорости сканирования)
Конечно, нагрузка будет больше, если процессор относительно старый и имеет одно-два логических ядра. Поэтому приведённые значения нагрузки индексатора службы Microsoft Windows Search на процессор следует считать условными.
Как можно уменьшить нагрузку службы Microsoft Windows Search на процессор?
Определяем папки, которые служба поиска должна индексировать
- Найдите и запустите “Параметры индексирования” в классическом варианте Панели управления.
Несколько простых способов в отдельной статье
- В открывшемся окне нажмите кнопку “Изменить”.
- Отметьте галочками папки или диски, которые вы хотите индексировать в фоновом режиме. Оставьте пустым квадрат, чтобы не индексировать папку или диск. После выбора индексируемых расположений нажмите кнопку “ОК”.
Уменьшив количество папок и дисков в окне “Индексируемые расположения”, вы сможете сократить нагрузку индексатора службы Microsoft Windows Search на процессор. Но имейте в виду, что поиск в исключенных расположениях будет долгим. А в случае использования кнопки поиска в панели задач поиск в неиндексированных расположениях осуществляться не будет. Поэтому не старайтесь исключать все папки. Оставьте папки, в которых вы часто используете функцию поиска.
Устанавливаем классический режим поиска
В Windows 10 предусмотрено 2 режима поиска: классический и расширенный. При классическом режиме поиск осуществляется только в библиотеках пользователя и на рабочем столе. Расширенный режим позволяет искать файлы по всему компьютеру, за исключением системных папок. Расширенный режим, как предупреждает операционная система, может снизить уровень заряда и увеличить нагрузку на центральный процессор. Особенно это актуально для владельцев ноутбуков, которым важно, чтобы их устройство проработало в автономном режиме как можно дольше.
- Перейдите в новые “Параметры Windows” (нажмите на клавиатуре кнопку с логотипом Windows + I ).
- Нажмите на раздел “Поиск”.
- В левом боковом меню нажмите на “Поиск в Windows”.
- Прокрутите список настроек и выберите параметр “Классический стиль”.

Активируем привязку производительности индексатора к параметрам питания устройства
Изменять режим производительности индексатора стало возможным с момента появления Windows 10 версии 2004 (майское обновление 2020 года). Если включить параметр “Использовать параметры режима питания устройства”, служба Windows Search будет оценивать, запущен ли на компьютере режим энергосбережения, пониженного электропотребления или игровой процесс. Если да, то служба поиска приостановит индексацию в фоновом режиме.
Также при включении производительности индексатора служба поиска приостановит индексацию файлов в фоновом режиме, если загрузка центрального процессора превысит 80% или загрузка жесткого диска поднимется свыше 70%.
- Перейдите в новые “Параметры Windows” (нажмите на клавиатуре кнопку с логотипом Windows + I ).
- Нажмите на раздел “Поиск”.
- В левом боковом меню нажмите на “Поиск в Windows”.
- Прокрутите список настроек и включите параметр “Использовать параметры режима питания устройства”.

Отключаем службу Windows Search
Отключая службу Windows Search, вы отключите индексирование папок и файлов в фоновом режиме.
Вы сможете осуществлять поиск по устройству, но он будет медленным.
- Запустите приложение “Выполнить” (нажмите на клавиатуре кнопку с логотипом Windows + R ).
- Наберите текст services.msc и нажмите кнопку “ОК”.

- В открывшемся окне найдите службу Windows Search.

- Дважды нажмите на строку службы “Windows Search”. Откроется окно с настройками.
- Выберите тип запуска “Отключена”.
- Нажмите кнопку “Остановить”, чтобы завершить активный процесс выполнения службы Windows Search.
- Нажмите кнопку “ОК”, чтобы сохранить настройки службы.
А как у вас работает служба поиска в Windows? Испытываете ли вы проблемы при ее работе в фоновом режиме?
Расскажите о своем опыте в комментариях 😉
How To Fix Windows Search?
How To Fix Windows Search In Windows 10 If It Is Not Working
Windows Search is a Windows service that allows users to quickly find and search for files on their computers. It is a search platform created by Microsoft that swiftly finds the most common file and data types. Before Windows Search, this function was known as Windows Desktop Search or WDS.
Type a keyword or two and it will reveal not only file and data results, but also web links, Windows tools, and settings. This can be very useful if you wish to find and open a specific Windows setting or tool in a single click. Using Windows Search, there is no need to look for a particular setting manually or go through several different windows to find a file. As well as typing manually, you can also use Cortana, the voice recognition assistant. If it is more convenient for you to use voice search, the results will be the same as typing.
Despite these advantages, operating systems are not perfect and users often face problems when using Microsoft Windows. For example, Windows Search might not be working properly, or not working at all. In this article, we show several methods to fix this type of problem. Since it can be difficult to ascertain what exactly causes these problems, you may need to try a number of the methods outlined below.

It is recommended to run a free scan with Malwarebytes — a tool to detect malware and fix computer errors. You will need to purchase the full version to remove infections and eliminate computer errors. Free trial available.
Table of Contents:
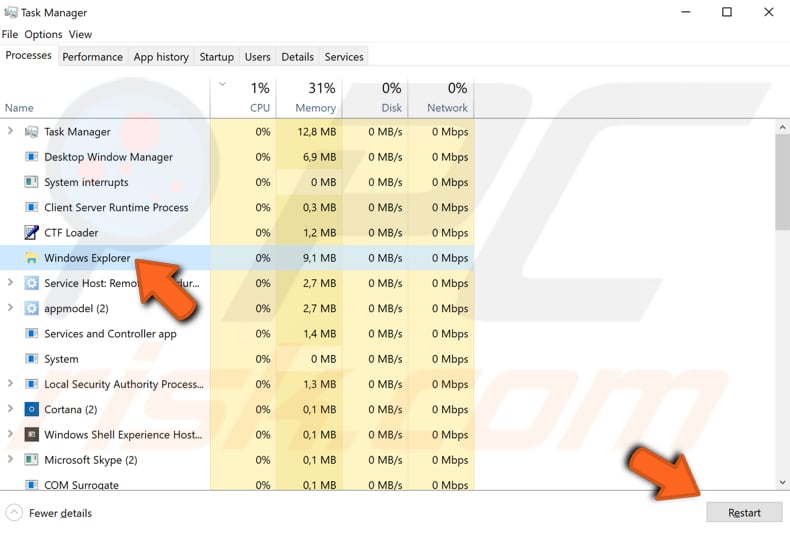
Restart File Explorer
File Explorer (formerly known as Windows Explorer) displays the hierarchical structure of files, folders, and drives on your computer. It also shows any network drives that have been mapped to drive letters on your computer. Using Windows Explorer, you can copy, move, rename, and search for files and folders. Restarting File Explorer might get Windows Search working properly. To restart File Explorer (Windows Explorer), open Task Manager by pressing the Ctrl + Shift + Esc keys on the keyboard or right-click Start menu and select Task Manager from the contextual menu. Once Task Manager is open, find «Windows Explorer» under the «Processes» tab and select it. Then locate the «Restart» button in the bottom-right corner and click it. File Explorer will be restarted and Windows Search should work properly.
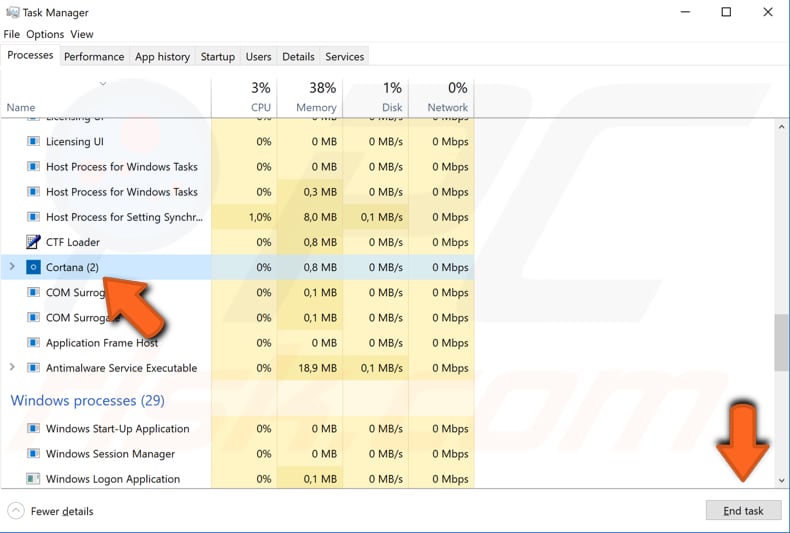
Restart Cortana
To restart Cortana, go to Task Manager by pressing Ctrl + Shift + Esc keys on the keyboard or right-click Start menu and select Task Manager from the contextual menu. Once Task Manager is open, find the Cortana process under the Processes tab and click the «End task» button in the bottom-right corner. Alternatively, right-click the Cortana process and select «End task» from the contextual menu. This will restart the Cortana process — check if Windows Search now works properly.
Check Windows Search Service
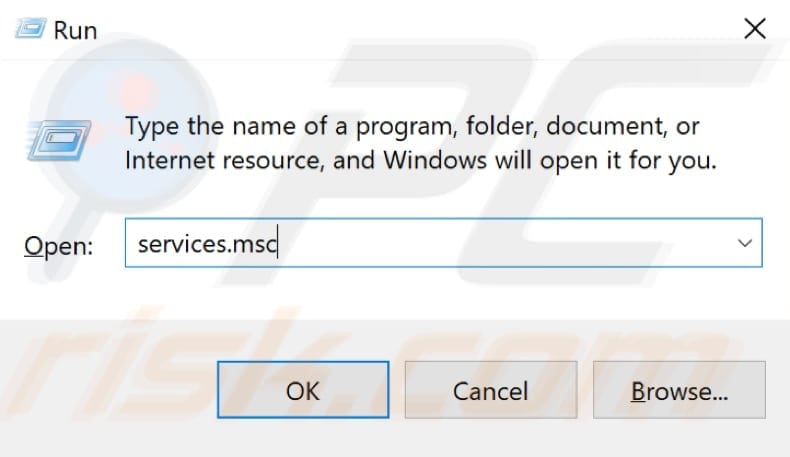
Windows Services (also know as services.msc) are used to modify how Windows services run on your system. These services are responsible for running available programs and managing many system settings and resources. You can modify a service’s settings for security, troubleshooting, and performance-related reasons. One reason why Windows Search might not be working is that the Windows Search service is not running or not enabled. To access the Windows Search service, press Win key + R to open the Run dialog box. Once the Run dialog box is open, type «services.msc» and click «OK», or press Enter on the keyboard.
In the Services window, you will see a list of local services. Scroll down to find «Windows Search» and right-click it. Select «Properties» from the drop-down menu to open the service’s properties.
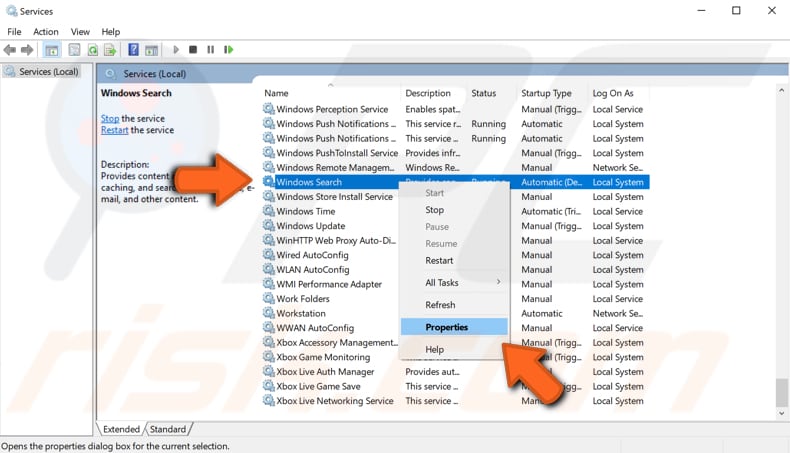
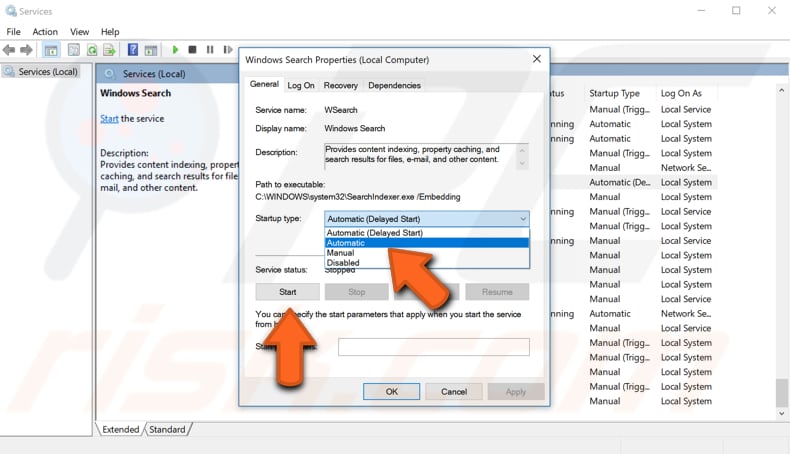
In the Windows Search Properties window, click «Start» to start this service (if it has stopped) and ensure that the «Startup type» is set to «Automatic». By doing this, you will direct the Windows operating system to start the Windows Search service on every Windows startup. Click «Apply» to save the changes made and «OK» to exit. You can also right-click the Windows Search service (when in the Windows Services window) and select «Restart» from the contextual menu. See if the Windows Search is now working properly.
Run Windows Troubleshooter
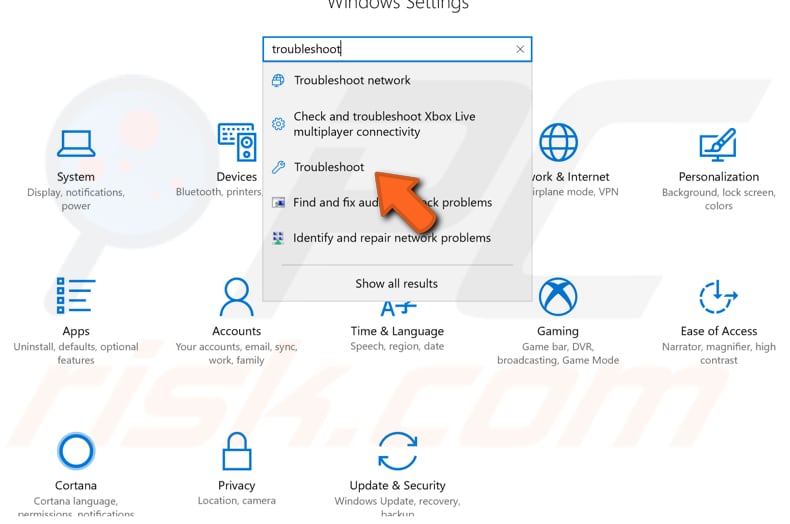
Windows includes a number of troubleshooters designed to quickly diagnose and automatically resolve various computer problems. Troubleshooters cannot fix all problems, but they are a good place to start if you encounter a problem with your computer or operating system. The built-in Windows troubleshooter can solve (or at least identify) most problems that can occur when using this operating system. To start troubleshooting, go to Settings and type «troubleshoot», and then select «Troubleshoot» from the list.
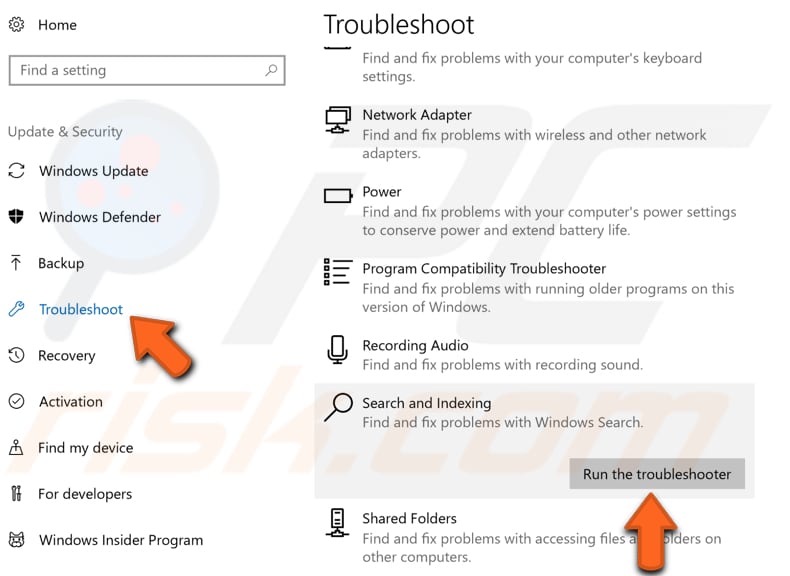
Now, scroll down to find «Search and Indexing» under «Find and fix other problems» and click it, and then click «Run the troubleshooter».
Windows troubleshooter will ask «What problems do you notice?» Mark the «Files don’t appear in search results» and «Search or indexing is slowing down the computer» checkboxes and click «Next» to start troubleshooting. See if this fixes the problem with Windows Search.

Re-register Cortana Using PowerShell
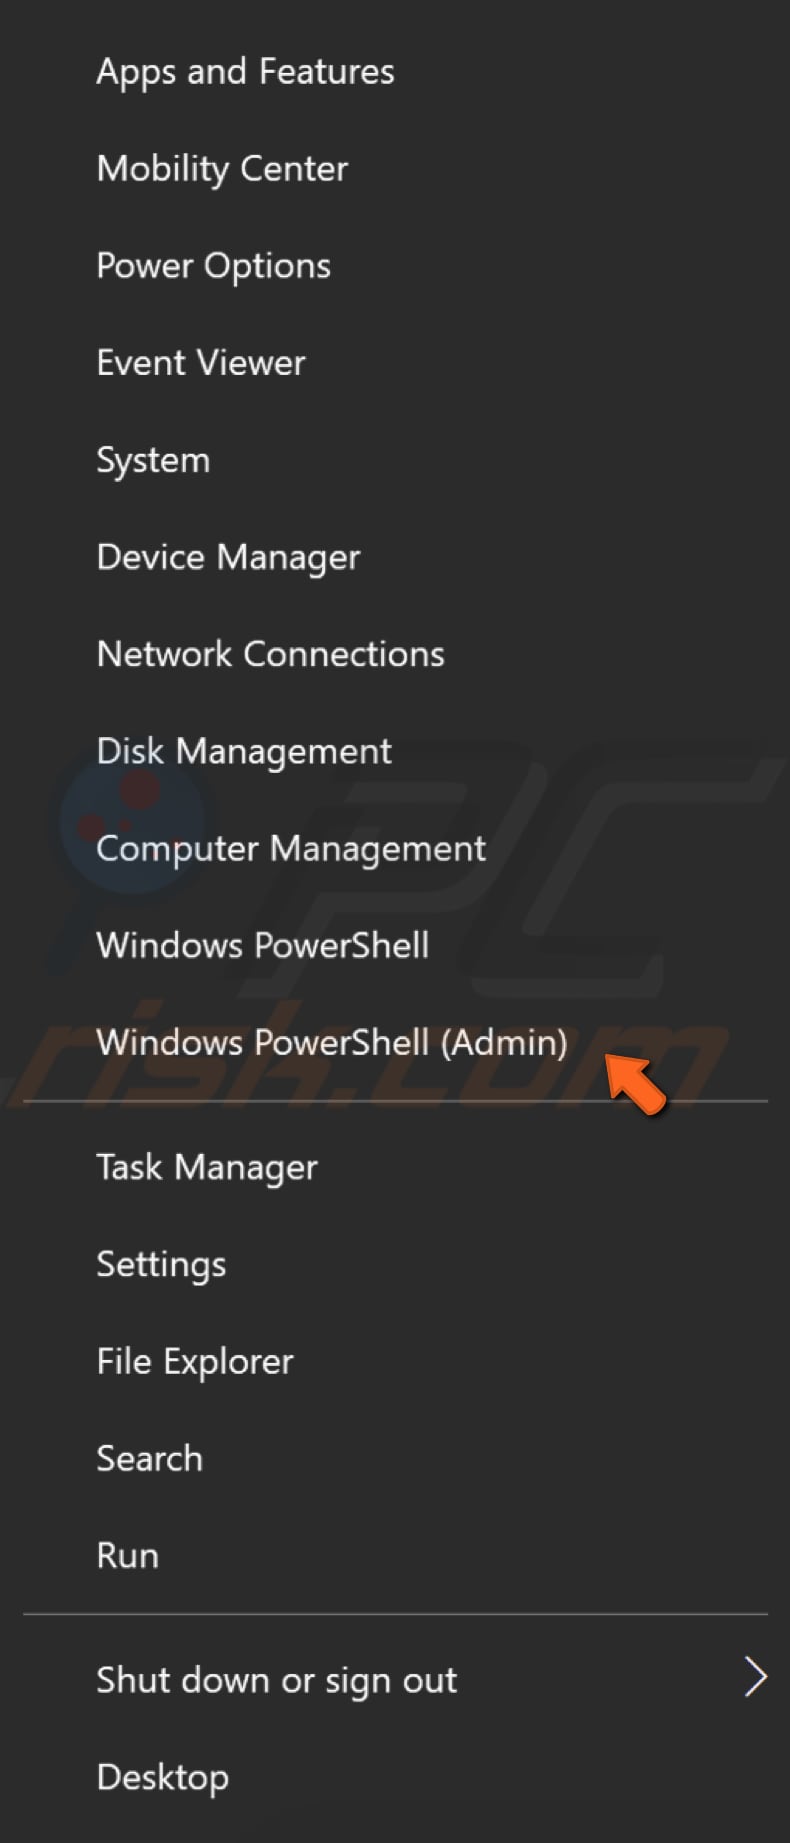
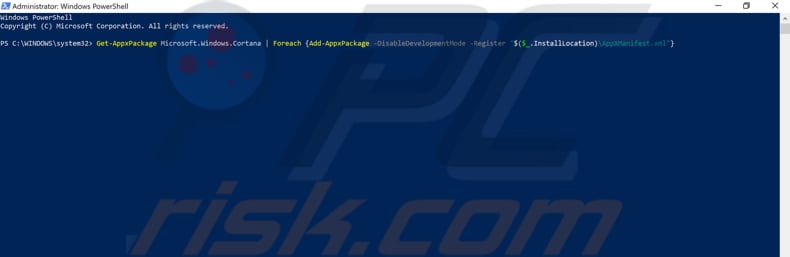
PowerShell is a task automation and configuration management framework from Microsoft, consisting of a command-line shell and associated scripting language. In PowerShell, administrative tasks are generally performed by «cmdlets», which are specialized .NET classes implementing a particular operation. You can access PowerShell by right-clicking on the Start icon in Windows and selecting the «Windows PowerShell (Admin)» result.
Now copy the «Get-AppxPackage Microsoft.Windows.Cortana | Foreach
Restore Indexing Service
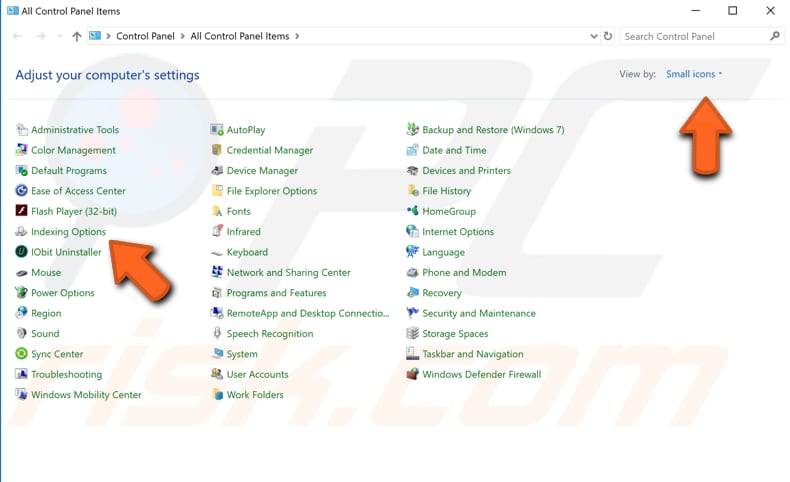
Indexing service (now known as Windows Search indexer) is a Windows service created to improve search performance on Windows computers. If Windows Search stops working properly or stops working completely, then restoring this service might help to fix the problem. To restore Windows Search indexer, go to Control Panel and find «Indexing Options». If it does not appear, ensure that the Control Panel view is set to «Small icons».
In the Indexing Options window, click the «Advanced» button.

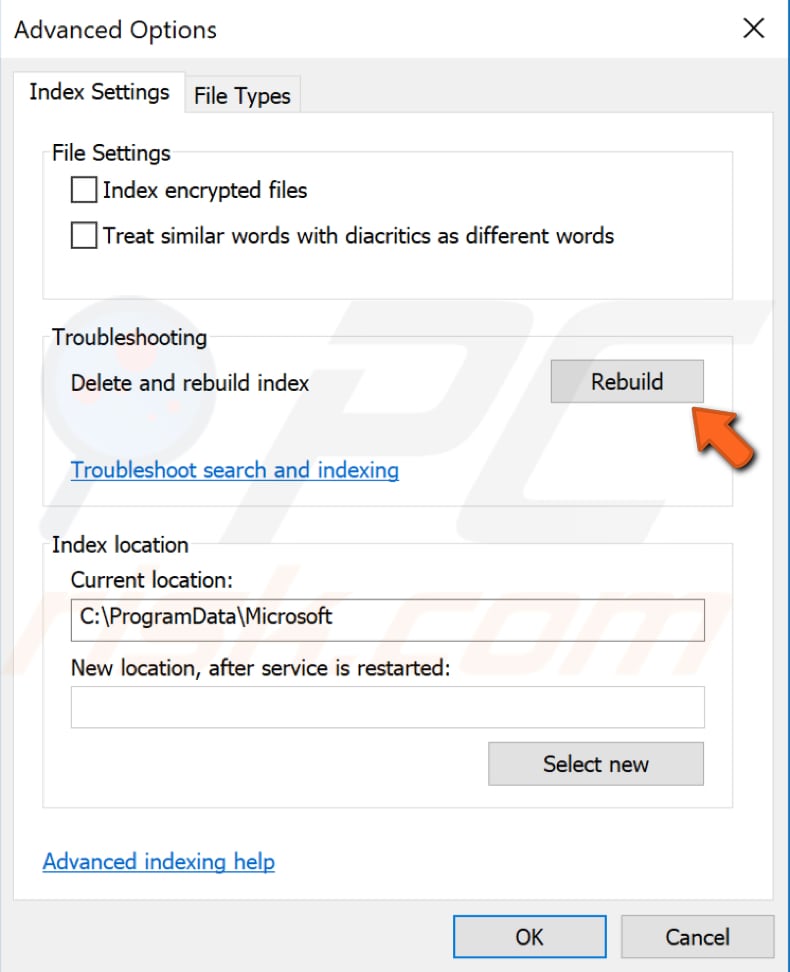
In the «Index Settings» tab, find the «Rebuild» button under Troubleshooting and click it. This will display a notification saying that rebuilding the index might take some time to complete and that some views and search results might be incomplete until rebuilding has finished. The amount of time required to finish this process will depends on the system speed. If you have an older or slower computer, it might take much longer to finish. Click «OK» to start rebuilding the index.
Restore Your System Using Restore Points
If none of the methods mentioned above fixed the problem with Windows Search, you can try to restore the Windows operating system to a previous state at which the problem with Windows Search was not present.
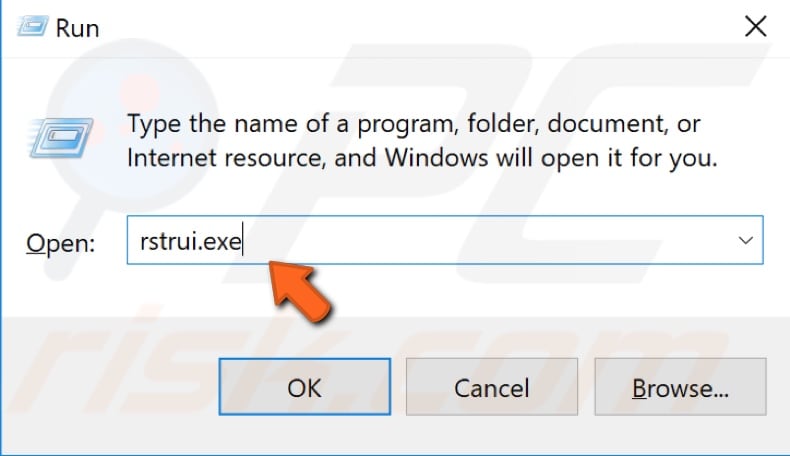
The System Restore tool creates restore points. A restore point is a collection of important system files stored by System Restore on a given date and time. System Restore reverts everything to a saved restore point, but first, you must have one recorded. If a restore point does not exist on your computer, System Restore has nothing to revert to. To use this tool, you must have previously created restore points. With a created restore point, this feature will bring your system back to the previous working state, without affecting your files and data. To restore your system, launch Run. To start it, press the Windows Key + R and type «rstrui.exe». In the Run dialog box, press Enter or click «OK».
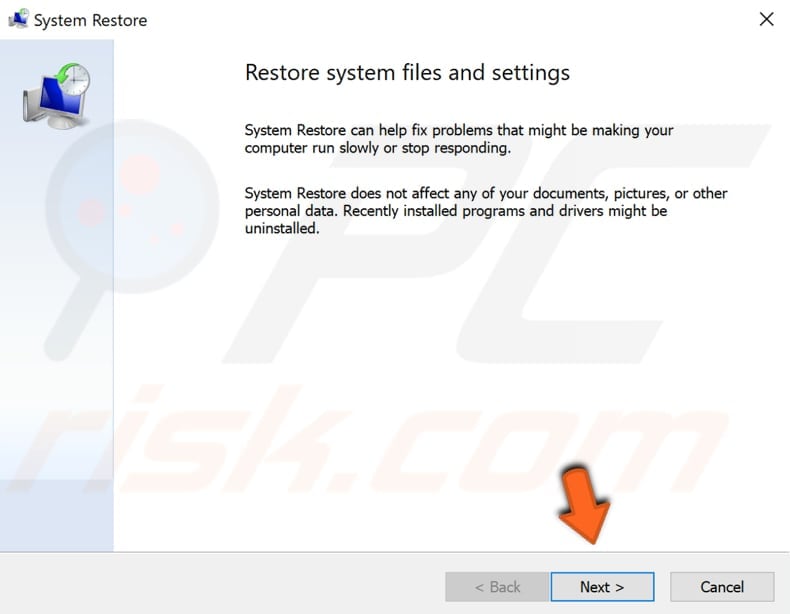
In the System Restore window, click «Next».
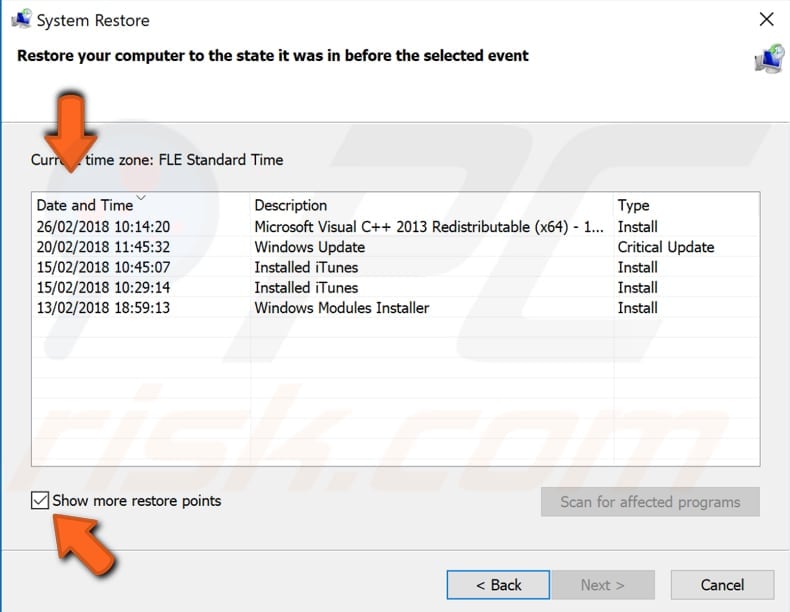
If there are restore points created, you will see a list of them. Mark the «Show more restore points» checkbox — this should display more restore points. Select the most appropriate restore point (depending on the time created, etc.) and click «Next». Do not select a Restore Point at a time when the Windows Search problem was already present — you certainly do not want to revert to that state.
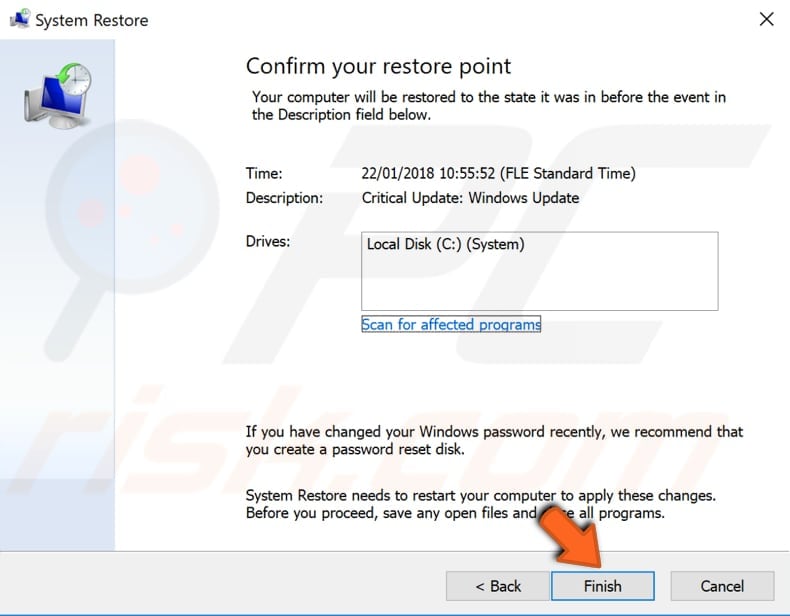
Confirm the restore point. Your computer will be restored to the state prior to the event detailed in the «Description» field. If you are happy with your choice, click «Finish» and the system restore process will begin.
We hope that this article was helpful and you were able to solve the problem with Windows Search. If you know of any other methods to fix these issues, please leave a comment in the section below.


