- Windows 10 Search Not Working? Try These Fixes
- Troubleshooting tips to get you back on track
- Causes of Windows 10 Search Problems
- How to Fix Windows 10 Search Problems
- Fix Windows 10 Search Not Working Easily (2021 Guide)
- Windows search not working or down: An issue that can be easily fixed
- Ways to Fix Windows Search Not Working
- Method 1. Fix Windows search that shows blank results (2020 Update)
- Method 1. Restart Search services via Task Manager
- Method 2. Restart Windows search service
- Method 3. Restart Windows Explorer and Cortana
- Method 4. Employ Windows Troubleshooter
- Method 5. Configure the size of the paging file
- Method 6. Check Indexing Options
- Method 7. Use Powershell commands
- Method 8. Run CTFMON process
Windows 10 Search Not Working? Try These Fixes
Troubleshooting tips to get you back on track
:max_bytes(150000):strip_icc()/JonMartindale-212236-455c6b37c6484d348179beac08f76d86.jpg)
:max_bytes(150000):strip_icc()/ryanperiansquare-de5f69cde760457facb17deac949263e-180a645bf10845498a859fbbcda36d46.jpg)
The search tool in Windows 10 has, with different feature updates of the operating system, both increased and decreased its integration with both Cortana and with File Explorer. These often-shifting changes to how search works leads to glitches—some of which present an easy fix.
These instructions apply to all versions of Windows 10.
Causes of Windows 10 Search Problems
When Windows search isn’t working, it’s almost always a simple software problem. The system may just need a restart to get it working again. Other possible causes could be network-related or the search system itself having a service interruption.
:max_bytes(150000):strip_icc()/windowssearchfix06-5bdc331846e0fb002d90f052.jpg)
How to Fix Windows 10 Search Problems
You’ll use a lot of the same methods to fix problems with search as other minor errors. Here are some options to try and get the system back to work.
Check your network connectivity. If you aren’t connected to the internet, Windows 10 search won’t work. Before you try anything more serious, make sure your network is functioning properly.
Restart your device. It’s basic advice, but there’s a reason it’s the first port of call for most Windows errors—reboots often work wonders. If you haven’t tried restarting your device, do so now, as a simple reboot of the system flushes memory and disk-cache glitches that adversely affect system performance. It’s better to perform a restart than shut down too, as shutdowns occasionally send your Windows 10 PC into hibernation mode.
Turn Cortana off and on again. Since Cortana is so entwined with Windows 10’s search function, turning it off and on again sometimes corrects Windows 10’s file-search problems.
Run Windows Troubleshooter. Microsoft’s Windows troubleshooter may not be able to fix every problem it comes across, but it can often send you in the right direction to learn more or at least pinpoint what the actual problem might be. The same goes for problems with the Windows 10 search bar not working.
Open the troubleshooter by opening the Start menu and going to Settings > Update and Security > Troubleshoot > Search and Indexing. Click the Run the troubleshooter button to go through the diagnostics.
Verify the Search service is running. It’s possible the Windows Search service itself has been disabled for some reason.
Press Win+R to open the Run window, then type “Services.msc” and press Enter.
When the Services window appears, scroll down the list of services to find Windows Search. If it’s already running, right-click it or tap and hold, then select Restart. Alternatively, if it’s disabled or has a blank Status, right-click or tap and hold, then select Start.
Rebuild the Windows 10 search indexing options. It may be that Windows 10 has forgotten where certain files and folders are. To help it remember, rebuild its indexing options. Start by accessing the Control Panel in Windows 10.
Select Indexing Options from the main menu icons, and then click Advanced. In the Advanced options, Click Rebuild.
The rebuilding process may take a short time to complete depending on the size of your drive and how full it is.
If none of the above tips helped get your Windows 10 search bar working again, try some more advanced Cortana help tips or opt for a full Windows reset.
Fix Windows 10 Search Not Working Easily (2021 Guide)
Windows search not working or down: An issue that can be easily fixed
More and more users report about Windows search not working lately. The search in Start Menu is something that all Windows 7/8/10 users employ in daily tasks using the computer. A sudden disappearance of this useful tool can be a disaster. You can no longer find programs, files, or even worse, control panel to launch a troubleshooter. However, the issue can be fixed quite quickly, and there is no need to use expensive programs for that. The guide provided below also contains 2020 Update for broken Bing search after Windows update.
 If Windows doesn’t return any results after you type in the search, it means you have to fix search service related problems.
If Windows Start Menu Search returns no results and remains blank as you type in the search bar, then it is time to take actions immediately. Although in some cases restarting the computer might fix the problem, the issue can be more rooted in the system or be related to Windows Updates from Microsoft, such as integration with Bing search in 2020. In fact, search problems are as common as Windows sound problems, so there is no need to worry.
To enable search in Windows 10, you must check several services and settings on your computer. We have prepared a detailed guide on how to fix Windows 10 Search not working. The methods you can use are provided below.
Ways to Fix Windows Search Not Working
Pro Advice. Use an award-winning Windows security & maintenance suite to leverage your PC’s performance to new heights. Remove malware, boost speed, and fix other computer problems in a few clicks.
FIX IT NOW
Compatibility: Microsoft Windows
Read Review
Fix PC errors, repair virus damage and identify hardware/stability issues using RESTORO – a unique PC Repair tool using a patented technology to replace damaged or missing Windows system files, which often are the real cause of annoying Windows errors. Try the FREE scan option to search for stability, security and hardware-related issues. To fix identified problems and receive hardware-related recommendations, you have to purchase the license key for the full software version.
Method 1. Fix Windows search that shows blank results (2020 Update)
On February 5th, many Windows 10 users around the globe discovered that Windows search shows blank results after entering a search query. Such issue arose from a Bing integration to Windows search bug. At the moment, there is nothing you can do to make the Bing service work properly as the issue lies on Microsoft’s end. However, you can disable it and continue using Windows search only. The safest way to do it is to edit the Registry yourself. We do not recommend downloading pre-made solutions as these can be recognized as dangerous by your antivirus.
How to Disable Bing Search integration
- Press Windows key + R on your keyboard at the same time. This launches the Run prompt.
- In Run prompt, type regedit and press OK.
- Now, you’re going to see User Account Control window on your screen, which asks whether you want to allow the program to make changes on your system. Click Yes.
- Now, use the left navigation pane to launch folders in the following order:
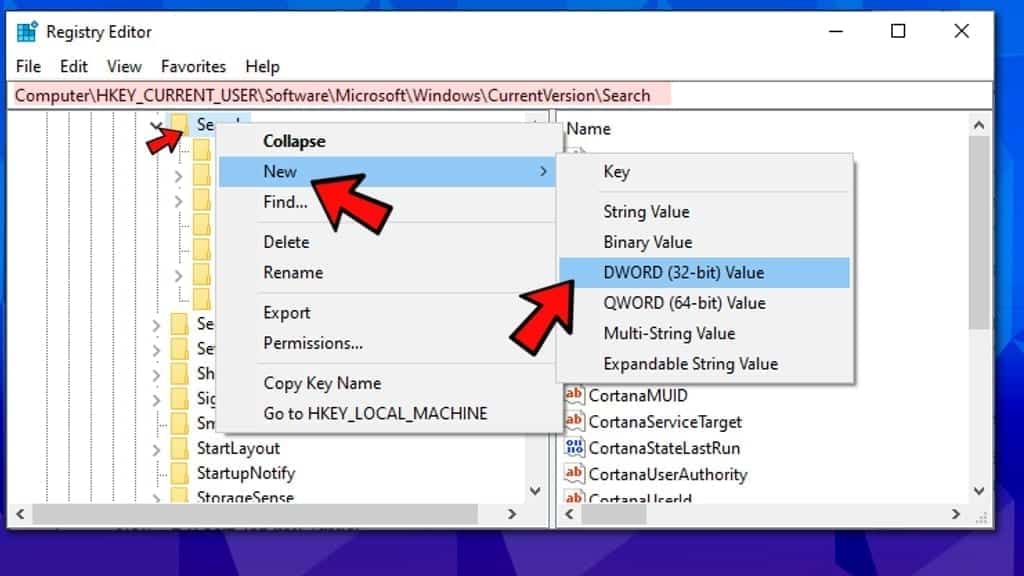
HKEY_CURRENT_USER\Software\Microsoft\Windows\CurrentVersion\Search. Or, you could just copy and paste this line in the navigation bar in Windows Registry. - Now, right-click on Search folder, and select New > DWORD (32-bit) Value.

- Now, name the created DWORD Value as BingSearchEnabled.
- Double-click it to ensure it has a value of 0. If you’re not familiar with technical terms, 0 means negative (false) and 1 means positive (true) value in IT. This is why BingSearchEnabled with value 0 means it is actually disabled.
- Now, in the same Search folder, find a key named CortanaConsent. Double-click it and set its value to 0. Click OK to confirm.
- Close the Registry and restart your computer for changes to take effect. Your Windows search should be back to normal and no longer show blank results.
TIP. Sooner or later Microsoft will release a fix for the Windows Search blank results error. As soon as it becomes available, you can delete the EnableBingSearch key and set CortanaConsent key value to 1 again.
Method 1. Restart Search services via Task Manager
One of the easiest methods to enable search in Windows is to restart Search and Cortana services via Windows Task Manager.
- Open Windows Task Manager by pressing Ctrl+Alt+Del. If required, click Task Manager. Now, go to the Details tab.
- Here, find SearchUI.exe process. Right-click on it and select End Task. This will automatically restart the Search and Cortana application. Check if the problem was solved by typing something in Start Menu Search.
Method 2. Restart Windows search service
You can restart Windows search service via Services panel.
- Launch Run prompt by pressing Windows key + R. Type services.msc and hit Enter.
- Find a process called Windows Search. Right-click it and choose Restart. Try to use the search now.
- Optional. After you right-click on the process, you can also go to Properties and set Startup type to Automatic. Don’t forget to click Apply and OK after doing so.
Method 3. Restart Windows Explorer and Cortana
In case the previous methods didn’t solve the issue with Windows search, you should try to restart Windows Explorer and Cortana.
- Launch Windows Task Manager by pressing Ctrl + Alt + Del and select Task Manager. Or you can simply click Ctrl + Shift + Esc.
- In Processes tab, find one called Windows Explorer. Right-click it to launch quick menu and select Restart. Now find a process called Cortana and do the same thing with it. Check if the Windows search not working error is now fixed.
Method 4. Employ Windows Troubleshooter
Windows Troubleshooter can help you to restore indexing services. In addition, troubleshooters are good because they do the hard work for you – you just need to run them and wait for instructions.
- Since you cannot use Windows search and the results’ area remains blank as you type something in, you will need to launch Control Panel via Run prompt. Press Windows key + R, type control panel and hit Enter.
- Go to Troubleshooting > System and Security. Now, click Troubleshoot common computer problems. New window should appear. Here, find Search and Indexing option and click it, then hit Run the Troubleshooter button.
- The troubleshooter should itself suggest running it as Administrator during the process. Agree to do so.
- Apply the suggested fixes.
- Check if the “search bar doesn’t work Windows 10” problem persists.
Method 5. Configure the size of the paging file
- Press Windows key + R on your keyboard. Type sysdm.cpl and press Enter.
- Navigate to Advanced tab, then click on Settings… in the Performance section. Look for Virtual memory area and click on Change… button here.
- Put a tick in the checkbox that says Automatically manage paging file size for all drives.
- Choose Custom size and enter 16 for Initial size and 2000 for the Maximum size. Press OK to confirm.
Method 6. Check Indexing Options
Yet another method to fix Windows 10 search that keeps loading is to slightly alter Indexing Options.
- Press two buttons at the same time: Windows key + R. Now, type control panel and hit Enter.
- In Control Panel, set View by to Large icons. Now look for Indexing Options and open it.
- Click on Advanced and then Rebuild in Troubleshooting. Click OK to confirm. As you can see, you can also access Windows search troubleshooter here if you wish to try it.
Method 7. Use Powershell commands
You can try running several commands via Powershell to fix the issue. Just copy and paste them.
- Right-click on Windows icon in the taskbar. Choose Windows Powershell (Admin). Click Yes in UAC window.
- Enter the given line and press Enter:PowerShell -ExecutionPolicy Unrestricted
- Then copy and paste then second command and press Enter:
$manifest = (Get-AppxPackage Microsoft.WindowsStore).InstallLocation + ‘\AppxManifest.xml’ ; Add-AppxPackage -DisableDevelopmentMode -Register $manifest - Restart your computer and check if the problem was solved.
Method 8. Run CTFMON process
Ctfmon.exe is a process that is responsible for Windows Alternative User Input and and Office language bar. Running this process might solve the search problem in Windows, so consider doing it:
- Press Windows + R to open Run.
- Paste the given line into it and press OK:
C:\Windows\System32\ctfmon.exe
If you have any other solutions for this problem, please share them with our community.

Norbert Webb is the head of Geek’s Advice team. He is the chief editor of the website who controls the quality of content published. The man also loves reading cybersecurity news, testing new software and sharing his insights on them. Norbert says that following his passion for information technology was one of the best decisions he has ever made. “I don’t feel like working while I’m doing something I love.” However, the geek has other interests, such as snowboarding and traveling.


